

Ezvid really easy-to-use video maker with video editing and slide show creation features. It is flexibility that enables you to control almost every aspect of your video while doing the editing.
But Ezvid is only available for Windows PC. If you’re a Mac user, i’m sorry to tell you that there isn’t any Ezvid Video Editor for Mac released yet. The compensation is to find an Ezvid Video Editor alternative for Mac.
Well, instead of edit video on Windows PC, how about making your own short film and posting it to YouTube with Ezvid Video Editor alternative for Mac? Here we seeking for an all-in-one but easy-to-use video editor to get start with, here’s one I’d recommend:
Pavtube Media Magician for Mac
Being released as an entry-level video editor, the Media Magician comes up with some impressive features that you may concern:
– Camcorder Manager – Capture, transfer and backup HD footage from camera/camcorder to your Mac fast and easily.
– Timeline Editing – Frame by Frame accurate clipping, merging, snapshooting, voice muting, etc.
– Special Effects – Adding 3D and other special effects to clips on timeline.
– Lossless output – keeping original format of source media, and rewrapping source video to MKV container without quality loss.
– YouTube Uploading – Directly upload camera videos onto YouTube by using your already-have YouTube account.
– Support to iOS and Android – Exporting files best suited for playing on Android devices, Windows devices, iPad, iPhone, Apple TV, HD Player, PSP/PS3, and HDV.
Here’s a basic workflow showing how to transfer, clip, convert and upload Christmas video to YouTube:
Step 1. Import files to Pavtube Media Magician for Mac.
If you have already stored footage on your HDD, you can choose to “Import Media Files” to browse and load video files from computer. If your footage is in camera/camcorder, just connect your cam to Mac and follow the auto wizard to transfer camcorder recordings to Mac.
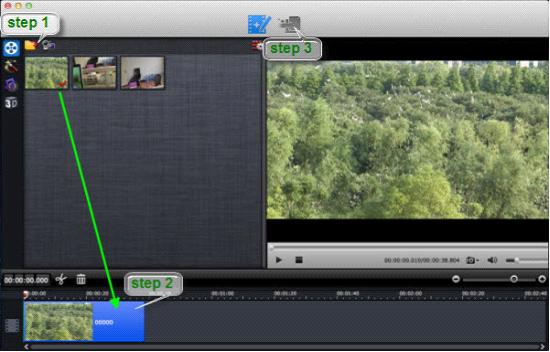
Step 2. Drag and drop videos onto Timeline for editing.
Here you can preview, trim, cut, delete, rearrange order, and merge videos. Also, if you like, it’s easy to set special effect to image and audio. Find some helpful instructions in below guides:
– How to split/cut/trim MTS in frame accurate editor without re-encoding on Mac?
– How to do timeline editing and select frames accurately using frame selection controller?
Step 3. Click the Output button on the top and switch it to output interface, where you set output options such as Lossless output and YouTube upload.
Step 4. Set it to upload video to YouTube.
1. Find and click “Online” output option on the upper right part.
2. Choose “YouTube”.
3. Put in you YouTube user name and password.
4. Put in video information so that people can find your video via Google search.
5. Decide video quality. You can choose SD 640×480, HD 720p or 1080p Full HD for output. The higher quality you set, the longer time it takes.

Step 5. Have Media Magician export and upload your film.
On the upper left of the interface, find and click the plus sign to add YouTube output as a conversion task. Then click on the triangle sign on it to start encoding/converting YouTube ready MP4 video.
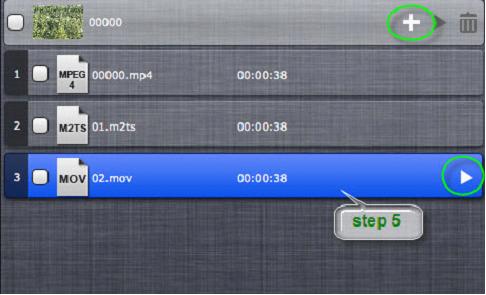
The software will upload the video to YouTube automatically after video conversion completes. Just take some coffee and leave it there. When you’re back, your film should have been posted to YouTube.
Read More:
- Top 5 Best Mac Video Splitter, Cutter, Merger/Joiner Reviewed
- A New Round of Giveaway: Media Magician for Mac from Apple Store
- Top 5 iMovie Alternatives for Mac Novice and Movie lovers
- Import MXF footage to FCP X/iMovie/FCE/AVID from Mac instantly without rendering on Mac
- How to Merge/Cut/Trim AVCHD MTS Clips Frame by Frame on Mac


Recent Comments