

If you are unfamiliar with iMovie Media Files Importing, the sections below will help you import video files or projects to iMovie 8/9/11 on Mac.
iMovie is consumer-level digital video editing software for Macintosh. You can use iMovie to edit the footage you film with digital video cameras and HD video cameras. If you are unfamiliar with iMovie, the sections below will help you import video files or projects to iMovie 8/9/11 on Mac. Let’s take iMovie 11 as an example.
Creating a new Project in iMovie 11
To open a new project:
1. Open the Applications folder
2. Click on the iMovie icon
![]()
3. When the iMovie 11 screen appears, click New Project, or you can access other projects by clicking on them in theProject Library located by clicking the Project Library Tab in the top left corner of the iMovie window.

The New Project button is the button designated with a plus sign in the lower right hand corner of the Project Library window

4. Click on the Plus sign button to create a new movie project.
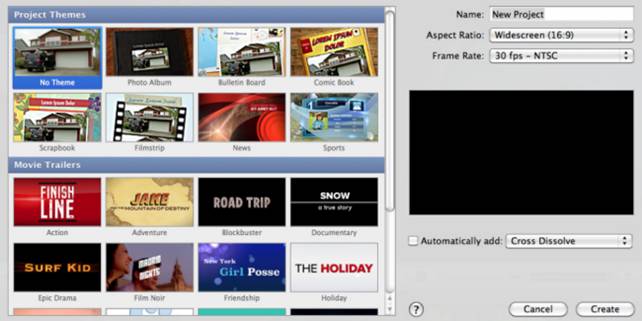
5. You will name your project and then select the Aspect Ratio for your project, either 4:3 fullscreen or 16:9 widescreen.
Note: fullscreen footage is shaped more like a square; widescreen footage is shaped more a like a rectangle (often with black bars at the top and bottom of the screen). You also have the option to select what type of project you will be working on. iMovie 11 now allows for the creation of Movie Trailers using specified templates which can be selected from the New Project menu. If you want to create a normal movie project you may select a Theme at this time as well. A frame rate drop down menu is also available to select different choices. For playback in the United States you should leave the default of 30 fps – NTSC selected. There also is a check box and drop down menu which will allow you to apply transitions to every clip within a project. By checking the Automatically Add: check box you may specify a transition using the drop down menu.
Importing Video Clips into iMovie 11
Before you can edit your footage you must import it into the computer. When you import video, iMovie stores it as an Event in the Event Library. This is the footage you use to create movie projects in iMovie.
This task describes how to import from a camera/camcorder that records to DVD, hard disk drive, or flash memory.
Import video from a camera/camcorder that records to DVD, hard disk drive, or flash memory
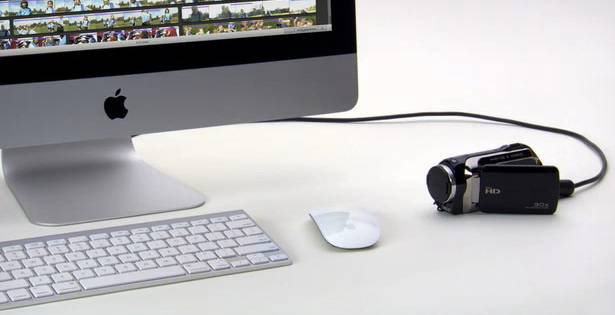
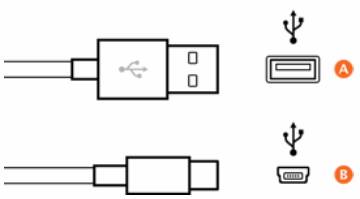
1. Locate the cable that came with your camera, or any other similar USB cable.
The cable should have at least one connector that plugs into your Mac and looks like the connector on the left (A, below). The other end of the USB cable, which plugs into your recording device, might look different (as shown in B, below).
2. Connect the camera to your computer with the cable.
3. Turn on your camera and set it to PC Connect mode (this mode may have a different name on your camera).
4. The first time you import from a device that records high-definition (HD) video, an HD Import Setting dialog appears. Even if you aren’t importing high-definition video now, select Large or Full, and then click OK.
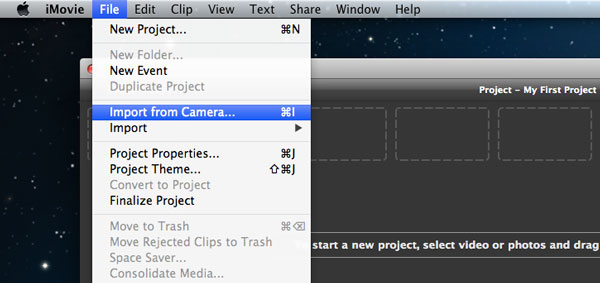
5. If the Import window doesn’t open, choose “File” > “Import from Camera…”
The Import window displays all the video clips on the device. You can use the playback controls below the viewer to play the clips.

6. Select which video clips to import:
- To import all clips, set the Automatic/Manual switch to Automatic, and then click Import All.

- To import specific clips, set the Automatic/Manual switch to Manual. Deselect the clips you don’t want to import, and then click Import Checked.
7. Choose the disk where you want to store the video from the Save To pop-up menu.
8. Choose how you want to organize the imported video in your Event Library.
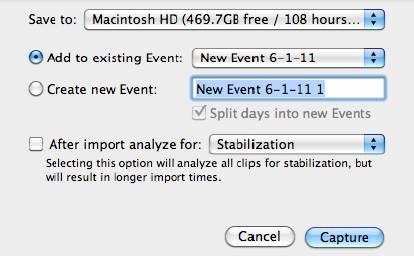
9. To have iMovie smooth the shaky portions of your video (a process called stabilization), or to have iMovie analyze your video for the presence of people, select “After import analyze for,” and then choose an option from the pop-up menu.
10. If you’re importing HD video, choose a size from the “Optimize video” pop-up menu.
11. Click OK.
It can take several minutes to more than an hour for iMovie to import the video, depending on how much video you have.
What to do if import error occurs?
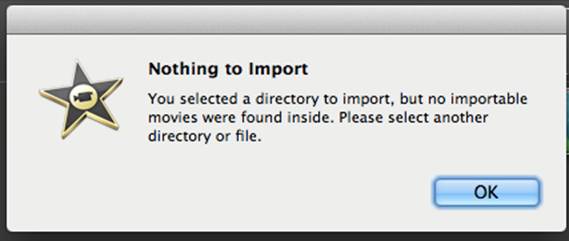
People may encounter issues one or another when importing footage into iMovie from different cameras. For example, to import AVCHD footage correctly, iMovie requires the directory structure of the camera footage must be the same as when it was recorded to the camera/card. If you’ve copied your footage onto a hard drive or other storage media and only kept part of the file structure you’re going to be presented with a Nothing to Import error message like this one…
Or the .MTS files turned gray and did not allow selecting for importing to iMovie. In that case, you’d better transcode AVCHD to AIC for using with iMovie by using a Mac converter app, like Pavtube MTS Converter for Mac or PavtubeMedia Magician for Mac.
More than importing issues concerned with AVCHD MTS clips, you may also encounter problems when loading MXF footage into iMovie, or editing H.264 MOV footage with iMovie. This also requires you to rewrap these camera videos to a format that best suited for iMovie editing.
The articles below will help you use iMovie 8/9/11 to edit your camera video efficiently:
- Sony Alpha A57 AVCHD MTS to iMovie
- Working with Sony XDCAM IMX media in iMovie
- Convert Panasonic P2 MXF to iMovie 8/9/11
- MXF to iMovie converter-convert Canon MXF to iMovie/FCE
- Import Canon Rebel T4i (EOS 650D) MOV to iMovie
- Convert Flash FLV/F4V to iMovie/FCE readable format
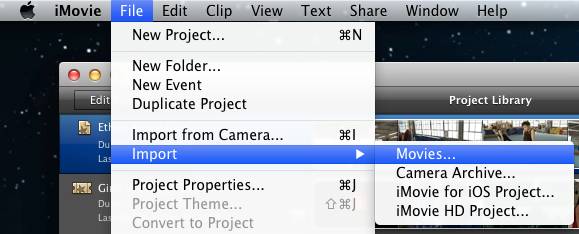
After format conversion finished, you are allowed to add the converted camera clips to your Event Library through “File” > “Import” > “Movies…”


Recent Comments