This iMovie tutorial will teach you how to use iMovie (iMovie 08/09/11) to edit videos professionally so as to make an eye-catching home movie step by step.
Apple’s iMovie is welcomed by all Mac users for home movie making which allows people to edit video clips, add sound and voiceover tracks and share movies in various ways. And in this article, we will show you how to use iMovie to create a short film step by step.
How to Use iMovie to Make Movies?
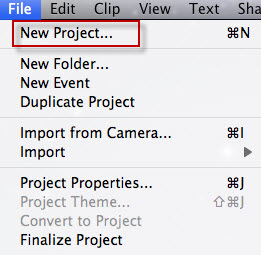
First, from applications, launch iMovie. And from “File” at the main menu, select “New Project” to start a new iMovie project. If you want to create a movie trailer in iMovie, you can refer to how to create a movie trailer in iMovie.

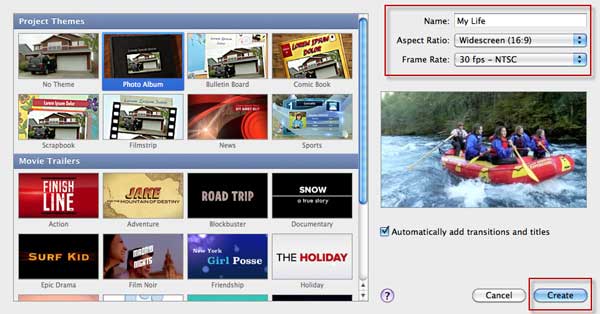
Then a window will pop up as below. Type in the title name of your project and select a theme, then click “Create”.

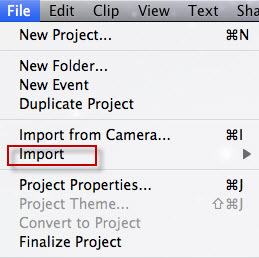
In the File drop-down list, choose “Import” > “Import Movies” to browser the movies and videos in your computer and select the movies you want to edit to iMovie, then click “OK”.

Tips: Please make sure your videos are supported by iMovie, if the video shows grey, it means they are not compatible with iMovie. At this time, you should use a Media Magician for Mac to convert any videos to iMovie supported video formats first and then import the converted videos to iMovie. As for Blu-ray and DVD movies, you can use a Mac iMedia Converter to convert the Blu-ray or DVD to iMovie AIC MOV videos first and add the MOV videos to iMovie.
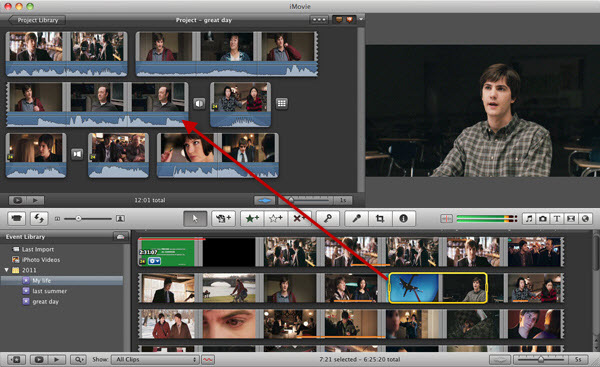
The videos then will be displayed in the Event Library at the bottom of the screen. Double click on the video clips to mark it yellow to select the clip. Select and drag the video clip you want to make a movie to the project library.

And now you can edit your videos freely, such as add transition to iMovie, create picture in picture effect, speed up and slow down videos, etc.
After you finished your iMovie project, you can select the completed project and from the menu bar at the top, choose Share. You can share it in many ways, such as export iMovie to YouTube or burn iMovie to DVD. Just choose the one you want and follow the indication to finish iMovie project exporting.

Done! You have used iMovie to create a home movie, enjoy it!
What If You Need a iMovie for Windows?
If you don’t have Macbook but you really like the function and interface of iMovie or you don’t like iMovie, you just need some alternatives to run in your Mac or PC. Pavtube Media Magician will be your best choice, which can lossless trim, split, cut, rotate, flip, timeline editing without rendering and merge almost all kinds of input movies. It can operate in Mac or Win with high compatibility without any quality loss. Free trial version is available below.
iMovie related Tips, Guide
- How to import video files or projects to iMovie 8/9/11 on Mac
- Edit Panasonic P2 MXF footage in iMovie 8/9/11
- Encode MXF Files from Canon XF series to iMovie compatible codec
- Working with Sony XDCAM IMX media in iMovie
- Working with Canon HF G25 MTS footage on iMovie
- Convert Flash FLV/F4V to iMovie readable format
- Transcode Canon HV30 HDV/AVCHD to AIC for iMovie


Recent Comments