

Summary: What is the best solution for editing AVCHD and AVCHD Lite MTS/M2TS footage in Final Cut Pro? This is a frequently asked question by FCP users. This article give you the best solution of importing AVCHD/MTS video into FCP for smoothly editing.
AVCHD is an HD video format jointly developed by Sony and Panasonic that uses Advanced Video Coding (AVC) compression (also known as MPEG-4 part 10 or H.264) to achieve high-quality images and low data rates. Generally speaking, AVCHD footage is usually saved in MTS or M2TS container format, which are widely used by Sony, Panasonic, JVC, Canon camcorders.
However, AVCHD files are not natively supported by Final Cut Pro and must be transcoded to FCP friendly codecs such as QuickTime movie and Apple Intermediate Codec before importing to FCP.
First method you could try
Thankfully, FCPX can import AVCHD footage from a hard drive, but you need to make sure you preserve the original file structure. Copy the whole card just as it is, onto your drive. Then from within the FCPX import window, navigate to the folder, and voila, you’ll see the video clips and be able to import then as normal (They’ll be converted to H.264 .MOV files and copied to the “Original Media” folder.) You’ll notice that you won’t have the option to uncheck “Copy Media to Events Folder.” That’s because FCPX reads the archive as if it were a card. That means in essence you will be duplicating your footage.
The second best method
To lower the quality loss during transcoding, Apple introduced in 2008 the Apple ProRes family to help Final Cut Pro works more efficiently with HD contents. By transcoding/converting AVCHD to Apple ProRes codec, the possible best quality is retained in post-production workflow and you can then edit the resulting media files just as you would edit in QuickTime Movie format. Besides, the rendering time is saved as Apple ProRes codecs are natively supported by FCP.
Hot Search: 4K AVCHD to iMovie/FCE/FCP | Play AVCHD on VLC Player | Import Media Files to Final Cut Pro
Pavtube HD Video Converter for Mac(read the review) will be the best choice for you. This is an AVCHD/AVCHD Lite transcoding tool for Mac. It can deals with AVCHD footage straightly from Sony, Panasonic, JVC and various other camcorders and exports HD contents encoded in various codecs for editing and playing back. The FCP friendly codecs includes Apple ProRes family (ProRes 422, ProRes 422 LT, ProRes 422 HQ, ProRes 422 Proxy, ProRes 4444), DVCPRO, HDV, Apple Intermediate codec, etc.
Meanwhile, this software can help you convert any HD video to Apple ProRes 422 for Final Cut Pro editing on Mac, or to Apple InterMediate Codec for FCE, iMovie. You can also convert videos between so many video formats.
If you are windows user, please turn to Pavtube HD Video Converter. It has the same features as Mac version.


Other Download:
- Pavtube old official address: http://www.pavtube.com/hd-video-converter-mac/
- AppStore Download: https://itunes.apple.com/de/app/pavtube-hd-video-converter/id502792488?mt=12
- Amazon Download: http://www.amazon.com/Pavtube-Video-Converter-Mac-Download/dp/B00QI9GNZS
- Cnet Download: http://download.cnet.com/Pavtube-HD-Video-Converter/3000-2194_4-76177786.html
Encode AVCHD to ProRes 422 for FCP
Step 1. Download Pavtube HD Video Converter for Mac.
This professional HD Video Converter can help you convert AVCHD files to ProRes 422 MOV format for Final Cut Pro, more output formats are also supported.
Install and launch this AVCHD Converter. Import AVCHD footage to the converter by clicking “File”>”Add Video/Audio”.
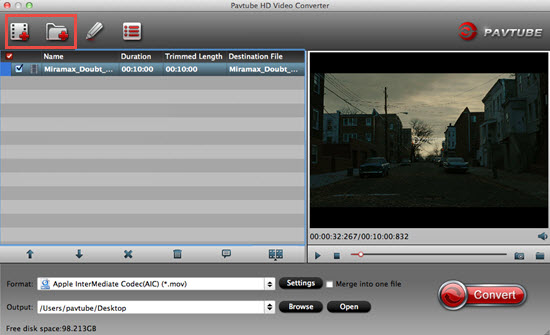
Step2. Click format bar to choose the output format.
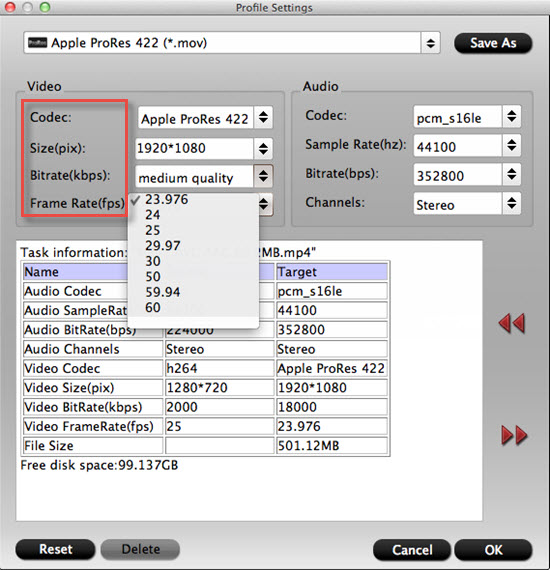
Click and choose “Final Cut Pro”>”Apple ProRes 422 (*.mov)”. If you don’t care about the generated file size while just pursuit the video quality, then you can totally go for “Apple ProRes 422 HQ (*.mov)”. (Differences among Apple ProRes codecs)

Step 3. You can click “settings” to customize the output parameters, adjust the resolution, bitrate as you want.
If you just want to keep the original video quality, you can choose “original “, or if there is no proper parameters for you to choose, you can just type them by yourself.
Step 4. Click convert button to start.
After you deinterlace AVCHD/MTS to FCP ProRes 422 codec, you can import the converted footages to Final Cut Pro, iMovie/Final Cut Express for editing without rendering, now please take a try.
Userful tips:
-“Interlaced” to “Progressive”
If you want to change the “interlaced’ into “Progressive”mode, then you can go to this “Edit” UI.
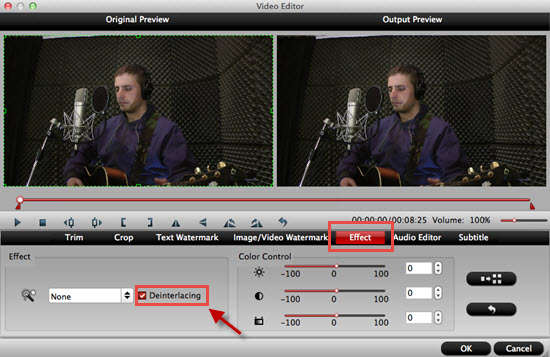
By this function, you can have the “Progressive” mode to get a better quality of your videos.
-Transfer files into FCP X
For many new users of Final Cut Pro, how to load files into Final Cut Pro smoothly without unknown problems may be very needed for them.
Read More:
- How to Play AVCHD/MTS Video on Mac&Windows PC
- Convert and Transfer Panasonic FZ300 AVCHD Video on Samsung TV
- Solve Canon XA30 AVCHD files in Premiere Pro CC no Sound problem
- Import Panasonic FZ300 4K Videos to FCP/Premiere/Avid
- Convert Sony RX10 II 4K XAVC S to ProRes MOV for FCP X/7/6


Recent Comments