

Summary: Get the best AVCHD to Final Cut Converter for Mac to encode/recode Sony NEX-FS100 1080 50p/60p AVCHD files to Final Cut Pro 7 or FCP X compatible codec for importing FS100 AVCHD clips to Final Cut Pro 7 without log and transfer on Mac.
Here is a problem from vimeo:
“I bought Sony FS100 in half a month ago and recorded some family videos in my FS100. Now, i am importing some mts files i shoot, but when I go to the log and transfer window some files are not recognized but Final Cut Pro 7. I think they were shot in 1920 (60 fps) Any option how to see them in FCP 7? Thanks”
Sony NEX-FS100 camcorder records AVCHD format video, and it uses MPEG-4 or MPEG-2 codec, this codec is not good for editing in FCP 7, so you will encounter importing and codec problems when you try to import FS100 1080/60p MTS to FCP 7/X or iMovie.
In fact, FCP 7 is not a omnipotent Video Editor, 1080p/50p or 1080p/60p is unsupported in FCP 7 and even the new FCP X, because it is a very non-standard format. Plus, AVCHD is not a good edit format for Final Cut Pro, its best compatible video format is Apple ProRes 422 Codec(*.mov). It means you have to convert Sony FS100 1080/60p AVCHD to ProRes codec no matter for FCP 7 or FCP X first. Use Pavtube Mac MTS/M2TS Converter for best lossless .mts to .mov conversion…(as far as I know) and select destination .mov ProRes 422 for importing Sony FS100 AVCHD footage to FCP without Log and Transfer. That works great for me. Here, I will share my way about how to transcode FS100 recordings to ProRes 422 for FCP 7 or FCP X on your Mac OS X.
Important Notice:
1. If you shoot 30p (or 24p), you won’t have a problem with Log and Transfer.
2. If you are also a FCP X user, before you try to do the conversion, don’t forget to make sure that you have installed the Apple ProRes Codec manually since the FCP X asks users to install it by themselves.
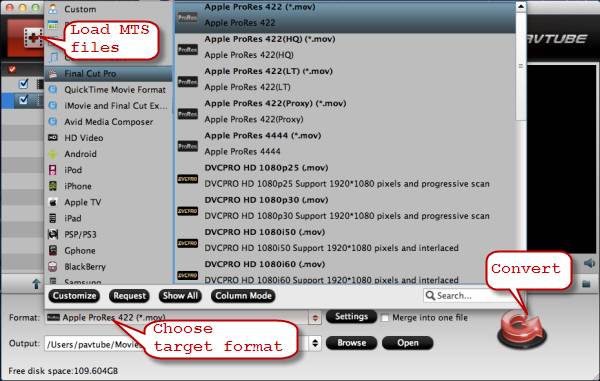
Step 1. Go to download and install Pavtube Sony FS100 AVCHD to FCP Converter for Mac to make the transcoding task without quality loss, which offers you particular Apple ProRes profiles for Final Cut Pro. Then launch the software to import your FS100 AVCHD clips to the professional AVCHD to FCP 7 Converter for Mac.
![]()
![]()
Step 2. Click on the “Format” box to select “Final Cut Pro > Apple ProRes 422(*.mov)” as the output format. If you want to get the best video quality for editing in FCP 7 or FCP X, you can choose “Final Cut Pro > ProRes 422 (HQ) (*.mov)”.
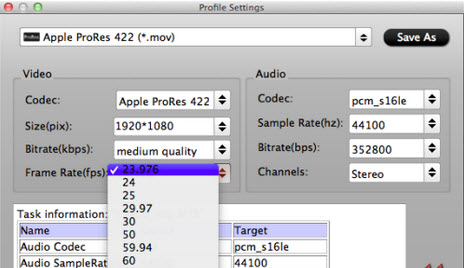
Step 3. You can click the “Settings” icon to do some audio/video settings before transcoding Sony FS100 1080 50p/60p AVCHD to Apple ProRes MOV. We recommend 1920*1080 as video size and 30fps as video bitrate for easier editing in Final Cut Pro. If you are in PAL(50p) area, you are recommended 25fps as video bitrate.
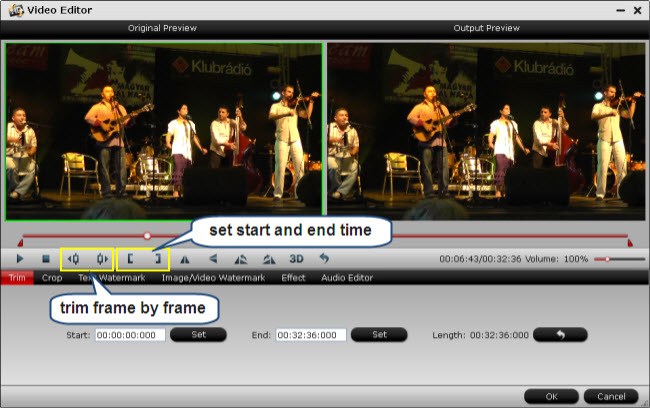
Step 4. You can edit the MTS video before you convert Sony FS100 AVCHD MTS to ProRes MOV. By clicking “![]() ” button, you can trim, crop the video, or add watermark and adjust effect to the videos which you will convert.
” button, you can trim, crop the video, or add watermark and adjust effect to the videos which you will convert.
De-interlace
By default the HD Video Converter will apply de-interlacing facility to all the MTS clips that are interlaced. If you’re using an older version, just click “Edit” to enter the video editor, switch to “Effect” tab, and check the “Deinterlacing” box. If you’d like to apply de-interlacing effect to all the loaded MTS files, click “Apply to All” before hitting “OK” to confirm.
Trim
Basically, video hosting sites restrict video clips to be in certain file size and length. For instance, YouTube stated that “videos can be up to 2GB in size and 10 minutes long”. You can trim the video to desired length with the Pavtube HD Video Converter. Simply click “Edit” menu > “Trim” tab and set start and end time point.
Merge
To join multiple MTS together, just select them in file list, and tick off the checkbox “Merge into one file” on the main interface.
Step 5. Click the small folder icon next to Output bar to specify a location for saving the converted Sony FS100 MTS files.
![]()
Step 6. Click on “Convert” button to start encoding FS100 1080 50p/60p MTS to ProRes 422 mov or ProRes 422 (HQ) mov. The converter supports batch conversion and will convert all the selected files in file list once you click “Convert”. You could select “Shut down computer after conversion” when the progress panel pops up.
After the conversion, click the “Open” button to locate converted files, then load ProRes .MOV files in FCP 7 or FCP X. Now you can successfully and easily import Sony NEX-FS100 1080 60p/50p MTS footage to FCP 7 or FCP X for editing with best quality.
The steps are finished. Is it easy? Once you have installed the Sony AVCHD to FCP X Converter, you can easily convert Sony FS100 files to FCP 7/X for editing, this software runs fast, so you can convert your FS100 footages to FCP in less time, video and audio synchronization are perfectly guaranteed, and you can use accurate trim function when you edit Sony AVCHD video in the software before conversion.
![]()
![]()
When the conversion process shows in 100% with the top AVCHD to ProRes Converter Mac, you can edit the converted Sony NEX-FS100 AVCHD videos in FCP 7/FCP X without any problems.
Tips:
1. If you want to import Sony FS100 AVCHD to iMovie or FCE for editing on Mac, only need to change the Step 2: click “Format > iMovie and Final Cut Express > Apple Intermediate Codec (AIC) (*.mov)” as the output format for encoding FS100 AVCHD MTS to AIC MOV for iMovie/FCE editing on Mac, you can view “Convert AVCHD MTS to AIC on Mac“.
2. If you want to import Sony FS100 AVCHD to Avid Media Composer, only need to change the Step 2: click “Format > Avid Media Composer > Avid DNxHD (*.mov)” as the compatible format for Avid MC, then you can recode Sony NEX-FS100 AVCHD to AIC MOV for editing in Avid Media Composer. In addition, you can also view “Avid Media Composer category“.
3. Learn more at MTS Column.


2 comments
Angral
October 4, 2012 at 5:52 am (UTC 0) Link to this comment
I would like to thnkx for that efforts you’ve got set in creating this web site. I’m hoping the same high-grade web site submit from you in the upcoming as well. In fact your creative producing abilities has inspired me to have my own web site now. Truly the running a blog is spreading its wings quickly. Your write up can be a great example of it.
Will
October 18, 2012 at 9:51 pm (UTC 0) Link to this comment
That’s a clever answer to a tircky question