

How to Connect the Sony XDCAM Media to a Mac and Transferring/Copying the Sony XDCAM Media onto Your Hard Drive for managing.
NOTICE
SxS CARD IMPORT ERROR WARNING
IMPORTANT! PLEASE READ THE FOLLOWING:
The Sony XDCAM occasionally experiences an error connecting its SxS Card media to computer systems, in which only one of the two cards properly mounts as a volume.
Make sure that both volumes mount when connecting the XDCAM to a computer for footage acquisition. They should appear on the Desktop as “Untitled” and “Untitled-1”.
If the SxS Cards do not mount correctly, follow these instructions:
Repeat steps if necessary.
Please note that this problem applies only to workflows incorporating the XDCAM as the intermediary connecting the SxS Card media to a computer system.
Direct connection of the SxS Card media to a computer via ExpressCard slot does not experience this issue.
If the problem persists contact the F&DM Equipment Checkout Lab ASAP!
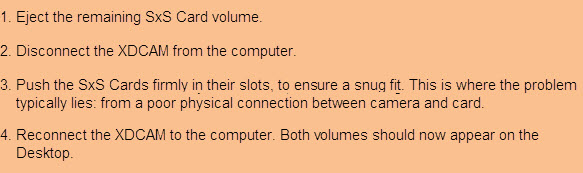
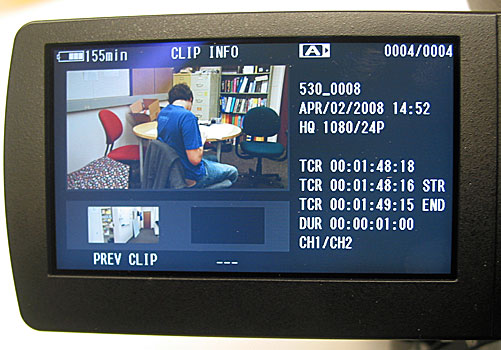
Viewing Clips on the Sony XDCAM EX1 Camera Monitor
1. After your shoot, rotate the LCD monitor out from beneath the built-in mic.
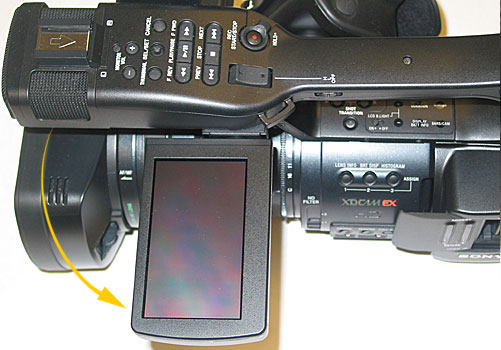
2. Now switch the camera on to “Media” mode.
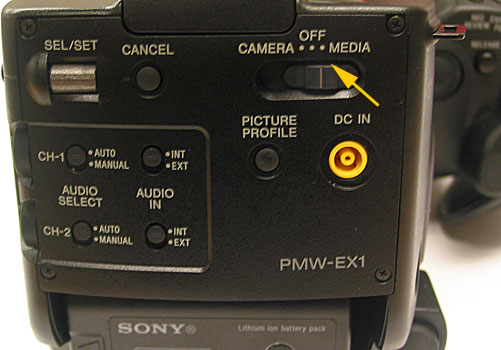
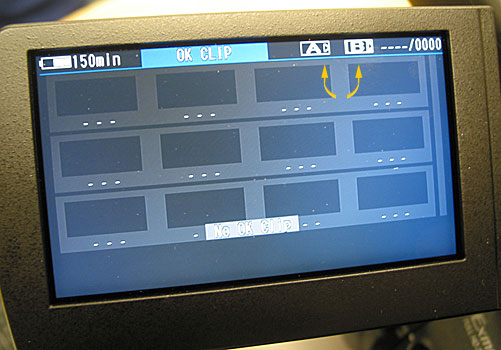
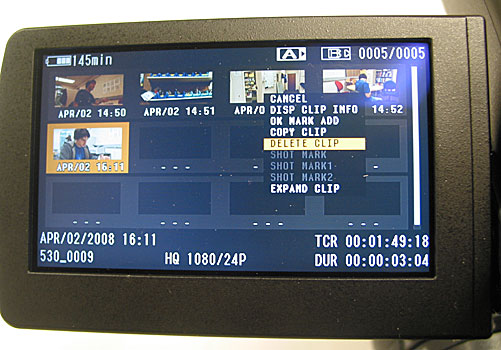
3. You will see thumbnails of your film clips on the LCD monitor as seen below.
4. You can select which card you will be viewing by pressing the “Slot Select” button, which will toggle the selected cards.
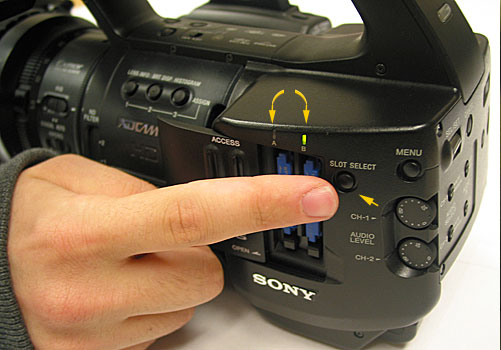
5. The selected card will be highlighted at the top of the monitor display as shown below (where card B has no clips recorded).
6. You can display the menu on the monitor by pressing the “Menu” button, and you can scroll and select by rolling/pressing the “Sel/Set” button.
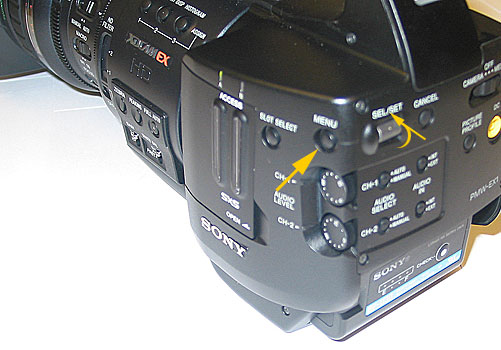
7. If you prefer, you can also scroll and select using the “Sel/Set” jog control on the operation panel on the handle.

8. Using the “Sel/Set” buttons, you can select a clip, and display info. Press in on the “Sel/Set” button to select a highlighted option.
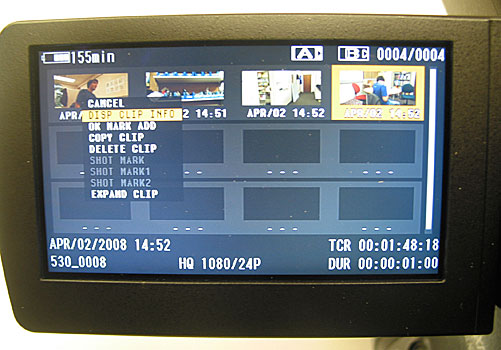
9. To delete an unwanted clip, select Delete Clip in the dropdown menu.
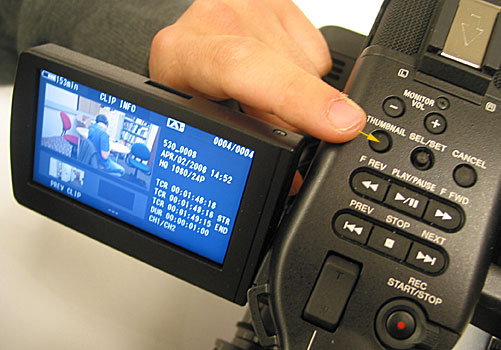
10. Press the “Thumbnail” button on top of the handle to return to the Thumbnail screen.
Note: If you want to view your clips on an NTSC monitor, the AV out port located next to the USB port, [using the special cable enclosed in the camera case] will allow you to view your work.
Connecting the XDCAM Media to a Mac
System Requirements
In order to import the Sony XDCAM footage for use in Final Cut Pro you will need to have the following prior to transfer/conversion and import:
Hardware
• Mac running Final Cut Pro 6.0.2 or later version
Software
• Sony SxS utility – on CD included with camera kit and here (SxS Driver Installer) (SxS installation info)
• Sony XDCam Log and Transfer Plugin for Final Cut Pro 6.0.3 through 7.0.3 (Log and Transfer Plugin 1.2.0)
Two Supported Methods for Connection
A. Use a Macbook Pro ExpressCard slot
B. Connect camera to a Mac via a USB cable
WARNING: Firewire import – The firewire port on the camera is a legacy connection to support HDV.
This is an older format of lesser quality than HQ, therefore, the department does not endorse acquisition of XDCAM media by firewire.
Using the Macbook Pro ExpressCard Slot
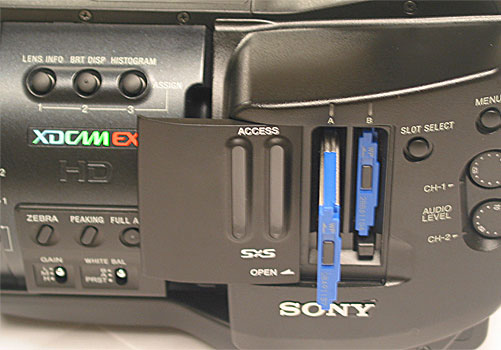
Before removing a card from the camera, be sure to touch metal to reduce the risk of transferring a static charge which could damage the card.
1. Slide open the Access panel
2. Push on the Eject button to release the lock, then pull the button out.
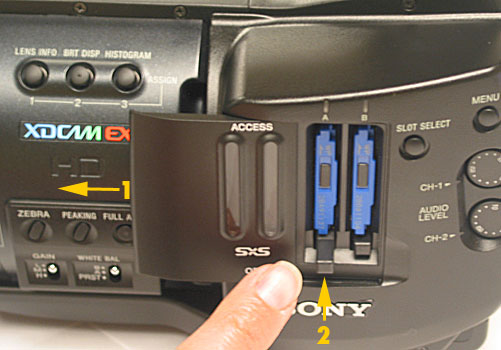
3. When the button is extended push on it to eject the card.
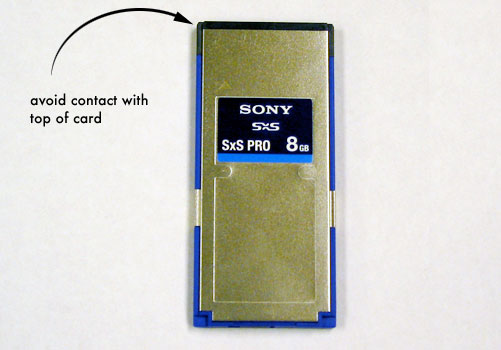
4. Pull the SxS card out carefully, taking care not to touch the top edge of the card where the pins are located.
5. Insert the SxS card into the MacBook Pro ExpressCard slot. Push it in firmly so it latches. Once the card is latched, don’t remove it until you eject the SxS volume on the desktop. Removal without first ejecting via the software could corrupt the media on the card, resulting in unusable footage.

6. Check your computer desktop to confirm that an SxS volume has been mounted . Congratulations, you are now ready to go to III. Transferring the XDCAM Media onto Your Hard Drive below.
Connecting the Sony XDCAM EX1 Camera to a Mac Via USB Cable
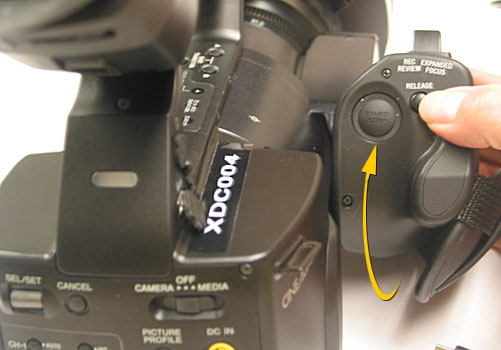
1. With the camera in the “Off” setting, (and the SxS cards still in their slots) press the “Release” button on the grip. This will enable you to rotate the grip as shown below:
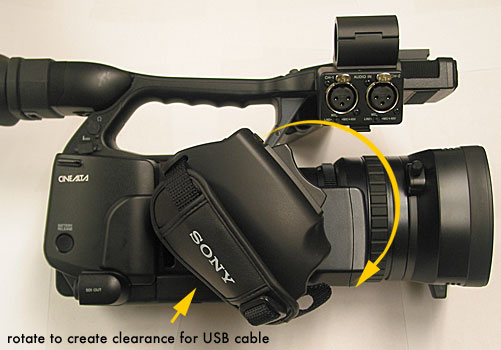
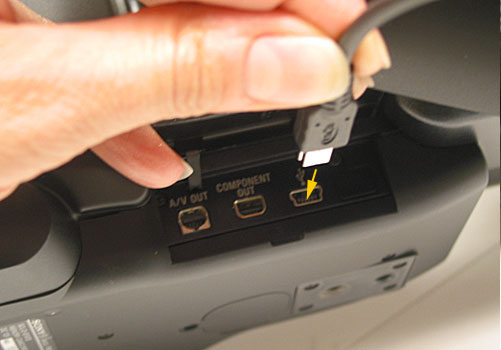
2. Lay the camera on its side to lift the connector panel below the grip. You may need to push up on the grip strap. There are three connection ports – the one on the far right is the USB port.
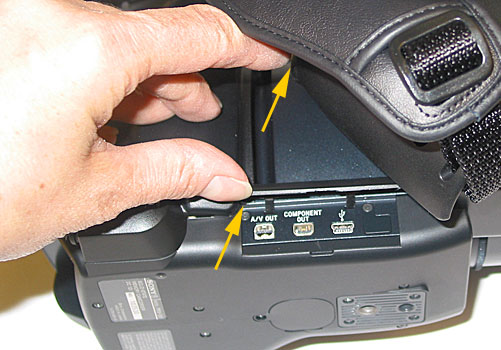
3. Insert the mini end of the USB cable into the USB port in the camera, taking care to check the form and direction of the USB connector. Take care to ensure that the cable has clearance from the grip, and there is no undue stress on the connector. Then, insert the other end into your computer’s USB port.
4. With the camera again upright, rotate the LCD monitor out from beneath the built-in mic.
.jpg)
5. Now switch the camera on to “Media” mode. You will see a “Connect USB Now?” dialog, as shown below. Select Execute.
.jpg)
6. Check your computer desktop to confirm that an SxS volume has been mounted . Congratulations, you are now ready to go to III. Transferring the XDCAM Media onto Your Hard Drive below.
Transferring the XDCAM Media onto Your Hard Drive
Once you have confirmed that the SxS volume is mounted on your desktop – you should see the following icon:
![]()
You are now ready to:
(1) Copy your media directly from the SxS card onto your hard drive (fast way to move media so you can shoot on the card again – but carries some risk – see section below)
Copying the XDCAM Media onto Your Hard Drive
WARNING: Please follow the workflow below exactly to prevent corruption and/or loss of your media.
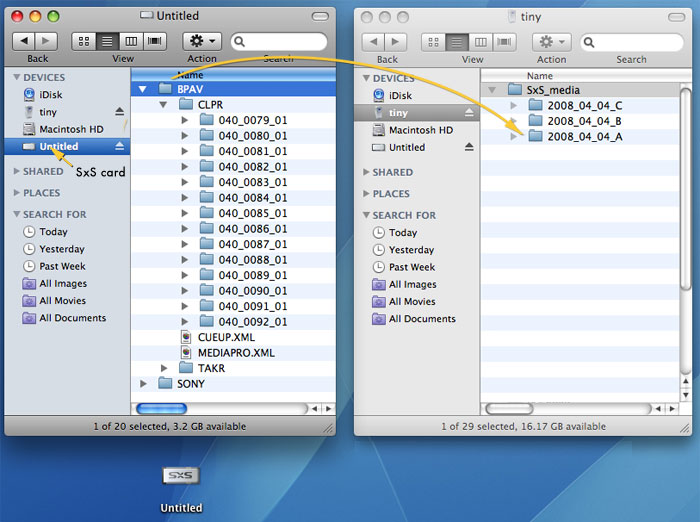
1. Create a directory on your external hard drive for copying raw SxS media. This directory could serve as a backup in case of a loss of your converted media. The example below is called “SxS media”
2. Create a subdirectory(or subdirectories) for each transfer of media – as shown below we chose the naming convention of 2008_04_04_ A which represents the year, month, day and A signifying the first folder. Using a similar naming convention will help you stay organized, and make the directories easy to sort. Each subdirectory should represent a transfer of media, so multiple transfers on the same day are designated by the letters A, B, C, etc.
3. Now open two finder windows and set them up as shown below. On the right is the window for the SxS card on the desktop and the one on the left is for the new directories on the external drive.
4. Drag the entire BPAV folder into the subdirectory as shown below. If you are importing material in the field, this should be the fastest way to get material off the SxS card. Wait until the directory is done copying.
5. Drag the SONY directory from the SxS card to the SxS Media directory. The SONY directory is an archive of all your camera settings. By saving this directory, you can later copy it back onto an empty reformatted card the next time you check out a camera. After copying you’ll insert the card into the camera and “recall” the camera settings – which will save you time and provide consistent setups. See below for more instructions on storing the settings and recalling them.
6. Once you are done copying both directories, you may eject the SxS card from the desktop. You should then delete the clips once the card is back in the camera which will free up space to shoot more clips.
Warning:
• Do not reformat your card without first copying your SONY directory
• the BPAV folder must be copied into an empty directory
• Do not delete or rename any of the BPAV directories or media files on your computer
• Do not search the metadata on SxS media with the Mac Spotlight search tool – it could modify the metadata and corrupt your files
Failure to not follow the above could result in corruption and/or unusable media.
Ejecting the SxS card
(1) If the card is in your laptop: Either right click (control + click if no right button) on the SxS card icon and select “Eject Disk” or drag the icon into the trash. When the SxS icon has disappeared it is safe to eject the SxS card from the ExpressCard slot.
(2) If you have been connected directly to the camera: Either right click (control + click if no right button) on the SxS card icon and select “Eject Disk” or drag the icon into the trash. When the SxS icon has disappeared it is safe to turn off the camera and disconnect the USB cable.
Erasing clips on the SxS Card on the Sony XDCAM EX1 Camera
Erasing clips on your camera preserves any Scene files, and camera settings. When you have imported your clips, the SxS card is (back) in the camera and you are ready to erase clips on your card in order to create space to shoot more footage, do the following:
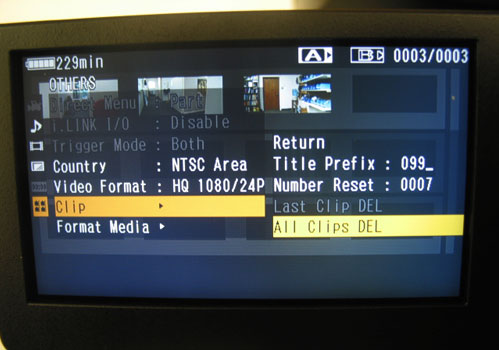
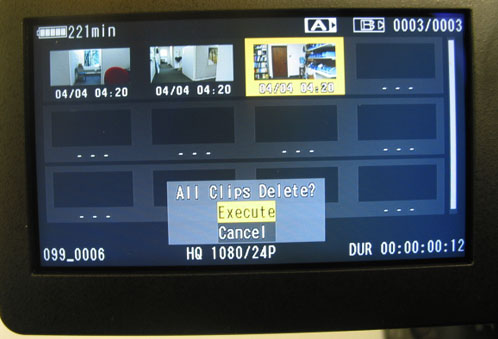
1. Click on the camera’s Menu button, and scroll down to the “Others > Clip” selection. Using your “Sel/Set” button select “All Clips DEL”
.jpg)
2. You will be asked if you want to All Clips Delete, select “Execute.” The clips will be deleted.
Copying Camera Settings onto a Reformatted Card
In order to reuse your camera settings, you’ll need to save them to the SxS card:
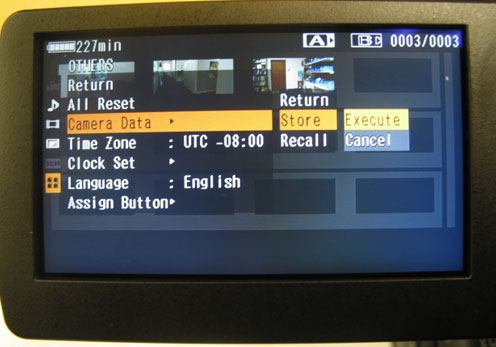
1. Click on the camera’s Menu button, and scroll down to the “Others > Camera Data” selection. Use your “Sel/Set” button to select “Store”, then “Execute”
.jpg)
Your Scene Files and Camera Setups will be located in the folder called “Sony” on the SxS card. By copying that folder onto your hard drive (see III. Transferring the XDCAM Media onto Your Hard Drive, #5) you can later copy that folder back onto a SxS card from another camera and load those same settings back to a different EX1 you are using. The Scene File/Camera Setup in the “Sony” folder keep basically ALL your personal camera setup information.)
Make sure you have a “clean” card before copying your settings by reformatting it as follows:
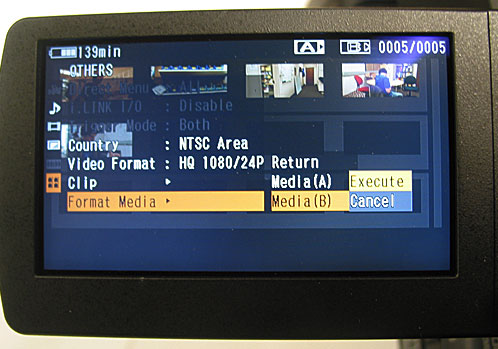
1. Click on the camera’s Menu button, and scroll down to the “Others > Format Media” selection. Use your “Sel/Set” button to select either Media (A) or (B), then “Execute”
.jpg)
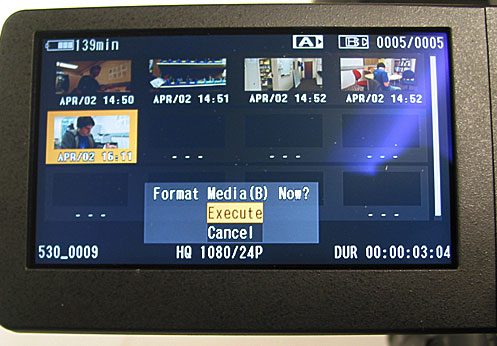
2. You will be asked if you want to Format Media Now? Select “Execute.” The card will be reformatted and is ready for .
3. Insert card into computer and drag “Sony” directory over to SxS card.
4. Eject card and reinsert in camera slot. Open monitor and turn on camera’s “Media” setting.
.jpg)
5. Click on the camera’s Menu button, and scroll down to the “Others > Camera Data” selection. Use your “Sel/Set” button to select “Recall”, then “Execute”.
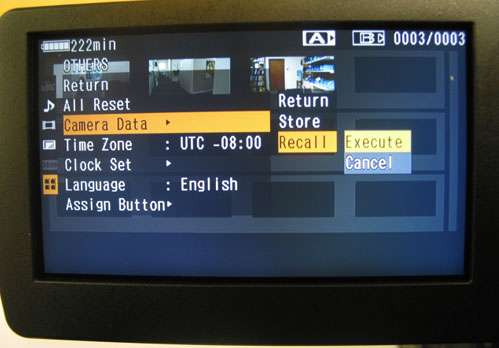
Your scene files and camera settings are now activated on the camera – you’re ready to shoot.


1 ping
Belle
May 14, 2013 at 8:56 am (UTC 0) Link to this comment
Your article Managing Sony XDCAM Media with Mac: Connecting, Transferring, Copying | AIC Converter-Import AVCHD/MTS to FCP/FCE/iMovie write very well, thank you share!…