AIC Converter,MTS to AIC,MTS to iMovie,MTS to FCE,MTS to Final Cut,AVCHD to AIC Converter,AVCHD to Final Cut Express,import AVCHD files to iMovie,MTS to ProRes 422,MTS to Final Cut Pro,MTS to FCP X,AVCHD and Final Cut Pro,Log and transfer MTS to FCP,edit MTS footage in iMovie,FCP transfer MTS files,transfer AVCHD files to iMovie

Sep 17

How to Get iMovie Support Sony HDR-PJ440/B MTS Files?

One of my friends has a Sony HDR-PJ440, which is the best camcorder as he thought. He captured many videos with his PJ440 like 1080/60p AVCHD, XAVC S, and he wants to edit the AVCHD MTS recordings with iMovie thus he can share the videos with us and upload video to the website. But while he trying to import MTS clips from Sony HDR-PJ440 to iMovie, the program can’t be compatible well with these AVCHD files.

Hot search: Canon XF200 MXF to iMovie | Phantom 3 4K MP4/MOV to iMovie | Canon EOS 5DS R MOV to iMovie

iMovie is one of the best video editing tools for Mac. With it, you can beautify your videos simply by cutting, cropping, merging, adding effects etc. to them. It works stable on Mac computer, so it’s loved by millions of users. On the official site, it says iMovie can support DV, MPEG-4, MPEG-2, MOV and M4V file types. According to this, you are unable to import MTS to iMovie.

As far as we know AVCHD format is a delivery codec not for editing, so it is not compatible with many editing software, such as iMovie. That is to say, iMovie doesn’t support Sony PJ440 AVCHD well, it takes much time to render. If you want to smoothly import and edit Sony HDR-PJ440/B MTS files with iMovie, you should convert Sony HDR-PJ440/B MTS to MOV format encoded with Apple InterMediate  Codec, that is best supported by iMovie.

Based on our testing, you can get a professional video tool like Pavtube MTS/M2TS Converter for Mac (review) to finish the conversion task. It can easily convert Sony HDR-PJ440/B MTS files to AIC MOV for iMovie on Mac OS X without quality loss. It can generate best editing format/codec for filmmakers and video enthusiasts to use in different NLE apps, such as Final Cut Pro 6/7/X, Adobe Premiere Pro CS4/CS5/CS6/CC, Adobe After Effects, Avid MC, Final Cut Express, and more.


Other Download:
– Pavtube old official address: http://www.pavtube.com/mts-converter-mac/
– Amazon Download: http://www.amazon.com/Pavtube-MTS-M2TS-Converter-Download/dp/B00QIE3U0Y
– Cnet Download: http://download.cnet.com/Pavtube-MTS-M2TS-Converter/3000-2194_4-76177029.html

How to work Sony HDR-PJ440/B MTS files with iMovie?

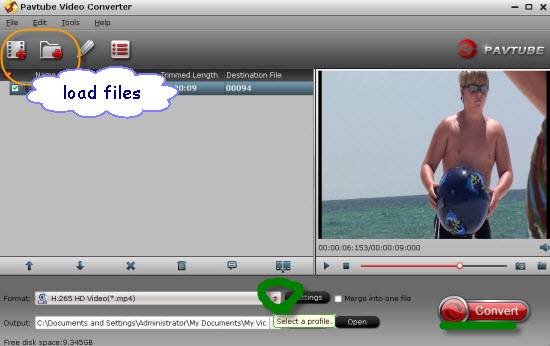
Step 1: Drag and drop source Sony HDR-PJ440/B MTS files to the main interface. Or click “Add Video” button to import videos.

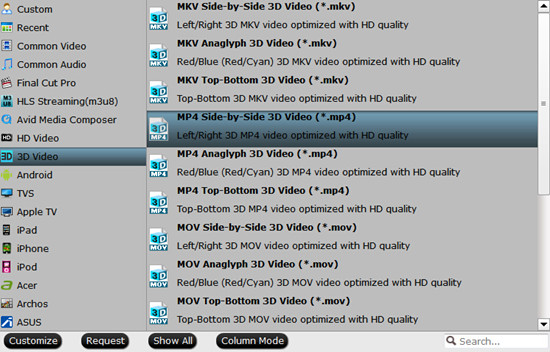
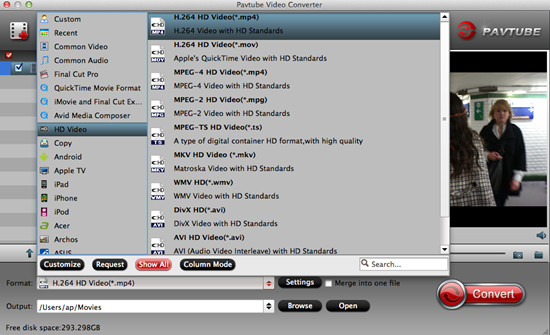
Step 2: Set up output format for Sony HDR-PJ440/B MTS files to iMovie. From format list, choose “iMovie and Final Cut Express>>Apple InterMediate Codec (AIC) (*.mov)” for output.

Step 3: This program offers some editing functions. You can tick “Merge into one file” under the preview window. And click “Edit” button, you can make changes to the video effects as you wish. In the editing window, you can trim your favorite part from the video, crop the frame size, adjust the visual effects, or add watermarks or subtitles. If you want to change the video parameters, go back to the main interface and click “Settings” button, you can select the video encoder, resolution, audio channel and more. This function is something worth trying. You can get the work done splendidly.

Step 4: Press the “Convert” button to start Sony HDR-PJ440/B MTS files to AIC .mov conversion.

Conclusion: Once finished, click “Open” to get converted videos. Then you could transfer them to iMovie for editing.

Further Reading:

Share

Sep 10

Convert GoPro MP4 to DNxHD MOV for DaVinci Resolve Editing

GoPro Hero cameras are compact, lightweight, and wearable on different vehicles. The GoPro HD cameras like Hero2, Hero3, Hero4, etc. are familiar with everyone whoever has passion for sports and other outdoor activities. A GoPro Hero camera produces HD H.264 MPEG-4 (*.mp4) videos, and can be played on computer well. As we all know, most of the editing software support MP4, and then why GoPro MP4 files cannot be edited in DaVinci Resolve?

“When I import the GoPro MP4 video into DaVinci Resolve, it looks blurry and pixely. However, when I view the same video out of the folder that it resides in, the video looks amazing. I’m assuming I’m doing something wrong during the import process. Any suggestions?”

As an extremely powerful editor in the post production workflow, DaVinci Resolve is well known for its color correction ability as well as a great manager of your entire creative process. It is claimed that DaVinci Resolve works with a wide variety of file formats in real time including DPX, CIN, EXR, Tiff, QuickTime, ProRes, DNxHD and MXF files. While importing the unsupported MP4 to DaVinci Resolve is such a pain. May be we need a video assistant to get more help.

Searching the web, I got some hints. What I can do with the current project is take the GoPro MP4 I have and convert it for use with DaVinci Resolve. And what I need is a great MP4 converter. After multiple testing, I found Pavtube HD Video Converter for Mac (review) is the best option for me. It is able to convert GoPro MP4 to DaVinci Resolve friendly format DNxHD MOV easily with the best video quality. Besides MP4, this video convert program can also help to convert between any popular video and audio formats as you need. Plus, with the built-in video editing feature of the program, you can trim, crop, add watermark and more to your video files.


Other Download:
– Pavtube old official address: http://www.pavtube.com/hd-video-converter-mac/
– Amazon Store Download: http://www.amazon.com/Pavtube-Video-Converter-Mac-Download/dp/B00QI9GNZS
– AppStore Download: https://itunes.apple.com/de/app/pavtube-hd-video-converter/id502792488?mt=12
– Cnet Download: http://download.cnet.com/Pavtube-HD-Video-Converter/3000-2194_4-76177786.html

How to convert GoPro MP4 to DaVinci Resolve?

Step 1: Download and have a quick installation. The trial version will have a watermark on your converted files. Except for that, there are no time limitation, no virus, and no unnecessary bundle apps while downloading. After that, click “Add Video” button to load your original videos. You can load several files at once thanks to “Add from folder” button.

Step 2: Here, you need to choose what you want the output to be. Click “Format” drop-down list, and then select “Avid Media Composer>>Avid DNxHD (*.mov)” as the best output format.

Step 3: Click “Settings” button to customize the output video and audio settings by yourself. But if you are not good at it, you’d better use the default parameters, they will ensure you a good balance between file size and image quality basically. You can change the resolution, bit rate, frame rate as you need.

Step 4: When everything is done, you can take a preview by hitting “Play” button. If you are satisfied with the final result, you can click “Convert” button to finish the conversion work.

Conclusion: Once the conversion process is complete, you can click “Open Folder” button to get the generated files for editing GoPro MP4 in DaVinci Resolve with optimum performance.

Further Reading:

Share

Sep 02

Import Sony Action Cam Mini HDR-AZ1 XAVC S to Premiere Pro CC

The Action Cam Mini HDR-AZ1 fits nicely inside the palm, yet it delivers excellent video using Sony’s XAVC S compression format. Well, here comes the problem that XAVC S video format is hardly compatible with many NLEs, like Premiere Pro CC.

This Cam can records video in XAVC S Codec, which is intended as a more economic and simpler consumer codec, and more appropriate to simpler editing and Internet streaming applications. The new version 8.2.0 of Adobe Premiere Pro CC can natively support XAVC S 4K and HD. Whereas, you will find it is a painful experience to import Sony AZ1 XAVC S to Premiere Pro CC (before 8.2.0) or CS6, CS5, CS4.

The basic reason is that XAVC S, the highest picture resolution and frame rate video compression codec is much more than a video format that Premiere can support. In this situation, maybe an upgrade of the Adobe version could help. Still stuck with unsuccessful attempts? Perhaps you need to convert Sony XAVC S to MPEG-2, which is best accepted by Premiere.

Actually, it’s not so hard to do the trick. With a professional XAVC S converter- Pavtube HD Video Converter for Mac, you can get the work done easily. This software is able to convert XAVC S files from Sony Action Cam Mini HDR-AZ1 to Premiere Pro CC fully compatible format and keep original quality at the mean while. It can also export Apple ProRes for FCP, Apple InterMedaite Codec (AIC) for iMovie/FCEDNxHD for Avid Media Composer for native editing.


Other Download:
– Pavtube old official address: http://www.pavtube.com/hd-video-converter-mac/
– AppStore Download: https://itunes.apple.com/de/app/pavtube-hd-video-converter/id502792488?mt=12
– Cnet Download: http://download.cnet.com/Pavtube-HD-Video-Converter/3000-2194_4-76177786.html

How to convert Sony HDR-AZ1 XAVC S to Premiere Pro CC?

Step 1: Backup your XAVC S files from Sony HDR-AZ1 to hard drive. Install and launch this program. Drag and drop XAVC S files to the software. You can import multiple files at once thanks to “Add from folder” button.

Step 2: Click the drop-down list in the format line to get the format box. Then choose “Adobe Premiere/Sony Vegas>>MPEG-2 (*.mpg)” as output format.

Step 3: Click “Settings” button to customize the output video and audio settings by yourself. But if you are not good at it, you’d better use the default parameters, they will ensure you a good balance between file size and image quality basically. You can change the resolution, bit rate, frame rate as you need.

Step 4: You can preview to check the final result. Once you are satisfied with it, click the “Convert” button to start converting XAVC S to MPEG-2 .mpg format. It will take you a little while.

Conclusion: After conversion, you can get the generated files by clicking “Open” button. Now, you’ll get no troubles in editing Sony HDR-AZ1 XAVC S files in Premiere Pro CC. Good News! During 2015 Label Day, Pavtube provides big sale with up to 50% off for some products.

Further Reading:

Share

Aug 27

Put C300 Mark II MXF on Zeiss VR One via Samsung S5

Canon C300 Mark II is a hot camcorder on the market, since it released it has attracted great attention due to its excellent hardware equipment. It features a Super 35mm CMOS sensor, which will help you to record 4K, 1920*1080 60/50i, 23.98/25p True 24p videos. With C300 Mark II you can record high quality videos in MXF format, it delivers the highest image quality with its XF Codec–the same codec used by other Canon XF professional camcorders.

The Zeiss VR One is a one-of-a-kind device allowing us to take our first steps in the world of virtual reality. Its lightweight design and 100% portability make it the perfect companion for videos, games and augmented reality. Currently, Zeiss VR One is compatible with iPhone 6, Samsung Galaxy S4, S5, S6, Nexus 5, and LG-G3 smartphones. The VR One Cinema app can play .mov, .mp4 file formats. It also can play a side-by-side 3D formatted 3D video.

Have a creative idea to watch C300 Mark II MXF on Zeiss VR One via Samsung S5? To achieve the goal, here Pavtube Video Converter is highly recommended, you can get this job done perfectly. With the latest version 4.8.6.5, this program adds Apple ProRes as output, supports encoding to H.265 MKV and is compatible with Sony/LG/Samsung/Panasonic TVs. If you are running on Mac operating system, you can refer to the equivalent version- Pavtube Video Converter for Mac (review). It works well even on the latest Mac OS X El Capitan. Besides, it also solves MKV/AVI/FLV to Zeiss VR One issues.


Other Download:
– Pavtube old official address: http://www.pavtube.com/video_converter/
– Amazon Download: http://download.cnet.com/Pavtube-Video-Converter/3000-2194_4-75734821.html
– Cnet Download: http://download.cnet.com/Pavtube-Video-Converter/3000-2194_4-75734821.html

How to convert C300 Mark II MXF to Samsung S5 for playing with Zeiss VR One?

Step 1: Download, install and run the corresponding program. Click “Add Video” or “Add from folder” to load your C300 Mark II MXF files.

Step 2: Click the “Format” bar and select “3D Video>>MP4 Side-by-Side 3D Video (*.mp4)” as output format.

Step 3: Click “Settings” button to customize the output video and audio settings by yourself. But if you are not good at it, you’d better use the default parameters, they will ensure you a good balance between file size and image quality basically. You can change the resolution, bit rate, frame rate as you need.

Step 4: Go back to the main interface, hit the big button “Convert” there.

Conclusion: There is no need for waiting for a long time. We can receive the best output files nicely. After conversion, you can get the generated files by hitting “Open” button.

Transfer C300 Mark II MXF to Samsung S5 for Zeiss VR One
-Connect your Samsung S5 via USB cable and open file transfer.
-Create a folder “VRCinema” on your phone at root level.
-Drag and drop your generated MXF files into this folder.
-All the videos you add here will be listed under the “Movies” folder inside the app.

Further Reading:

Share

Aug 20

Upgrade! Pavtube add ProRes/TV/H.265 MKV Support for Windows

Pavtube Studio just announced all Pavtube Windows products, including BDMagicByteCopyDVDAidVideo Converter UltimateVideo ConverterMXF ConverterHD Video ConverterMTS Converter and MXF MultiMixer, are upgraded. PC users now can encode Blu-ray, DVD movies and all kinds of Common/HD/4K Videos to MOV with Apple ProRes codec, HEVC/H.265 MKV, and Sony/LG/Samsung/Panasonic TV formats with excellent video/audio quality and super speed. Registered users could download and install the latest version for solution to their issues.

See also:

What’s new in this upgrade?

1. Add Apple Prores as output

PC users who are eager to create Apple ProRes video under Windows OS would love the new upgrade of Pavtube Windows programs because this has been realized in the new version. Pavtube adds Apple ProRes MOV in Format list for fluent video playback, video editing, and personal use you desire.

2. Support encoding to H.265/HEVC MKV

Another new element in the new Pavtube programs is that registered users now can save Blu-ray, DVD, and video sources to HEVC/H.265 MKV. HEVC provides better video quality in same file size compared to H.264. And Pavtube members can do that in the new upgrade with fast speed.

3. Compatible with Sony/LG/Samsung/Panasonic TVs.

Last but not least, Pavtube software is not compatible with Sony, LG, Samsung and Panasonic TVs. Pavtube adds these TVs under Format menu, without extra operations, you can easily create movies and videos for perfect playback on any of these TVs.

More information you need about the new upgrade and Pavtube products can be found on Pavtube official website.

Pavtube Software Upgrade Promotion on Facebook

http://bit.ly/1hmOn34

This upgrade, Pavtube Facebook provide up to 35% Off Blu-ray/DVD Ripper & various (HD) Video Converters, the best yet easy-to-use tools to convert your Blu-ray/DVD movies, Common/HD/4K Video files into H.265 MP4/MKV, Apple Prores, various TV profiles, M3U8, MP4, MOV, MKV, AVI, M4V, WMV, VOB, MPG, FLV, SWF, Divx, Xvid, AAC, MP3, WMA, WAV, M4A, AC3, FLAC and more onto smartphone, tablet, computer, media player, stream server, TV set, game console, VR headset, hard drive, etc. with multiple wanted audio/language/chapter markers!

Up to 35% OFF Discount can be shared here:

35% Off Pavtube BDMagic for Windows or Mac
35% Off Pavtube DVDAid for Windows or Mac

30% Off Pavtube Video Converter Ultimate for Windows or Mac
30% Off Pavtube Video Converter for Windows or Mac

20% Off Pavtube ByteCopy Windows or Mac
20% Off Pavtube MTS/M2TS Converter for Windows or Mac
20% Off Pavtube Multi-track MXF Converter for Windows or Mac

Just like us on page and you can get it with all other free software giveaways, useful guides, and lifelong discounts.

If you have any problem to buy or use Pavtube software, pls feel free to contact support@pavtube.com (for Windows user), macsupport@pavtube.com (for Mac user).

More Topics

Share

Aug 13

How to Import AVCHD to EDIUS 6?

EDIUS Pro provides a simple alternatives to the industry leaders, but it has all of the tools that other professional video editing software has such as powerful tools, enhanced timeline, advanced multicam support, 64-bit processing. One peculiarity that sets EDIUS Pro apart from others is that it doesn’t utilize GPU acceleration for rendering, transcoding and exporting videos. And this is a big advantage over other applications that require time and processing capacity to render footage.

Hot search: MKV to EDIUS Pro 8 | GoPro MP4 to EDIUS Pro 7 | AVI to EDIUS 7/7.01 | Panasonic DVCPro HD MXF to EDIUS Pro 7 | H.265/HEVC to EDIUS 5/6/7/8

“Hello everyone, the past 3 months I tried to collect some money to buy a new camera the Sony a58 which records in AVCHD, long story short I want to know the best project settings and render format in order to edit them in EDIUS 6 and get the best quality out of my videos. Any suggestions about converting AVCHD to EDIUS 6 is appreciated!”

EDIUS Pro supported format for file import:

Since EDIUS lacks GPU acceleration for transcoding AVCHD video files, you will need to employ a third-party application to perform the video codec transcoding process for you. After multiple testing, I found Pavtube Video Converter is the best option. It is able to convert AVCHD to EDIUS 6 friendly format easily with the best video quality. Besides AVCHD, this video convert program can also help to convert between any popular video and audio formats as you need. Plus, with the built-in video editing feature of the program, you can trim, crop, add watermark and more to your video files.


Other Download:
– Pavtube old official address: http://www.pavtube.com/video_converter/
– Amazon Download: http://download.cnet.com/Pavtube-Video-Converter/3000-2194_4-75734821.html
– Cnet Download: http://download.cnet.com/Pavtube-Video-Converter/3000-2194_4-75734821.html

How to import AVCHD to EDIUS 6?

Step 1: As soon as you download and install the program, launch it and when the main interface pops up in front of us, just click the “Add Video” or “Add from Folder” to let in.

Step 2: Click the drop-down list in the format line to get the format box. Then choose “Adobe Premiere/Sony Vegas>>MPEG-2 (*.mpg)” as output format.

Step 3: Click “Settings” button to customize the output video and audio settings by yourself. But if you are not good at it, you’d better use the default parameters, they will ensure you a good balance between file size and image quality basically. You can change the resolution, bit rate, frame rate as you need.

Step 4: After that, click “Convert” to start AVCHD to MPEG-2 conversion.

Conclusion: After conversion, you can get the generated files by clicking “Open” button. Now, you’ll get no troubles in editing AVCHD files in EDIUS 6.

Further Reading:

Share

Aug 06

Import Canon C100 Mark II MTS to FCP/Premiere/Avid for Editing

The Canon C100 Mark II Digital HD Camera offers all of the advantages of its predecessor while adding advanced new imaging and operational features by popular demand. In addition to improved RGB video processing, the camera’s dual codec capability supports simultaneous AVCHD and MP4 recording, including 59.94P capture along with slow and fast motion recording.

“I have bought a Canon C100 Mark II camcorder one month ago, and recently I recorded some full HD videos with it. Today I need to use some of the videos in Avid MC and Premiere Pro CC, when I tried to import the C100 Mark II recorded AVCHD MTS videos to Avid Media Composer and Premiere Pro, the programs said this MTS format is not supported, I checked and guess this MTS format is not compatible with Avid MC and Premiere. So I turn to FCP, it doesn’t work either. Which MTS converter is recommended? Any suggestion is appreciated.”

As we know AVCHD MTS format is great for recording footage from the camera, but it can be a challenge for editing. Although FCP now has the ability to support MTS videos natively, it doesn’t mean you can edit MTS in FCP smoothly all the time.

There is a well documented bug with editing long AVCHD clips in Adobe Premiere Pro. One of the affected camera is the C100. Adobe acknowledged the existence the bug some time ago and although they final announced that they are committed to fixing the bug. However, it’s still painful experience for C100 owners who want to edit Canon C100 Mark II AVCHD in Premiere Pro, as so many issues still exist.

AVCHD is a high compressed codec and it’s not a good editing format for Avid MC. Besides, the 5.5 version is out-dated and needs to be upgraded. The latest Avid MC 6.5 may support to import C100 Mark II AVCHD files without any trouble.

If you think it is a troublesome thing, you can use a third-party program to convert Canon C100 Mark II MTS to ProRes for FCPMPEG-2 for PremiereDNxHD MOV for Avid Media Composer. The utility applied here is the professional Pavtube MTS/M2TS Converter for Mac (review). By running it, there’s no need to set the codec by yourself; the Mac program has optimized presets for FCP/Premiere/Avid Media Composer. It can also help you convert C100 Mark II AVCHD files to AIC for iMovie and more.


Other Download:
– Pavtube old official address: http://www.pavtube.com/mts-converter-mac/
– Amazon Download: http://www.amazon.com/Pavtube-MTS-M2TS-Converter-Download/dp/B00QIE3U0Y
– Cnet Download: http://download.cnet.com/Pavtube-MTS-M2TS-Converter/3000-2194_4-76177029.html

Here is a step-by-step tutorial for you to figure out your AVCHD MTS footage to FCP/Premiere/Avid MC problem:

Step 1: Import Canon C100 Mark II files to Mac MTS Converter. Run it as the best Mac MTS Converter, and click the “Add video” button to load your original files. You may also directly drag and drop files to application UI for importing files.

Step 2: Click the “Format” bar to get the drop-down menu and you can get “Avid Media Composer>>Avid DNxHD (*.mov)” as the best output format.

Tips: For editing C100 Mark II MTS in FCP, choose “Final Cut Pro>>Apple ProRes 422 (*.mov)”.
For editing C100 Mark II MTS in Premiere, choose “Adobe Premiere/Sony Vegas>>MPEG-2 (*.mpg)”.

Step 3: Click “Settings” button to customize the output video and audio settings by yourself. But if you are not good at it, you’d better use the default parameters, they will ensure you a good balance between file size and image quality basically. You can change the resolution, bit rate, frame rate as you need.

Step 4: When everything is ready, click “Convert” to start converting C100 Mark II AVCHD MTS to ProRes/MPEG-2/DNxHD. This Mac MTS/M2TS Converter supports batch conversion so you may load multiple files and convert them at one time.

Conclusion: After converting, you can get the generated files by clicking “Open” button. Now, you can transfer Canon C100 Mark II MTS to FCPPremiereAvid Media Composer freely.

Further Reading:

Share

Jul 30

Import Sony HX400V MTS to iMovie for Further Editing

Sony has produced another solid camera in the HX400V, with some excellent technologies working to make sure it produces excellent images. There are a lot of interesting functions that make it even more appealing, including the 50x optical zoom, built-in Wi-Fi and creative functions.

Sony HX400V Camcorder shoots HD videos in 1080/60p AVCHD format. Regarding to the 1080/60p AVCHD codec, it is very popular in both the professional and consumer market. That means most non-linear editing software should have full support for the codec, but the thing is that users still have problems one or another while trying to import 60p AVCHD to iMovie for further editing.

“Hi, there, I recently purchased a Sony HX400V and loved shooting short video clips with it. Unfortunately, I’m currently having a problem editing the 60p AVCHD footage shot by the HX400V. The video loaded, but the entire editing process is not as smooth as I expected. Does iMovie not support Sony HX400V 60p AVCHD footage well? If so, what should I do to go about this? I would really appreciate any help.”

If you are trying to import 60p AVCHD to iMovie for editing, you may get down. That’s because iMovie does not have native support for 60p files in AVCHD format. In order to import and edit HX400V 60p AVCHD in iMovie without crashing problem and avoid rendering, you’d better transcode 60p AVCHD to iMovie native formatPavtubeMTS/M2TS Converter for Mac (review) can help you do the format conversion with high quality.


Other Download:
– Pavtube old official address: http://www.pavtube.com/mts-converter-mac/
– Amazon Download: http://www.amazon.com/Pavtube-MTS-M2TS-Converter-Download/dp/B00QIE3U0Y
– Cnet Download: http://download.cnet.com/Pavtube-MTS-M2TS-Converter/3000-2194_4-76177029.html

Workflow to import HX400V 60p AVCHD to iMovie for editing:

Step 1: Connect your Sony HX400V camcorder to Mac via USB cable and find the AVCHD files from the camera folder. Then copy and transfer the AVCHD files from Sony HX400V to the Apple hard drive disk.

Step 2: Import Sony HX400V 60p AVCHD files to Mac MTS Converter. Run it as the best Mac MTS Converter, and click the “Add video” button to load 60p AVCHD videos. You may also directly drag and drop HX400V 60p AVCHD videos to application UI for importing files.

Step 3: Click the “Format” option and navigate the mouse cursor to “iMovie and Final Cut Express>>Apple InterMediate Codec (AIC) (*.mov)” as output format.

Step 4: To set the profile settings, please click the “Settings” button. General speaking, the default settings are just fine. Click the “Browse” button to browse and specify a destination folder to save the converted files.

Step 5: When everything is ready, click “Convert” to start converting 60p AVCHD to AIC MOV. This Mac MTS/M2TS Converter supports batch conversion so you may load multiple files and convert them at one time.

Conclusion: As AVCHD to AIC MOV Mac video converter, it enables you to trim out unwanted part, crop out black bars, change aspect ratio from 4:3 to 16:9 and vice versa, rotate 90 degrees clockwise, anti-clockwise, add plug-in subtitles, apply special effect, and more.

Further Reading:

Share

Jul 22

Import Panasonic W850 AVCHD to FCP X for Editing

The Panasonic HC-W850 Twin Camera is a Full HD camcorder, many photographers are highly interested in this amazing camcorder but there is a problem that hinders their future step–How to import Panasonic W850 1080/60p AVCHD MTS to FCP X on Mac OS X (El Capitan is included) if they want to do some editing work with their AVCHD recordings.

“I like the W850 camcorder, great to have manual control etc., but what bothers me is the preference to AVCHD, which is so hard to find a way to make it editable in FCP X. I want the AVCHD format for recording, but the importing issue is my big problem.”

While, it’s a pity that currently 1080/60p footage from Panasonic HC-W850 is a very non-standard format and it’s unsupported in FCP X. The 1920*1080/60p AVCHD MTS/M2TS full recordings from Panasonic W850 can’t be edited by FCP directly via Mac. If you are the Panasonic HC-W850 users and wanna get Panasonic HC-W850 60p AVCHD into FCP X, you will face the Panasonic HC-W850 AVCHD to FCP X importing troubles.

Actually, it is not so difficult to handle the problem. Panasonic HC-W850 AVCHD is not the natively supported video format of FCP X, but the Apple ProRes Codec is. So, you just need to convert Panasonic HC-W850 recordings to FCP X compatible video format and your incompatibility problem can be solved.

Now the question is how to get a powerful Panasonic HC-W850 to FCP X Converter for Mac? Here we highly recommend Pavtube MTS/M2TS Converter for Mac (review). By running it, there’s no need to set the codec by yourself; the Mac program has optimized presets for FCP X. Besides, the program is developed with some useful editing features, including merging several clips into one for easy importing, downsizing the files for editing and storage, adding text/image/video to original files, adding subtitles, replacing original audio tracks, etc.


Other Download:
– Pavtube old official address: http://www.pavtube.com/mts-converter-mac/
– Amazon Download: http://www.amazon.com/Pavtube-MTS-M2TS-Converter-Download/dp/B00QIE3U0Y
– Cnet Download: http://download.cnet.com/Pavtube-MTS-M2TS-Converter/3000-2194_4-76177029.html

Here is a step-by-step tutorial for you to figure out your AVCHD MTS footage to FCP X problem:

Step 1: Import Panasonic HC-W850 files to Mac MTS Converter. Run it as the best Mac MTS Converter, and click the “Add video” button to load your original files. You may also directly drag and drop files to application UI for importing files.

Step 2: Click the “Format” bar to get the drop-down menu and you can get “Final Cut Pro>>Apple ProRes 422 (*.mov)” as the best output format.

Step 3: Click “Settings” button to customize the output video and audio settings by yourself. But if you are not good at it, you’d better use the default parameters, they will ensure you a good balance between file size and image quality basically. You can change the resolution, bit rate, frame rate as you need.

Step 4: When everything is ready, click “Convert” to start converting Panasonic HC-W850 AVCHD MTS to ProRes MOV. This Mac MTS/M2TS Converter supports batch conversion so you may load multiple files and convert them at one time.

Conclusion: After converting, you can get the generated files by clicking “Open” button. Now, you can edit Panasonic HC-W850 AVCHD footage in FCP X freely.

Further Reading:

Share

Jul 15

Upload GoPro Videos to Social Media for Sharing

The GoPro HD cameras like Hero2, Hero3, Hero4, etc. are familiar with everyone whoever has passion for sports and other outdoor activities. GoPro HD is the world’s first true HD and best selling wearable camera to record sporting and other activities. The latest GoPro Hero4 Black allows you to record at up to 4K resolution at 30 frames per second. When you got some clips from GoPro, you would probably upload them to social media like YouTube, Vimeo, Twitter, Facebook, Instagram etc. for sharing with your friends and family members.

Hot search: GoPro Video to DropBox | GoPro Video to Sony Movie Studio | GoPro Video to VLC

When you want to upload videos shot by GoPro camcorder to social media, problems will pop up such as social media couldn’t recognize GoPro 4K video files. Currently, most 4K movies are recorded in MXF/RAW/XAVC/XAVC-S format, while none of them is widely supported by social media. Here, the suggestion is converting GoPro video to MP4 format for social media uploading with an all-in-one software. Why should we convert 4K video to MP4 format is for two reasons: First, MP4 is widely used. More and more portable devices are support this file form. Second, MP4 has a much smaller file size and meanwhile remain the high video quality.

Although there are numbered tools and utilities can convert the 4K videos, few of them can process at a fast speed. Well, Pavtube Video Converter for Mac (review) is considered to be the best GoPro video to social media converter. It is surely in the support of converting GoPro videos with original quality preserved. For Windows users, Pavtube Video Converter is the alternative choice.


Other Download:
– Pavtube old official address: http://www.pavtube.com/video-converter-mac/
– Amazon Store Download: http://www.amazon.com/Pavtube-Video-Converter-Mac-Download/dp/B00QIBK0TQ
– Cnet Download: http://download.cnet.com/Pavtube-Video-Converter/3000-2194_4-76179460.html

How to upload GoPro Videos to social media for sharing?

Step 1: Download and have a quick installation. The trial version will have a watermark on your converted files. Except for that, there are no time limitation, no virus, and no unnecessary bundle apps while downloading. After that, click “Add Video” button to load your GoPro videos. You can load several files at once thanks to “Add from folder” button.

Step 2: Click the “Format” drop down list to select output format. If you want to upload GoPro videos to social media, you’d better set a preset profile that best meets your needs. “HD Video>>H.264 HD Video (*.mp4)” would be the best choice.

Step 3: Click “Settings” button; you can adjust video and audio settings, including codec, aspect ratio, bit rate, frame rate, sample rate, and audio channel.

Step 4: After all the settings, you can preview the final result. If you are happy with the effect, you can then press the big “Convert” button on the lower right to launch the conversion.

Conclusion: Wait a moment, and then the conversion will be done flawlessly. After conversion, click “Open Folder” button to locate the converted video files. It would be easier for you to upload GoPro videos to social media smoothly and perfectly.

Further Reading:

Share
Page 11 of 37« First...910111213...2030...Last »