AIC Converter,MTS to AIC,MTS to iMovie,MTS to FCE,MTS to Final Cut,AVCHD to AIC Converter,AVCHD to Final Cut Express,import AVCHD files to iMovie,MTS to ProRes 422,MTS to Final Cut Pro,MTS to FCP X,AVCHD and Final Cut Pro,Log and transfer MTS to FCP,edit MTS footage in iMovie,FCP transfer MTS files,transfer AVCHD files to iMovie

Jul 08

Alternative to GoPro Studio to Work with GoPro Hero Footage

Although GoPro Studio is pretty good at what it does, sometimes you may also want to get your hands on some decent GoPro Studio alternative for satisfying all your video editing needs. Here we list the best GoPro Studio alternative. So no matter the tech, you’ll still be able to create works of art.

GoPro Studio software makes it easy to import your GoPro media, play back your videos and Time Lapse photo sequences, view photos and create professional-quality videos. It is an application that allows you to create professional-quality videos. You can add music, add titles, edit points, slow motion effects, add various videoclips, rim and mix clips, adjust video playback speed for fast or slow motion and create videos from time-lapse photo sequences.

“Have bought the GoPro Hero4 Black, I recorded some 4K MP4 footage saved to laptop. Downloaded GoPro Studio software to edit the footage but it always crashes during transfer. Anyone use other better software? Is there an alternative to GoPro Studio to edit GoPro Hero footage?”

I have scoured the Internet, tried everything I could find. There are more than one threads mentioned the GoPro Studio issues while editing or converting GoPro footage. In fact, GoPro Studio is a free software makes it easier than ever to create professional-quality videos with your GoPro content. While, it’s still not a solid software for us to handle GoPro video clips. In this case, what we need is a GoPro Studio alternative that works on Windows or Mac.

Since GoPro Studio can both process video editing and converting, we need to find a likewise tool. After trying several apps on the market, I found Pavtube Video Converter for Mac (Windows version) is considered as the best replacement. This video app is an all-in-one video converter, editor and even video player. With its built-in editing feature, it allows you to trim clips, crop videos, add effects, insert subtitles, etc as GoPro Studio does. Plus, it is more easy-to-use and offers some unbeatable features like batch conversion and downsize 4K videos to 1080p with high quality kept and more. Overall, you can effortlessly find this program can be seen as the best GoPro Studio alternative and is even much better than it.


Other Download:
– Pavtube old official address: http://www.pavtube.com/video-converter-mac/
– Amazon Store Download: http://www.amazon.com/Pavtube-Video-Converter-Mac-Download/dp/B00QIBK0TQ
– Cnet Download: http://download.cnet.com/Pavtube-Video-Converter/3000-2194_4-76179460.html

How to use GoPro Studio alternative to edit GoPro Hero footage?

Step 1: Download and have a quick installation. The trial version will have a watermark on your converted files. Except for that, there are no time limitation, no virus, and no unnecessary bundle apps while downloading. After that, click “Add Video” button to load your GoPro Hero footages. You can load several files at once thanks to “Add from folder” button.

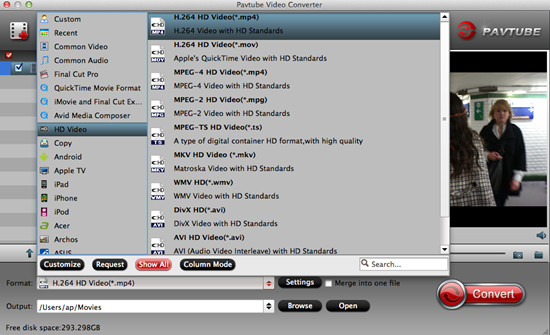
Step 2: Click the “Format” drop down list to select output format. If you want to edit GoPro Hero footages in GoPro Studio, you’d better set a preset profile that best meets your needs. “HD Video>>H.264 HD Video (*.mp4)” would be the best choice.

Step 3: Click “Settings” button to customize the output video and audio settings by yourself. But if you are not good at it, you’d better use the default parameters, they will ensure you a good balance between file size and image quality basically. You can change the resolution, bit rate, frame rate as you need.

Step 4: After all the settings, you can preview the final result of movie. If you are happy with the effect, you can then press the big “Convert” button on the lower right to launch the conversion.

Conclusion: Wait a moment, and then the conversion will be done flawlessly. After conversion, click “Open Folder” button to locate the converted video files. Now, you can edit GoPro Hero footage seamlessly with the help of alternative to GoPro Studio.

Further Reading:

Share

Jul 01

Panasonic Media Player Can’t Accept MTS Files

Whilest on holiday I moved the *.mts files from the SDHC card we were using in our Panasonic HDC-S80 video camera to an External USB drive in order to free up space to allow additional recording.

The MTS files play fine on the laptop however I would like to put them back on an SD card so that I can inflict them on friends and family directly from our Panasonic TX-L37D25B, however they don’t show up in the Media Player.

I tried reformating the SD card in the Video Camera, transfering some of the .mts files back and then recording a new short video with the video camera. Only the new one shows up when the SD card is put in the telly or in the index on the camera!

Does anyone know what I need to do to have the *.mts files show up in the Media Player of our Television?

MTS is a container format, commonly used for high definition video on AVCHD. It’s used for multiplexing audio, video and other streams. Since MTS files cannot be played smoothly on Panasonic media player like the situation mentioned above, you have to convert MTS files to playable formats at first. Here I recommend you convert MTS files to MP4 format for two reasons. First, MP4 is widely used on the most popular devices. More and more portable devices are support this file form. Second, MP4 has a much smaller file size and meanwhile remain the high video quality. Not perfect enough, we here would like to introduce you the professional Pavtube Video Converter (Mac version), which can meet the most people’s basic need.


Other Download:
– Pavtube old official address: http://www.pavtube.com/video_converter/
– Amazon Download: http://download.cnet.com/Pavtube-Video-Converter/3000-2194_4-75734821.html
– Cnet Download: http://download.cnet.com/Pavtube-Video-Converter/3000-2194_4-75734821.html

More details are allowed here for you to take the advice:

Step 1: Download and install the corresponding program. Click “Add video” on the main interface to load MTS files to the program. You can also drag the files to the program’s window list directly. This program can also support the batch video clips.

Step 2: Click the “Format” bar to get the drop-down menu and you can get “HD Video>>H.264 HD Video (*.mp4)” as output format.

Step 3: In the “Settings” button, you can adjust video and audio settings, including codec, bit rate, frame rate, sample rate, and audio channel.

Step 4: After all the settings, you can preview the final result of movie. If you are happy with the effect, you can then press the big “Convert” button on the lower right to launch the conversion.

Conclusion: Wait a moment, and then the conversion will be done flawlessly. After conversion, click “Open Folder” button to locate the converted video files. Follow the steps and do you solve the problem that Panasonic media player can’t accept MTS files?

Further Reading:

Share

Jun 25

How to Fix MTS to Sony Movie Studio 10/11/12/13 Incompatible Issues?

Sony Movie Studio’s efficient controls and low price make it the ideal choice for casual users. It supports most commonly-used video codecs including AVI, MPEG-1, MPEG-2, MPEG-4, QuickTime MOV, WMV. Have you ever found MTS or M2TS? No! It’s not supported natively by Movie Studio including the latest Movie Studio 13. What if you want to import MTS files to Sony Movie Studio for editing?

Luckily, there is an easy workaround to fix the problem. You just need to convert MTS/M2TS to MPEG-2, which is the most compatible format for Sony Movie Studio. You can refer to detailed Sony Movie Studio supported formats below:

Import: AAC, AA3, AIFF, AVI, BMP, CDA, FLAC, GIF, JPEG, MP3, MPEG-1, MPEG-2, MPEG-4, OGG, PCA, PNG, QuickTime, SND, SFA, W64, WAV, WDP, WMA, WMV

Export: AAC, AIFF, AVC, AVI, BMP, FLAC, JPEG, LPEC, MP3, MPEG-2, MPEG-4, OGG, PCA, PNG, TIFF, QuickTime, W64, WAV, WDP, WMA, WMV

To adjust MTS/M2TS to Sony Movie Studio format, you can adopt Pavtube Video Converter for help. This program features high efficiency and seamless conversion. By running it, there is no need to to set the codec yourselft, the program has an optimized preset for Sony Movie Studio 10/11/12/13. With it, you can do batch conversion from AVCHD, MTS, M2TS, MOV, AVI, MKV, MP4, and more to Sony Movie Studio compatible MPEG-2 codec without quality loss in simple clicks of mouse.


Other Download:
– Pavtube old official address: http://www.pavtube.com/video_converter/
– Amazon Download: http://download.cnet.com/Pavtube-Video-Converter/3000-2194_4-75734821.html
– Cnet Download: http://download.cnet.com/Pavtube-Video-Converter/3000-2194_4-75734821.html

More details are allowed here for you to take the advice:

Step 1: Download and install the program. Click “Add video” on the main interface to load MTS files to the program. You can also drag the files to the program’s window list directly. This program can also support the batch video clips.

Step 2: Select the right formats for editing in Sony Movie Studio. Here we suggest you to go to the “Adobe Premiere/Sony Vegas” list, you will get the “MPEG-2 (*.mpg)”as the best output.

Step 3: By clicking the “Settings” button, you can adjust the output video/audio resolution, frame rate, bit rate, etc. to customize the output files to get the best quality you want.

Step 4: At this point, you can change the output filename or output path if you wish. If you feel satisfied with your options, Just hit the “Convert” button to activate MTS file to Sony Movie Studio MPEG-2 conversion.

Conclusion: This program is highly efficient because it’s boosted with CPU and GPU (30X faster). And a neat process bar will show the percentage and remaining time. When all conversions completed, you’ll get a pop-up notice. Just click “Open Folder”, you can fast find where your converted files are saved. Now, the converted MTS files can be imported to Sony Movie Studio 10/11/12/13 for editing, organizing, or sharing successfully.

Further Reading:

Share

Jun 17

Make Panasonic V130 MTS Compatible with Premiere Pro

The HC-V130 Full HD Camcorder from Panasonic features Creative Control effects for easily creating artistic video images a 38x Optical Zoom and 75x Intelligent Zoom high-magnification for bringing faraway subjects up close. It also includes a backside illuminated sensor for recording high quality even in low-light situations, perfect for birthday parties and outdoor filming.

Panasonic HC-V130 has the capability of capturing HD videos at 1080p that catches people’s attention. However, the merits sometimes can also be the demerits. When users want to edit V130 AVCHD MTS files in Premiere Pro CC/CS6/CS5, the incompatibility will disappoint them.

“I am a Panasonic HC-V130 user and met some troubles on importing 1080p MTS recordings to Premiere Pro for editing, I always get an error information while imputing. How should I do?”

“After many tests, we found that the recordings gray out while importing Panasonic HC-V130 1080/60p MTS to Premiere Pro. It seems that the Mac editing software can not recognize V130 MTS recordings at all”

If you are currently using an older version of the Adobe (for instance prior to Adobe version CS5), maybe an upgrade of the Adobe version could help. Still stuck with unsuccessful attempts? Perhaps there is some required codec missing or it is an incompatible video file format. Actually, it’s not so hard to do the trick. Why we always have trouble editing because Premiere Pro still cannot accept all codecs contained in an MTS file to go natively. From Adobe Premiere Pro supported file formats list, we can find Premiere supports MPEG-2. So here comes to the key problem.

Now, the problem seems easier to be solved–a professional and powerful Mac MTS to MPEG-2 Converter is the solution. Here we recommend Pavtube MTS/M2TS Converter for Mac, applying which you are capable of converting V130 MTS to MPEG-2 MPG format, the compatible video format with Premiere, with lossless quality at faster speed so that you can edit the footages in Premiere Pro without any problem. Besides, the program is developed with some useful editing features, including merging several clips into one for easy importing, downsizing the files for editing and storage, adding text/image/video to original files, adding subtitles, replacing original audio tracks, etc.


How to import Panasonic V130 MTS to Premiere Pro for editing?

Step 1: Import Panasonic V130 files to Mac MTS Converter. Run it as the best Mac MTS Converter, and click the “Add video” button to load your original files. You may also directly drag and drop files to application UI for importing files.

Step 2: Click the “Format” option and navigate the mouse cursor to “Adobe Premiere/Sony Vegas>>MPEG-2 (*.mpg)” as output format.

Step 3: Click “Settings” button to customize the output video and audio settings by yourself. But if you are not good at it, you’d better use the default parameters, they will ensure you a good balance between file size and image quality basically. You can change the resolution, bit rate, frame rate as you need.

Step 4: When everything is ready, click “Convert” to start converting V130 MTS to MPEG-2 MPG. This Mac MTS/M2TS Converter supports batch conversion so you may load multiple files and convert them at one time.

Conclusion: After converting, you can get the generated files by clicking “Open” button. Now, you can edit V130 MTS in Premiere Pro freely.

Further Reading:

Share

Jun 10

Panasonic DMC-G7 4K to Avid Media Composer Workflow

Panasonic has introduced the G7 to replace the G6, and it sits just below the Panasonic GH4–but alongside the GX7. That’s a lot of G numbers, but basically, the G7 is the company’s mid-range compact system camera. Formerly the preserve of professional filmmakers and photographers, LUMIX G7 is opening up the world of 4K to everyone. Whether you’re making movie memories to last a lifetime, or taking amazing stills from your 4K footage, the G7 is changing photography, for good.

With Panasonic Lumix DMC-G7, you can record 4K MP4 video and Full HD AVCHD video easily. 4K footage looks amazing but if you don’t have a fast computer with a high end RAM and speedy processor it can make video editing a real nightmare. Your computer may freeze or crash when editing G7 4K MP4 in Avid Media Composer.

As far as we know, the latest version of Avid MC can handle 4K files without much problem, but it is extremely hardware intensive. What’s more, the older version are not able to support 4K video. Thus, you can’t get a flawless 4K workflow in most cases.

Thankfully you probably don’t have to buy a new computer, but you do need to convert G7 4K MP4 to a format that is suitable for use in Avid Media Composer. The process is surprisingly easy and can be done with the help of Pavtube Video Converter for Mac. If you are running on Windows operating system, you can refer to the equivalent version-Pavtube Video Converter. No matter what version, you can effortlessly encode/re-encode Panasonic G7 4K MP4 footage for smoothly importing and editing in various non-linear editing systems including FCPiMovie/FCE and more.


How to edit Panasonic DMC-G7 4K MP4 in Avid MC on Mac?

Step 1: Download and have a quick installation. The trial version will have a watermark on your converted files. Except for that, there are no time limitation, no virus, and no unnecessary bundle apps while downloading. After that, click “Add Video” button to load your 4K MP4 files. You can load several files at once thanks to “Add from folder” button.

Step 2: Click the “Format” bar to get the drop-down menu and you can get “Avid Media Composer”. Choose “Avid DNxHD (*.mov)” as output format.

Step 3: Wanna compress your MP4 videos? Well, in the “Settings” button, you can adjust video and audio settings, including codec, bit rate, frame rate, sample rate, and audio channel.

Step 4: With all the preparations work done? Why not go back to the main interface to click the “Convert” button to get the work started?

Conclusion: Once the conversion is finished, click “Open” to quickly find the converted files. Then, Avid Media Composer will recognize, catalog, play and stream them just fine. You can edit Panasonic DMC-G7 4K files in Avid MC flawlessly.

Further Reading:

Share

Jun 03

Is It Possible to Import DJI Phantom 2 Vision+ Video to Sony Vegas Pro?

The Phantom 2 Vision+ Quadcopter with Gimbal-Stabilized 14MP, 1080p Camera from DJI is based on the same air frame as the Phantom 2 and Phantom 2 Vision. Unlike its siblings, however, it features a 14 MP camera that is stabilized and controlled with an integrated 3-axis gimbal. Gimbal stabilization makes the Phantom 2 Vision+ ideal for shooting aerial footage and photos. The camera can take 14 MP, Adobe DNG RAW photos, and can record video in 1080p Full HD at 30 fps or 720p at 60 fps for creating slow motion effects.

Recently on many editing forums, both Sony Vegas Pro newbies and professionals have come across the same annoying problem when importing DJI Phantom 2 Vision+ recorded H.264 MP4 to Sony Vegas Pro: “I have some MP4 videos that were originally recorded with the H.264 codec. The client wants these DJI Phantom 2 Vision+ videos to be imported to Vegas for editing. Is there an easy way to do this without going through the lengthy process of re-transcoding? There are 3 one-hour videos.”

Though Sony Vegas Pro allows you to import MP4 video, things may sometimes go wrong when working with H.264 codec in it. In fact, H.264 is the ubiquitous codec, and it looks like it will stay for quite some time. Sony Vegas Pro supports H.264 via AMA Link. Well, if you failed on this try, another solution is introduced. From Sony Vegas Pro official website you will learn that MPEG-2 codec is natively supported by Sony Vegas Pro. So the second method is to convert H.264 MP4 to MPEG-2 for Vegas Pro editing with the assistance of Pavtube Video Converter. It has fast conversion speed and high quality preserved.


More details are allowed here for you to take the advice:

Step 1: Download and install the program. Click “Add video” on the main interface to load H.264 MP4 files to the program. You can also drag the files to the program’s window list directly. This program can also support the batch video clips.

Step 2: Select the right formats for editing in Sony Vegas Pro. Here we suggest you to go to the “Adobe Premiere/Sony Vegas” list, you will get the “MPEG-2 (*.mpg)”as the best output.

Step 3: Wanna compress your H.264 videos? Well, in the “Settings” button, you can adjust video and audio settings, including codec, bit rate, frame rate, sample rate, and audio channel.

Step 4: With all the preparations work done? Why not go back to the main interface to click the “Convert” button to get the work started?

Conclusion: Once the conversion is finished, click “Open” to quickly find the converted files. Then, Sony Vegas Pro will recognize, catalog, play and stream them just fine. Good news! Pavtube still have money saving bundles and deals activity provided for you.

Further Reading:

Share

May 27

Work Sony Alpha 77 Mark II AVCHD with DaVinci Resolve

Summary: I get a lot of questions from Sony Alpha 77 Mark II users about how to convert AVCHD to DaVinci Resolve. This article shows you my solution for editing Alpha 77 Mark II AVCHD in DaVinci Resolve.

The Sony Alpha 77 Mark II is an extraordinary high spec enthusiast / semi-pro digital SLR camera. Designed to ensure you never miss the moment in also has 12fps continuous shooting for amazing action sequences, and 79 AF points for a very sophisticated and accurate focus. The BIONZ X image processor makes sure even with all this information the camera never gets flustered.

With its advantages appeared, disadvantages are not hidden. While enjoying the stunning image quality, many folks may find it a painful experience to import Sony Alpha 77 Mark II AVCHD to DaVinci Resolve for further editing. “I just have a Sony Alpha 77 Mark II camera on hand. I’m wondering what people are using in order to get the AVCHD files from Alpha 77 Mark II work with DaVinci Resolve. I shot the video in 1080 60p, I found the AVCHD MTS clips cannot be recognized by DaVinci Resolve. How can I solve the import issue?”

Well, a bit frustrating. The Sony Alpha AVCHD highly compressed files are still not well supported by DaVinci Resolve due to DNxHD is DaVinci Resolve best friendly format. As you may encounter many audio and video problems and I know that DaVinci Resolve can’t handle raw AVCHD videos, so there is no doubt that it will take more time on rendering while ingesting the files. Back to the point, if you have been struggling with Sony Alpha 77 Mark II AVCHD to DaVinci Resolve, what’s the available workaround?

Fortunately, to get the work done, the easy option to work Sony Alpha 77 Mark II AVCHD with DaVinci Resolve beautifully is to rewrap and convert AVCHD to DNxHD via third-party program. It will help you import the files correctly and saving the rendering time. To fulfill your task, you can just get Pavtube MTS/M2TS Converter for Mac, a powerful video converter, editor and player. It offers an optimized presets for DaVinci Resolve for easy access. Besides transcoding AVCHD to DaVinci supported formats with optimized settings while keeping the video quality, the all-in-one and easy-to-use tool can convert all other popular video formats like AVI, MXF, MP4, WMV, MKV, FLV, ASF, M2TS, VOB, etc. to Premiere Pro, iMovie, FCP, FCE, Avid MC and more NLEs natively supported video formats on Mac OS X Yosemite with fast encoding speed.


How to edit Alpha 77 Mark II AVCHD in DaVinci Resolve?

Step 1: Connect your Sony Alpha 77 Mark II camcorder to Mac via USB cable and find the AVCHD files from the camera folder. Then copy and transfer the AVCHD files to the Apple hard drive disk.

Step 2: Import Alpha 77 Mark II AVCHD files to Mac MTS Converter. Run it as the best Mac MTS Converter, and click the “Add video” button to load AVCHD files. You may also directly drag and drop AVCHD videos to application UI for importing files.

Step 3: Click the “Format” option and navigate the mouse cursor to “Avid Media Composer>>Avid DNxHD (*.mov)” as output format.

Step 4: When everything is ready, click “Convert” to start converting Alpha 77 Mark II AVCHD to DNxHD. This Mac MTS/M2TS Converter supports batch conversion so you may load multiple files and convert them at one time.

Conclusion: Click “Open” button to get the generated files. Now, you can edit Alpha 77 Mark II AVCHD files in DaVinci Resolve freely.

Further Reading:

Share

May 20

Best Way to Edit PJ810 AVCHD Files in Premiere Pro CC

Summary: Since Premiere Pro CC is not able to accept Sony HDR-PJ810 AVCHD files smoothly owing to codec problem, then the easy way for us to follow is to find a third-party program to convert PJ810 AVCHD files to MPEG-2, Premiere friendly format.

Sony HDR-PJ810 is one of the most popular camcorders on the market, since it released, it has attracted a lot of video fans. The PJ810 equipped 1920*1080 Full HD 24p/60p with 24.5MP Exmor R CMOS sensor, balanced Optical SteadyShot image stabilization, it also has equipped with advanced Manual Controls, users can manual control of Iris/Shutter/Exposure/White Balance, etc.

Sharing PJ810 AVCHD files with your friends or family, you can upload the video to some video supported forums or video sites for sharing online. I think you may need to edit PJ810 AVCHD files in NLEs such as Premiere Pro CC before sharing. Occasionally, many PJ810 users may encounter AVCHD files to Premiere Pro CC import issues.

“How can I import Sony PJ810 recorded AVCHD files to Premiere Pro CC for editing natively? Just got the Sony PJ810 camcorder and recorded some full HD footages when I travel, now I want to edit PJ810 AVCHD files in Premiere Pro CC smoothly, however, the AVCHD format is not supported by many editing software, can you give me some suggestions?”

As we know, AVCHD video is not so good for Premiere Pro CC editing, the best way is to convert PJ810 AVCHD to Premiere Pro CC best supported format. From Premiere official page, you’ll get the info that MPEG-2 is well for Premiere Pro CC. Here Pavtube MTS/M2TS Converter for Mac is highly recommended to you which is not only preset output format for most editing tools, such as FCP, iMovie/FCE, Avid, Adobe and etc., but also equipped with many output formats for portable devices.


How to edit PJ810 AVCHD files in Premiere Pro CC?

Step 1: Connect your Sony HDR-PJ810 camcorder to Mac via USB cable and find the AVCHD files from the camera folder. Then copy and transfer the AVCHD files from PJ810 to the Apple hard drive disk.

Step 2: Import PJ810 AVCHD files to Mac MTS Converter. Run it as the best Mac MTS Converter, and click the “Add video” button to load AVCHD files. You may also directly drag and drop AVCHD videos to application UI for importing files.

Step 3: Click the “Format” option and navigate the mouse cursor to “Adobe Premiere/Sony Vegas>>MPEG-2 (*.mpg)” as output format.

Step 4: When everything is ready, click “Convert” to start converting PJ810 AVCHD to MPEG-2. This Mac MTS/M2TS Converter supports batch conversion so you may load multiple files and convert them at one time.

Conclusion: This Mac MTS/M2TS Converter equipped with some simple but useful editing features, such as merging several videos into one file, deinterlacing the original footages, cropping video size, trimming video clips, adding special effects and text/image/video watermarks to output videos. Now, you can edit PJ810 AVCHD files in Premiere Pro CC freely. Just have a try!

Further Reading:

Share

May 13

Transcode SD900 AVCHD to ProRes for Editing in FCP 7/X

Summary: Panasonic is always trying to reach every possibility to make videos clear and vivid, so SD900 came out and successfully proved the point. As it records AVCHD files, how to transcode SD900 AVCHD to ProRes for editing in FCP 7/X?

Along with its HYBRID O.I.S and 3D Image Recording, Panasonic SD900 is hotly received by all the photographers and shutterbugs without any doubt. In addition, SD900 recording is another characteristic that makes you put it on the top of your purchase list. With its transfer rate of 28 Mbps, 1080p recording conveys about twice the information of 1080i recording. So it makes you preserve your precious memories with the highest quality. But merit and demerit are the best friends in life. When users are intended to import SD900 AVCHD to FCP 7/X for editing, the notice that shows the files are unrecognizable will jump out.

“I have AVCHD files created by Panasonic SD900 and would like to use either Premiere Pro or Adobe Media Encoder to transcode SD900 AVCHD to ProRes in the hopes that ProRes would retain the original camera timecode and for editing in FCP 7/X. When I tried opening Adobe Media Encoder as a standalone app, none of the presets reflected a ProRes preset. And when I tried to create a custom one, the drop down menu were not revealing the flavors of ProRes as an option.”

Here recommended the best SD900 AVCHD to ProRes converter- Pavtube MTS/M2TS Converter for Mac, which is also compatible with Mac OS X Yosemite. It can help you transcode SD900 AVCHD to ProRes more easily and quicker than other converters do. Most important is that quality can be highly preserved. With the recent upgraded version 4.8.5.1, it can also encode/decode H.265/HEVC videos so nicely.


Workflow to transcode SD900 AVCHD to ProRes for editing in FCP 7/X:

Step 1: Connect your Panasonic SD900 camcorder to Mac via USB cable and find the AVCHD files from the camera folder. Then copy and transfer the AVCHD files from SD900 to the Apple hard drive disk.

Step 2: Import Panasonic SD900 AVCHD files to Mac MTS Converter. Run it as the best Mac MTS Converter, and click the “Add video” button to load AVCHD videos. You may also directly drag and drop AVCHD videos to application UI for importing files.

Step 3: Click the “Format” option and navigate the mouse cursor to “Final Cut Pro >>Apple ProRes 422 (*.mov)” as output format. Apple ProRes 422 (*.mov) and Apple ProRes 422 (HQ) (*.mov) have higher qualities. Apple ProRes 422 (LT) (*.mov) and Apple ProRes 422 (Proxy) (*.mov) have smaller size. You can choose according to your requirement.

Step 4: When everything is ready, click “Convert” to start converting SD900 AVCHD to ProRes. This Mac MTS/M2TS Converter supports batch conversion so you may load multiple files and convert them at one time.

Conclusion: This Mac MTS/M2TS Converter equipped with some simple but useful editing features, such as merging several videos into one file, deinterlacing the original footages, cropping video size, trimming video clips, adding special effects and text/image/video watermarks to output videos. Just have a try!

Further Reading:

Share

May 07

Pavtube Biggest Promotion for 2015 Mother’s Day

What gift would you like to send to your mother on this 2015 Mother’s Day? To show our thanks to our mother, we are all thinking how to make this year’s Mother’s Day special with special gifts. If your mom likes watching the latest movies or videos, how about a professional video converter to get rid of the incompatible troubles to enjoy the favorite movies so smoothly? Pavtube Studio has upgraded all products to the latest version, which could be a warm gift for mom. Big discount will be offered by Pavtube Studio!

Pavtube Big Deal for Mom (Mother’s Day Only)
40% off discount we can enjoy if we get into the official promotion page and give the comments below: ‘What do you want say to your mom”. All of us can get the big coupon with the best Pavtube HD Video Converter for Windows/Mac, which is a professional converter to transcode all video formats nicely for any NLEs or media devices with a high quality preserved.

Other Special Off on Facebook(For Facebook users)
From May 7th to May 14th, all facebook users can enjoy a 50% discount of each Pavtube products during the 2015 Mother’s Day celebration! Just “Follow” the Pavtube official topic and “Like” it and you can own the qualification. Come on!

Other Official Website 20% – 40% discount:

Pavtube Video Converter for Mac(for Windows)
Have full access to SD videos,digital camcorder recordings, DVR videos on devices such as Apple/Android/Windows series, media players, game consoles and video editing programs.
Pavtube MTS/M2TS Converter for Mac(for Windows)
Convert Sony/Canon/JVC/Panasonic recorded MTS/M2TS/M2T/TS/MOD/TOD footage to play on media players or edit with Premiere Pro, Avid Media Composer, Final Cut Pro, etc.
Pavtube MXF Converter for Mac(for Windows)
Converting MXF video files generated by Canon/Sony/Panasonic camcorders to various video formats such as H.264/MPEG-4, MKV, MP4, AVI, MPEG, WMV, FLV, SWF, F4V, etc.
Pavtube iMixMXF(for Windows)
Transcoding MXF video files to Multi-track Apple Prores MOV for Final Cut Pro or Multi-track MP4/MKV format for other video editing program and media playback devices.

Additional Tips: With the recent upgraded version of Pavtube Mac products, all products have been upgraded to support the H.265/HEVC decode and encode. Some other bugs and fixed well there! Just come to Pavtube to know more and enjoy ourselves on 2015 Mother’s Day!

Share
Page 12 of 37« First...1011121314...2030...Last »