AIC Converter,MTS to AIC,MTS to iMovie,MTS to FCE,MTS to Final Cut,AVCHD to AIC Converter,AVCHD to Final Cut Express,import AVCHD files to iMovie,MTS to ProRes 422,MTS to Final Cut Pro,MTS to FCP X,AVCHD and Final Cut Pro,Log and transfer MTS to FCP,edit MTS footage in iMovie,FCP transfer MTS files,transfer AVCHD files to iMovie

Sep 10

Find ways to import Sony HDR-TD30V 3D MTS to iMovie or FCE

Hearing from that you are finding some ways to import Sony HDR-TD30V 3D MTS to iMovie or FCE, somebody may ask: Why do you choose Sony HDR-TD30V to record your videos? Any reasons listed like below?

Double Full HD 3D Consumer camcorder
3D Ready 3.5” Xtra Fine LCD™ display (1229K)
1920×1080 Full HD 24p/60p w/20.4MP Exmor R CMOS Sensors
10x Optical Zoom in 3D mode
Dual Wide Angle G Lenses to capture everything you want
5.1 Surround Sound Microphone

Generally speaking, we are all attracted by the first one ’Double Full HD 3D Consumer camcorder’, right? So for some professional photographers, usually they need to do some further dispose like remove the noise, add other subtitles or modify the image effect, etc. The professional editing system iMovie and FCE may become good companions. Cause the two guys can’t accept Sony HDR-TD30V 3D MTS videos, it is necessary for us to find a help, 3D MTS to iMovie Converter

Special advice:
If you just want do some simple editing with your 3D MTS files, this 3D MTS converter can also make your wishes come true. Additional item ’Editor’ you can have a try during the conversion. Something like ‘Trim’—to decide the length of converting the selected clips, ‘Crop’— to get rid of the black edges and unwanted area of the image, ‘Effect’— to add special effect and other special effects like Simple Gauss Blur, Flip Color, Invert, Aged Film to your source video. See the following picture to know more.

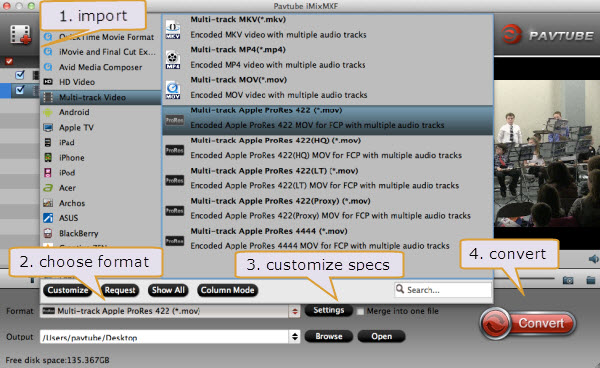
Main steps of converting your 3D MTS files:

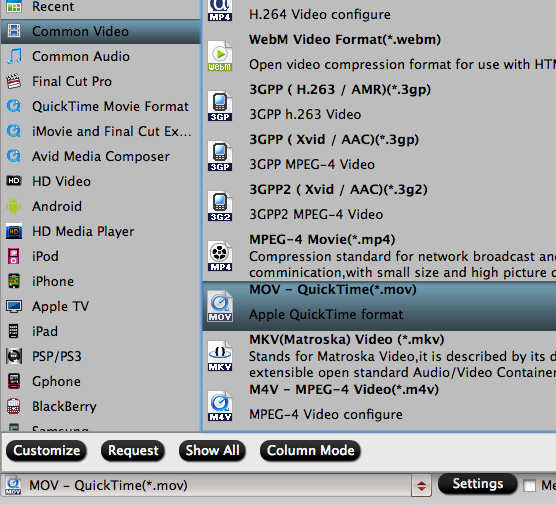
Load your 3D MTS after download the 3D MTS converter for Mac, choose the special format for “3D video’>>’MOV Side-by-side 3D Video (*.mov)—supported both in iMovie and FCE.

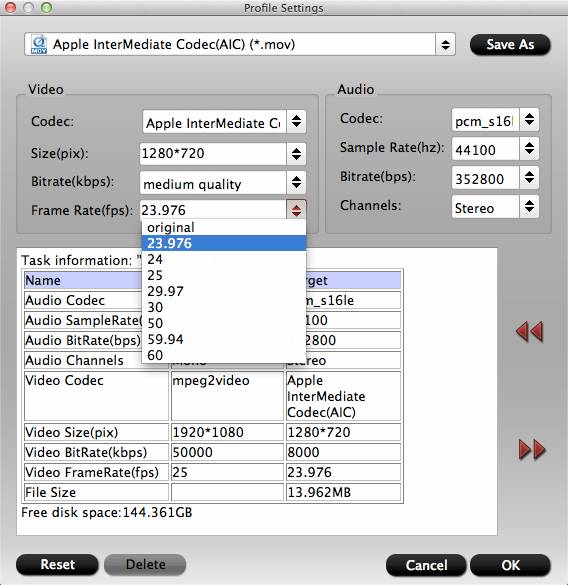
Then click ’Settings’ to adjust your output files, ‘video’ and ‘audio’ are all included. Finally, you can ‘Convert’ to start your conversion smoothly.

You may be wrong if you consider that this 3D MTS converter for Mac only work for iMovie and FCE, Do you know the FCP, Avid and DaVinci Resolve are included too? Open the following guides to know more:

Share

Sep 03

Handle Panasonic Lumix GH4 4K videos in Apple Aperture 3 on Mac OS X

“I upgraded to Apple Aperture 3, but I still do not see my MTS files when I try to import them (Panasonic GH4 files). I tried changing the file extension, but no luck. Any ideas?” Guys, do you know the answers to the questions above? In order to find the answers, we should learn more about Apple Aperture first. Come on!

Apple Aperture 3, works with a wide varity of videos formats, but not all QuickTime-compatible video formats are suppoted. Certain compression options, codecs, and frame rates are not supported. Including MTS clips. Aperturegives your photography the professional treatment it deserves, with more sophisticated tools to perfect your images and powerful ways to browse and choose your best shots. And now that Aperture is optimized for the MacBook Pro with Retina display, it’s a whole new way to see everything.

After knowing more about Apple Aperture, now you must get the answers to the question above. Yes, you are right! If we convert MTS format to Apple ProRes 422 codec MOV,the best supported for editing in Apple Aperture. There’s nothing we should worry about.

The recommend solution should be converting these incompatible formats to Apple ProRes. Pavtube MTS Converter for Mac maybe such a tool for us to finish this work. Only converting video formats to Apple ProRes? Absolutely not! For iMovie, FCP or Premiere, etc. More steps for importing videos in MTS video converter are offered to you here.

Step 1.Load your 4K MTS files and tick the clips you want. Oh, don’t forget it can convert video in volume or individually.


load-files

Step 2. The most important point, choose the best format.’ Apple ProRes codec 422’

format-to-adobe-and-vegas

Step 3. Click ’Settings’ to modify your output videos.

settings-for-output-format

Step 4. If you are in a hurry in converting the footage, here is an item for you!’Options>>Convert’

editor-for-output-format

Then click ‘Convert’ to start your conversion. To all Mac fans, it’s no doubt a good idea for you to edit your MTS files in Apple Aperture. Do you like it ?

Fortunately, here is a column about PanasonicandMTS, you can open it to have a look.

If you like here:
Editing Canon XF305 MXF Files in FCP X with Multi-track Audio 
Editing Canon XF205 MXF files with Apple Aperture 3.

Share

Aug 29

Editing Canon XF305 MXF Files in FCP X with Multi-track Audio

Question: “Hi, I filmed using Canon XF305 camera using 2 clip mics and want to edit in Apple Final Cut Pro X. I’ve tried several programs but always loss some of the audio channels. Pls I need to edit both the original two channels in my FCP X. How can I solve this?”

Along with the XF300, the XF305 Professional Camcorder represents Canon’s entry into professional solid state video acquisition. Following on the heels of its widely respected XH line of tape-based camcorders, the XF305 takes advantage of the latest HD technology–along with Canon’s newly developed MPEG-2 4:2:2 codec–to record Full HD video to widely available Compact Flash cards.

canon-xf305

XF305 MXF recordings will not be recognized by FCP X. Hereby if you want to edit them in Final Cut X, the Apple Prores encoded MOV is mostly recommended. That is to say, you need to convert Canon XF305 mxf to Prores for FCP X. And to keep the original audios preserved when converting, Pavtube iMixMXF can help you to get it done.
With it you can do MXF to Prores conversion keeping the original quality at its best, meanwhile you are allowed to preserve all or any audio tracks for output Prores .MOV and mix the multiple audio tracks into one if you need. To help most XF305 users to get rid of the multi-track MXF importing problem with FCP X, I provide a brief guide here to help you easily convert XF305 multiple video/audio track MXF to ProRes for Final Cut Pro X.

Step 1. Get this Mac multi-track MXF Converter installed, click add video to load individual XF305 mxf videos; or clickadd from folder to load the entire folder. It will recognize all the audio channels.

import-files-to-imixmxf

Step 2. Click “Format” and choose Multi-track Video>Multi-track Apple ProRes 422(*.mov) as the most compatible codec for FCP X editing.

format-to-multi-track-422

Step 3. Click “Settings” to customize your video size, bitrate, frame rate and other specs; and check video channels that you want to keep.

Follow the bottom left icon to “mix into one channel”; or that it will keep all the audio tracks apart.

multi-track audio

Step 4. Click “Convert” to start converting multi audio channels XF305 MXF to multi-track Apple Prores 422 mov saving multi audio channels for editing in FCP X on Mac.

Tips:

1. For users don’t need to deal with multi-track thing, just simple want to convert MXF to other formats, the MXF Converter for Mac (only $29) is highly recommended. And at Pavtube Christmas & New Year Giveaway to win free .
2. If you would like to Share Pavtube Hottest Activity at your Facebook page – you can get more discoun

Share

Aug 27

Working ALS Ice Bucket Challenge Recordings with Sony Vegas Pro 13

As the ALS Ice Bucket Challenge has becoming a kind of public culture from West to East, we can see so many superstars have joined this big activity to take recordings to show their kindness. People are encouraging awareness of this rare ALS disease in this happy way by taking the advantage of overcoming Ice Bucket Challenge.

ice-bucket-video-to-sony-vegas

Whatever On TV or website, we already saw so many famous person taking part in this event, just like Eason-a famous singer, Bill Gates-Microsoft builder, Cristiano Ronaldo-football superstar. So what are you waiting for?

Before uploading your challenge recordings online, have you ever think of making your recordings full of arty effects by editing in some editors like Sony Vegas Pro 13? That idea is not bad but actually we can’t import all video footage into Sony Veags except WMV, MOV and MPG-three best formats that Sony Vegas supported. For now you need not to be worry about that after using a professional converter-Pavtube Video Converter.

Steps of importing Ice Bucket Challenge Videos:

Step1 . Add your Ice Bucket recordings correctly.

import-videos-to-video-converter

Step 2.  Choose the supported format by clicking ‘Format bar’

choose-format-to-adobe

Step 3. You can also do some simple editing in Ice Bucket Converter.

video-editor

Step 4.’Convert’ to wait for your output videos.

After editing recordings in Sony Vegas with Ice Bucket Converter, we are all a big warm family to prevail this rare ALS disease.

Related Articles:

Share

Aug 22

Editing Canon EOS Rebel T5/EOS 1200D MOV Files in After Effects CS6/CS5

If you encountered problems with Canon EOS Rebel T5/EOS 1200D MOV when importing to After Effects CS6/CS5, you can follow this article to find the solution and solve it.

Perfect for families, budding photo enthusiasts and first-time SLR users alike, the EOS Rebel T5 makes it easy to capture movies and photos that are nothing short of dazzling. It enables you to capture video footage in H.264 QuickTime MOV format.


However, you may find After Effects CS6/CS5 isn’t compatible with .MOV files. If you try to import, AE will says the file type is unsuppported. According to the information on Adobe After Effects official website, MPEG is the most compatible video format for After Effects. Then, the editing process becomes easier. We just need to get a professional Converter to transcode MOV videos from T5/1200D to MPEG so that After Effects CS6/CS5 can accept without issue.
Here we recommend Pavtube Video Converter (Win/Mac)

The software does a good job in converting Canon EOS Rebel T5/EOS 1200D H.264 .mov files to MPEG formats for editing in After Effects CS6/CS5 and not loose much quality. Becides, it allows you to join the Canon EOS Rebel T5 mov clips together. The following passage guides you how to.

Make Canon EOS Rebel T5/EOS 1200D MOV MOV files compatible with After Effects CS6/CS5 for further editing

Step 1. Load Canon EOS Rebel T5 .mov footage to Canon H.264 MOV Converter.

Transfer h.264 encoded .mov files from Canon T5 camera to computer.

Download Video Converter for Win/Mac from Pavtube and run the software as the best Canon MOV converter. Click the “Add Video” button or “Add from folder” icon to load .mov videos from Canon EOS Rebel T5.

Step 2. Set MOV format as output format for editing.

Click format bar to choose the format for output. Select “Adobe Premiere/Sony Vegas > MPEG-2 (*.mpg)” as the compatible format for AE CS6/CS5 importing.

Step 3. Adjust video and audio settings to keep 1080p HD quality

Click “Settings” button, then you will be able to adjust audio and video parameters on the popup window to customize the output file quality, these adjustable parameters include codec name, aspect ratio, bit rate, frame rate, sample rate, and audio channel.

To maintain original HD quality, you may set “original” in the fields of “Size”, “Bitrate” and “Frame rate”. To downsize the Canon EOS Rebel T5 .mov files, just set a smaller bitrate.

Step 4. Click “Convert” button to convert Canon EOS Rebel T5/EOS 1200D MOV files to MPEG.

Once the conversion is finished by Canon MOV to AE Converter, you can click “Open” button to get the output files effortlessly. Launch After Effects, choose “File > Import” to load the converted MOV files in After Effects CS6/CS5 for further editing.

FYI: 

Pavtube Video Converter for Win/Mac is not only able to convert Canon MOV files for editing in After Effects, but also able to convert various camcorder footage to playable formats for iPad/iPhone, Android devices, other editing program such as FCPiMovieAvid Media Composer and other Adobe editing software and so on.

Share

Aug 21

Editing Canon XF205 MXF Files in FCP6/7

If you want to transcode your Canon XF205 MXF footages to ProRes for FCP with keeping timecode for Final Cut Pro 6/7, you may prefer to follow this article because it will show you the way out.

The XF205 is a professional-grade camcorder for fast-paced productions. Yeah, not getting many referrals there! Enter the Canon XF205, a surprisingly low profile, high-feature professional HD camcorder that seems created for the rush of news, events and more. High bitrate HD footage is recordable in an MXF format to the CompactFlash cards.

However, MXF Video can’t be recognized by mostly video editing software, like Final Cut Pro. We will meet some troubles when we import Canon XF205 MXF redordings to FCP 6/7. The reason is the MXF format is not the FCP compatible video format.

In order to make Canon XF205 Camcorder MXF files editable in FCP 6/7, you just need to get help of PavtubeiMixMXF which can convert Canon XF205 MXF videos to FCP comptible Apple Prores codec for natively importing in Final Cut Pro on Mac and also the timecode is kept for FCP 6/7.

Why do you choose Pavtube iMixMXF?

Import/Retain/Mix multi-track MXF in MKV/MP4/MOV formats.

Output multi-track or single audio track Apple ProRes MOV for FCP (X).
Mix the MXF multiple track/channel audio into one or keep the multi tracks.
Add *.srt/*.ass/*.ssa subtitle files to MXF footage.
Support DVCPRO/HDV/Avid DNxHD/AIC/AVI/MPG/WMV/FLV output.
Convert Panasonic P2 MXF, Canon MXF, Sony XDCAM MXF to editable footage for editing, playing, or broadcasting.
Merge/split/trim/crop MXF footages.
Keep timecode for Final Cut Pro
Support Mac OS X 10.9 Mavericks.

Added 3D profiles in Format menu. (Side-by-Side, Top-Bottom, or Anaglyph 3D in MKV/MP4/MOV/WMV/AVI)

The following instruction will tell you how to transcode Canon XF205 MXF to Apple Prores for editing in FCP 6/7 on Mac. Now download and install the best Canon MXF Converter, and go to try those wonderful functions.

Step 1. Load MXF footages.

Run Pavtube iMixMXF on your Mac, click “+” button to load the MXF video files or load the MXF folder.

Note: “Merge into one file” can help you to convert several MXF videos into one video. Just select the tasks you need and then check “Merge into one file”, you will get one combination of those videos.

Step 2.Select Apple Prores 422 .mov format.

Click “Format” and choose Final Cut Pro > Apple ProRes 422 (*.mov) as the most compatible codec for FCP 6/7 editing.


Learn more Apple ProRes, please refer to Types of Apple ProRes Codecs

Tip: If you want to get multi-track audio in output video files, choose “Multi-track Video>Multi-track Apple ProRes 422 (*.mov)” for editing in FCP 6/7.

Step 3. Settings for Prores .mov video.

You can also click “Settings” right beside to set up outputting video bitrate, frame rate, codec and size all according to your needs.

Step 4. Start conversion.

Click “Convert” button to start to encode Canon XF205 MXF to Apple Prors .mov for FCP 6/7, after a while go to “Open” button to locate the generated .mov videos and imported to Final Cut Pro 6/7 for editing.

Tip
:

1. Refer to the picture below to see how this cool mac mov converting tool keep the timecode for FCP.

2. For users don’t need to deal with multi-track thing, just simple want to convert XF205 MXF to other formats, theMXF Converter for Mac (only $29) is highly recommended.

3. Read Canon XF205 and FCP X workflow and XF205 MXF iMovie importing tips.

Share

Aug 14

Bring Canon XF205 MXF Files on Mac with QuickTime Player

If you have best wishes for playing Canon XF205 MXF files on Mac with QuickTime Player, why not get Pavtube MXF Converter for a help?


With the improvement of electronic information in our daily lives, we are sometimes inescapable to take some parties or outdoor activities. Some camcorders like Canon XF205. This kind camcorder has high image quality system ideal for use with a variety of digital cinema and broadcast operations. It indeed helps us in keeping the happy moments in families, meetings or other occasions. It is wonderful to enjoy videos recorded on Mac with Quicktime Player or something else. At the same time, it’s a pity that Quicktime palyer cannot accept the MXF format by Canon XF205, so what should we do to solve this?
If you get videos formats like mp4,mav or mov, there’s no doubt we can easily bring them into Quicktime. How could we put Canon XF205 MXF in? Don’t worry about it! Pavtube MXF Converter for Mac will be our loyal friend if we want! It’s a good convert tool to transcode your MXF to any other format compatible with Quicktime, especially the best MOV.


Also, you will find we can customize and decorate videos as we like if you want. For more details about this function, click here and I’m sure you won’t be disappointed. Additional functions abou MXF Converter for Mac Additional functions abou MXF Converter for Mac

If you don’t know the process clearly, maybe the following articles can do you a favor.

1.Downlod and install Pavtube MXF Converter for Mac correctly. Once launched the program, click ’Add Video’ button to load your source.


2.Select QuickTime(*.mov) as output format.


mxf-converter-mac-01-quicktimemov


3.You can click ‘Settings’ button to adjust the video and audio.


mxf-converter-mac-profile-settings.jpg


4.Finally, click the button ’Convert’ and wait for you output video.


Frankly speaking, this converter is like a bridge that combines our Canon XF205 MXF with QuickTime Player wonderfully. What are you waiting for?


Some guides related to QuickTime :

Share

Apr 16

iFonebox for windows released for iPhone/iPad/iPod

iFonebox for Windows is released this morning,iPhone/iPad/iPod users can use this powerful ios data recover tool to restore deleted/lost data include contacts,sms message,notes,photos,calendar,etc in a few steps. Moreover, iFonebox supports the latest iOS 7.1 too.What can iFonebox do?  You can get to know it from the list below:


1. Lets you recover deleted data by directly scanning your iPhone/iPad/iPod and extracting the iTunes backup.
2. Allows you to recover deleted Contacts, Messages(SMS, iMessages), Call history, Calendar, Notes, Reminder, Safari bookmark, Camera Roll (Photo & Video), Photo Library, Message attachments, Voice memos,etc.
3.iFonebox allows you to preview lost files before recovery, clear, organized and in original quality.
– Preview contacts in detail, including address, job title, etc.
– Read SMS contents including iMessages, photos, videos, etc.
– Export and check your list of lost files in HTML
4. Supports iPhone 5C, iPhone 5S, iPhone 5, iPhone 4S, iPhone 4, iPhone 3GS, iPad air,iPad mini, iPad with Retina Display, The New iPad, iPad 2, iPad, iPod touch 5 and iPod touch 4.Pricing and Availability

iFonebox (Windows) is available at $59.95 on official website. buy now
Please visit it here to learn more:
http://www.ifonebox.com/
Free download here: iFonebox
Share

Dec 26

Create 3D & Multi-track Videos for Videographers With Latest Update to Pavtube MXF MultiMixer

The latest upgrade to Pavtube’s MXF MultiMixer and iMixMXF software allows users to now create 3D videos and still support multi-track audio preservation. The latest upgrade also allows MXF videos to be played on websites, tablets, smartphones, HD Media Players and TVs.

Source: PRWeb

Photographers and videographers can now convert 2D videos to 3D and preserve or mix MXF multi audio tracks with the latest upgrade to Pavtube’s MXF MultiMixer and its Mac version, iMixMXF.

The MXF video format is familiar to most professional videographers and enthusiasts if they use any sort of professional camera or camcorder. However the MXF format is not supported by major editing software(Convert Canon MXF to multiple audio tracks ProRes 422 for FCP 6/7), most websites, tablets, smart phones and TVs, and people cannot play MXF video on them directly.

The Pavtube MXF MultiMixer software is designed to help those video-graphing fans to be able to edit or play videos on these platforms and also do much more with their videos.

“I get numerous customer requests everyday asking for ways to convert MXF video for all usable formats. A lot of users shoot videos with camcorders in HD quality and then want to upload the videos online, to websites like YouTube and others,” said Sally Lee, one of Pavtube’s customer support professionals.

Sally continued, “Many people converting MXF multi-track videos have tried to have all audio tracks in one video, but weren’t able to do so. They simply mix them up into one, or lose one or two tracks. Some customers also have the need to output 3D videos. With the recent upgrade to our software, we found a way to help them.”

Many professional cameras and camcorders now record videos with multiple audio tracks in MXF format. Canon XF series cameras, for example, are the most typical and widely used models which include two audio tracks, one is recorded by the microphone and the other recorded by headset. Of course, more audio tracks options come with more professional devices, such as Panasonic P2 MXF, and Sony XDCAM MXF.

Pavtube’s developers found ways to meet customers’ needs with some advanced technology in the first version of MXF MultiMixer/iMixMXF and helped users retain the original audio tracks in .MKV, .MP4 and .MOV. With this latest upgraded version they were able to add 3D output.

Sally continued “Some customers also found it helps fix some Cannon C300 clips that were corrupt, and can merge several clips into one bigger clip. These 2 features are also frequently mentioned and favored by other Pavtube users.”

“With this latest update with 3D video output feature, Pavtube MXF MultiMixer/iMixer becomes unique among MXF converters. It is really good news for video editing hobbyists. They are now able to convert their current 2D videos to 3D in MKV, MOV, AVI, MP4, WMV formats so that they can play 3D video on various portable devices, and make 3D Stereoscopic editing with Premiere Pro CS5 etc. And it’s still a perfect multi-track MXF mixer and preserver,” concluded Sally.

From Videographers Can Now Create 3D & Multi-track Videos With the Latest Update to Pavtube MXF MultiMixer

Share

Dec 25

How to enable Surface Pro 2 play Canon/Sony/Panasonic recordings (MTS, MXF, MOV, XAVC, MP4 formats)

Did you shoot many Christmas videos with Canon/Panasonic/Sony cameras? Do you have problems putting these MTS/MXF/MOV/XAVC/MP4 video on Surface (Pro) 2 for playback? Why can’t we share Canon/Panasonic videos to Surface (Pro) 2 directly?

According to the official data from Microsoft, Surface (Pro) 2 support videos in MP4/DivX/XviD/WMV/H.264/H.263 natively. Obviously, most Canon/Panasonic/Sony footages in MTS/MXF/MOV/XAVC and some MP4 files encoded with special codec are not Surface (Pro) 2 friendly. If you want to transfer MTS/MXF/MOV/XAVC files to Surface (Pro) 2, the best way is to convert them to H.264 MP4 as the best video format and codec for Surface (Pro) 2 for playback.

In this article, we will introduce how to convert Canon/Panasonic/Sony MTS/MXF/MOV/XAVC files to Surface (Pro) 2.

Recommended tool:

Pavtube Camcorder to Surface Converter, an all-in-one video converting program to help you transcode Canon, Panasonic, Sony and Nikon footages to various video formats for Surface (Pro) 2, iDevices, Android and other Windows tablets. (Mac version is available here: Camcorder to Surface Converter for Mac)

Download a free version here.

Breaking news!

* You can get 20% off on both the two programs at Pavtube Christmas Deals!

How to convert Canon/Panasonic/Sony MTS/MXF/MOV/XAVC videos for playing on Surface (Pro) 2

Step 1. Run this Camcorder to Surface Converter; add videos.

Click the top left two “+” icons to import your single video files or the entire folder. Or you can drag and drop the videos directly.

Step 2. Choose target video format.

Click the drop-down list and choose “Windows>Microsoft Surface Windows RT/Pro H.264 MP4 Video (*.mp4)” as the best preset for Surface (Pro) 2.

Step 3. Edit source video or adjust output file settings (Optional).

Tips: About interlaced/progressive

Most of you may choose to record videos in interlaced (like 1080/60i, 1080/50i); videos playback in camera are flawless. But if you transfer to other device like computer or a full-size tablet, the small waves inside this interlaced video would be enlarged and finally affect the video playback.

In order to get smooth videos, you are suggested to click the pencil-like “Edit” icon on the top and switch to “Effect” tab, check “Deinterlacing”. You can also trim/crop/edit audio/subtitles there.

And if you are not satisfied with the default video specs, click “Settings” to adjust target file settings. You are allowed to change video size, bitrate, frame rate and audio specs accordingly.

Step 4. Start Conversion.

Hit the big red “Convert” to start converting Canon/Panasonic/Sony MTS/MXF/MOV/XAVC files to MP4 for Surface (Pro) 2.

After the conversion, hit “Open” or “Open output folder” to locate the converted video directly.

Learn How to transfer media files to Surface Pro 2

More articles:

Source: Import MTS/MXF/MOV/MP4/XAVC videos onto Surface (Pro) 2

Share
Page 18 of 37« First...10...1617181920...30...Last »