AIC Converter,MTS to AIC,MTS to iMovie,MTS to FCE,MTS to Final Cut,AVCHD to AIC Converter,AVCHD to Final Cut Express,import AVCHD files to iMovie,MTS to ProRes 422,MTS to Final Cut Pro,MTS to FCP X,AVCHD and Final Cut Pro,Log and transfer MTS to FCP,edit MTS footage in iMovie,FCP transfer MTS files,transfer AVCHD files to iMovie

May 21

How to Use iMovie to Edit Videos and Make a Home Movie?

This iMovie tutorial will teach you how to use iMovie (iMovie 08/09/11) to edit videos professionally so as to make an eye-catching home movie step by step.

Apple’s iMovie is welcomed by all Mac users for home movie making which allows people to edit video clips, add sound and voiceover tracks and share movies in various ways. And in this article, we will show you how to use iMovie to create a short film step by step.

How to Use iMovie to Make Movies?

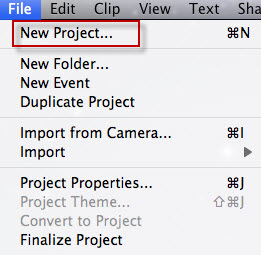
First, from applications, launch iMovie. And from “File” at the main menu, select “New Project” to start a new iMovie project. If you want to create a movie trailer in iMovie, you can refer to how to create a movie trailer in iMovie.

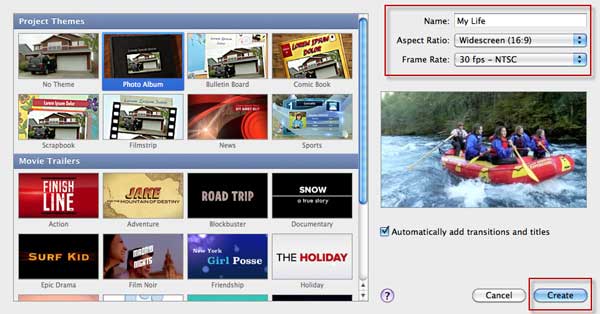
Then a window will pop up as below. Type in the title name of your project and select a theme, then click “Create”.

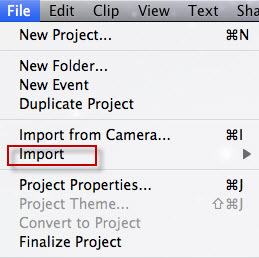
In the File drop-down list, choose “Import” > “Import Movies” to browser the movies and videos in your computer and select the movies you want to edit to iMovie, then click “OK”.

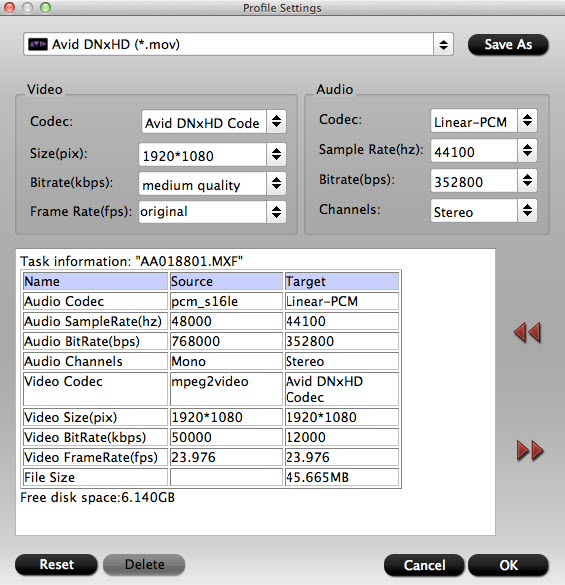
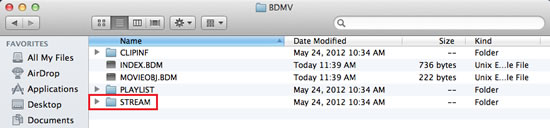
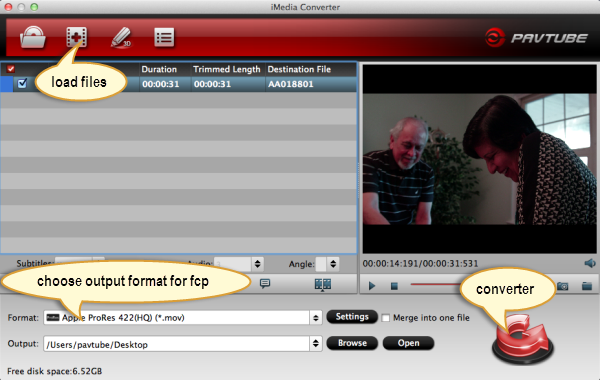
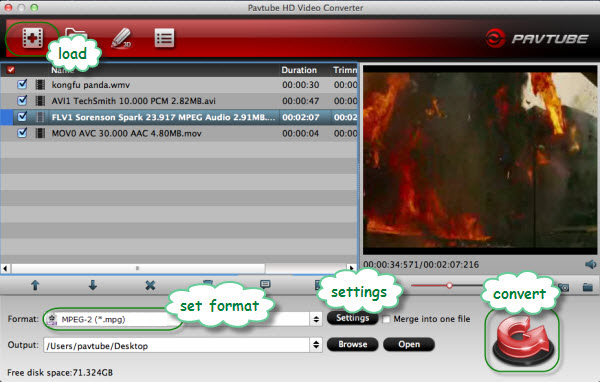
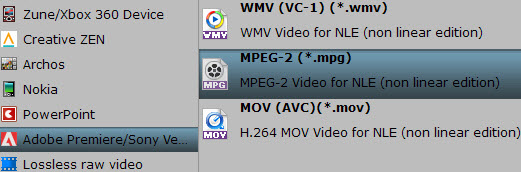
Tips: Please make sure your videos are supported by iMovie, if the video shows grey, it means they are not compatible with iMovie. At this time, you should use a Media Magician for Mac to convert any videos to iMovie supported video formats first and then import the converted videos to iMovie. As for Blu-ray and DVD movies, you can use a Mac iMedia Converter to convert the Blu-ray or DVD to iMovie AIC MOV videos first and add the MOV videos to iMovie.

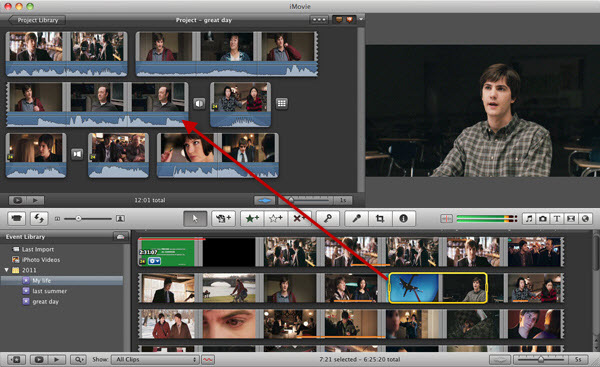
The videos then will be displayed in the Event Library at the bottom of the screen. Double click on the video clips to mark it yellow to select the clip. Select and drag the video clip you want to make a movie to the project library.

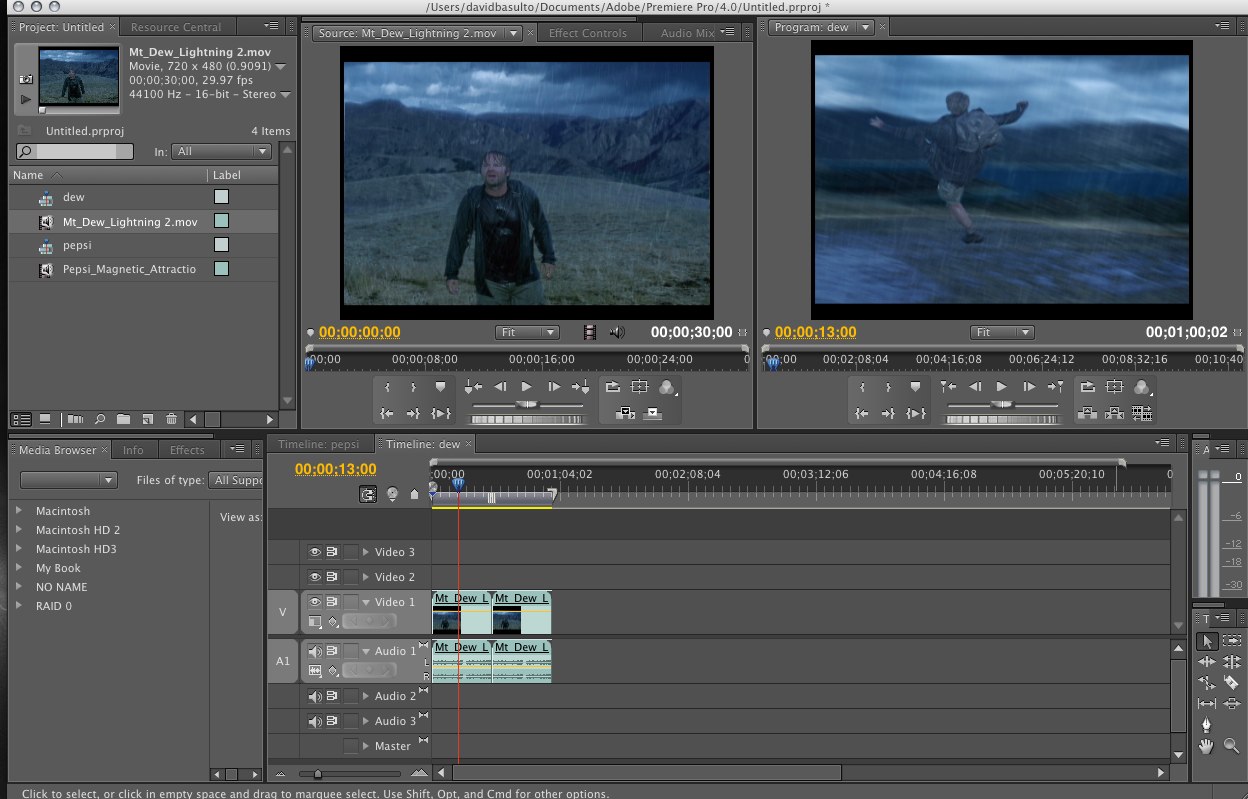
And now you can edit your videos freely, such as add transition to iMovie, create picture in picture effect, speed up and slow down videos, etc.

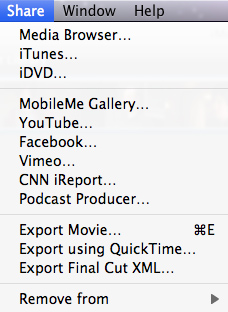
After you finished your iMovie project, you can select the completed project and from the menu bar at the top, choose Share. You can share it in many ways, such as export iMovie to YouTube or burn iMovie to DVD. Just choose the one you want and follow the indication to finish iMovie project exporting.

Done! You have used iMovie to create a home movie, enjoy it!

What If You Need a iMovie for Windows?

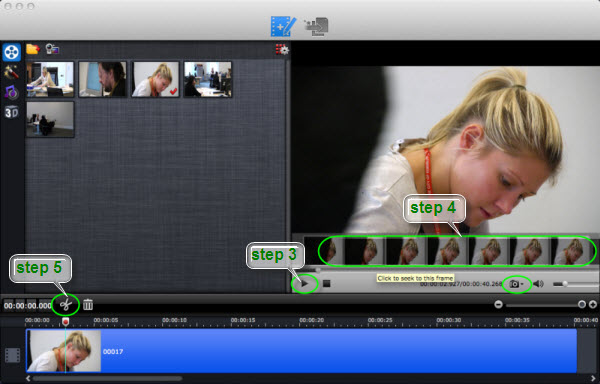
If you don’t have Macbook but you really like the function and interface of iMovie or you don’t like iMovie, you just need some alternatives to run in your Mac or PC. Pavtube Media Magician will be your best choice, which can lossless trim, split, cut, rotate, flip, timeline editing without rendering and merge almost all kinds of input movies. It can operate in Mac or Win with high compatibility without any quality loss. Free trial version is available below.

iMovie related Tips, Guide


Share

May 20

MXF to Avid-Ingest Sony F65 MXF to Avid Media Composer 6.5/6/5/4 on Mac

In 2012, the Sony F65 grabbed attention with higher resolution than any previous digital motion picture camera. Plus extremely low noise, even in the blacks. Plus a wider color gamut than print film. Plus 16-bit linear RAW and 10-bit SR File recording. No wonder the F65 was quickly chosen for productions of every type. Now with Version 2.0, 2.2, and 3.0 refinements, the F65 does even more, including High Frame Rate RAW at up to 120p with no windowing. And 12-bit HD recording with 4:4:4 color. This camcorder from Sony are really strong in video quality and hd resolution.

However, while the Sony F65 provide high quality videos, the MXF files it outputs become larger and larger; hence it’s not easy for people to edit Sony F65 MXF in Avid Media Composer on Mac.

To ingest Sony F65 MXF to Avid Media Composer on Mac, you will need to transform MXF to Avid Media Composer preferred video format – Avid DNxHD files in mov suffix.

Here we would like to introduce an all-in-one Mac MXF Converter – a professional Pavtube Mac MXF to Avid Converter, it’s not only able to convert Sony PMW F65 MXF to Avid DNxHD MOV for Avid Media Composer, but also can convert various MXF files from different camcorder to suitable format for FCP (X), iMovie, Adobe Premiere Pro, Android/Apple iOS/Windows 8 portable devices and so on.

FYI:

1. It also provides try-before-purchase service, click here to download a free trial version;
2. Please choose to download dmg package if you are running mac 10.5 or 10.6;
3. A windows version is available for windows users: MXF to Avid Converter.

Now get your program installed and let’s begin!

How to Convert Sony F65 MXF to Avid DNxHD MOV on Mac?

Step 1. Install and launch the Mac MXF to Avid Converter, click ‘add videos’ to load individual videos, or click ‘add from folder’ to load the entire folder.

Step 2. Click “Format” and choose Avid Media Composer -> Avid DNxHD (*.mov) as the best output format for editing video files in Avid MC.

Optional: You can also click “Settings” – which is marked as step 3 in screenshot – to set up frame rate, video quality, bitrate and check the generated file size.

Step 3. Click “Convert” and let it go! It will help to shut down computer if you have many videos to convert.

3..2..1..bingo! Ok now you can click “Open” to locate your converted MXF videos and load it to Avid Media Composer.

In addition, you can also refer to this guide to learn about How to import video files to Avid Media Composer on Mac.

Share

May 16

How to Get Sony Cyber-shot HD AVCHD Videos on Windows or Mac?

Why We Need to Save or Import Sony Cyber-shot Videos onto Windows or Mac?

Cyber-shot is the Sony‘s line of point-and-shoot digital cameras introduced in 1996. Cyber-shot model names use a DSC prefix, which is an initialism for “Digital Still Camera”. And nowadays, more and more people tend to capture their happiest and sweetest moments with Sony Cyber-shot digital cameras. We may shoot lots of smooth and sharp HD (high definition) footages during travelling or family time, and we usually expect to save those great movies to our computer rather than locking them in our camera, then transcode AVCHD MTS to any video formats and edit in video editing programs on Windows like Avid, Adobe Premiere, Sony Vegas, or on Mac like FCP, FCE, iMove, CyberLink PowerDirector, etc. After reading the below article, you may get a clear instruction about how to get Sony AVCHD videos on Windows or Mac for video editing later.

How to import Sony Cyber-shot HD AVCHD videos to Windows computer?

For Windows users:

1. Turn on the computer.

2. Ensure the recording media with the pictures or movies is inserted in the camera.

3. Connect the supplied USB cable to the camera and the USB input jack on the computer.

4. Turn on the camera.

NOTE: The computer automatically detects the UBS connection from the camera and installs the appropriate driver from the Windows 7 operating system. Afterwards, an AutoPlay window appears on the computer screen.

5. In the AutoPlay window, click Import Pictures and videos using Windows.

6. In the Import Pictures and Videos window that appears, click Import Settings .

7. In the Import Settings window, assign the location on the computer to where you want to copy the picture and movie files.

Next to Import images to click the Browse button and then select the desired folder (for example, My Pictures).

Next to Import videos to click the Browse button and then select the desired folder (for example, My Videos).

8. Click the OK button.

9. In the Import Pictures and Videos dialog box, click the OK button.

10. Click the Import button.

Tip: There is a problem that AVCHD is not a playable and editable video format for Avid, Adobe Premiere, or Sony Vegas, and transcoding process is necessary. Use Sony AVCHD MTS Converter to transcode your Sony Cyber-shot AVHCD MTS to DNxHD MOV for Avidconvert Sony AVCHD MTS to WMV for Premiere/Sony Vegas and more.

For Mac users:

Method 1: You could copy and paste your Sony AVCHD videos via a USB cable to Mac computer. Here are the steps.

Tip : This procedure is helpful when you are not using iMove or some other software application to import your video.

Preparation: You need a Mac computer, your Sony camcorder, and a USB cable.

Step 1: Power on your Mac PC

Step 2: Connect the Sony Camcorder directly to the USB cable on your computer. The Sony Cyber-shot camcorder will display as a hard drive on computer.

Steps 3: Turn on the camcorder, navigate to the Sony Cyber-shot hard drive to access the memory stick, select USB Connect, the LCD will show USB Mass Storage. iPhoto may automatically open, if so, just turn it off.

Step 4: On the Finder bar select “Go”, and then “Computer”. Select “No Name” or untitled item. Select the “AVCHD” folder then “BDMV” folder and on the “STREAM” folder.

Step 5: Click on the video you wanna transfer. If you have multiple videos you would like to transfer, press and hold the “command” key, then select the videos by clicking on them. To copy these files, press and hold the command key and the press the “C” key.

Step 6: Select folder you wanna save the videos. Enter that folder, hold the comman key then press the V key, then your videos are be paste to local computer.

Method 2: You can capture and transfer Sony AVCHD videos to iMac/MacBook Pro via iMovie after connecting camera to computer with USB cable.

However, you may face problem when trying to log and transfer AVCHD videos from Sony AVCHD to Final Cut Express (FCE) 4 or Final Cut Pro (FCP) 5. After transferring HD .mts videos from camera to computer hard drive, just run Pavtube Sony AVCHD MTS/M2TS Converter for Mac as the Mac Sony Cyber-shot AVCHD MTS converter to deinterlace and convert MTS to Apple ProRes for FCP XImport Sony AVCHD MTS to FCE if you want to edit HD videos.

Share

May 15

Import Panasonic Lumix DMC Series AVCHD Lite MTS to FCP 6/7 without rendering

Lumix is Panasonic‘s brand of digital cameras, ranging from pocket point-and-shoot models to digital SLRs. They are equipped with Leica lenses. And in 2009, Panasonic introduced AVCHD Lite and AVCHD to selected members of its Lumix line of digital cameras.

AVCHD Lite identifies a subset of AVCHD format, in which progressive-scan video is acquired at 30 frames/s with 720-line resolution. Such a video is recorded in the AVCHD 720p 60 stream by using a flag telling a decoder to play each frame twice. Announced in January 2009, the Panasonic DMC-ZS3/DMC-FT1/DMC-TZ7 digital cameras were the first digital cameras to offer AVCHD-lite movie mode. Since then, Panasonic has added AVCHD-lite to more of its digital cameras, the most typical models is the Lumix DMC series.

However, many video editing software on Mac like iMovie 8/9/11, Final Cut Pro 6/7, FCP X, Avid, Adobe Premiere Pro, After Effects, etc. can’t perfectly import AVCHD/AVCHD Lite .mts files from Panasonic Lumix Series directly. For Example:

“I have Panasonic DMC-ZS7 camera and want to convert AVCHD video to ProRes or more common formats for editing on FCP 7 without rendering. What program do you recommend for this task? Looking for easiest to operate and cheapest. There are many programs on the internet. Thanks.”

To import Panasonic Lumix AVCHD Lite MTS files to FCP 6/7 or FCP X for editing without rendering, you will want to try this Pavtube iMedia Converter for Mac (now are on 30% off, you can save $20) – a powerful and professional Panasonic AVCHD Lite MTS Converter for MAC, which is recommended converting software for MTS footage. With intuitive interface, you can easily and fast convert Panasonic Lumix DMC AVCHD Lite MTS files to Apple ProRes codec using the professional lumix to Apple ProRes Converter. And the latest Mac OS X Mountain Lion 10.8.3 is supported, just feel free to try it!

How to import Panasonic Lumix DMC series AVCHD Lite MTS files to FCP 6/7 without rendering on Mac Mountain Lion

Step 1. Connect your Panasonic Lumix DMC Camcorder to Mac with USB cable or use card reader to transfer the MTS files to Apple hard drive disk.

Step 2. Run Panasonic AVCHD Lite MTS Converter for Mac, and click the “Add Files” button to load mts videos.

Step 3. Choose MOV with Apple ProRes 422 codec for Final Cut Pro 6/7/X.
Click the “Profile” option, and move mouse cursor to “Final Cut Pro > Apple ProRes 422 HQ (*.mov)” as output format. To get 1080 videos, we need to click the “Settings” button and choose 1920*1080 as output video resolution.

Step 4. Specify output file path. Click on “Browse” and browse to where you’d like to save target Apple ProRes 422 HQ video. Now click the big “Convert” button. You don’t have to wait aside for that it provides a function to shut down computer for you.

Step 5. Press “Open” to locate result video. Launch FCP 6/7/X, and go to “File > Import > Files…” to import converted MTS videos to FCP project.

MTS files bite up storage. If you have lots of AVCHD Lite MTS video stored on Mac HDD and are now ending up with plenty of long files with only a few short gems, it is recommended that you use this MTS Converter program which works like a charm.

Tips:
1. Now the windows version is available here: Pavtube Video Converter Ultimate(now are on 30% off).
2. Read more about how to ingest and import AVCHD to Final Cut Pro.

Share

May 13

Save $20 Get MTS/MXF/MKV/AVI/Blu-ray/DVD Converter for FCP, iMovie, Avid, Premiere, etc. on 2013 Mother’s Day Special Offer

HOOOOOOOOT NEWS: Mother’s Day happens to be just around the corner, and we sincerely hope you’ve got plans to show as well as tell your mom how much you love her. If you haven’t figured out a strategy, take a look at Pavtube 2013 Mother’s Day Crazy Discount. The most popular software Pavtube iMedia Converter for Mac, Video Converter Ultimate, Blu-ray Ripper and DVD Ripper is at 30% off Discount expiring on May 22, 2013Time-limited! Never Miss!

This is Mother’s Day best Gift Idea from Pavtube Studio.

* If you like shooting, just use your lovely cameras and camcorders to record the best moment with your family and then converting AVCHD/MTS/M2TS/MXF video files to Mac compatible format for editing in FCP 7/X, iMovie, Avid Media Composer, Adobe Premiere Pro, iPhoto 8/9/11 etc smoothly.

* If yu choose a computer, a tablet or a smartphone as Mother’s Day gift, we do offer low prices software solutions for your mom to enjoy videos, TV shows, camera recordings and Blu-ray DVD movies on those devices anywhere and any time in pleasant quality with iMedia Converter for Mac.

Top Pick –30% OFF Pavtube iMedia Converter for Mac (Saving $20)

Pavtube iMedia Converter for Mac is an all-in-one video converter, DVD ripper and Blu-ray Ripper, which means it lets you convert Blu-rays, DVDs, TV recordings, HD (AVCHD) shootings, Flashes and many other video types into desire formats (MP4, MOV, M4V, TS, MKV, AVI, WMV, MPG, VOB, etc) for playback on your Android tablet, such asNexus 7Galaxy Tab,Galaxy S3Asus Transformer PrimeAcer Iconia TabHP TouchPadBlackBerry PlayBook,Motorola XoomKindle File HD, Nook Color, Pandigital Novel 7 Tablet, etc. or IOS Device like Apple TViPhone 5,Microsoft Surface and others.

Pavtube iMedia Converter for Mac can also convert Canon, Nikon, Olympus, Sony and Panasonic camera or camcorder recorded HD videos or 1080p footages to editable HD video formats for non-linear editing software like iMovie, FCE, FCP 7/FCP X, Final Cut Studio, Avid, Adobe Premiere, Sony Vegas, Pinnacle Studio, Cyberlink PowerDirector, Windows Movie Maker, etc. The HD footage can be compressed to SD video clips for storage when you wanna save storage space.

Part I: Highlights of the software- Why Choose this Best HD Video to Mac Converter: 

* Rip Blu-ray/DVD to Mac HDD in MP4, AVI, MOV, M4V, MKV, MPG and more formats;

* Convert HD MKV, AVI, WMV, etc for playback on iPad, iPhone, iPod, Apple TV;

* Convert HD footages (AVCHD MTS/M2TS/M2TMXF, HDV, TOD, MOD, MOV) to iMovie and Final Cut editable codec (AIC, DV, ProRes, etc);

* Restore DVR TiVo files to lossless MPEG files or convert TiVo to desired formats;

* Convert among other common videos such as flash videos, Quicktime videos, CD files, digital video files, Matroska files, etc.

* Extract audio tracks from the source discs and clips for personal use;

* Edit the video and movie clips by trimming, cropping, watermarking, flipping, etc.

Part II: Customer’s Review: 

* I have to say your product seems very good, and as a professional film editor its ability to convert to Avid codecs was definitely a plus.

* Yes, we’re using it to convert mxf files taken off a P2 video card – and it works great – love it! We were using an iMedia Converter for everything, but it didn’t do MXF files, so we had to find you – thanks again.

* I Love This Product because I have been able to convert my whole entire movie collection including my Blu-rays to itunes, which I can now watch everything on my apple TV. It’s great.

Part III: Related guides for you: 

More Giveaway on Pavtube 2013 Mother’s Day Coupon:

1. Pavtube Blu-ray Video Converter Ultimate (30% off) 

What does the software do? Basically it lets you put Blu-ray movies, DVDs and videos of various formats onto any portable device, so that you can use the copy-protected movies freely and watch movie anywhere.

Useful tips:

2. Pavtube Blu-ray Ripper (Windows) (Mac) (30% off) 

The app lets you back up and convert Blu-ray& DVD collections into iPad/iPhone/Apple TV friendly format so as to enjoy movies. This is definitely a good gift for frequent travelers. The software exports up to 1080p full HD video with both stereo and 5.1 sound, so as to make full use of available surround sound system. Moreover, the latest update includes 3D Blu-Ray ripping feature!

Useful tutorial:

3. Pavtube DVD Ripper (Windows) (Mac) (30% off)

It has outputs for almost all the Android models, so you can start getting DVD movie library ready for your Android devices like Kindle Fire HD, ASUS Transformer Prime, Nook (HD/HD+) Tablet, Samsung Galaxy Tab 2, Galaxy Note 10.1, Galaxy S4/S3, Google Nexus 7, Google Nexus 10, Nexus 4, Lenov ThinkPad tablet, Sony Tablet S, Toshiba Thrive, Motorola Xoom, etc…

More than converting Blu-ray/DVD movies to Android tablet playing both on Mac and Windows, Pavtube DVD Ripper also pack perfect support for portable devices that run other OS, including iPad, iPhone, BlackBerry PlayBook, Microsoft Surface RT/Pro tablet, HP TouchPad, Nokia Lumia 920/822, etc.

Related tricks and tips:

Share

May 02

Giveaway: Pavtube Media Magician for Mac For FREE (Until May 7, 2013)

Media Magician for Mac helps manage/backup/combine/convert your camcorder footages and videos for better editing in FCP/ FCE/ Avid Studio/ iMovie/ Adobe Premere/ Adobe After Effect/ Apple Aperture, playback on iPad/ iPhone/ Apple TV/ Android Tablets, and sharing on YouTube.

The simple editing functionalities help you frame-by-frame trim, join, cut, delete clips on timeline; add 3D and gauss blur effects, etc. You can flip video horizontally, vertically, clockwise, or counter-clockwise as well. Volume can also be enlarged or reduces for output.

Moreover, the conversion management list helps create conversion tasks with clicks and output files with different formats from same sources placed on timeline. You can output lossless MTS/MKV from MTS source files which makes it possible to lossless join your camcorder AVCHD MTS clips into one in seconds. (click the Guides to learn more solution)

In a word, it’s a useful HDcam assistant software with smart camcorder wizard helps make better use of your camcorder videos.

Product Page: http://www.pavtube.com/media-magician-mac/

System Requirements

  • 1G Hz or above Intel processor.
  • Mac OS X Leopard (10.5), Snow Leopard (10.6), Lion (10.7), Mountain Lion (10.8)
  • 512 MB physical RAM (memory) or above.
  • 1024*768 or higher resolution display.

Giveaway

Pavtube Studio is giving away Media Magician for Mac FREE until May 7, 2013.

Promo page:
https://www.facebook.com/pavtubefans/app_203351739677351

Share

May 02

Import Canon Vixia HF G10/G20 AVCHD to Avid Media Composer or Adobe Premiere Pro

Canon showcases four VIXIA cameras including the HF G20 with exceptional video capability. The G20 holds a CMOS PRO Image sensor and combines with a DIGIC DV III image processor to increase low-light performance (20 percent better compared to the HF G10). The hardware makes the G20 capable of face detection, Touch & Track, Cinema-Look filters and of course 1920×1080 recording. Many features could be repeated with Canon’s G10, one notable one is simultaneous record in MP4 and AVCHD. It can hit full HD resolution at 60p. However, the 1080/60p .mts videos are not standard AVCHD format and thus are not acceptable by editing software like Avid Media Composer, Final Cut Pro and Adobe Premiere Pro.

The simplest and fastest way to solve the problem is converting Canon Vixia HF G10/G20 AVCHD to one of Media Composer/ Premiere Pro preferred editing format. Here comes Pavtube Canon AVCHD Converter to help you out. This Canon Video Converter features full supports for almost all Canon, Sony and Panasonic AVCHD cameras, and it converts Canon MTS files to editable format for using in MC without visible quality loss and ensures audio and video in perfect synchronization.

You can follow the guide on converting Canon Vixia HF G20 AVCHD to Avid MC/Adobe Premire Pro on Mac

Step 1: After the launching the Canon AVCHD Converter, load your MTS files to it from your camcorder. Join several mts clips ticking the “Merge into one” box.

Step 2: Click Format on the main interface and choose specific output format for your video editor.

In order to convert Canon Vixia HF G10/G20 AVCHD to Avid, choose “Avid Media Composer > Avid DNxHD(*.mov)” as output format.

To get Canon Vixia HF G10/G20 AVCHD into Adobe Premiere Pro, the best format is “Adobe Premiere> MPEG-2 (*.mpg)”.

Tip: You may as well click Settings to set video size to 1920*1080, frame rate to 30fps for easy editing.

Step 3: Click Convert button to start to convert Canon HF G20 AVCHD to Avid DNxHD or MTS to Premiere MPEG2 video.

Step 4: Click “Open” button to get the generated MOV/MPG files on Mac OS X for use. .

When the conversion is finished, you can import video files to Avid MC or Premiere Pro for editing smoothly.


Share

Apr 24

Panasonic launches $500 Lumix DMC-LF1 enthusiast compact with WiFi, NFC


Panasonic‘s just unveiled the 12-megapixel Lumix DMC-LF1 compact for fans of high-end compacts like Canon‘s S110 who may not want to snap with a smartphone camera. But the social set will still be able to share images to their handset or tablet thanks to the LF1’s built-in WiFi with NFC pairing and included app. Meanwhile, most cellphones definitely can’t compete with the 1/1.7-inch, 12-megapixel CMOS sensor and 28-200mm equivalent f2.0-5.9 Leica zoom lens. Other specs include 1,920/60i video with AVCHD and MP4 recording, POWER O.I.S image stabilization, a 200K EVF, a variety of shooting modes like panorama, and full manual control. There’s no set arrival date, but it’ll run a hefty $500 or so –perhaps a hard sell against certain photo-clever handsets.

See more: Engadget


Share

Apr 09

How to import and edit BlackMagic Intensity Pro ProRes 1080p recordings in Adobe Premiere Pro

Blackmagic’s Intensity Pro is a PCI Express card which allows you to capture footage from an unprotected HDMI source, along with analogue Composite, S-Video and Component footage. Believe it or not, capturing via HDMI could deliver superior quality from certain HD camcorders than a traditional Firewire link, and doing so with the Intensity can also deliver files which are quicker and easier to edit too. However, users may meet some issues when they use the tool, now, just take a look at the question of somebody:

“I’m getting the BlackMagic Design Intensity Pro (Mac OS 10.6.6) to capture in 720 59.96 ProRes 422, which work great on my Mac Lion with FCP 7 setup. The issue I’ve been running into lately is I need to collaborate with other studios that are using Adobe Premiere Pro CS4. The issue I need to create some premiere project on my Windows 7 pc while Premiere Pro doesn’t/ can’t import ProRes 422 files (.mov files). Is there any plugin or solution that I can get Black Magic Intensity Pro ProRes files compatible with Adobe Premiere Pro?”

ProRes in a MOV file format from Black Magic Intensity Pro is beyond the capability of Adobe Premiere. To solve the problem, you need to convert BlackMagic Design Intensity Pro ProRes files to Premiere Pro supported format and codec. Follow the tutorial below to get Intensity Pro recorded ProRes files into Premiere Pro for editing.

Required tool:

Pavtube ProRes Video Converter for Mac – A professional ProRes to Premiere Pro Converter


The Mac ProRes to Premiere Pro Converter provides customers with several simple editing functions, including cropping, trimming, deinterlacing, watermarking, adding special effects, and audio replacing, which help you do a fast and necessary editing on your footage before importing them to Premiere Pro. It also supports versatile output options for iPad, Android tablets and mainstream editing software: like How to import BlackMagic Intensity Pro recordings to Avid)

How to Convert BlackMagic Intensity Pro ProRes files to MPEG for Premiere Pro

Step 1. Run the Pavtube ProRes Converter for Mac as the perfect Mac ProRes to MPEG Converter, and load your BlackMagic Intensity Pro ProRes footage to this Mac app.

Step 2. Click on “Format” bar and select output format from drop-down list. Premiere Pro prefers AVI or MPEG format for editing. Here I suggest you follow “Adobe Premiere Pro/Sony Vegas” to select “MPEG-2 (*.mpg)” or “WMV (VC-1) (*.wmv)” format. You can also choose “Format -> HD Video -> MPEG-2 HD Video(*.mpg)” as out format for Premiere Pro.

Step 3. You can control output video quality by setting resolution, bitrate and frame rate in “Settings”. For preserving 5.1 channels surround sound, set audio channels to “5.1 channels” instead of Stereo. To keep 1080p full HD high quality, you can set video bitrate up and Size to 1920×1080.

For MPEG-2 (*.mpg) profile settings:

For MPEG-2 HD Video(*.mpg) profile settings

Step 4. Click on the “Convert” button to start convert BlackMagic Intensity Pro ProRes to MPEG/WMV for Premiere Pro editing. By ticking off the checkbox before “Merge into one file” option, you can combine all the checked videos into one file.

When conversion is completed, you can click “Open” to get the Premiere Pro MPEG files from its default output folder.

Now open up Adobe Premiere Pro and you’re ready to import Black Magic Intensity Pro recordings to Premiere Pro CS3/CS4/CS5/CS6 for post-production~

            
Share

Apr 07

Canon EOS Rebel SL1 Review: 18MP, 4 FPS, 1.6x sensor, 1080 HD, 3″ touch screen

Canon has announced the word’s smallest and lightest DSLR*, the EOS Digital Rebel SL1. 25 percent smaller and 28 percent lighter than the EOS Rebel T4i, the SL1 boasts many of the same features from the T4i (and the new T5i) save for slower speed capabilities and no vari-angle LCD display.

The world’s smallest and lightest DSLR with an APS-C sized image sensor
as of March 1, 2013

The SL1 compact DSLR includes an 18-megapixel APS-C sized image sensor, the DIGIC 5 image processor, an ISO range up to 6400, four frames-per-second continuous shooting, a 3.0-inch Touch Screen (fixed), and it works well with Canon’s STM lenses (one comes in the standard kit) for virtually silent, continuous Auto or Manual Focus during Full 1080p HD video recording.

For novices worried about making the jump from a point-and-shoot digicam to a DSLR, the SL1 offers Scene Intelligent Auto Mode, “an advanced function that detects faces, colors, brightness, movement, contrast, distance and other factors and automatically adjusts and selects the exposure method needed.” Effect Shot Mode is another great feature, which adds a Creative Filter to stills, but captures two separate images (one stylized, one clean) to provide users with after-the-fact flexibility.

A few new Scene Modes on this camera, including Kids, Food, and Candlelight, round out the creative effects, while Background Blur Simulation will make any photo and any lens look like an extreme telephoto shot. All filters and modes and auto focus settings can be adjusted on the fly in Live View via the touch screen LCD display.

  • Canon EOS Digital Rebel SL1 Features
  • 18-megapixel APS-C sized CMOS image sensor
  • DIGIC 5 image processor
  • 3.0-inch Clear View Touch Screen Display (fixed)
  • ISO 100-12800
  • 4 frames per second high speed burst shooting
  • Hybrid CMOS AF II Auto Focus Sensor
  • Live View
  • Movie Servo AF (compatible with STM lenses)
  • Full HD 1080p movie recording
  • Scene Intelligent Auto Mode
  • Effect Shot Mode
  • Creative Filters
  • Background Blur Simulation
  • In-Camera Editing and Cropping
  • Scene Modes, including the newly created:
  • Kids
  • Food
  • Candlelight
  • .6″W x 3.57″H x 2.74″D
  • 14.36 oz (body only)

Read More about Canon EOS 100D/Rebel SL1 review:


Share
Page 21 of 37« First...10...1920212223...30...Last »