AIC Converter,MTS to AIC,MTS to iMovie,MTS to FCE,MTS to Final Cut,AVCHD to AIC Converter,AVCHD to Final Cut Express,import AVCHD files to iMovie,MTS to ProRes 422,MTS to Final Cut Pro,MTS to FCP X,AVCHD and Final Cut Pro,Log and transfer MTS to FCP,edit MTS footage in iMovie,FCP transfer MTS files,transfer AVCHD files to iMovie

Apr 07

Encoding Canon EOS 100D/Rebel SL1 H.264 footage for editing on Mac (FCP, iMovie, Avid, Premiere Pro…)

How to edit Canon EOS 100D(Rebel SL1) H.264 Video on Mac? Best Canon Rebel SL1 Video Converter can help you to encode H.264 MOV clips from Canon EOS Rebel SL1  to FCP, FCE, iMovie, Premiere Pro, Avid Media Composer friendly codec and Edit/Split/Cut/Merge Canon Rebel SL1 MOV clips on Mac.


High-definition video capture has become commonplace in digital SLRs across the board, all the way from models aimed at amateurs and the budget-conscious to those intended for professional use. The precise feature set on offer varies widely, however, and along with this the utility of video capture for a variety of purposes.

Canon‘s latest release EOS Rebel SL1 is one of the top picks for the 2013 Spring. It gives the photographer plenty of control over both the video and audio portions of movie capture. The CMOS sensor records high definition video at a maximum resolution of 1,920 x 1,088 pixels with a 16:9 aspect ratio — approximating what’s sometimes referred to as “Full HD”, or 1080i/1080p, although it actually includes 8 extra rows of pixels beyond the standard 1,920 x 1,080. The full resolution can be downsampled in-camera to produce 1,280 x 720 (720p) resolution movies, with the NTSC mode using 59.94 frames/second, and the PAL mode offering 50 frames/second. Finally, a standard definition 4:3 aspect ratio mode captures 640×480 pixel (VGA) movies, again with 59.94 frames/second in NTSC or 50 frames/second in PAL.

The Canon EOS Rebel SL1 records its movies as .MOV files using variable bitrate MPEG-4 AVC / H.264 compression, which is much more conservative of memory card space. H.264 .mov is very friendly to Mac users, as the format is well-supported by both QuickTime and iTunes. Mac based Editing software iMovie, Final Cut Express and Final Cut Pro also like the .mov format, but not in H.264 codec. Because of its high data rate (20-30mbps), the Canon EOS Rebel SL1 footage is quite demanding and it’s prone to freeze or crash if your Mac is not so up-to-date.

In order to process Canon EOS Rebel SL1 footage fast and seamless on Mac, it requires that the H.264 .mov videos to be transcoded into an editing friendly format before importing the Rebel SL1 video to non-linear editing apps. This is usually done with a Mac Video Converter.

Recommended Tool:

The Mac App can transcode Canon EOS Rebel SL1 H.264 shootings to Apple ProRes/AIC/DVCPRO/HDV/Avid DNxHD/AVI/WMV/MOV/MP4 and creates stunning high definition footage up to 1080p on Mac(Mac Mountain Lion 10.8 included).

How to convert Canon EOS Rebel SL1 H.264 MOV footage for editing on Mac (FCP, FCE, iMovie, Avid, Premiere…)

A. Convert Canon EOS Rebel SL1 H.264 video to AIC MOV

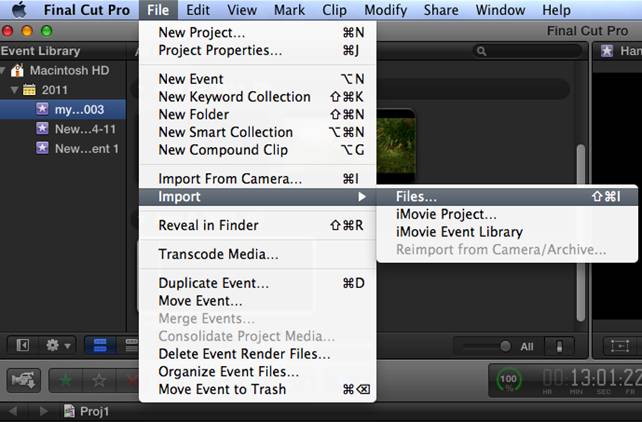
In attempting of importing Rebel SL1 H.264 video to iMovie or Final Cut Express for smooth editing, you are suggested to transocde H.264 video to AIC (Apple Intermediate Codec), the favorite editing codec of iMovie in advance. The Apple Intermediate Codec (AIC) does not use temporal compression, so every frame can be decoded and displayed immediately without first decoding other frames. The drawback of this codec is that it requires much more bandwidth and hard drive storage space.

Also Read:

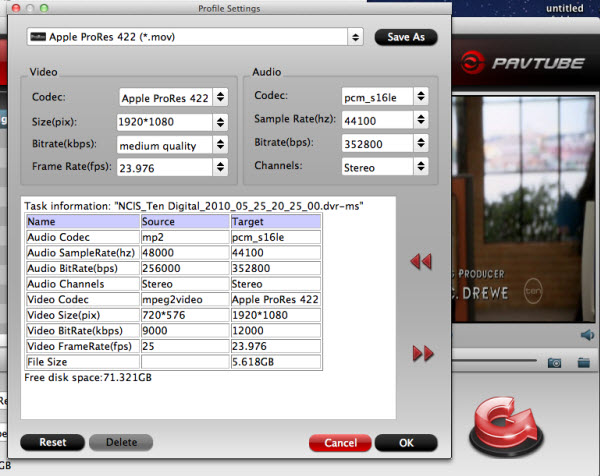
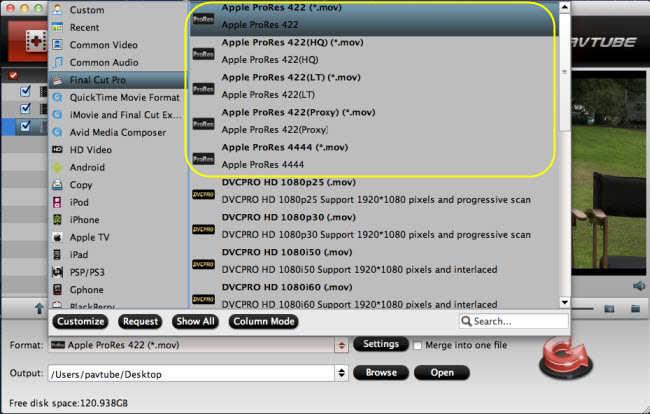
B. Transcode Canon EOS Rebel SL1 H.264 video to Apple ProRes 422 Codec

In order to process Canon DSLR footage fast and seamless in Final Cut Pro, it requires that the H.264 .mov videos to be transcoded into Apple ProRes codec, which is the best intermediate codec developed specifically for seamless Final Cut workflow. Refer to a detailed guide:

C. Encode Canon EOS Rebel SL1 H.264 MOV to DNxHD MOV codec

To get Canon EOS Rebel SL1 H.264 video into Avid Media Composer for post-production, the best way is converting H.264 to DNxHD codec. DNxHD is a video codec intended to be usable as both an intermediate format suitable for use while editing and as a presentation format. It offers you optimal mastering picture quality, minimal degradation over multiple generations, reduced storage requirements, and enables real-time HD sharing and collaboration.

The Pavtube HD converter for Mac supports a more variety of DSLR cameras than you expect – including Canon EOS 5D Mark III, EOS-1D Mark IV, EOS 5D Mark II, EOS 7D, EOS 60DRebel T3i, Rebel T2i and Nikon DSLR cams. Pavtube Video Converter reads standalone .mov files from Canon memory card. You don’t need the full card structure, just pick up what you want to keep. To learn more conversion solutions for Canon cameras, you are recommended to visit Pavtube’s Canon Camera File Transcode page.

Pavtube HD converter for Mac is a well known professional Canon H.264 to DNxHD Converter which can deal nearly all kinds of MOV videos, it can convert Canon H.264 MOV files to DNxHD codec MOV natively for Avid Media Composer on Mac, and then you can edit Canon 650D/600D/550D/450D MOV files natively in Avid.

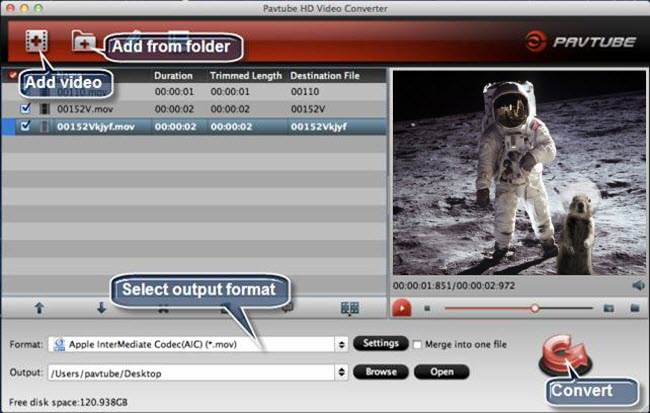
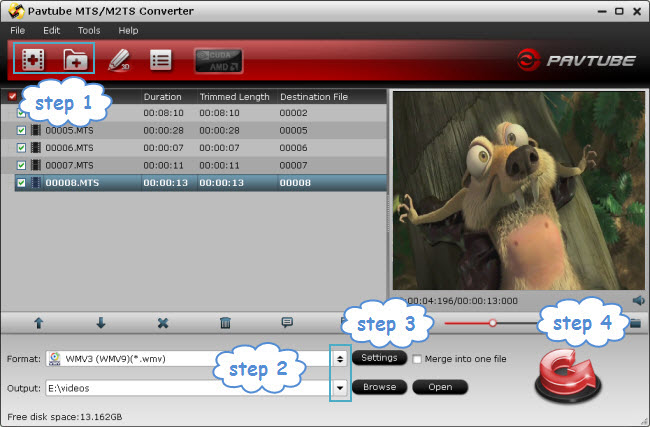
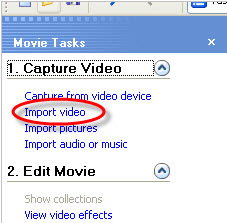
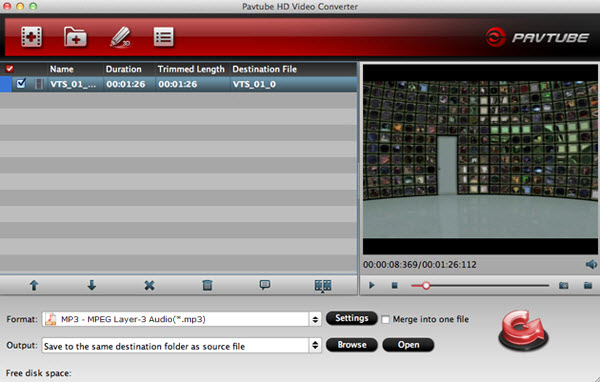
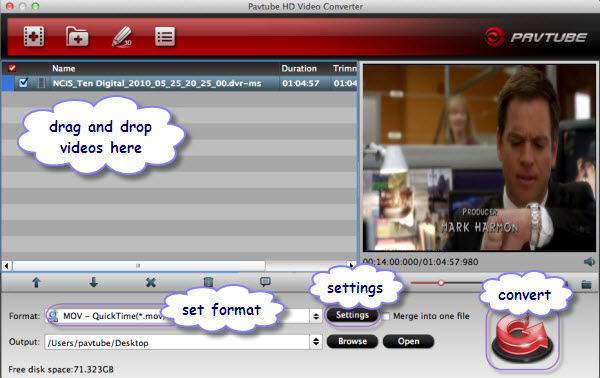
Step 1. Load H.264 .mov footage to Canon 60D MOV Converter.

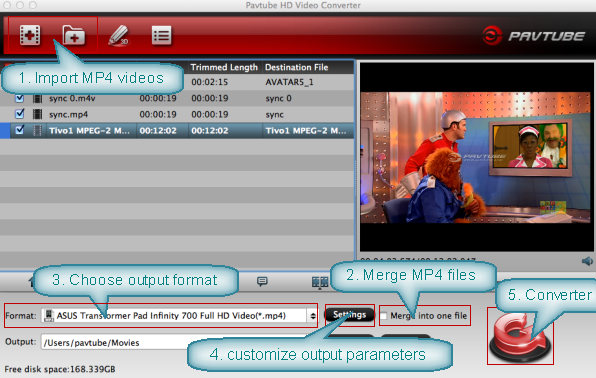
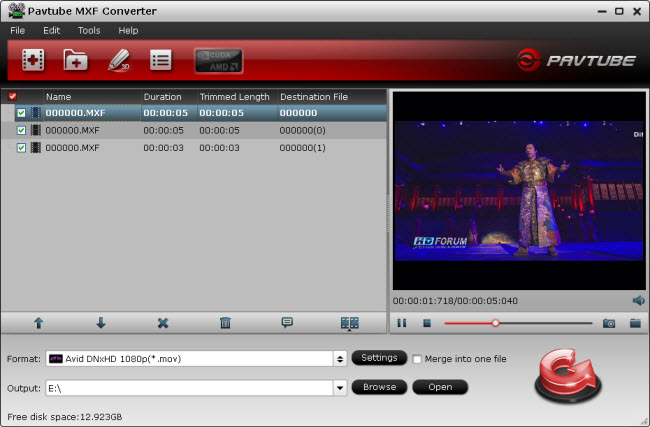
Transfer h.264 encoded .mov files from Canon 60D camcorder to computer via USB cable. Download a trial of Pavtube HD Video Converter and run the software as the best Canon 60D MOV converter. Click the “Add Video” button or “Add from folder” icon to load .mov videos from 60D camcorder.

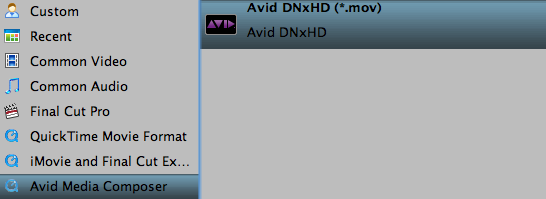
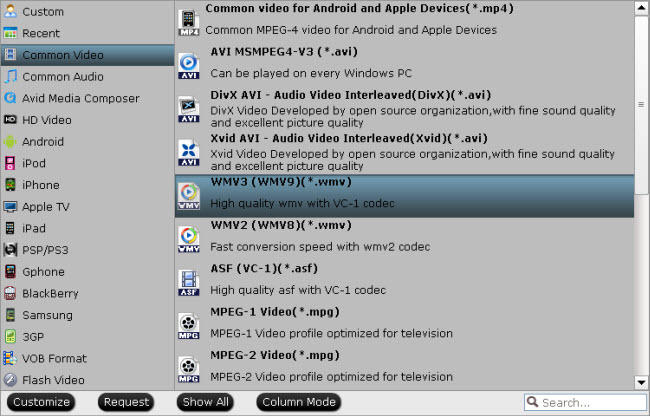
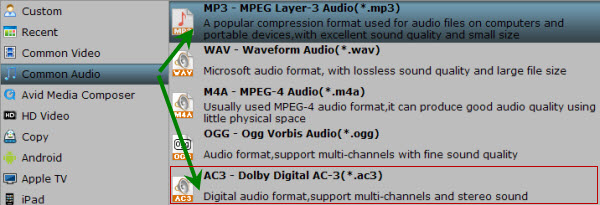
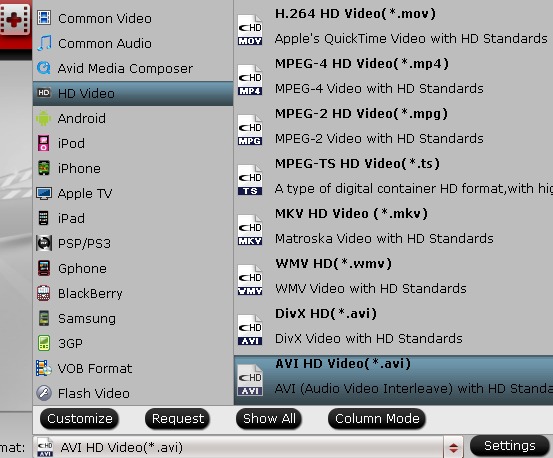
Step 2. Set a Avid friendly codec (e.g. Avid DNxHD MOV) as export format.?Click on “Format” bar and set a Avid friendly codec in dropdown-list. You are advised to follow “Avid Media Composer” template and choose “Avid DNxHD(*.mov)” as export format.

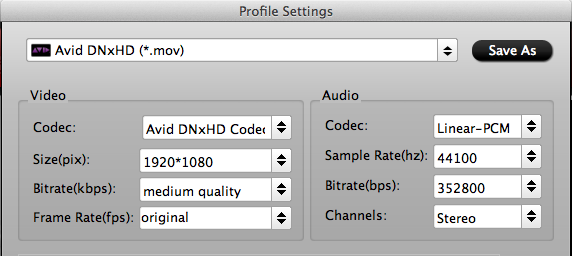
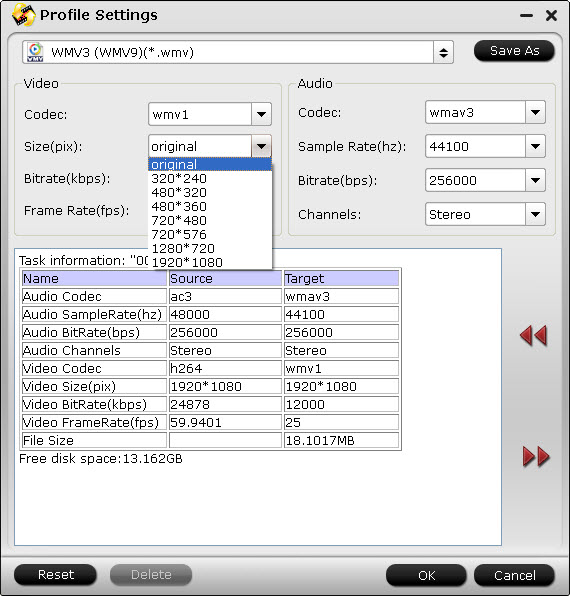
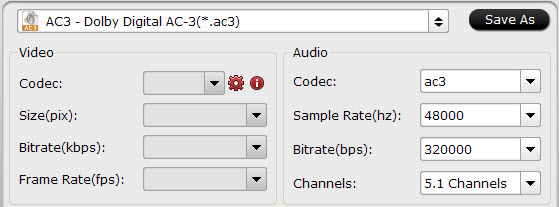
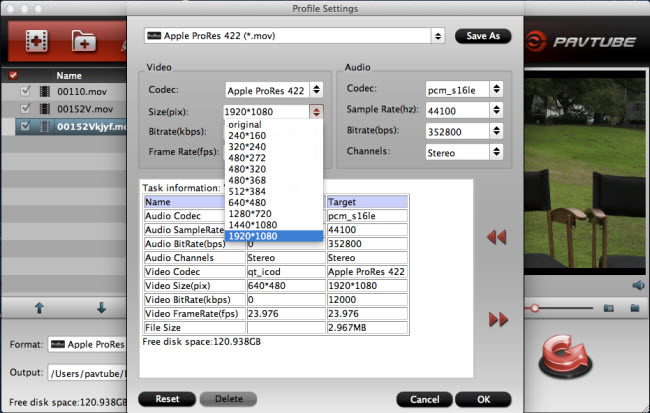
Step 3. Set possible best quality for Avid MC editing.

Click the “Settings” button and customize proper video/ audio parameters if necessary. Video size, bitrate and fame rate are flexible and can be adjusted as you like. E.g. Set video size to 1920*1080 when you feel like to keep 1080p as the source file features. Or set “original” in video bitrate drop-down list to keep best quality. You may skip this step as well as default format works well with Avid too.

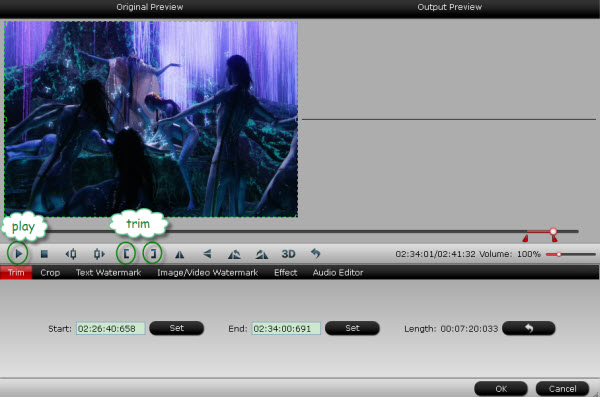
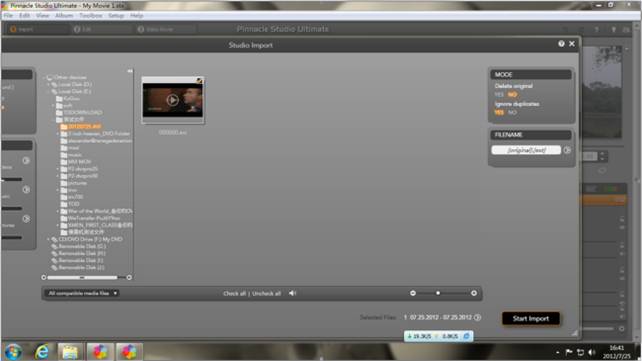
Step 4. Start the process to?Convert Canon EOS 100D/Rebel SL1 H.264 MOV to DNxHD MOV?for Avid MC workflow?by clicking the big “Convert” button.?

To learn more conversion solutions for MVI/MOV files recorded by Canon PowerShot and EOS DSLR cameras, or Canon MXF clips captured by XF100, XF105, XF300, XF305, and Canon EOS C300, or AVCHD MTS files shot by VIXIA cameras, you are recommended to visit my Blog’s Canon Video Column.

Share

Mar 29

How to Import AVCHD MTS/M2TS to Windows Movie Maker for editing

Here I will show a Free Windows Movie Maker tutorial: How to convert AVCHD MTS/M2TS files to WMV with MTS to Windows Movie Maker Converter and How to import video to Windows Movie Maker for editing. Well, we look at a Windows Movie Maker user’s problem…

Why Windows Movie Maker can not play MTS files from my JVS HD camera? 

“I have MTS files from a JVC HD Camera. I want convert them to a file that can be edit in Windows Movie Maker without an error message before play back. When I use MPG1 the picture becomes so tiny. Is there a happy medium? I have some files that are very long – 20 to 30 minutes.”


As we all know, Windows Movie Maker is the free video editing software installed on a PC using Microsoft Windows OS. However, probably because of the copyright issues, Windows Movie Maker only provides supports for a relative small range of formats. Unfortunately, the most popular AVCHD MTS/M2TS footages captured by a Panasonic, Canon or Sony camera/camcorder are out of the range.

Windows Movie Maker support media formats:

  • Video files: .asf, .avi, dvr-ms, .m1v, .mp2, .mp2v, .mpe, .mpeg, .mpg, .mpv2, .wm, and .wmv
  • Audio files: .aif, .aifc, .aiff, .asf, .au, .mp2, .mp3, .mpa, .snd, .wav, and .wma
  • Picture files: .bmp, .dib, .emf, .gif, .jfif, .jpe, .jpeg, .jpg, .png, .tif, .tiff, and .wmf

It is obviously that AVCHD MTS and M2TS files are out of the above mentioned formats range. If you try to capture these videos to Windows Movie Maker, it will prompt you that:

That means to edit MTS/M2TS files with Windows Movie Maker, you have to do format conversion to obey the format restrictions of WMM.

So I wrote this Guide to help you solve how to use MTS to Windows Movie Maker Converter to convert JVC HD MTS to Windows Movie Maker compatible format without crashing problem and avoid rendering.

Required:

  • Pavtube MTS/M2TS Converter: a top JVC MTS to Windows Movie Maker Converter
  • Supported OS: Windows XP/2003/Vista/Windows 7/Windows 8
  • DirectX Version: 9.0 or above
  • Memory: 64MB at least
  • Processor: 500MHz Intel or 500MHz AMD CPU
  • Hard Disc Space: 512MB or above

The top AVCHD MTS Converter is specially designed for Sony, Canon, JVC and Panasonic AVCHD Camcorder/camera owners to convert MTS to AVI, convert MTS to MOV, convert M2TS to WMV, convert MTS to MP4, convert MTS to MPG, convert 3D MTS to any file format etc. with excellent audio and image quality for using in video editing software and multimedia devices.

Okay, here we go…

Step 1. Import .mts files to MTS to Windows Movie Maker Converter.

Download Pavtube MTS to WMM Converter, install and run it. Once run it, you can click “Add Video” button or “Add from folder” button to load your .mts and .m2ts AVCHD files from JVC or other camcorders.

Step 2: Select WMV as output format and set destination folder.

Click the pull down menu of “Format”, then you will be able to select a Windows Movie Maker supported format from the output format profile, we choose “Format > Common Video > WMV3 (wmv9)(*.wmv)” as the format for Windows Movie Maker. Or you can also choose “Format > HD Video > WMV HD (*.wmv)” as output format.

Meanwhile, click the folder icon at the end of “Output” to specify where to save the output files for your WMM, if not, this program will export them to the default save path automatically. BTW, if you want to combine multiple .mts and .m2ts files into a single file, you can tick off the checkbox “Merge into one file” to realize this goal.

Step 3: Adjust video and audio settings to optimize output file quality

Click “Settings” button, then you will be able to adjust audio and video parameters on the popup window to customize the output file quality, these adjustable parameters include codec name, aspect ratio, bit rate, frame rate, sample rate, and audio channel.

Step 4: Convert JVC MTS to WMV for importing to Windows Movie Maker.

Click “Convert” button to start converting. Once the conversion is finished by MTS to Windows Movie Maker Converter, you can click “Open” button to get the output files effortlessly, and now you are ready to import Video files to Windows Movie Maker for editing. Just import the converted files to Windows Movie Maker for editing via its “Import video” option.

You can import a video clip into a brand new Windows Movie Maker project or add a video clip to an existing movie in the works.

  • 1. Important – Make sure that all components of this project are saved in the same folder.
  • 2. In the Tasks pane on the left side of the screen, click on Import video under the Capture Video section.


Share

Mar 28

How to Transfer Videos from Camcorder to PC/Mac

First of all, you can see the following two camcorder user’s questions:

1. How to transfer video from my canon camcorder to PC?

I have very little computer skill and I would like to be able to transfer video from my canon xa10 to my PC, then edit these videos with premiere for bruning to DVD, what do I need?

2. How do I transfer video from camcorder to a Mac?

I have a Panasonic HC-X900 camcorder. How do I transfer the video from my camera to my MacBook Pro?


After reading, does it found similar problems are bothering you you?

Camcorder does not only captures videos, but the excited moments and memories that treasured for a life time. Maybe you have taken all of this great camcorder footage of your wife, your kids, your dogs, your Harley Davidson and your party etc… In order to make the most of your video, you want to somehow get this footage on to your PC/Mac or even convert camcorder video to DVD. This article not only shows you how to transfer camcorder video to computer, but also tells you a great way to convert camcorder video to DVD. After that is done, with the correct windows or mac video editing software, you can edit your videos on computer like a professional, or just watch them on TV with family and friends, or you can upload and sharing these camdorder videos to Youtube, Video, Facebook etc.

  • Part 1. How to Transfer Video from Camcorder to PC?
  • Part 2. How to Transfer Video from Camcorder to Mac?
  • Part 3. How to convert Camcorder videos to DVD?
  • Part 4. How to upload Camcorder videos to YouTube, Vimeo?

Part 1. How to Transfer Video from Camcorder to PC?

1. Install a video capture device

Once you have your device installed, you will be informed what cables to hook up from your camcorder or VHS to the device before transferring the camcorder videos.

2. Run video capture software.

Now that you have your capture equipment installed, and connected your camcorder or video source to the capture device. Your device should have come with video capturing software. So run this software. Once inside you might have to tell it what device you are going to use for the video source. If all went well during the installation of the hardware then in the setup properties for the software you should be able to locate the source capture device. Select it and then continue.

3. Transfer camcorder video to computer

Now most of these software packages once connected to the capture device have a capture page this is where you are going to, YEP you guessed it CAPTURE the video. You can normally leave the rest of the capture settings default unless you have some special needs on the format you wish to save the video as. Click on the capture option of your software and press the play button if necessary on your camcorder or video source. The software will now begin to capture your video and save it to your computer.

Part 2. How to Transfer Video from Camcorder to Mac?

Connecting a camcorder to a Mac is not very complicated and is not so different than connecting it to a PC, but you must make sure to be informed on how it connection works and how to follow the right steps before actually connecting them.

1. Make sure your camcorder is set to the correct mode for importing photos and videos.

2. Locate the four-pin FireWire port on your video camcorder.

On most video camcorders, you’ll find it located under a plastic or rubber boot. Leave the video camcorder powered off and simply lift up the boot from the camcorder and insert the smaller four-pin end of the FireWire cable into the FireWire port of the camcorder.

3. Insert the other end of the FireWire cable to Mac.

Insert the other end of the FireWire cable, the larger six pin end, into the FireWire port of your Mac. When both of the cables are connected, you can turn on the power to your video camcorder.

4. Transfer video from camcorder to Mac.

Your Mac should automatically launch iMovie in a few seconds. Follow the on-screen instructions on your Mac and begin the video transfer from your video camcorder to your Mac.

Now I believe you can transfer video from you camcorder easily to both your PC and Mac.

Part 3. How to convert Camcorder videos to DVD on Windows or Mac?

If would like to edit and convert camcorder videos to DVD for better saving, please keep reading:

What you need is a DVD burner. Here I strongly recommend Pavtube DVD Creator, which can not only support burning various camcorders like Canon, Panasonic, Sony, JVC, etc video to DVD, but also allow you burn any kind of video sources (MKV, AVI, MP4, WMV, MOV, MTS, TiVo, etc) to DVD. With it, you can make editing, like cropping, trimming, customizing DVD menu, adjusting video and transition effects to your camcorder videos. Photos can be made into slide show DVD simply with a few clicks. In addition, the Quick Burn feature enables users to burn archived ISO image and DVD-Video structure instantly.

Detailed steps refer to:

What’s more, it has also a Mac version: DVD Creator for Mac. So if you are a Mac user, and had just transferred your camcorder video to your Mac, you can download Pavtube Mac DVD Creator software and to burn your camcorder videos to DVD on Mac.

Detailed steps refer to:

Part 4. How to upload Camcorder videos to YouTube, Vimeo?

Do you like to cover all kinds of homemade video footage, such as weddings, birthdays, graduation ceremonies, children growing up etc and then upload these AVCHD, MXF, AVI, etc. videos to YouTube for sharing with friends or others? But while uploading you will meet the problem: YouTube doesn’t support these videos. YouTube gets format limitation, it only accepts files in format of FLV, MOV, MP4 etc. But, don’t worry! We can use third party software, such as Media Magician (Mac) to convert AVCHD, MXF, AVI, Tivo, MTS video to YouTube friendly video formats at first, and then upload the converted video to YouTube directly for share.

Detailed steps refer to:

Share

Mar 27

How to extract audio from Canon DSLR video to MP3 on Mac

How many times have you watched a canon dslr video with a fantastic piece of music on it? Wouldn’t it be great if you could make an MP3 file to play on your iOS & Android devices, Mac, or MP3/Media Player? As long as you don’t infringe on copyrighted material, there’s a great selection of audio extraction tool that you can use to generate digital audio files from video. In this tutorial, we use the Pavtube Audio Extractor to extract the audio from Canon DSLR video to MP3 files…

Quoted from Pavtube’s user feedback

“I’m creating family movie from Canon DSLR camera footage (.mov). I use Pavtube HD Video Converter for Mac to convert camcorder/dslr files to iMovie format and create DVD for watching and archiving. Pavtube has all main formats, great price and fantastic customer service. I’m very satisfied with the outcome and will highly recommend it to my friends. I would be glad if you could include Audio only conversion, by which I mean extracting the audio from Canon DSLR video and save as MP3 files. Thanks for your support. Keep up good job!”


The Pavtube Canon HD Video Converter for Mac is designed for converting HD videos from HD camcorders or DVs (like JVC, Panasonic, Sony, Nikon and Canon), non-protected HD or DVR files (*.tivo) to other file types for playback on iOS/Android/Windows 8 devices and editing in Final Cut Pro (X), iMovie, Final Cut Express, Avid, Adobe Premiere Pro, and so on. On top of that, it features various editing facilities, including extracting audio from videos.

Meanwhile, Pavtube HD Video Converter for Mac can also be used as a professional Audio Extractor Tools. The video to audio conversion lets you extract audios from AVI, MKV, MP4, WMV, MPEG, MPG, FLV (Flash Video), MOV, MP4, 3GP video files and save the audio track to MP3/ WMA/ WAV/ AAC/ AC3/ MKA/ FLAC files. With the trimming function, it’s quick and easy to take an hour’s footage and extract only five minutes’ for fun. Follow the guide below for extracting audio from Canon DSLR camera footage and convert to mp3.

How to extract audio from Canon DSLR Video and save as MP3 files?

Step 1. Load Videos to the Audio Extractor.

Back up Canon DSLR video structure to Mac HDD. Run the Pavtube HD Video Converter for Mac software and click “Add Video” and browse to source folder or individual .mov file. You may also import AVI, MKV, MP4, WMV, MPEG, MPG, FLV, MOV, MP4, 3GP videos from local HDD.

Step 2. Set output audio format from the “Format” bar.

Click on the “Format” bar and choose “Common Audio > MP3 – MPEG Layer-3 Audio(*.mp3)”, here you can also find various other audio formats (wav, m4a, ogg, ac3, wma, aac, au, aiff, mp2, flac, mka) for you to choose from.

Tips: If you prefer 5.1 surround sound, choose “Format > Common Audio > AC3 – Dolby Digital AC-3(*.ac3)” format, then follow the steps below:

1. Click on “Settings”.

2. In the Settings window, find “Channels” and select “5.1 channels” from its drop-down list.

Step 3. Extract MP3 audio from Canon DSLR videos.

Click the “Convert” button and the Audio Extractor will convert audio from Canon DSLR video files to MP3 or other desired audio format.

Learn More Pavtube Canon HD Video Converter for Mac Tips:

1. How to trim/extract a section only, instead of full-length audio?

This is a very basic but pretty helpful editing feature. It is very simple to extract partial length of sound track from videos.

To use the Trim function in the Editor, simply select the item you want to trim, click “Edit” button, then switch to “Trim” tab. Play the video while setting start time by clicking “[” and end time “]”.

2. How to extract multiple audio tracks into one file?

To extract multiple audio tracks as one file, just check the box “Merge into one file” before the software starts extracting audios.

PS. Click to read more Conversion Solutions for Canon Footage.

Share

Mar 26

Convert DVR-MS video to Final Cut Pro preferred Apple ProRes 720p video

“I needed to edit dvr-ms files, which I could not open with any professional software. It was from a Canon HDV camcorder / ingested into a PC via some standard Windows software. The software which helped me to at least trim the videos and save them in original HDV mpeg2 with an .mpg container was Video Redo, which I had to use in virtual Windows. I would appreciate if the software would be able just to rewrap the dvr-ms (and other) files into another Final Cut Pro friendly container. It would be good if there is a Mac oriented app available…”

Part 1. What are DVR-MS files?

DVR-MS (Microsoft Digital Video Recording) is a proprietary video and audio file container format, developed by Microsoft used for storing TV content recorded by Windows XP Media Center Edition, Windows Vista and Windows 7. Video is encoded using the MPEG-2 standard and audio using MPEG-1 Layer II or Dolby Digital AC-3 (ATSC A/52). The format extends these standards by including metadata about the content and digital rights management. Multiple data streams (audio and video) are wrapped in an ASF container with the extension DVR-MS.

Part 2. How to play DVR-MS files on Final Cut Pro?

As far as I know, the format is by no means intended for editing in Final Cut Pro. In order to work with DVR-MS videos in FCP, you must convert the DVR-MS files to FCP support format, like ProRes 422 or LT etc.

The tool we need is DVR-MS Converter for Mac. This is an excellent piece of software for users to convert DVR-MS video as well as various popular video formats (AVI, FLV, AVI, MKV, VOB, TS, etc) to Apple ProRes 422 .mov and iOS optimized MP4 videos. Thus, you can play the DVR-MS in many devices like iPod, iPad, iPhone, PSP, PS3 and so on. With it, you can convert DVR-MS files to FCP for Mac with fastest conveting speed, best output quality and excellent A/V sync and so on.

What’s more, the DVR-MS to FCP Converter provides customers with several simple editing functions, including cropping, trimming, deinterlacing, watermarking, adding special effects, and audio replacing, which help you do a fast and necessary editing on your footage before importing them to Final Cut Pro 6/7/X.

Just in few steps, the conversion will be finished. All the functions make conversion more easily. The software is compatible with OS X 10.8/10.7/10.6/10.5. PC users may get its Windows version. Follow the guide below to convert DVR-MS to Apple ProRes MOV easily by using this DVR-MS Converter for Mac.

Step-by-step guide: Convert DVR-MS to Final Cut Pro preferred Apple ProRes video

1. Run the DVR-MS to FCP Converter for Mac. Drag and drop DVR-MS video to the converter.

2. Press the “Format” bar and choose the format which you want to convert, you can select “Final Cut Pro” > “Apple Prores 422(.mov)” as output format.

3. You can control output video quality by setting resolution, bitrate and frame rate in “Settings”. For preserving 5.1 channels surround sound, set audio channels to “5.1 channels” instead of Stereo.

4. Click on the “Convert” button to start converting DVR-MS files to ProRes 422 MOV format.

When conversion is completed, you can easily and fast get the Apple ProRes files from its default output folder.

5. After conversion, you can edit the converted videos with FCP on Mac instantly.

Read More: FCP Media Files Importing | FCP Column

More features of DVR-MS Converter for Mac

1. By ticking off the checkbox before “Merge into one file” option, you can combine all the checked videos into one file.

2. If you want, you can also convert DVR-MS files to MP4 on mac, convert DVR-MS to MPG on mac, convert DVR-MS to AVI on mac, convert DVR-MS to WMV on mac, convert DVR-MS to FLV for uploading, import DVR-MS to iMovie, import DVR-MS to FCE, import DVR-MS to Avid, etc. for palying on your portable equipments or editing on your Mac editing software.

Share

Mar 26

2016 Top 5 Best Mac Video Splitter, Video Cutter, Video Merger/Combiner Reviewed

If you want to accurate Split/Cut Video Clips or Fast Join & Merge together multiple video files for playback but have no idea of what app to use on your Mac computer, refer to our 2016 Top 5 Best Mac Video Splitter/Cutter and Fast Video Joiner.

  • 1. Pavtube Video Converter for Mac
  • 2. Pavtube Media Magician for Mac
  • 3. QuickTime Pro ($30)
  • 4. iMovie (Built-in Free App)
  • 5. MPEG Streamclip (Free)

Top 1. Pavtube Video Converter for Mac ($35)

Introduction: Pavtube Video Converter for Mac is an all-in-one Video Converter on Mac OS X. It is able to do format conversion among various popular video and audio formats, including Flash Video/YouTube video (*.flv, *.f4v), HD Video (*.tod, *.mod, *.mov, *.mts, *.m2t, *.m2ts, *.ts, *.tp, *.trp, *.evo, *.mkv, *.dv ), General Video (*.avi, *.mpg, *.wmv, etc), QuickTime video(*.mov), DVR Videos (*.tivo) and more. In that way, you can edit or play your video files with different video editing software and universal portable players. The Mac video converter helps you to convert video files for your new iPad 3iPhone 5Apple TV 3, Galaxy Tab 2, Kindle Fire HD, Nook HD Tablet,Surface RT/Pro, iTunes, QuickTime Player, iMovie, FCE, Final Cut Pro, Avid Media Composer, iDVD, and more.

Supported Formats:

Input: Video formats (*.avi,*.divx, *.wmv, *.wma, *.asf, *.dvr-ms, *.wav, dts in wav, *.rm, *.rmvb, *.ra, *.mov, *.qt, *.mp4, *.3gp, *.3g2, *.dv, *.m4b, *.m4v, *.m4a, *.aac, *.flv, *.f4v (YouTube, Hulu, Fox, etc.), *.dat, *.mpg, *.vob, *.mod, *.tod, *.mxf (partial), *.mov from JVC, Panasonic, Cannon, Sony cameras and camcorders, *.m2v, *.m2t, *.m2ts (Blu-ray), *.ts, *.tp, *.evo, *.mkv, *.dv, *.tivo); Audio formats (*.au, *.mp3, *.mp2, *.flac, *.ape, *.ogg, *.8svx, *.aiff,*.aif, *.caf, *.dts, *.smv, *.tta, *.voc)

Output: *.avi, *.wmv, *.asf, *.mpg, *.mp4, *.3gp, *.3g2, *.mov, *.mkv, *.m4v, *.vob, *.dv, Apple ProRes 422 (*.mov), Apple ProRes 4444 (*.mov), DVCPRO (*.mov), HDV (*.mov)

Split/Merge Features:

  • 1. Merge multiple AVI, WMV, MP4, MPG, etc files into one big file.
  • 2. Trim a duration from each video clip and combine these individual clips into one file.
  • 3. Split one video file into 2 or more files evenly.
  • 4. Split one video clip by every specified time frame (e.g. split a TiVo show by every 20 mins).
  • 5. Split one big file by specified file size (e.g. split and save one MKV into VOB by every 1000MB).
  • 6. Export video in AVI, MP4, MPG, MKV, etc with specified quality (high, medium, low quality).
  • 7. Split large movie files quickly into H.264 videos for Android/iOS/Windows devices

Top 2. Pavtube Media Magician for Mac ($45)

Pavtube Media Magician for Mac is a user-friendly package designed for video transferring, compressing, converting and entry-level video editing. It helps you transfer any AVCHD (and other HD cam) videos to Mac HDD, make your own film with some basic editing, and upload your masterpiece to YouTube. Also, it gets your MTS, M2TS, TOD, MOD, MOV, MXF video into the correct format to suit your project of Final Cut Pro, Adobe Premiere Pro, Avid MC,iMovie/FCE, etc. No matter you are an experienced videographer or a video-editing novice, you will be very impressed with its easy-to-use process and its compatibility with a wide variety of cameras/camcorders footage, such as MXF, AVCHD*(MTS, M2TS), AVCHD Lite*(MTS, M2TS), MOV, TOD, MOD, MP4, AVI, etc.

Supported Formats:

Media Magician for Mac supports the same import and export formats as Pavtube Video Converter for Mac does.

Split/Merge Features:

  • 1. Merge multiple AVI, WMV, MP4, MPG, etc files into one big file.
  • 2. Cut out junk frames from each video and join the rest clips while exporting your self-made film.
  • 3. Export video in AVI, MP4, MPG, MKV, etc with specified quality (high, medium, low quality).
  • 4. Split large movie files quickly into H.264 videos for Android/iOS/Windows devices

Related Guide:

Top 3. QuickTime 7 Pro ($30)

QuickTime 7 Pro can convert your media to different formats, so you can watch a movie or video on your iPhone, iPod, and Apple TV. You can also use QuickTime 7 Pro to record video and share everything you make with friends and family. QuickTime Player Pro lets you import and convert tracks from compact disk (CD) audio to QuickTime, AIFF, or WAV. You can also import karaoke files into QuickTime Player Pro and maintain the text track. QuickTime Player Pro lets you import MIDI files, modify them (change instruments, for example) and save them as QuickTime audio, AIFF, or modified QuickTime MIDI. With QuickTime 7 Pro, you can record audio and video directly from your built-in iSight camera, FireWire camcorder, or microphone. You can even trim what you’ve recorded to the ideal length.

Supported Formats:

Input: MOV, MPEG-1, MPEG-2, MPEG-4, 3GPP, 3GPP2, JPEG, DV, Motion JPEG, AVI, MQV, H.264, AIFF/AIFC, Audio CD, CAF, MOV, MP3, MPEG-4, AU, WAV, iTunes audio

Output: H.264, MPEG-4, Sorenson Video, H.263, H.261 (MP4, MOV, M4V, 3GP, 3G2)

Split/Merge Features:

  • 1. Take several video files and merge them into one video movie or slide-show.
  • 2. Split large movie files quickly into H.264 videos for iOS devices.

Top 4. iMovie (Built-in Free App)

iMovie is a proprietary video editing software application sold by Apple for the Mac and iOS (iPhone, iPad, ipad mini and iPod touch). iMovie imports video footage to the Mac using either the FireWire interface on most MiniDV format digital video cameras or the computer’s USB port. It can also import video and photo files from a hard drive. From there, the user can edit the photos and video clips and add titles, music, and effects, including basic color correction and video enhancement tools and transitions such as fades and slides. The latest iMovie 11 has the ability to make trailers for home movies, more control over audio, instant replay and flash and hold effects, facial recognition, news themes, and the ability to watch the video on a Mac, iPad, iPhone/iPod touch, or Apple TV, as well as sharing on Facebook and YouTube.

Supported Formats:

Input: DV, DV Widescreen, HDV 1080i (25 and 30 fps), HDV 720p (25 and 30 fps), MPEG 4 Simple Profile, iSight, AVCHD (.mts, .m2ts)

Output: MOV, MP4, M4V, MPEG-4, M-JPEG, QuickTime

Split/Merge Features:

  • 1. Join together all the video sequence in the current iMovie project.
  • 2. Cut out junk frames from each video.

Top 5. MPEG Streamclip (Free)

Despite its slightly unintuitive user interface, MPEG Streamclip is a highly effective and versatile video encoder and converter. MPEG Streamclip is more than a simple encoder. It also works as an editor, converter and player. The application supports almost any video format and can export converted files to any format of your choice. Despite its slightly unintuitive interface, which might put off first time users, MPEG Streamclip is actually relatively easy to use. Just select your file, choose a compression type and let MPEG Streamclip do the rest. You’ll find a wide choice of settings which will let you adjust quality, encoding level and bitrate of videos among other things.

Supported Formats:

Input: MPEG, VOB, PS, M2P, MOD, VRO, DAT, MOV, DV, AVI, MP4, TS, M2T, MMV, REC, VID, AVR, M2V, M1V, MPV, AIFF, M1A, MP2, MPA, AC3

Output: MOV, AVI, MP4, DV

Split/Merge Features:

  • 1. Join (stitch) together multiple video files
  • 2. Handle multiple audio tracks and works with files larger than 4GB


Share

Mar 22

How to Embed FLV videos to PowerPoint Slide and insert Windows Media Player

Now, more and more people download their favorite FLV files from YouTube and other video sharing websites and want to insert them into PowerPoint files to make a good presentation. But how to insert FLV Videos into PowerPoint presentation effectively? Many people have difficulty in inserting FLV Video to PowerPoint Slide. Here I will show you how to insert your favorite FLV Video to PowerPoint according to my experience. Hope it can help you.

“I want to attach an flv file that I downloaded from YouTube to PowerPoint slide but to no avail. It keeps popping up error message… Is it possible to enable flash in PPT?”


FLV stands for “Flash Live Video”. It is a format designed for web video playback that offers high rates of compression and produces high quality video.  Notable users of the FLV file include Google Video, Reuters.com and YouTube.

An FLV file is the native, proprietary document file format created by the Adobe Flash authoring program. Now more and more people download their favorite flash videos from YouTube and other video sharing websites and want to insert them into PowerPoint to make a good presentation. However, Flash videos in .flv and .f4v format are not compatible with PowerPoint, even with the latest PowerPoint 2010. One effective solution is to convert FLV/F4V to WMV. Though FLV is not accepted by PowerPoint 2010, there are many formats that PowerPoint 2010 supports like the most common AVI and WMV video format. The following guide instruct you 2 ways to insert FLV video to PowerPoint.

Method 1: Insert FLV video to PowerPoint Slide

If you want to add FLV video of YouTube online to your PowerPoint Slide, you can follow the steps below:

Take this video for example: http://www.youtube.com/watch?v=9esdUmEfZD0

Step 1: Copy and paste the YouTube video URL to http://youtubeonlinevideoconverter.com/ orhttp://www.ixconverter.net/, which are online conversion apps for you to convert FLV video to AVI format.

Step 2: Select AVI as the output video format and click Convert button. The video conversion will be done automatically.

Step 3: When the conversion is finished, download the output AVI video to your computer.

Step 4: Insert the video to your PowerPoint. Click Insert -> Video -> Video from File.

Method 2: How to convert FLV to WMV for attaching to PPT

Required Tool: FLV to WMV Converter

This is a nice small took kit that lets you transcode between AVI, WMV, MKV, TS, MPG, MTS, M2TS, MOV, FLV, TOD, MOD, TiVo, etc. It also features basic editing features such as trimming, merging, cropping, watermarking, and audio replacing facility. By using the trimming action you can clip a specific duration from a video clip and turn it into PowerPoint preferred WMV format.

Step 1. Run FLV Converter for PPT, drag and drop source FLV file(s) to the software.

Step 2. Click on “Format” bar, and select “Common Video>> WMV3 (WMV9)(*.wmv)” format from its drop-down profile list.

Step 3. Press on the big “Convert” button to get FLV Video Converter convert FLV to PowerPoint preferred WMV format.

Step 4. After conversion you can press “Open” to locate resulting file.

Tips:

1. Trim out unwanted frames: Press shortcut key “Ctrl” + “E” to enter video editor, where you can set starting and ending frame.

2. Combine 2 or more videos into one: Check the “Merge into one file” box before conversion.

3. Preview output file size/adjust video quality: Press on “Settings” to preview estimate file size. For better quality, set video bitrate up. Otherwise set video bitrate down to 1000kbps or below.

How to add converted WMV file into PowerPoint

1. In PowerPoint, select the slide that you’d insert video.

2. Click the “Insert” menu and select “Movies and Sounds.”

3. Choose “Movie From File” and browse to locate the video you want to insert.

4. Double-click the WMV file you just saved. The video will now appear in the PowerPoint slide.


Share

Mar 22

Merge Sony DSC-H200 multiple MP4 clips into one for editing and uploading

The Sony H200 looks rather like a digital SLR, and that’s no accident — its styling and grip design are intended to evoke Sony’s Alpha DSLR cameras. And while its lens is fixed in place, consumer photographers aren’t likely to mind, because with a powerful 26x optical zoom on offer, the DSC-H200 likely offers all the range they’ll need in most shooting situations.

Ease-of-use features include Sony’s Intelligent Auto mode, which recognizes the scene type and then configures the camera appropriately, as well as a 360-degree sweep panorama function that handles image capture and stitching automatically. All you need do is press the shutter button once and pan across the scene. There’s also a Beauty Effect function that lets you retouch portrait images to smooth and tone your subject’s skin, whiten their teeth, widen their eyes, and remove shine. And as well as stills, you can shoot high-def 720p movies, with a resolution of 1,280 x 720 pixels.

Merge multiple MP4 clips from Sony DSC-H200 into one for editing and uploading

You may have use Sony DSC-H200 recorded many high-definition clips, they may be splited, in order to edit with only one video, it is good choice to merge multiple MP4 clips from Sony DSC-H200 into one for editing and uploading, to solve your problem, here I humbly recommend Pavtube HD Video Converter for Mac, which can automatically merge MP4 files without changing video quality. What’s more, you can edit the recordings wtih this software, or convert videos to best codec formats for editing software, or upload to YouTube for sharing with friends.

How to Merge MP4 Files?

Software Required:

Pavtube HD Video Converter for Mac

Step 1: Import MP4 files to merge.

You can either click “Import” button on the primary window and locate MP4 files on your computer, or just drag and drop MP4 files from Windows File Explorer to the software. All imported MP4 files will be listed.

Step 2: Merge Sony DSC-H200 videos.

Please pick the “Merge into one file” option in right of the output format, this feature will merge your recordings into one file.
Note: You can change the list’s quene in the importing process.

Step 3: Choose the output format you need.

You can choose MP4 format for output as original, or you can choose quicktime MOV, AVI, MKV, or final cut pro prores mov, Avid DNxHD codec MOV for output. Just choose as you want.

Step 4: You can customize the output parameters.

This Sony DSC-H200 MP4 converter has powerful customization feature, you can adjust the output parameters as you want, such as resolution, bitrate, etc.

Now, please download this software and take a free try, hope this program can help you merge/edit Sony DSC-H200 MP4 videos perfectly.

Share

Mar 20

How to get Panasonic AJ-HPX2000 P2 .MXF into Pinnacle Studio 15?

Pavtube MXF to Pinnacle Studio Converter provides a perfect way for you to import Panasonic AJ-HPX2000  P2 MXF files to Pinnacle Studio 15 for making your own home videos with Pinnacle Studio 15.

“For some years I have produced as a hobby railway DVD’s which I sell at local shows. I film trains all over the UK, USA/Canada and mainland Europe and the new camera was purchased to enable me to get into HD quality production. I recently purchased a Panasonic AJ-HPX2000 camcorder and as I have always used mini DV film in the past I was not aware that the camera produced files in MXF format which are not recognized by Pinnacle editing software. When I done a search Pavtube product kept coming up, how does this app work with Panasonic AJ-HPX2000 .mxf files? Which apps should I choose and what do I need to get P2 .MXF into Pinnacle Studio 15?”

For converting MXF video into editing software friendly format, the best recommendation is Pavtube MXF Converter, which lets you convert convert MXF to MPEG, encode MXF to WMV, transcode MXF to MP4, render MXF to AVI, and more. This is a smart tool specially designed for MXF users to preview and convert MXF recordings to your wanted video and audio formats, so as to smoothly add them into Sony Vegas, Adobe Premiere, Windows Movie Maker, Magix Movie Edit Pro, Ulead DVD MovieFactory, Pinnacle Studio and more other video editing software to do further editing. It naturally support converting MXF recordings shot by a Panasonic P2 camcorders (What is P2?) and Canon XF camcorders.

The guide below shows you how to get P2 .MXF into Pinnacle Studio 15 with the app.

Part I: Transcode MXF to HD AVI – native editing format for Pinnacle Studio.

1. Backup Panasonic AJ-HPX2000 camcorder MXF videos from P2 HD card to local HDD with full P2 directory preserved, as both the video and audio are saved separately as .mxf files.

2. Run Pavtube MXF to Pinnacle Studio Converter. Click “Add Video” or “Add from folder” icon to load MXF files.

3. Choose “AVI HD Video (*.avi)” as target format from “HD Video” option.

4. Click “Settings” button and enter “Profile Settings” panel to adjust video and audio settings if necessary. Users are free to reset codec, bit rate, frame rate, sample rate, and audio channels.

5. Click the big button “Convert” to start Convert Panasonic AJ-HPX2000 P2 MXF to AVI for Pinnacle Studio.

6. Locate converted P2 recordings (in .AVI format) by clicking on “Open” button.

Part 2: Import converted HD AVI to Pinnacle Studio for editing.

Now your Panasonic AJ-HPX2000 .MXF footage are converted into Pinnacle Studio natively supported format. Launch Pinnacle Studio HD Ultimate 15, and follow “Import” > “IMPORT FROM” > “Other devices” > “the folder stored the converted AVI files” > “Start Import” to get P2 footage into Pinnacle Studio 15.

Personally I am very pleased with the product. As I have only used the product a few times so far it is difficult to give any constructive comments at this stage but all my conversions were done successfully with stunning image quality – I can hardly tell any quality difference.

You might also be interested in MXF Converter for Mac and more MXF Transcoding solutions at MXF Column.

Share

Mar 20

What is P2 (storage media)?


P2 (P2 is a short form for “Professional Plug-In”) is a professional digital recording solid-state memory storage media format introduced by Panasonic in 2004, and especially tailored to electronic news-gathering (ENG) applications. It features tapeless (non-linear) recording of DV, DVCPRO, DVCPRO25, DVCPRO50, DVCPRO-HD, or AVC-Intra streams on a solid-state flash memory. The P2 card is essentially a RAID of Secure Digital (SD) memory cards with an LSI controller tightly packaged in a die-cast PC Card (formerly PCMCIA) enclosure, so data transfer rate increases as memory capacity increases. The system includes cameras, decks as drop-in replacements for Videocassette recorders (VCR), and a special 5.25-inch computer drive for random-access integration with non-linear editing systems (NLE). The cards can also be used directly where a PC card (PCMCIA) slot is available, as in most older notebook computers, as a normal hard disk drive, although a custom software driver must first be loaded.

As of early 2010, P2 cards are available in capacities of 4, 8, 16, 32 and 64 GB. At introduction, P2 cards offered low recording capacity compared to competing, video tape-based formats (a miniDV tape holds roughly 13 GB of data, and an S-size HDCAM tape holds 50 GB). To solve this, camcorders and decks using P2 media employ multiple card slots, with the ability to span the recording over all slots. Cards are recorded in sequence, and when a card is full, it can be swapped out while another card is recording. This limits recording time only by power supply and the available number of cards. If a card is partially full, the deck will record only until it is full. Unlike video tape, old video cannot be recorded over accidentally; old footage must be manually deleted.

P2 cards are of a ruggedized PCMCIA type with the fastest transfer speeds currently available through this format. The card also contains a processor that organizes and safeguards the files and the case is developed and crafted to “military” (according to Panasonic) specifications, making P2 cards tough and reliable.

The first pieces of equipment released by Panasonic which use the P2 format included the AJ-SPX800 (a 2/3″ broadcast camcorder for ENG and EFP applications), the studio recorder AJ-SPD850, the AJ-PCD10 offload device (basically, a five-slot PC card reader with USB interface designed to fit a 5-1/4″ IT systems bay), and the memory cards themselves – AJ-P2C004 (4 GB) and AJ-P2C002 (2 GB). Panasonic is currently shipping a wide range of camcorders that support the P2 format, including the professional video camera AG-HVX200 HD handheld camcorder, and the high-end, or broadcast professional shoulder-mount AG-HPX500, AJ-HPX2000, and AJ-HPX3000 camcorders. Panasonic has also announced the P2-based AG-HPX170 handheld HD tapeless camcorder. The HPX170 is very similar to the HVX200 and the HVX200A, the main difference being the lack of a video tape drive on the 170. The latest products to feature P2 technology are the well-received recently launched AJ-HPX2700 and AH-HPX3700 “Varicam” high end cameras.

On April 15, 2012, Panasonic introduced the “MicroP2” system, an extension of the P2 format. It utilizes a P2 Card adapter that enables the use of high-speed SDHC or MicroP2 cards. Current P2 products will require a firmware update to be able to use the new format.

P2 card footage related guide:

PS. More solutions about P2 card footage at MXF Column and File Importing; More Question at FAQ

The original source: pavtube.com

Share
Page 22 of 37« First...10...2021222324...30...Last »