AIC Converter,MTS to AIC,MTS to iMovie,MTS to FCE,MTS to Final Cut,AVCHD to AIC Converter,AVCHD to Final Cut Express,import AVCHD files to iMovie,MTS to ProRes 422,MTS to Final Cut Pro,MTS to FCP X,AVCHD and Final Cut Pro,Log and transfer MTS to FCP,edit MTS footage in iMovie,FCP transfer MTS files,transfer AVCHD files to iMovie

Feb 01

Cut and Join, Convert Panasonic P2 AG-HVX200/AJ-HPX3000 1080/60i MXF for FCP 6/7/X Importing, Editing

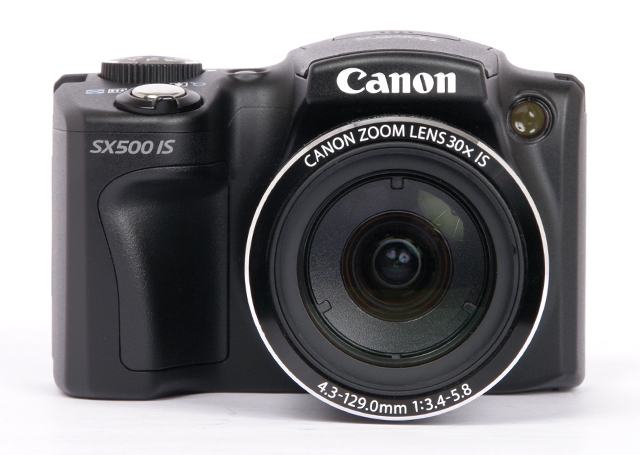
“I have a Panasonic P2 AG-HVX200 camcorder which records MXF footages, and I use L&T to load videos to FCP on Mac Mountain Lion 10.8. This way is easy to import but it is not good for editing, because it takes long time to render after the importing. How can I shorten the process? Is there a way to import Panasonic P2 MXF to Final Cut Pro without rendering? Thanks for help”.

Panasonic AJ-HPX3000 Panasonic’s top of the line camera is a 1920×1080, 10-bit 4:2:2 color sampling beauty. It uses a 2.2 million pixel 3-CCD block and records using the new AVC-intra codec to capture true native 1080p images at 24p, 25p & 30p frame rates. This codec, thanks to a low compression ratio at a video bit rate of 100 Mbps (1080/59.94i, 720/59.94p) and the easy-to-edit intra-frame compression system, is suitable for recording fast-moving subjects with no motion artifacts other than motion blur. However, the P2 MXF does not seem to work in Final Cut Pro well. Although it is reported that the “log and transfer” can help import the MXF files, stored onto the P2 card, actually there still exists some problems causing error when importing AG-HVX200 1080/60i MXF to FCP 6/7/X. A better workflow is to convert Panasonic AG-HVX200 1080/60i MXF to Apple ProRes 422 first, as it is the best codec for FCP editing. Below is the simple step-by-step guide for P2 camcorder users to keep and maintain 1080/50 mbps or 100 mbps from Panasonic AG-HVX200/AJ-HPX3000 MXF to Apple ProRes for FCP on iMac/MacBook Pro with Mac OS X, Leopard, Snow Leopard, Lion, Mountain Lion.

Cut and Transcode Panasonic AG-HVX200/AJ-HPX3000 MXF to Apple ProRes for Final Cut Pro editing
1. Backup your P2 MXF files structure to local computer.

2. Get Media Magician for Mac installed on your Mac.

Pavtube Media Magician for Mac offers an easy introduction to video editing with support for color adjustment, themes, easy to use effects, a simplistic timeline view and built-in camcorder wizard for ingesting video from camera/camcorder. Moreover, this smart app even exports intermediate codecs and professionals can export ProRes, AIC and DNxHD etc. for further post-production in FCPiMovie/FCEAvidAdobe AE, etc.

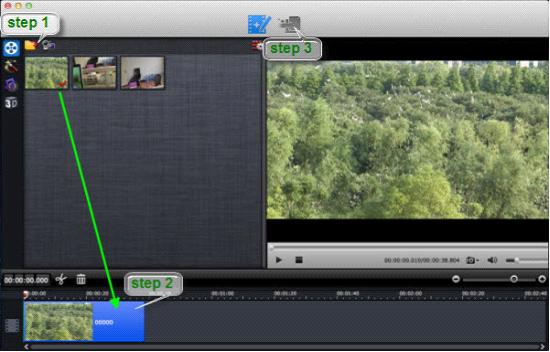
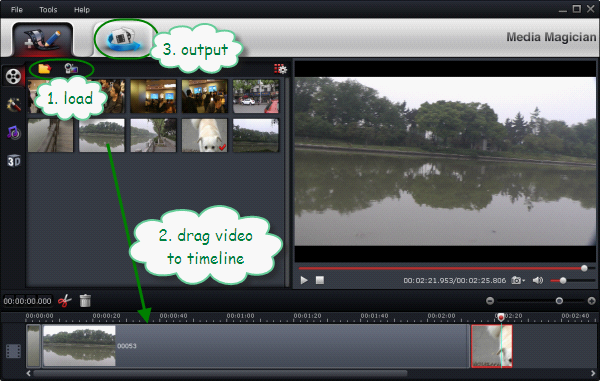
Step 1: Run Media Magician for Mac.

To load stored MXF clips on your computer’s HDD, you can choose to “Import Media Files” or “Import Media Folder” to browse and load your source files from computer.

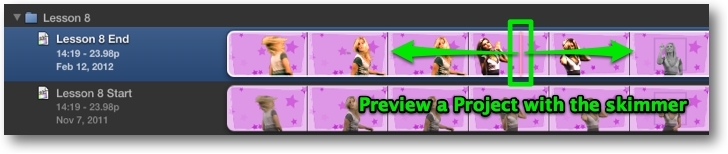
Step 2: Organize and edit Panasonic AG-HVX200 MXF videos in timeline.

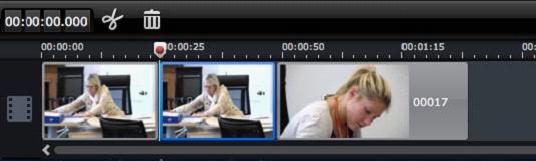
Drag and drop the MXF videos to timeline. Here you can remove unwanted .mxf clips, trim out unwanted frames from specific clip by frame-accurate, and put them into the right order for merging. Use the scissor icon to do frames trimming.

Step 3: Choose “Output” on the top of main interface to switch it to output interface.

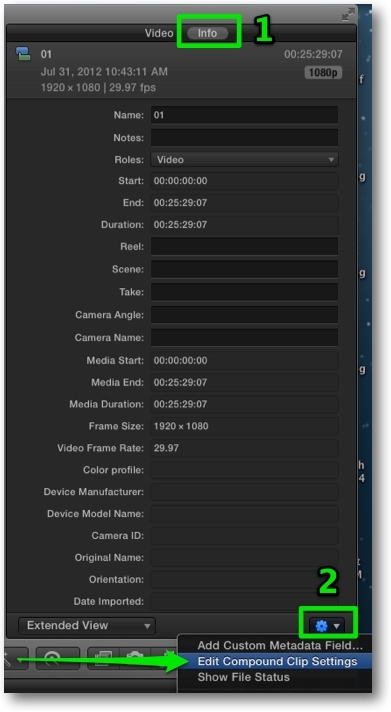
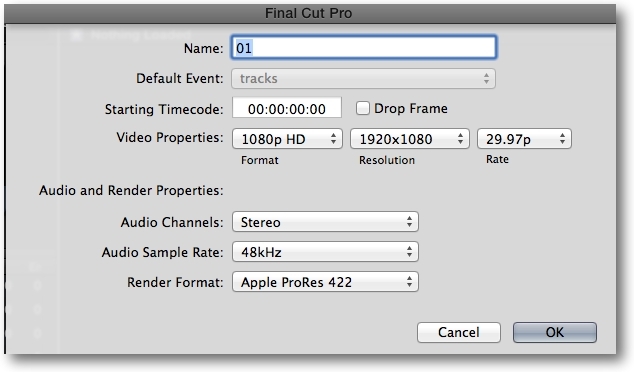
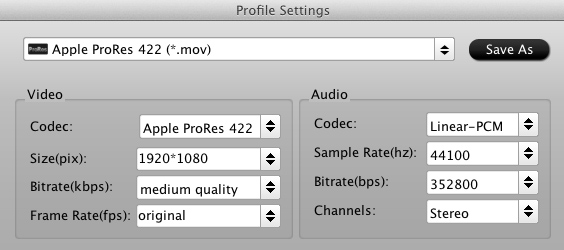
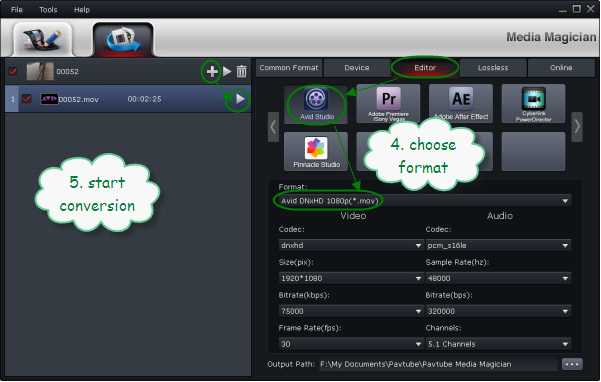
Step 4: Choose Apple ProRes codec as output format. For importing Panasonic P2 video to FCP, follow the steps to set Apple ProRes 422 preset:

1. Move your mouse to Editor, click on the tab.
2. Select “Final Cut Pro” group.
3. The default output format for FCP is Apple ProRes 422. To use other codec in the ProRes family, just select the desire codec (ProRes LT, Pro, HD, ProRes 4444) from the drop-down list of “Format” bar. Set bitrate and frame rate if necessary.

Step 5: Export Apple ProRes video for FCP 7/FCP X.

Press the plus sign (+) to add task for conversion. Select the task(s) and click on the triangle sign to start encoding Sony MXF to Apple ProRes 422 MOV.

After converting and merging the Panasonic P2 AVC-Intra MXF files, just import Apple ProRes 422 MOV to Final Cut Pro. In Final Cut Pro, follow pull-down menu- File/Import/Files… to import converted Panasonic P2 AVC-Intra MXF footage to FCP 6/7/X without rendering.

Tips: If you would like to edit Panasonic P2 AVC-Intra 50/100 MXF with FCE/iMovie, Avid, Adobe Premiere Pro, After Effects, etc, you can convert Panasonic P2 MXF to Mac itself bring format like ProRes MOV for FCE and iMovie, or transcode Panasonic AVC-Intra MXF to H.264 MOV, DV, AVI, M4V, MPG for Avid, Adobe Premiere Pro, After Effects on Mac.

Share

Feb 01

Remux MTS without recompression: Lossless merging Sony HDR-TD10 3D MTS clips for streaming to PS3

“I just received the neat Sony HDR-TD10 camera and I’m trying to figure out the particulars of the MTS files that it shoots. Now I’d like to merge multiple Sony HDR-TD10 .MTS without losing quality, so that I can stream the result AVCHD footage smoothly over Wi-Fi to PS3 in full HD quality. The HDR-TD10 also shoots in 3D mode, so I’d prefer some tool that let me merge 3D .mts video as well. I’m working on iMac with OS X Mountain Lion. Thanks. ”

There are some MTS converters that can convert your media (HDR-TD10 MTS video) in mp4 file as I read in previous posts, but you will definitely loose a lot of details doing it. This Mac MTS Converter can encode 3D MTS to MP4, if you don’t mind. For lossless merging of Sony HDR-TD10 MTS clips, I find the Media Magician for Mac a best solution. Using the software, you can merge m2ts/mts files (2D or 3D) together without losing quality. Overall, this is a best solution to easily re-mux m2ts/mts files produced by Sony HDR-TD10 or other similar camcoders in order to stream them smoothly over Wi-Fi to PS3 in full HD quality. Below is a guide for your reference.

Tutorial: Remux AVCHD MTS/M2TS camera videos without recompression on Mac

1. Import source files into Media Magician for Mac Run Pavtube Media Magician for Mac, load source videos into it.

Learn the details on How to import source videos into Media Magician for Mac

2. Drag and drop Sony HDR-TD10 MTS video to timeline

In the Timeline panel of Pavtube Media Magician for Mac, you can copy a video clip by “Duplicate This Clip” in the Timeline. You can also change the start time and end time of a clip to trim/cut off unwanted parts in a movie clip. To remove clips, select one or more clips in the sequence and press “Delete”. You can also change the order of clips once they are there in the Timeline. If you would like to split a clip into two parts, you can drag the cursor/pointer to the right place and click the “Cut” button to cut off the clip.

Read More: How to Duplicate, Trim, Split and Delete a Clip with Media Magician for Mac.

3. Remux Sony HDR-TD10 MTS videos with no conversion on Mac

Choose “Output” in the main interface, then switch to “Lossless” > “original” or “Lossless” > “original”. Click “Plus” icon to add conversion task, and click “Start” to begin merging and remuxing Sony TD 10 MTS without recompression on Mac.

Soon after the rewrapping task is finished by Media Magician for Mac, you can add the generated MTS file to your Mac media server and play the 2D/3D MTS video to PS3 over Wi-Fi. Enjoy it!

Share

Jan 31

Final Cut Pro X Tips and Tricks #6

06-01 Sequence/Timeline markers (like FCP7).

You can have Sequence markers for the entire timeline by placing them in a clip the length of your timeline. Here I’ve placed markers in a slug in a storyline. I use a slug because a slug is transparent in an upper storyline in FCPX. You can use any clip to hold your timeline master markers if you disable it. Even a disabled title clip will work. To add markers, move your skimmer in the master marker storyline clip where you want the marker to be and hit the M key. Once markers are added you can jump to any timeline marker location by clicking on the marker in the timeline index.

To “Delete All Markers” just delete the markers storyline. You can also “Delete Selected Markers” by selecting all Timeline clips and visiting the menu Mark > Markers > Delete Markers in Selection or use the keyboard selection Ctrl – Shift – M.

06-02 Highlight with a Shape Mask.

Shape Masks are actually two masks in one, inside the mask and outside the mask. Here I’m using a jpg with text for highlighting In my timeline. Select your clip in the timeline and in the video tab of the Inspector click the add Shape Mask button. This will add a default circle Shape Mask. Change the Shape Mask into a rectangle by dragging the rectangle control point to the left. The outer circle controls the feathering of the Mask Shape.

Move the Mask Shape by dragging on its center move handle to the area that you want highlighted. Then change the Shape Mask height by dragging the top and bottom green button controls and its width by dragging the left and right green button controls to size it to fit this first highlight area.

Click the Correction 1 Show Correction right arrow button to go to the Color Adjustment panel.

(1) Click on the Exposure tab. (2) Click the Outside Mask control at the bottom of the panel. (3) Drag the global control down to darken outside of the Shape Mask to achieve the desired highlighting effect as shown below.

06-03 Animate a Highlight with Shape Mask keyframes.

In the inspector, click the Shape Mask 1 keyframe button (1) to set a keyframe at your first highlight position. In the timeline, move the playhead the length of time you want your first area highlighted. In the Inspector, add a second keyframe to lock in this time length.

Move the timeline playhead one second (or other length of time) forward. This will be the highlight travel time from area one to area two. In the Viewer move your Shape Mask by dragging on its center control point (2) to position it over the next highlight area. A new position keyframe will automatically be added to the Shape Mask. Repeat moving the timeline playhead, setting keyframes and adjusting the Shape Mask position for all additional areas that you want highlighted. The highlight will now pause and then move when played back in the timeline.

06-04 Use a slug as your main storyline clip for some projects.

If you need the freedom to move attached clips or secondary storylines around without being restricted by what they are attached to, you can use this technique. The attached clips are effectively connected to the entire timeline.

If you are cutting a music video, you could also use your master audio track as your main storyline clip to achieve the same effect.

06-05 1/10th pixel adjustments for position parameters in the Inspector.

Hold down the Option key while dragging up/down on the position values to get 1/10th pixel adjustments. Without the Option key held down, dragging up and down will move the position in whole pixels. To move 10 pixels at a time, hold down the Shift key.

06-06 To edit a Compound clip’s settings.

select the compound clip in the Event browser, go to the info panel of the Inspector (1) and at the bottom of the Info panel click on the little gear icon drop-down menu (2). From the drop-down menu choose Edit Compound Clip Settings.

Here you can modify the Name, Starting Timecode, Video Properties, Audio Properties and Render Format of your Compound clip.

06-07 Preview a Project before opening it.

The skimmer is a great tool for reviewing clips in the Timeline and Event browser but you can also can preview an entire Project complete with edits, transitions, titles, effects and listen to audio before you open it. If you have multiple versions of a Project and want to open a certain one, this is the way to check which one to open. Select your Project in the Project Library and skim your mouse pointer over it for an instant preview. You can also play the Project from the skimmer position by pressing the spacebar. Of course skimming (S key) has to be turned on for this to work.

Share

Jan 31

Canon EOS-1D X Firmware 1.2.1 Download

Update! Canon EOS 1D X firmware v1.2.1 is now available for download here.

Release of New Firmware Version 1.2.1, firmware incorporating disablement (operational error prevention) of the Image Size selection button

We are releasing firmware version 1.2.1 for EOS -1D X for service prior to the Web announcement. We are planning to make this firmware available on the Web for download in mid-January 2013.

This firmware update is to improve operational function in response from several professional photographers that the Image Selection button was pressed without realizing and the image size had been changed. Also, this firmware incorporates quality issue fixes that have been reported from the market.

1. Details of Functional Improvements and Fixes

1-1. The function to disable the Image Size selection button is added.

1-2. Fixes Err 70 and Err 80 which may occur depending on the camera settings, shooting scenes, or the timing of releases. Also, some complained camera freeze when Err 80 occurred.

The above mentioned (1-2) phenomenon occur in very rare instances. In addition with the firmware update for 1-1, the fixes for these phenomena have been incorporated.

a) Err 70

In customization of operational buttons, there were errors in operational program for the exposure level display in the viewfinder when the Main Dial is set to change the aperture value in Manual mode, and may cause Err 70.

b) Err 80

Err 80 may occur depending on the distance to the subject, shooting scenes, or the timing of metering.

This phenomenon occurs in very rare instances due to the error in operational program for metering when shooting a subject at a distance with telephoto lenses with focal lengths of 300 mm or 400 mm.

Canon 1D X Available at Amazon | Adorama | B&H


Share

Jan 31

Canon Announced PowerShot ELPH 330 HS, ELPH 115 IS and A2500

LAKE SUCCESS, N.Y., January 28, 2013 – Canon U.S.A., Inc., a leader in digital imaging solutions, today announced the addition of three stylish, feature-packed PowerShot Digital Cameras: the PowerShot ELPH 330 HS, ELPH 115 IS and A2500. These new models are ideal for photography enthusiasts of all levels looking for great photo quality and excellent video performance in compact, powerful point-and-shoot designs.

The new PowerShot ELPH 330 HS digital camera provides advanced wireless connectivity for easy sharing. Providing great performance in dimly lit situations, the ELPH 330 HS digital camera includes the Company’s HS SYSTEM that delivers clear images with minimal noise and maximum detail even when shooting in low-light. The new cameras offer great features such as Canon’s Smart AUTO, enabling even novice users to get optimal camera performance automatically, so whether photographing a running child or a solo recital on stage the cameras deliver spectacular images with ease. Smart AUTO allows the cameras to detect up to 58 scenes for the PowerShot ELPH 330 HS digital camera and up to 32 scenes for the PowerShot ELPH 115 IS digital camera and PowerShot A2500 digital camera. All three models also feature ECO Mode, an advanced new method that manages power consumption and extends battery life by approximately 30 percent, when enabled, allowing you to shoot more photos for a longer amount of time.

“With the introduction of these sleek, new models to our family of PowerShot digital cameras, we are able to provide our customers with a range of imaging options including more models with wireless connectivity to upload and share their amazing creative images,”said Yuichi Ishizuka, executive vice president and general manager, Imaging Technologies and Communications Group, Canon U.S.A.

PowerShot ELPH 330 HS Digital Camera

Photography today is as much about image quality as it is about sharing, whether through prints or online communities. With this in mind, the PowerShot ELPH 330 HS digital camera builds upon the success of the PowerShot line with built-in advanced wireless capabilities to easily share high-quality images captured with an impressive 10x optical zoom lens and 12.1-megapixel High-Sensitivity CMOS image sensor. After an initial one-time set-up, the camera can connect to both iOS® or Android™ smartphones and tabletsi for quick and easy sharing. Users launch Canon’s free CameraWindow applicationii, available on both the iOS® and Android™ operating systemsi, to wirelessly transfer photos and videos from the camera to their device. Frequently used devices and accounts are conveniently stored in the camera’s wireless history menu for quick one-touch access.

With these enhanced wireless capabilities, users now have the ability to comment on their uploaded photos directly from the camera – so being part of conversations taking place on social networking sites is easy and convenient. In addition, individuals can control the destination of Facebook uploads – choosing to share content with everyone, or post photos only to selected Facebook groups. Users can also instantly upload images wirelessly from the camera to Canon iMAGE GATEWAYiii, and automatically upload them to a computer remotely. Photos can also be printed wirelessly using Wireless PictBridgeiv on select Canon wireless inkjet printers, including the new PIXMA MG6320 Photo All-In-One printer, so special moments can be preserved and cherished.

A fantastic multipurpose lens: the PowerShot ELPH 330 HS digital camera provides a 10x optical zoom lens taking images from 24mm wide, up to 240mm at the telephoto end, able to capture that group shot, or zoom in for a dynamic close-up. Great even in low light, the camera’s 12.1-megapixel High-Sensitivity CMOS image sensor and DIGIC 5 image processor combine and deliver on Canon’s HS SYSTEM helping ensure detail is captured even in dark or shadowed areas at a maximum ISO speed of up to 6400. For capturing memorable moments on video, at the touch of a dedicated movie-record button, the PowerShot ELPH 330 HS digital camera shoots beautiful 1080p Full HD video and includes a built-in stereo microphone for great sound. Helping document vacations with your own personal highlight reel, the camera’s new Hybrid AUTO mode utilizes a combination of Smart AUTO and Intelligent IS to create a beautiful and steady HD video clip (up to approximately 4 seconds) in Movie Digest mode every time you shoot a still image. Helping ensure you don’t miss those magic moments, the camera features both High Speed AF for fast focusing speed and High-Speed Burst for continuous capture at up to 6.2 frames per second while maintaining superb image quality. The combination of features, including wireless connectivity, Canon’s Intelligent IS system and ECO Mode, help make the PowerShot ELPH 330 HS digital camera a great imaging companion for vacations, all-day sporting events, or family parties.

Expected to hit store shelves in March, the PowerShot ELPH 330 HS digital camera will be available in three modern colors: black, silver and pink for an estimated retail price of $229.99.

PowerShot ELPH 115 IS Digital Camera

The new pocket-able PowerShot ELPH 115 IS digital camera features an 8x optical zoom lens (28-224mm), which provides a focal range to capture most any situation. The PowerShot ELPH 115 IS digital camera includes a 16-megapixel image sensor and DIGIC 4 image processor for exceptional image quality. For those photographers who “shoot it all” and seamlessly move from scene to scene, the PowerShot ELPH 115 IS digital camera provides Canon’s Smart AUTO mode that intelligently selects the proper camera settings based on up to 32 predefined shooting situations for capturing spectacular images in a variety of settings with ease. For creative video capture, users can record HD video with a built-in microphone for great sound. The PowerShot ELPH 115 IS digital camera also includes Canon’s unique Intelligent IS system technology, matching the lens movement with one of six stabilization modes for smooth video and sharp still images. The camera also includes Canon’s new ECO Mode allowing you to shoot more photos for a longer amount of time.

With anticipated in-store availability in March, the PowerShot ELPH 115 IS digital camera will available in four sleek colors: blue, silver, black and pink at an estimated retail price of $169.99.

PowerShot A2500 Digital Camera

Rounding out Canon’s new PowerShot lineup is the PowerShot A2500 digital camera, which includes a 16-megapixel image sensor and DIGIC 4 Image Processor, as well as a 28mm wide-angle lens with 5x optical zoom that can extend out to 140mm at the telephoto end. The camera also features Canon’s Smart AUTO mode that analyzes each scene to intelligently select camera settings based on 32 predefined shooting scenarios to help capture stunning images with ease. The PowerShot A2500 digital camera can also capture great video, recording HD through a dedicated movie button. Helping ensure crisp images, Canon’s Digital IS reduces the effect of camera shake and subject movement. For travelers and those on the go, Canon’s new ECO Mode conserves battery life, allowing you to shoot more photos over a longer period of time. For those photographers looking to be a little more creative, the camera also features various Scene Modes such as Fisheye Effect, Toy Camera Effect and Monochrome to help provide additional creative freedom when capturing your photos. And for those just learning the art of photography, a Help Button will provide simple explanations of camera settings and functions.

Expected for sale in April, the PowerShot A2500 digital camera will be available in silver, red and black for an estimated retail price of $129.99.

Share

Jan 30

How to Import MOD, TOD to Final Cut Pro (X) for editing on Mac?

MOD and TOD videos are usually recorded by JVC, Canon, Panasonic camcorders. Many annoying problems will reveal when these camcorders’ lovers try to import MOD/TOD to Final Cut Pro 6/7 or FCP X and find they are difficult to use, they are not supported by most Mac Editing Software. At the same time, you’ll find that you can’t play MOD and TOD files on Quicktime or Windows Media Player and other video players.

Here are some questions from discussions.apple.com:

Question 1: Final Cut Pro X/Compressor & .MOD File Types

“I am using Final Cut Pro X and Compressor. The video camera I record with records in .MOD which final cut doesn’t recognize nor does compressor. I want to know what to convert the .MOD file to make it compatible with Final Cut Pro X but to also avoid ruining the quality of the video image. Any suggestions”

  • Source: https://discussions.apple.com/thread/4116824?start=0&tstart=0

Question 2: How to compress Canon FS200 recorded clips for FCP?

“I’ve been given lots of MOD (and MOI) files to edit. I realise I need to convert these files before I can import them into FCP. The question is what compression should I use? h.264, Apple DV PAL, the list is endless. The end result will be exported for the web. If it helps, the footage was recorded on a Canon FS200.”

Question 3: JVC HD7 and .TOD files in FCP or FCE

“I am interested in purchasing a JVC GZ-HD7 to use with Final Cut Express. The reason I’m posting here is I will also be using FCP on my school computers. Anyhow, JVC lists the filetype as mpeg-2 ts, but several websites have mentioned that the filetype is actually called .TOD. Does anyone know if this filetype will import into FCP or FCE without a hitch? Can’t seem to find a straight answer off of JVC’s website.

ON a side note, Anyone have any idea why the JVC GZ-HD7 varies in price so much with different retailers???? B&H photo is selling it for $799.00, yet many other sites like amazon are selling it for 1200.00 and up… Am I missing something? I’ve read the product description on B&H compared to others, and it seems to include the same hardware and accessories…”

  • Source: https://discussions.apple.com/thread/1668687?start=0&tstart=0

Question 4: JVC GZ-HD7E (.TOD) vs. Final Cut Pro 7

“The Mac world is really new to me, I have iMac, I have Final Cut Studio HD (the latest and updatet) and I have JVC GZ-HD7E camera – but they dont work together

I thought that this huge program would take .tod files but neither FCP or iMove likes these files.

Hope someone has some kind of answer that could help me, and if this is already postet somewhere else, im sorry then!”

  • Source: https://discussions.apple.com/thread/2409444?start=0&tstart=0

– – – – – – – – – – – – – – – – – – – – – – – – – – – – – – – – – – – – – – – – – – – – – – – – – – – – – – – – – – – – – – – – – – – – –

When you capture live video from an JVC or Canon camcorder and try to edit them with Final Cut Pro or Final Cut Pro X, there are some things need to know previously:

1. JVC camera includes many series like JVC Everio, JVC GZ series, JVC Picsio camcorder, etc and most of them captures video in TOD, MOD, AVCHD video format. Such as:

JVC MOD Camcorders

  • 2004: GZ-MC100 (SD), GZ-MC200 (SD)
  • 2005: GZ-MG30 (HDD), GZ-MG70 (HDD)
  • 2006: GZ-MG37 (HDD), GZ-MG77 (HDD), GZ-MG505 (HDD, SD/SDHC card)
  • 2007: GZ-MG130 (HDD), GZ-MG155 (HDD), GZ-MG175 (HDD, SD/SDHC card), GZ-MG255 (HDD), GZ-MG555 (HDD, SD/SDHC card)
  • 2008: GZ-MS100U (SD/SDHC card)
  • 2008: GZ-MG7230 (30 GB HDD, MicroSD)
  • 2009: GZ-MG630 (60 GB HDD, MicroSD), GZ-MG670 (80 GB HDD, MicroSD), GZ-MG680 (120 GB HDD, MicroSD)

JVC TOD Camcorders

  • 2007: GZ-HD7 (HDD, SD/SDHC), GZ-HD3 (HDD, SD/SDHC)
  • March 2008: GZ-HD5 (HDD, MicroSD), GZ-HD6 (HDD, MicroSD)
  • June 2008: GZ-HD30, GZ-HD40 (HDD, MicroSD, capable of both TOD and AVCHD recording)

In addition, for MOD files, maybe it’s from internet or recorded by some camcorders like Canon FS series:

Canon MOD Camcorders

  • 2008: FS100 (SDHC), FS10 (SDHC), FS11 (SDHC)
  • 2009: FS200 (SDHC), FS21 (SDHC), FS22 (SDHC)[10]

Read More: MOD and TOD in Wikipedia

2. Final Cut Pro (abbreviated as FCP) and Final Cut Pro X (FCP X) read videos in ProRes, Quicktime, AIC MOV format not directly from a JVC camera.

3. The most recent version, Final Cut Pro X, Final Cut Pro X, run on Mac personal computers powered by Mac OS X version 10.6.7 or later and using Intel processors, FCP 6, FCP 7, FCE.

May be you are a photography lover who often shoot videos with JVC Everio, and have got a batch of TOD/MOD records which you want to edit with Final Cut Pro 6/7 or Final Cut Pro X.

Is there no way to import JVC Everio footages to Final Cut Pro (X) for further editing? The answer is no. TOD/MOD to FCP Converter for Mac provides you a good solution to convert TOD or MOD to FCP X importable form with original quality, say Apple ProRes MOV (keeping all the original setting). The TOD/MOD to FCP Conversion will be finished with several mouse movements on shareware application TOD to FCP Converter. And converted MOV files can be imported to FCP X for further editing. Of course, it also facilitates your editing TOD/MOD in iMovie as well. By the way, the program is fully compatible with OS X Lion 10.7. and you can have our pro customer service for further instruction.

Email:

  • Mac: macsupport@pavtube.com
  • Windows: support@pavtube.com

Unsupported video files really both a lot of people, but the professional HD Video Converter for FCP X works all problems out. After convert JVC/Canon TOD, MOD video, the Mac conversion push you to adjust video resolution, frame rate, bitrate to keep the original high definition, crop out unnecessary objects, split video files into small segments, tune video saturation, etc.


Tutorial: How To Convert TOD, MOD files to Apple ProRes MOV Format for FCP (X)?

Step 1. Download PavtubeMOD/TOD to FCP Converter on your Mac, and run it after installation. As soon as the main interface comes up, click “Add video” or “Add from folder” to load your source MOD or TOD files.

Tips: The program support batch load and convert and merge video file.

Step 2. Click the “Format” bar and choose the output format. Click and choose “Final Cut Pro -> Apple ProRes 422 (*.mov) format”, it’s the best format if you want to edit MOD/TOD files in Final Cut Pro (X).

Step 3. You can click “Settings” button to adjust the output parameters as you want. Such as resolution and bitrate, you can also keep it as default.  (Optional)

Step 4. You can click ““, edit the .tod or .mod video files by editing features including cropping, trimming, and special effects. (Optional)

Step 5. After every thing necessary was selected, you can click the big red “Convert” button to start converting TOD/MOD file to Apple ProRes MOV for Final Cut Pro X on Mac(Mac Mountain Lion 10.8 included).

After converting, you just need to import converted videos to Final Cut Pro 7 or Final Cut Pro X, and then you can edit the recorded footages without rendering.

Launch Final Cut Pro 7/Final Cut Pro X on your Mac and you can see the layout of the Final Cut Pro Interface. From under the File command at the top of the interface, select “Import” and “Files”. Then select one converted file from the Choose a File window and press the “Choose” button to choose this file. So that, you could easy import movies into Final Cut Pro 7or Final Cut Pro X for editing.

Share

Jan 30

Final Cut Pro X in 2013

What might we expect for Final Cut Pro X in the year 2013?

FCP X will be two years old in June. I think we will see Final Cut Pro X version 10.1 in 2013.

Here are some of my reasons.

1) I think a two year full point upgrade cycle for FCP X in 2013 is more likely than a three year upgrade cycle in 2014. If that proves to be true, Final Cut Pro X could be updated to version 10.1 sometime around the second half of 2013, maybe with a sneak peak in the Spring around NAB.

2) There are only two more incremental numerical updates left for Final Cut Pro X 10.0, – 08 and 09. We had five FCPX updates in 2012. After the next two updates, 08 and 09, it’s on to number 10.1.

3) Apple doesn’t have the luxury of a leisurely release schedule for FCPX. It has to stay aggressive and at the forefront of modern NLE applications. Avid and Premiere are formidable competitors.

Some people question having to pay the full price of $299 for Final Cut Pro X in the App store for version 10.1. Previous upgrades for one version of Final Cut Pro to the next full point upgrade were discounted from the full price. Currently there is no way to get a discounted price on an upgrade for an app you previously bought from the App Store.

To be fair to current customers, some of the App store developers offer a discount when they introduce a new full point upgrade in the App Store. For example, Screenflow went from version 3 to version 4 and had a discount of about 50% for a few days. And 1Password has announced the new App store version, V4, will be free to existing V3 customers. Their new V4 iOS version is on sale for over 50% off.

I see no reason why Apple can’t introduce Final Cut Pro X version 10.1 with the same kind of discount for a week or so. Or Apple can change the App store rules to include an upgrade path for existing customers of a given app. This is something App Store developers and customers have been requesting for quite a while.

But even if Apple doesn’t provide a discount or upgrade path, I don’t have a problem paying $299 every two years, or $150 per year, for a full point upgrade version of Final Cut Pro X. An individual can install one copy of Final Cut Pro X “…on each of the Mac Computer(s) that you own or control” according to current App Store Terms and Conditions. So if you own or control more than one Mac, you can install FCPX on each machine and only pay for the FCPX app once.

What kind of new features can we expect to see in Final Cut Pro X version 10.1? There are three categories.

The first category would be to add back missing features that FCP7 had (audio mixer, multiple scopes windows open at the same time, custom recallable window layouts). I expect the FCPX team will continue to return missing features that are much better versions than previous incarnations (like they did with multicam, persistent selections and Share).

The second category would be to add features that FCP never had but are an industry standard – A Scrolling Timeline:

where the Timeline scrolls behind a stationary Playhead. I have a hard time believing that a new 64 bit application built from the ground up with modern foundations and leveraging all processors and unlimited memory still has a playhead that scrolls off the screen when it gets to the end of the Timeline. Motion 5 has one. Every NLE and DAW has one. Why not FCPX?
Watch the movie below to see it in action. This movie’s been viewed over 6,700 times.

And the third category would be unique FCP X features that no one has (like the introduction of the skimmer or the magnetic timeline) – where the puck is going, magic NLE features. Whatever the Final Cut Pro X team has up their sleeves, these are the features that will justify a full point upgrade.

2013 could prove to be quite an exciting time for FCPX users with future updates, new powerful iMacs already here and a new Mac Pro in “later” 2013. As a professional user and proponent of Final Cut Pro X, I maintain a master list of Final Cut Pro X feature requests here. Let’s see how many Final Cut Pro X requests Apple crosses of the list in 2013.

Learn More Final Cut Pro X:


Share

Jan 30

10 Quick Final Cut Pro X Tips

Whether you’re new to Final Cut Pro X or an experienced editor looking to sharpen your skills, don’t miss this video tutorial covering 10 quick FCP X tips.

Read More: How To Import Video Files or Projects to Final Cut Pro X?

We’ve previously featured YouTube user Matt’s Macintosh for his great “Sky Color Correction” tutorial in Final Cut Pro X.  Now he’s released another FCP X Video Tutorial that’s a must-see for any Final Cut Pro X editor: TEN 10 SECOND FCP X TIPS.

In this video Matt shows you his favorite Final Cut Pro X tips including:

  • 1. Copy and paste effects and attributes from one clip to another.
  • 2. Shortcut for view entire Final Cut Pro X timeline.
  • 3. Modify and customize Final Cut Pro X shortcuts.
  • 4. Color correct footage in FCPX that appears outside a mask.
  • 5. Using the share menu to export multiple still image formats.
  • 6. Duplicate works similar to “Save as” in legacy versions of FCP.
  • 7. Use duplicate to save space on your hard drive.
  • 8. Change audio from mono to dual mono.
  • 9. Where to look for FCP X plugins and effects?
  • 10. Where do custom Final Cut Pro X templates and effects live on your system?

Take 2.5 minutes and learn these very useful FCP X tips!  Visit Matt’s Macintosh YouTube channel for more great videos on Final Cut Pro X editing, video production and Apple related topics.

Got an FCP X tip to share?

FCP X Related Tutorial:

Any suggestion, pls leave it in the comments below!

Share

Jan 29

Canon PowerShot SX500 IS Review | 2013

PROs

  • Size
  • Zoom range
  • Low-light AF performance
  • Manual exposure

CONs

  • Lens quality
  • Video mode

Super-zoom cameras have traditionally occupied a position in the market in between compact cameras and more advanced cameras such as DSLRs and CSCs, but with advances in lens technology over the past few years, compact cameras have been getting ever more powerful zoom lenses, while CSCs and their zoom lenses have become smaller. This has left traditional super-zoom cameras such as the Nikon P510, Panasonic FZ48 or Canon PowerShot SX50 HS looking a bit bloated.

The Canon PowerShot SX500 IS is a pocket-sized super-zoom camera with a 30x optical range. Announced in August 2012, Canon claims it’s the World’s smallest 30x optical zoom camera, with a range that extends from 24-720mm with Intelligent image stabilisation to iron-out the wobbles. The sensor is a 16 Megapixel CCD paired up with the Digic 4 processor to provide features like scene detection and Face detect AF.

The SX500 IS has a 3in fixed LCD screen with 461k pixel resolution and a pop-up flash, along with full PASM exposure modes in addition to Smart Auto, a range of scene modes and Creative filters which can be used for both stills and movies. The PowerShot SX500 IS can also shoot HD movie footage at resolutions up to 1280 x 720 at 25 frames per second encoding files using either the H.264 codec or the more edit-friendly Apple iFrame format.

Then this feller turned up! Not as long a zoom. Sure! But smaller! And cheaper!

The 30X PowerShot SX500 IS, I figure, is today’s camera for today’s crowd: go anywhere, shoot anything.

Whilst the video res is still 1280×720, the still capture can catch a maximum image size of 4608×3456 pixels or 39x29cm as a print.

Canon Powershot SX500 IS Features

While still not strictly pocketable, the camera is sure small, sitting easily within a male hand.

External controls are minimal: auto, Program AE, shutter and aperture priority is available on the mode dial, along with scene modes (portrait, low light, snow, fireworks), effects (fish eye, miniature, toy camera, mono, super vivid, poster). There is also direct access to image brightness, colour balance and saturation.

From the latter feature I got the feeling that Canon is addressing the user who just wants to get his or her hands wet in fine tuning image capture without the need to dive into techy land and deal with white balance and brightness/contrast adjustments!

Next to the mode dial is the shutter button and for’ard of this is the prominent zoom lever. Ergonomically, a good setup.

Rear controls are again minimal: the four way dial gives access to ISO settings, macro, self timer and flash options. Added to this is an exposure compensation button, replay, display choices, menu and a button set functions.

One button I think I’ve never seen before is a framing assist control which, no matter where your zoom is set, will throw the screen image back into full wide so you can determine where you are! This helpful button is set into the left side of the zoom.

Canon Powershot SX500 IS Startup

Within two seconds of startup I was able to shoot my first shot; succeeding shots came in at about two second intervals. Not the fastest baby on the block.

Distortion

I found a small amount of barrel distortion at the zoom’s wide end, along with a small degree of pincushion distortion at the tele end.

ISO Settings

OK until you reach ISO 800; at ISO 1600 noise and lack of definition intrude but possibly OK for the right subject.

Canon Powershot SX500 IS Verdict

Quality: about average.

Why you would buy it: a long zoom snapshot camera – nothing more!
Why you wouldn’t: your expertise level would not be satisfied.

IMHO, this camera will appeal to many, starved of a decent zoom.

And a word of caution: don’t think for one moment that you can shoot at the tele end of the zoom with a handheld camera; for one thing it is extremely difficult to aim accurately, for another, your shot will probably be blurred.

Video and long tele? Use a tripod!

Canon Powershot SX500 IS Specifications

  • Image Sensor: 16.0 million effective pixels.
  • Sensor Size: 11mm CCD.
  • Lens: f3.4-5.8/4.3-129mm (24-720mm as 35 SLR equivalent).
  • Metering: Evaluative, centre-weighted averaging, spot.
  • Exposure Modes: Program AE, shutter and aperture priority, manual.
  • Shutter Speed: 15 to 1/1600 second.
  • Continuous Shooting: 0.5/0.6/0.8/2.8 fps.
  • Memory: SD/SDHC/SDXC cards.
  • Image Sizes (pixels): Stills: 4608×3456 to 640×480.
  • Movies: 1280×720 at 24fps, 1280×720 and 640×480 at 25/30fps.
  • Viewfinder: 7.6cm LCD screen (461,000 pixels).
  • File Formats: JPEG, MPEG4.
  • Colour Space: sRGB.
  • ISO Sensitivity: Auto, 100 to 6400.
  • Interface: USB 2.0, HDMI mini, analog audio and video output.
  • Power: Rechargeable lithium ion battery, DC input.
  • Dimensions: 104×69.5×80.2 WHDmm.
  • Weight: 342 g (inc card and battery).
  • Price: Get a price on the Canon PowerShot SX500 IS at Amazon.

PS. If you want to deal Canon SX500 IS shootings with Mac, pls view the tutorial.

Share

Jan 29

How to Edit Panasonic Lumix GH3 1080/50p AVCHD recordings with Avid Media Composer

Have you ever met the similar issue? And do you know the reason? Have you find what is the best way to solved the problem and get Panasonic GH3 50p AVCHD to Avid Media Composer? The Media Magician will help you.

Panasonic Lumix DMC-GH3 Reviews

They are really pushing the combination high-quality still and video in one camera. They have really helped their cause by adding a headphone jack for monitoring to the camera along with a flip-out 3-inch LCD screen. This is the cheapest camera available to offer this feature.

The Panasonic GH3 once again focuses on video as much as photo performance. From the specs we can see that the new Lumix DSLR records at much higher bitrate video. AVCHD capture is now at up to 1080/50p. However, the big news is a QuickTime mode that records at 1080/24p, 1080/25p or 720/50p using an unusually high 72Mbit/s bit rate and all-intra compression. Unlike normal AVC compression, this describes each frame from scratch rather than updating areas that have changes since the last frame. It should give less compression artifacts than the heavily compressed AVCHD output from the GH2, particularly for fast-moving scenes. QuickTime 1080/50p capture is at 50Mbit/s, and while it doesn’t use all-intra compression, it should still give better results than the GH2’s 24Mbit/s maximum bit rate. It supports several video recording formats:

  • H.264 MOV: [Full HD] 1,920 x 1,080, 50p, 25p, 24p; [HD] 1,280 x 720, 50p
  • AVCHD (MTS/M2TS): [Full HD] 1,920 x 1,080 50p/50i/24p
  • MP4: [Full HD] 1080 25p; [HD] 720 25p; [VGA] 480 25p

The 1080/50p shooting mode brings Full HD 1920x1080p video with best possible quality, but it could be a problem if you’re working AVCHD footage in Avid Media Composer. Avid does not support the 50p footage. So far I am still not able to import the 1080/50p from my Panasonic DHC-TM900. But still the 50i AVCHD is very good to see on a 42 inch plasma screen.

Here’s a solution for importing 1080/50p to Avid with the help of 3rd-party app Pavtube Media Magician for Avid, a nice camcorder assistant manager and AVCHD editor. When serving as an intermediate decoder, the software can convert 1080/50p AVCHD .mts/.m2ts video into Avid DNxHD .mov format, which is naturally supported by Avid Media Composer.

How to get Panasonic GH3 1080/50p video into Avid DNxHD .mov format?

Step 1: Import AVCHD clips from Panasonic GH3 to Media Magician.

Connect your camera with your PC and launch Pavtube Media Magician for Windows (If you work on OS X, get Media Magician for Mac). The app will automatically detect your camera and ask “Camcorder is connected. Are you ready to launch wizard now?” Click “Yes” to confirm. Select the 1080/50p video files you’d like to import to AVID, and then press “Start” to import AVCHD to Media Magician library.

Step 2: Organize and edit Panasonic GH3 1080/50p videos in timeline.

Drag and drop the AVCHD videos to timeline for editing from library. Here you can remove unwanted .mts/.m2ts clips, trim out unwanted frames from specific clip by frame-accurate, and put them into the right order for merging. Use the scissor icon to do frames trimming.

Step 3: Choose “Output” on the top of main interface to switch it to output interface.

In output interface you can set intermediate codec for editing software as well as common video format (AVI, MKV, MP4, MOV, MPG, etc) for compressing AVCHD.

Step 4: Choose Avid DNxHD codec as output format.

For importing Panasonic GH3 1080/50p video to AVID, follow the steps to set Avid DNxHD preset:

1. Move your mouse to “Editor”, click on the tab.
2. Select “Avid Studio” group.
3. The default output format for AVID is “Avid DNxHD 720p(*.mov)”. To export 1080p full HD video, just select the “Avid DNxHD 1080p(*.mov)”from the drop-down list of “Format” bar. Set higher bitrate for better quality if necessary.

Step 5: Convert Panasonic GH3 1080/50p videos and export best format for AVID Studio

Press the plus sign (+) to add task for conversion. Select the task(s) and click on the triangle sign to start encoding Panasonic GH3 1080/50p videos to Avid DNxHD MOV.

After conversion you can refer to this post: How to Import Media contents to Avid Media Composer naturally without rendering/encoding.

Share
Page 25 of 37« First...1020...2324252627...30...Last »