AIC Converter,MTS to AIC,MTS to iMovie,MTS to FCE,MTS to Final Cut,AVCHD to AIC Converter,AVCHD to Final Cut Express,import AVCHD files to iMovie,MTS to ProRes 422,MTS to Final Cut Pro,MTS to FCP X,AVCHD and Final Cut Pro,Log and transfer MTS to FCP,edit MTS footage in iMovie,FCP transfer MTS files,transfer AVCHD files to iMovie

Jan 16

Frame Accuracy-Seek/Locate Each Frame, Split/Cut AVCHD MTS File Frame by Frame

“I have a bunch of .mts files containing AVCHD Progressive video recorded by a Panasonic camera, and I need software on Ubuntu Lucid with which I can remove the boring parts, and concatenate the interesting parts, all this without reencoding the video stream. It’s OK for me to cut at keyframe boundary.

If Avidemux was able to open the files, it would take about 60 hours of work for me to cut the files. (At least that was it last time I tried with similar videos, but of a file format supported by Avidemux.) So I need a fast, powerful and stable video editor, because I don’t want that 60 hours of work go up to 240 or even 480 hours just because the tool is too slow or unstable or has a terrible UI.

I’ve tried Avidemux 2.5.5 and 2.5.6, but they crash trying to open such a file, even if I convert the file to .avi first using mencoder -oac copy -ovc copy. mplayer can play the files.

I’ve tried Avidemux 2.6.0, which can open the file, but it cannot jump to the previous or next keyframe etc. (if I make it jump to the next keyframe, and then to the previous keyframe, it doesn’t end up at the original keyframe, sometimes displays an error etc.). Also I’m not sure if Avidemux 2.6.x would let me save the result without reencoding.

I’ve tried Kdenlive 0.7.7.1, but playback is very choppy, and it cannot play audio at all (complaining that SDL cannot find the device; but many other programs on the system can play audio). It would be a pain to work with.

I’ve tried converting the .mts file to .mkv using ffmpeg -i input.mts -vcodec copy -sameq -acodec copy -f matroska output.mkv, but that caused too much visible distortions in the video in both mplayer and Avidemux.

I’ve tried converting the .mts file with TsRemux.exe, but Avidemux 2.5.x still can’t open that file.

Is there another program to cut and concatenate the files? Is there a preprocessor which would create a file (without reencoding the video) on which Avidemux wouldn’t crash?”

What is Frame Accuracy?

MTS recordings from AVCHD camcorder are often highly compressed before stored, such a compressed movie contains key frames and non-key frames. Key frames can be displayed independently, while non-key frames can not be displayed without key frames. So such a functionality to locate and display every frame correctly, no matter key frame or non-key frame, is called frame accuracy (frame by frame). (Tip: Frame is one of the many single photographic images in a video.)

The Advantages of Frame Accuracy:

With Frame Accuracy, you can precisely start locating and displaying on desired frame; easily get exactly what you see or want. Without Frame Accuracy, you may lose the desire frame, or you may get SECONDS of frames you do not want before desired one.

When you are working on a movie or short film which requires accurate frame extracting from video stream, you need the ability to capture a precise single frame from a video file. You may ask such question: Is it possible to capture a frame from a video in any format? The answer is YES. And there are a lot of choices. If you’re Mac user, you can use iMovie, one the best free video editing app that comes with your computer. Yet iMovie works only with a few video formats. Some AVCHD .mts and HD videos can not even be loaded to iMovie. Here’s a new alternative for iMovie – thePavtube Media Magician for Mac, which supports a variety of codecs and file types, including AVCHD, MTS, M2TS, TOD, MOD, MKV, MOV, AVI, MP4, ASF, DVD compatible MPEG files, flash videos and even protected TiVo recordings.

In terms of accurate editing, the Media Magician for Mac can show you all the frames in a video (like for example 24 frames in a 1 sec video) and then allow you to delete individual or more frames, add frames, split the video exactly between two frames you choose, join AVCHD/TOD/MOD videos seamlessly (without encoding). If you’re looking for a Mac based video editor that cuts any video frame by frame, pick up this app.

Guide: How to cut AVCHD MTS file frame by frame with Media Magician for Mac

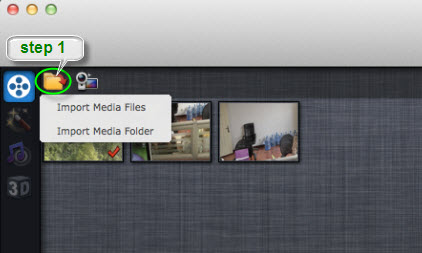
Step 1. Load video to Media Magician. Open up the software, and press the Open button to import video. You can either choose a single video clip or a folder that contains multiple videos to import. Imported videos are displayed in the media library area.

If your source video is saved on a camera/camcorder HDD, just connect the cam to Mac and the software will pop up a wizard for you to capture AVCHD MTS/M2TS and TOD footage.

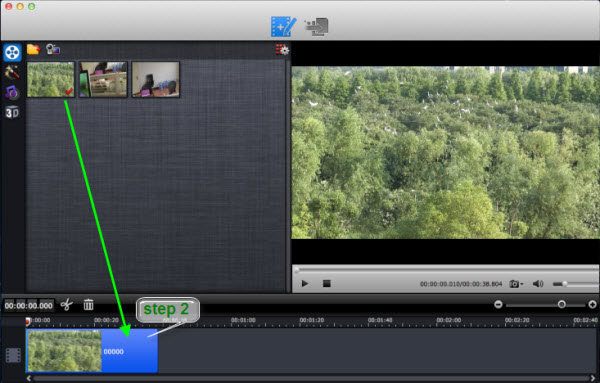
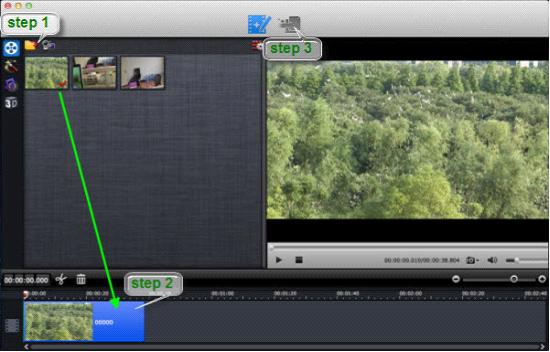
Step 2. Drag and drop video clip(s) to timeline. Just click on the video you’d like to edit and drag-and-drop it to the timeline at the bottom.

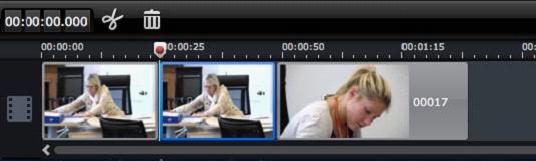
Step 3. Find a rough-cut point. Double-click on the video in timeline to play it. When it plays to where you’d like to cut/split the video, press pause button.

Step 4. Find an accurate-cut point. Move your mouse to playing area, and it will present you previous and next frames of current point. Use your mouse to select the frame that you’d like to cut at.

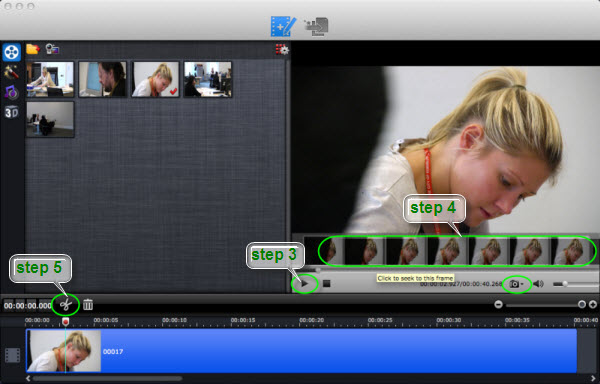
Tip: You can take snapshoot of the present frame by clicking the camera icon in player, so as to save the frame as still image.

Step 5. Press the scissor icon to split video by the specific frame you select.

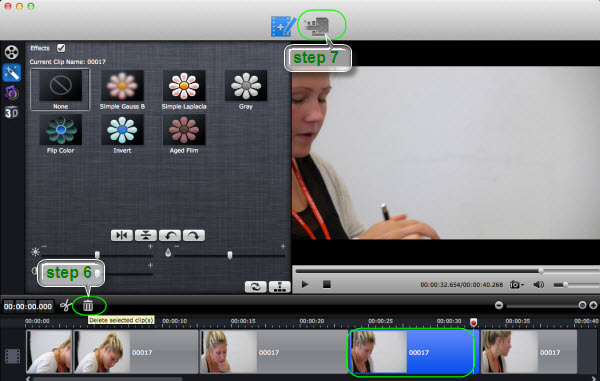
Step 6. Remove unwanted frames.

Repeat the operations of Step three to five until you split the video into as many segments as you like. To delete unwanted segments, you may select them in timeline and press the trash icon.

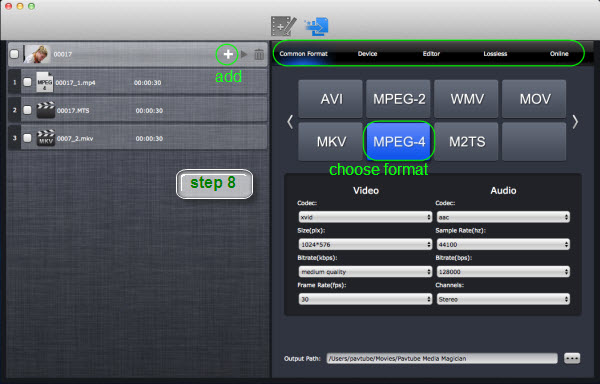
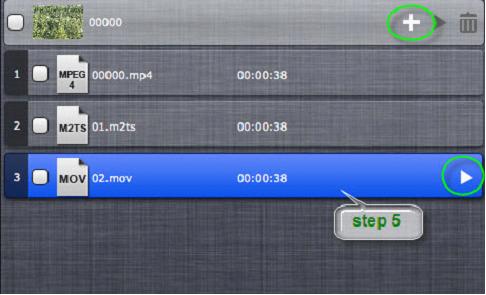
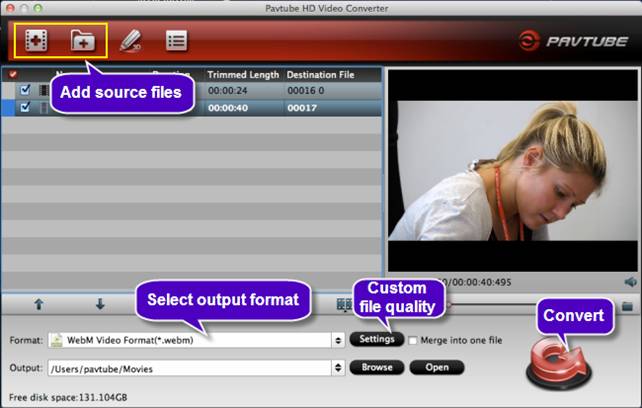
Step 7. Click the Output button on the top and switch it to output interface.

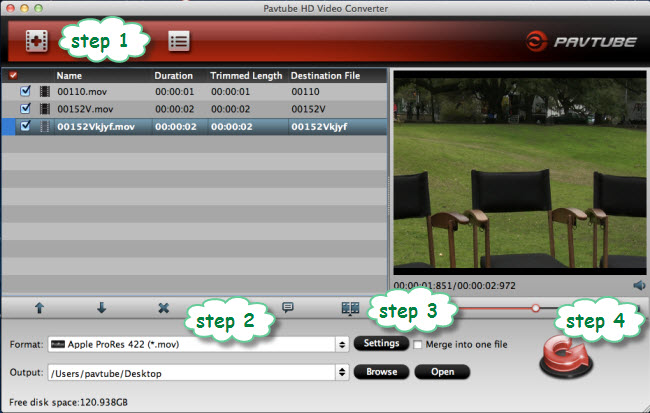
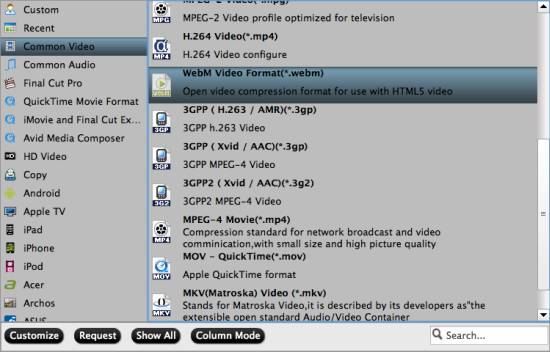
Step 8. Create output task list. Decide your output format, choose it, and then click on the + sign to add it as a conversion task. You can add multiple tasks for batch conversion.

Step 9. Select the task(s) and click on the triangle sign to start encoding video.

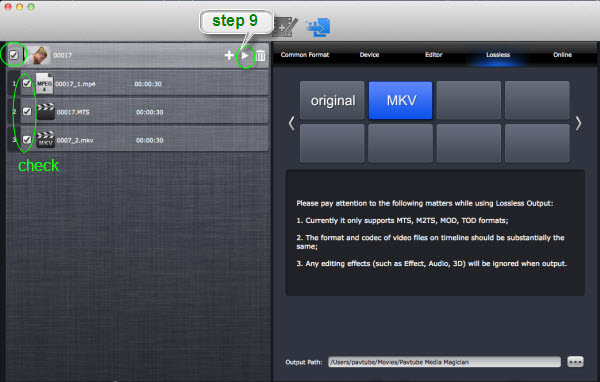
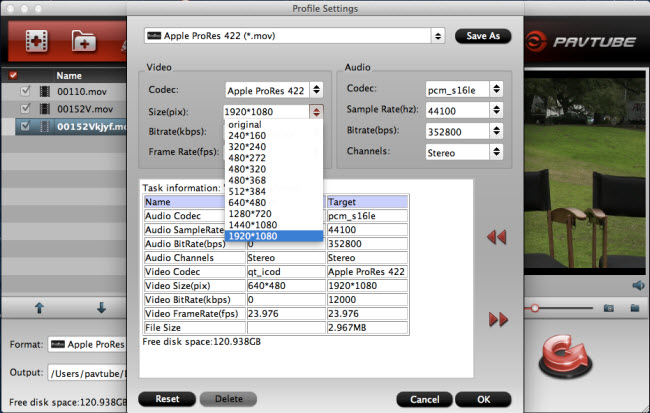
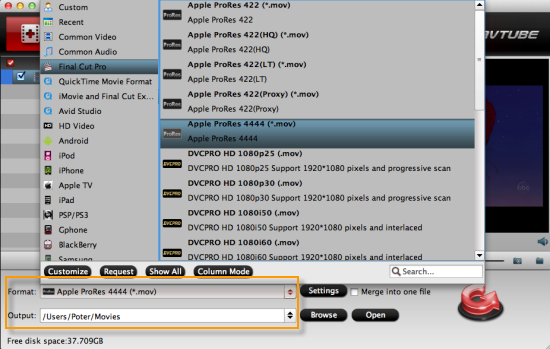
Trick: The encoding process may take long time. In order to shorten the processing time, you may switch to “Lossless” tab and choose “original” or “MKV” as output format. This makes it possible to cut and join multiple MTS/M2TS/TOD/MOD videos together without encoding. Yet it does not work for AVI, MKV, MP4, MOV and other formats.

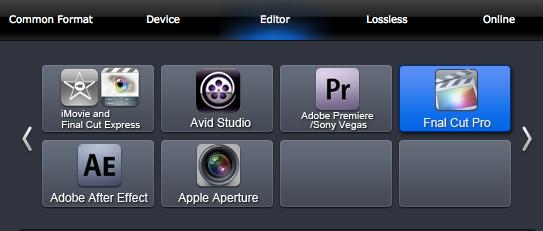
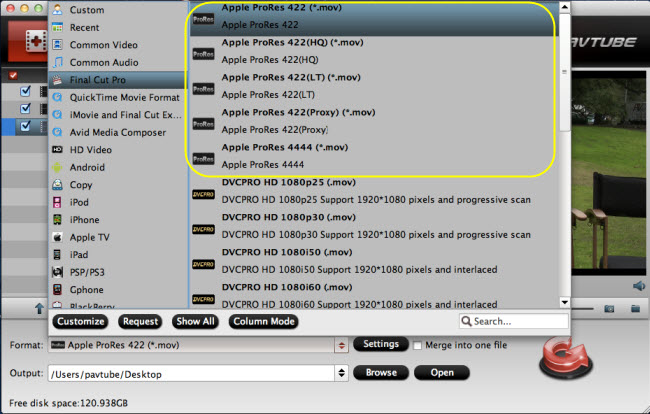
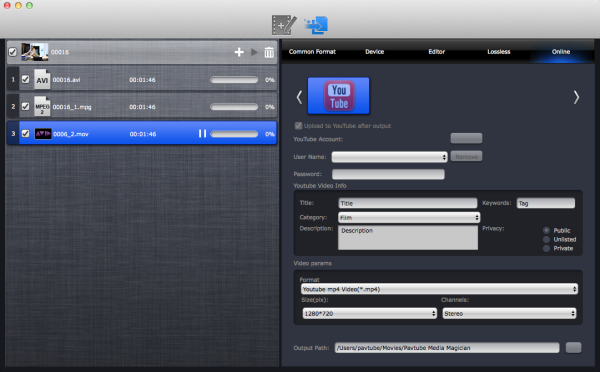
In this way you cut/split/trim HD video frame-by-frame and export self-made video for playing in iTunes, QuickTime as well as editing in iMovie, Final Cut Pro, Avid, etc – the Media Magician includes intermediate codecs (AIC and ProRes 422) that are naturally accepted by professional non-linear video editors. Also, it is able to access YouTube and upload your work for sharing.

You may also like:


Share

Jan 14

How to edit movies on a timeline and frame selection control on Mac?

For Mac users, it’s hard to find an easier way to bring your moving images together into one professional looking production than the built-in video editor iMovie. I’ve been working with iMovie for a while and thought it great till I got stuck importing some AVI videos- iMovie simply would not recognize them. Later I found the real big problem, that my MTS shootings taken with a Sony AVCHD camcorder grey out when I tried to bring them for editing.

Is there an easy-to-use free video editor for Mac that works with any video? I did long time Google search and spent a few hours trying out the top picks, yet none works to my satisfactory. Some do not deal my AVCHD footage, others are not so intuitive to use. Then I got this Pavtube Media Magician for Mac, which is brilliant! I would definitely recommend this app to anyone who is seeking for an iMovie alternative.

Why I like it? It edits everything – AVCHD footage, MXF, AVI, MKV, flashes, MPEG, VOB videos copied from DVD, and even my TiVo shows! And the interface is sooo easy to get started. You just import a video to the app, then drag it to the timeline where you start editing. The control buttons on timeline help you locate frames accurately so that you can cut, trim, delete, and merge video clips in a much easier way.

The following passages are some guidance quoted from its help page How to split/cut/trim MTS in frame accurate editor:

Control buttons on Timeline of Media Magician for Mac:

1. Time Display Controller: Move your mouse cursor on timeline, the opposite time point will be displayed here. Once you entered a time point into the time display box and click enter, the Preview Window and Timeline will switch to the frame of this time point. This helps to locate to the accurate frame that you want.??

2. Zoom in and Zoom out: Drag the bar on top-right of timeline to Zoom in or out for better view.

3. Preview: Highlight a clip on timeline and click Play button, you can preview. Double click on a clip can also begin preview.

4.Trim: Put your cursor to the start or end point of a clip on timeline until it changes to trimmer. Drag the trimmer and you can trim off unwanted starting or ending.

5. Cut: Drag the pointer to the right place; Put your cursor to process bar under preview window and select the right frame; Click the Scissors button and you can cut the clip. And then you can rearrange order or delete.

6. Delete: Highlight the unwanted clip on timeline, and click Delete button. You can also delete it with right-click menu.

7. Rearrange order: Drag and hold a clip to the right place until the place line shows. Drop the clip and it will be placed right there.

8. Merge & join: All files placed on timeline will be output as one file. So if you want to merge and join several clips, just drag them to timeline in right order.

On the preview window, you can use Frame Selection Controller to seek to the corresponding frame of the current image, or seek the previous frame/next frame, which helps to locate frames accurately.

In general, Pavtube Media Magician for Mac offers an easy introduction to video editing with support for color adjustment, themes, easy to use effects, a simplistic timeline view and built-in camcorder wizard for AVCHD ingesting. It will leave you hungry for more if you’re more used to work with iMovie (like me) or after a powerful video editing solution, but thanks god this smart app even exports intermediate codecs! I really like that I can export MOV in Apple Intermediate codec that is natively supported by iMovie –this avoid rendering and lags in video editing. Also, professionals can export ProRes and DNxHD for further post-production in FCP, Avid, Adobe AE, etc.

Share

Jan 11

Remux MKV/M2TS with no Conversion – Time-saving joiner for WD TV Live Plus HD video playback on Mac

High definition consumer camcorders like Sony Handycam, JVC Everio and Panasonic DMC series shoot and save footage in AVCHD file structure (based on actual directory structure from Canon and Panasonic camcorders). Aside from recorded audio and video, AVCHD includes features to improve media presentation: menu navigation, slide shows and subtitles. There are 2 problems when it comes to playing raw AVCHD contents because of the file system.

1. For better playback of AVCHD contents, it requires that your Blu-ray player or HD media player support navigating AVCHD file structure, while the latter needs to be re-generated each time you delete some unnecessary .MTS or .M2TS clips.

2. When you have an HD media player (e.g. WD TV Live Plus) read individual .MTS and .M2TS clips instead of AVCHD file system, the order of the recordings is messed up. This media player supports the most popular file formats listed as below:

  • Video: AVI (Xvid, AVC, MPEG1/2/4), MPG/MPEG, VOB, MKV (h.264, x.264, AVC, MPEG1/2/4, VC-1), TS/TP/M2T (MPEG1/2/4, AVC, VC-1), MP4/MOV (MPEG4, h.264), M2TS, WMV9, FLV (h.264)
  • Photo: JPEG, GIF, TIF/TIFF, BMP, PNG
  • Audio: MP3, WAV/PCM/LPCM, WMA, AAC, FLAC, MKA, AIF/AIFF, OGG, Dolby Digital, DTS
  • Playlist: PLS, M3U, WPL
  • Subtitle: SRT, ASS, SSA, SUB, SMI

One good solution to solve the problem is, organize and join the AVHCD .MTS/.M2TS together. Merging .MTS/.M2TS clips usually takes a long time encoding the H.264 contents. So you may have seen this question asked somewhere else:

“Does anyone know of a way to join multiple .MTS files – without having to re-encode the video?”

To fast organize and join .MTS/.M2TS files without encoding, the Pavtube Media Magician for Mac is a best choice. Its “Lossless Output” option provides a jointless MTS/M2TS/TOD merging and rewrapping solution. This allows you to capture AVCHD footage from camcorder and join multiple .MTS or .M2TS clips into one and rewrap it to M2TS or MKV format without encoding. Not only the processing time is greatly shortened, but also you get the original HD quality.

Free Download Pavtube Media Magician or Mac

Note: The free trial version of Pavtube Media Magician for Mac has the following limitations:

  • It will add Pavtube logo watermark in output file(s).
  • Lossless output has a file size limit of 5 minutes.

Warnings: 
To remux camera videos to MKV/M2TS, you need to use “Lossless Output” in Media Magician for Mac. There are some things you need to pay attention to while using “Lossless Output”:

1. Currently the “Lossless Output” only handles MTS, M2TS, MOD, and TOD formats, thus you are limited to do the following rewrapping without conversion:

  • Remux MTS to MTS
  • Remux M2TS to M2TS
  • Remux TOD to TOD
  • Remux MOD to MOD
  • Remux MTS to MKV
  • Remux M2TS to MKV
  • Remux TOD to MKV
  • Remux MOD to MKV

2. The format and codec of video files on timeline should be substantially the same;

3. Any editing effects (such as Effect, Audio, 3D) will be ignored when output.

The steps to merge and remux AVCHD videos to M2TS/MKV on Mac.

Step 1. Import source files into Media Magician for Mac

Run Pavtube Media Magician for Mac, load source videos into it. (Learn the details on how to import source videos into Media Magician)

Step 2. Organize and edit the loaded clips in Timeline panel

In the Timeline panel of Pavtube Media Magician for Mac, you can copy a video clip by “Duplicate This Clip” in the Timeline. You can also change the start time and end time of a clip to trim/cut off unwanted parts in a movie clip. To remove clips, select one or more clips in the sequence and press “Delete”. You can also change the order of clips once they are there in the Timeline. If you would like to split a clip into two parts, you can drag the cursor/pointer to the right place and click the “Cut” button to cut off the clip.

Step 3. Remux camera videos to MKV/M2TS with no conversion on Mac

Choose “Output” in the main interface, and click “Plus” icon to add conversion task before selecting output format. Then switch to “Lossless” > “original” or “Lossless” > “MKV” and click “Start” to begin exporting M2TS to M2TS or remux MTS/M2TS/TOD/MOD to MKV without recompression on Mac.

Soon after the rewrapping task is finished by Media Magician for Mac, you can add the generated M2TS or MKV files to your WD TV Live Plus for playback. Enjoy it!

Share

Jan 11

Join videos for uploading to YouTube-edit/split HD videos frame by frame

Well, it’s Christmas and New Year again. Instead of watching festival films, how about making your own short film and posting it to YouTube this year? If you’re newbie to video editing, and is seeking for all-in-one but easy-to-use video editor to get start with, here’s one I’d recommend:

Pavtube Media Magician for Mac

This is the one for absolute beginners, and the features are very easy to use! Being released as an entry-level video editor, the Media Magician comes up with some impressive features that you may concern:

 Camcorder Manager – Capture, transfer and backup HD footage from camera/camcorder to your Mac fast and easily.

 Timeline Editing – Frame by Frame accurate clipping, merging, snapshooting, voice muting, etc.

 Special Effects – Adding 3D and other special effects to clips on timeline.

 Lossless output – keeping original format of source media, and rewrapping source video to MKV container without quality loss.

 YouTube Uploading – Directly upload camera videos onto YouTube by using your already-have YouTube account.

 Support to iOS and Android – Exporting files best suited for playing on Android devices, Windows devices, iPad, iPhone, Apple TV, HD Player, PSP/PS3, and HDV.

Here’s a basic workflow showing how to transfer, clip, convert and upload Christmas video to YouTube:

Step 1. Import files to Pavtube Media Magician for Mac.

If you have already stored footage on your HDD, you can choose to “Import Media Files” to browse and load video files from computer. If your footage is in camera/camcorder, just connect your cam to Mac and follow the auto wizard to transfer camcorder recordings to Mac.

Step 2. Drag and drop videos onto Timeline for editing.

Here you can preview, trim, cut, delete, rearrange order, and merge videos. Also, if you like, it’s easy to set special effect to image and audio. Find some helpful instructions in below guides:

 How to split/cut/trim MTS in frame accurate editor without re-encoding on Mac?

 How to do timeline editing and select frames accurately using frame selection controller?

Step 3. Click the Output button on the top and switch it to output interface, where you set output options such as Lossless output and YouTube upload.

Step 4. Set it to upload video to YouTube.

1. Find and click “Online” output option on the upper right part.
2. Choose “YouTube”.
3. Put in you YouTube user name and password.
4. Put in video information so that people can find your video via Google search.
5. Decide video quality. You can choose SD 640×480, HD 720p or 1080p Full HD for output. The higher quality you set, the longer time it takes.

Step 5. Have Media Magician export and upload your film.

On the upper left of the interface, find and click the plus sign to add YouTube output as a conversion task. Then click on the triangle sign on it to start encoding/converting YouTube ready MP4 video.

The software will upload the video to YouTube automatically after video conversion completes. Just take some coffee and leave it there. When you’re back, your film should have been posted to YouTube.

Share

Jan 08

Import MXF footage to FCP X/iMovie/FCE/AVID from Mac instantly without rendering on Mac

Professional camcorders for video and broadcasting like Canon XF305 and Panasonic P2 HD cam shoot in MXF format. MXF is now submitted to SMPTE and is well on its way to helping media flow in the television/IT convergent world. End users will be able to better manage their media and to concentrate on their prime tasks of productivity and creativity. There are an increasing number of professional video editing tools that can work with MXF files natively including Avid, Adobe Premiere Pro 3.1 or above, and Sony Vegas. But many users have problems importing MXF footages to Mac non-linear video editing software such as Final Cut Pro, iMovie, FCE and Avid.

When loading .MXF files for post-production, many are finding the .mxf files gray out, not allowing users to select them. With Panasonic and Canon MXF cams, you need to load their drivers. But here’s the workflow for most tapeless imports into FCP, iMovie, FCE, AVID and other video editors.

By using the Pavtube Media Magician for Mac to encode MXF video to popular video format or intermediate codecs that work with your video editor, importing MXF footage should never be a problem any longer. Here’s how-to.

Buy Media Magician for Mac  |  Download Free Trial

Step 1. Import MXF files to the software.

If you have already stored MXF clips on your HDD, you can choose to “Import Media Files” to browse and load the .mxf files from computer.

Step 2. Drag and drop MXF clips onto Timeline.

After source MXF clips are imported into the program, you can directly drag and drop the clips that you want to do frame accurate splitting onto timeline, add special effect, and volume up/down.

Step 3. Click the Output button on the top and switch it to output interface.

Step 4. Choose output format(s). You can create videos for editing with Final Cut Pro, iMovie, FCE, Avid Studio, Adobe Premiere, Sony Vegas, Adobe After Effects, and Apple Aperture. Just click on “Editor” and choose an intermediate codec for use. For example, when exporting MXF to Final Cut Pro, you can follow “Editor” > “Final Cut Pro” to choose “Apple ProRes 422” codec, and set advanced video and audio parameters at the bottom part.

Step 5. Click on the + sign to add it as a conversion task. Select the task and click on the triangle sign on it to start converting MXF to the best format for FCP, iMovie, FCE, AVID, etc.

When conversion completes, you can import converted MXF footage to FCP X, iMovie, FCE, AVID from Mac instantly – without rendering.

Highlights of Pavtube Media Magician for Mac:

– Importing directly from camera/camcorder or backup camcorder videos to local HDD.

Timeline editing, helping you edit camera clips in an easy and accurate way.

Frame by Frame editing, helping you trim, cut and delete unwanted parts accurately.

– Adding 3D and other special effects to clips on timeline.

– Output Apple ProRes MOV for editing in FCP (X) without rendering.

– Featuring optimal presets for iMovie, FCE, Avid Studio, Adobe Premiere, Sony Vegas, Adobe After Effects, and Apple Aperture.

– Exporting files best suited for playing on Android devices, Windows devices, iPad, iPhone, Apple TV, HD Player, PSP/PS3, and HDV.

– Transcoding camera videos to a wide range of file formats, including AVI, MPEG-2, WMV, MOV, MKV, MPEG-4, and M2TS

Lossless output – keeping original format of source media, and rewrapping source video to MKV container without quality loss.

– Directly upload camera videos onto YouTube by using your already-have YouTube account.

Share

Jan 07

Can I import YouTube or Flash(flv/f4v) files into FCP 6/7/X?

The following are two questions from FCP users:

Question 1: How to import YouTube videos into FCP 7 for editing

“I am doing a television interview, and we want to cut away to a YouTube video. Is there a way to download and import YouTube videos into Final Cut Pro 7?”

Question 2: How to import and edit Flash (.flv) files in FCP X?

“I am currently away from my personal computer and so I do not have access to FCP. Can someone tell me whether or not it is possible to edit Flash (.flv) files in FCP X? If it is necessary to convert the .flv files, does anyone know of a quality, easy-to-use program that can do that?”

Flash Video is a container file format used to deliver video over the Internet using Adobe Flash Player versions 6–11. Flash Video content may also be embedded within files. There are two different video file formats known as Flash Video: FLV and F4V. The audio and video data within FLV files are encoded in the same manner as they are within files. The latter F4V file format is based on the ISO base media file format and is starting with Flash Player 9 update 3.

This article is mainly to show the way to import YouTube video, Flash video in FLV/F4V to Final Cut Pro 6/7/X. As many users get FLV/F4V videos from YouTube or other online websites, problems are coming up, some of them have the need to import FLV/F4V files to Final Cut Pro 6/7/X for editing on Mac, but they always have the importing problems due to the video codec and format. Though Final Cut Pro is able to import and edit any QuickTime compatible video format, camera-native formats, even Apple ProRes, there is still limitation in importing YouTube video and FLV/F4V to Final Cut Pro, let alone to edit those kind of video formats.

As we know, the Final Cut Pro 6/7/X only supports few formats, it doesn’t support FLV/F4V files well, so in order to import FLV/F4V to Final Cut Pro 6/7/X, you need to convert YouTube, FLV/F4V videos to FCP 6/7/X compatible formats, such as Apple ProRes 422 codec MOV format, this format is best supported by Final Cut Pro. Now you can follow the steps below to convert FLV/F4V to Apple prores 422 MOV for Final Cut.

This following will introduce a step by step guide on how to successfully import YouTube and Flash FLV/F4V video to Final Cut Pro 6/7/X.


1. Download Pavtube HD Video Converter for Mac. It’s the professional FLV/F4V converter, this software can help you convert YouTube videos or Flash FLV/F4V to Apple ProRes, AIC, etc.

2. Install and launch the software, import FLV/F4V videos to the FCP converter for Mac. Click format bar to choose the best video format for output. You are recommended to choose Final Cut Pro -> Apple ProRes 422 (*.mov). if you need to edit in FCE, you can choose iMovie/Final Cut Express -> Apple InterMediate Codec (AIC) (*.mov) format.

3. You can click settings button to adjust the output video’s parameters, such as resolution, bitrate, etc.

4. Edit function is easy and useful, you can trim, crop, or add watermark to the video.

5. Click convert button to start convert/compress YouTube and Flash(FLV/F4V) to ProRes MOV for Final Cut Pro 6/7/X editing on Mac.

After conversion, you just need to transfer converted videos to Final Cut Pro 6/7/X then you can edit the videos as you want. This software can convert FLV/F4V to Final Cut with best video and audio quality.

PS. Learn more Cameras/Camcorders related tutorial, pls view my FCP Column.

Share

Dec 27

Pavtube Media Magician for Mac Release-A Professional Camcorder Companion tool for Mac users

Dec 21, 2012 – Multimedia developer Pavtube Studio has introduced a new piece of software to the public. The new app, named Media Magician for Mac, is a user-friendly package designed for AVCHD transferring, compressing and entry-level video editing. An average user may find it very handy to back up AVCHD (and other HD video) recordings to Mac HDD and export their own short film with just some simple editing while a professional would use this app to get HD MTS, M2TS, TOD, MOD, MOV, MXF footage ready for post-production in Final Cut Pro, Adobe Premiere, Avid Media Composer, iMovie, Final Cut Express etc.

http://image.pavtube.com/img/media-magician-for-mac/1-interface.png

Pavtube Media Magician for Mac comes with a camera wizard that allows you to quickly transfer video from most cameras- including digital cameras (Canon Vixia, Panasonic Lumix), HDD based camcorders (Sony Handycam, Panasonic HD, JVC Everio, etc) and flash drive cameras – to Mac HDD. It is easy to filter and choose desired clips by film date or file type for downloading to your computer. And there is a built-in media library for you to organize existing HD footage.

Editing in Media Magician is quite intuitive. Any video from the media library can be dragged and dropped to the timeline where you cut video by frame-accurate, trash undesired frames, join multiple AVCHD clips together, set video effect including 3D Red-Blue/Red-Cyan effect, mute (or articulate) audio, rotate video, take snapshot, etc.

http://image.pavtube.com/img/media-magician-for-mac/1-interface.png

What set Media Magician apart from other video editing software is its massive output formats. Lossless M2TS/MKV output is intended for seamless merge of multiple AVCHD clips; under Editor tab there are intermediate codecs for mainstream video editors so that professionals can further edit the footage natively in FCP, Avid, Adobe AE, etc; the Online tab offers a time-saving way for users to upload their work to YouTube; also there’s a Device tab under which you can find hundreds of presets for almost all the devices that play video, from tablets and smartphones to HD media players and video game console. This really makes sense for average users who has no idea what codecs are or what format to use- just find your device in the list and choose the preset.

http://image.pavtube.com/img/media-magician-for-mac/1-interface.png

System Requirements:

Operating System: Mac OS X Leopard (10.5), Snow Leopard (10.6), Lion (10.7), Mountain Lion (10.8).
Memory: 512 MB physical RAM (memory) or above.
Processor: 1G Hz or above Intel processor.
Display: 1024*768 or higher resolution display.

Pricing and Availability:

Pavtube Media Magician for Mac is only for $45(USD) at www.pavtube.com.

Related Tutorials for Pavtube Media Magician for Mac Beginners:


Share

Dec 26

How to Get Final Cut Pro X working with MKV files on Mac

Want to edit MKV in Final Cut Pro X on Mac OS X? Pavtube MKV to ProRes Converter for Mac can do that job. FCP or FCP X recognizes Apple ProRes Codec well, so the professional MKV to ProRes Converter can help you to convert MKV files to Apple ProRes 422, Apple ProRes 422 (LT), Apple ProRes 422 (Proxy), or Apple ProRes 4444.

User Question:

Q1: “I got some .mkv files stored on my mac computer, and I wanna import them to video editor FCP for editing. But the editor seems that can not recognize the .mkv files. Who guys can give me some suggestion?”

Q2: “I have a 1080p MKV file I want to get into Final Cut Pro X. I know MKV won’t work in FCP X and that it needs to be converted to something friendlier like ProRes. Right now I’m converting the MKV using Perian in Quicktime but it’s taking an extremely long time: it’s been 15 hours and it’s only halfway through. I was wondering if there was something like that available for MKV files so I don’t have to re-encode. Any suggestions?”

From above questions, we can find that the FCP user tried to edit MKV files in FCP, but he noticed that FCP cannot handle MKV format. We guess some other users would met the similar trouble, thus, we give you the solution here.

First of all, let’s learn more about MKV format. MKV is a video and audio container format. Being different from other video formats, MKV could integrate various video and audio tracks into one file while most of other formats could only handle one single video and audio stream. It means that a MKV file would contain many media streams including several audios and subtitles, just like an image of DVD or Blu-ray movie, in which you can select different language which you want to hear and read.

We had to tell you that when you intend to edit MKV in FCP, convert/transcode MKV to Apple ProRes for FCP/FCP X on Mac will the best and the only choice for you. For the reason that FCP (X) couldn’t read MKV as its native video format is Apple ProRes. Native format means that when using this format, one can easily import the video files into FCP (X) without rendering, if not, FCP X will not be able to recognize the movies or spend too much on the process of rendering.

The best Pavtube MKV to FCP Converter for Mac can help transcode MKV files to FCP (X) native video format Apple ProRes on Mac OS X at super fast speed. Follow the guide.

Free Download the professional Mac app


Beginners Turotial: How to convert MKV to Apple ProRes for FCP (X) on Mac with the best MKV to FCP Converter for Mac

Step 1. Load MKV files.

After download, install and launch the Pavtube MKV to FCP X Converter for Mac, click “Add Video” to add MKV file. Or you can also drag and drog MKV files to the program directly. If it is necessary, you can double click the each file to have a preview.

Step 2: Select Apple ProRes as the output format for FCP and set the output folder.

Click on the “Format” and get the dropdown menu, then move you pointer to “Final Cut Pro”. Under the sublist there are a few formats which are all compatible with FCP. Here we recommend the “Apple PreRes 422(HQ)” if you give the priority to the quality of the converted videos for importing MKV to FCP keeping high quality. Then you can set the output folder by clicking “Browse” icon as you need.

Note: If you want the files to be in smaller size, you can follow Final Cut Pro > Apple ProRes 422(LT)(*mov) or Apple ProRes 422(*mov) option. If your files size is at SD levels, you are advised to choose “Final Cut Pro > Apple ProRes 422(Proxy)(*mov)”, which is recommended for 480i/p and 576i/p shootings as well.

Step 3: Click “Settings” icon to adjust audio and video parameters.

Click the “Settings” icon and you will go into a new interface named “Profile Settings”. You can adjust codec, bit rate, frame rate, sample rate and audio channel in the interface according to your needs and optimize the output file quality.

Note: You’d better set the video frame rate as 30fps, video size as 1920*1080 to keep the best quality for editing in FCP (X).

4. Transcode MKV to ProRes 422 MOV for FCP (X)

At last, hit the “Convert” button to transcode MKV to ProRes 422 MOV for FCP (X) editing on Mac Mountain Lion 10.8.

After the MKV to Apple ProRes for FCP on Mac conversion, you will be able to get the output files for FCP (X) via clicking on “Open” button effortlessly. Now you can import the MKV to FCP X and edit the MKV files in FCP without any trouble keeping high quality.

With Pavtube MKV to FCP Converter for Mac, you can easily change MKV files to FCP (X) for editing, this software runs fast, so you can convert your MKV footages to FCP (X) in less time, video and audio synchronization are perfectly guaranteed.

PS. If you have any problem, pls contact with macsupport@pavtube.com to get more information. You also can leave a message on Pavtube Community or Pavtube Facebook, we will answer your questions as soon as possilble.

Share

Dec 25

Rewrap ProRes files from FCP to MKV, H.264, FLV, WebM, MP4, AVI, MPG and more

User Review:

I think the software is great – I tried and sampled many others and none were both straight forward AND accurate – particularly with regard to synchronizing audio with the video.

From the user questions:

“I have 1920×1080 Apple ProRes 422, Linear PCM, Timecode .mov files exported out of Final Cut Pro that I would like convert those ProRes 422 to other formats for different usages such as for preparing for web upload(YouTube or Vimeo), playback on personal computers, playback on DVD players, etc. Is there a Mac application do to so? Any assistance with that would be greatly appreciated. Thanks in advance.”

———————————————————————————————————————————————————–

Final Cut Pro enables videographers to export projects as Apple ProRes 422, Apple ProRes 422 (HQ), Apple ProRes 422 (LT), Apple ProRes 422 (Proxy) and Apple ProRes 4444 in different settings depending on their final use.

Sometimes video editors need a third party application to convert these Apple ProRes clips to other formats like MKV, MP4, AVI, MPG, H.264, FLV, WebM and more to fit other uses, that’s because Final Cut Pro itself doesn’t support rewrapping exported ProRes to these video formats and so is Apple Compressor.

You probably have been in the same situation as mentioned above. Apple ProRes is an intermediate codec that provides high-quality, frame-accurate editing. Apple describes ProRes as visually lossless. That means while data is being removed during compression, the resulting images do not suffer from image degradation. Unlike H.264, ProRes is not a distribution codec for finished work. That’s why people sometimes need to convert ProRes to other formats. As for transcoding Apple ProRes to other formats for different usages, Pavtube ProRes Converter for Mac is what you need. In the guide below, we will introduce how to convert Apple ProRes clips exported from Final Cut Pro to your desired file formats (e.g. MKV, MP4, AVI, MPG, H.264, FLV, WebM, etc.) by using Pavtube program in detail.

Introduction of ProRes Converter for Mac

As the leading video conversion and video editing software, Pavtube ProRes Converter for Mac is the first to support Apple ProRes conversion and ProRes encoding. It can convert ProRes 422, ProRes 422 HQ, ProRes 4444 and more to AVI, WMV, MKV, MP4, MOV, FLV, WebM and other Apple unfriendly video formats as well as convert ProRes to Apple friendly MP4, MOV, M4V and convert ProRes to HD and SD video for Android devices and Windows 8 devices as well as Apple devices including iPad 3, iPhone 5, iPod 5, Apple TV, Kindle Fire HD, Google Nexus 10, Microsoft Surface, Nook HD etc. Pavtube HD Video Converter for Mac is deserved to be the first professional ProRes Converter.

In addition to converting ProRes, the ProRes Converter can also converting any format video/audio to any desired video and audio formats including converting MXF/P2 MXF to ProRes, AVCHD MTS/M2TS to ProRes, WMV, MP4, AVI, FLV, MOV to ProRes and convert Blu-ray/DVD to ProRes etc. Pavtube ProRes Converter is also powered with advanced features such as split video based on chapter markers, trim video to keep excellent part, crop video to focus screen, adjust aspect ratio to 16:9 or 4:3, customize video bitrates and more.

First Free Download HD Video Converter for Mac Trial


After downloaded the program, simply follow the installation wizard to install it onto your Macintosh computer. Then follow the guide below to transcode ProRes files to your desired format. Please notice that the free trial version produces files with PAVTUBE watermark standing in the center of the image, to avoid the watermark, you should purchase its full version.
Beginners Tutorial – How to convert ProRes clips from Final Cut Pro (X) to other formats (e.g. MKV, MP4, MOV, AVI, MPG, H.264, FLV, WebM, etc.)?

Step 1: Load the ProRes file to ProRes Converter for Mac

Locate your ProRes files, simply drag and drop them to ProRes Converter for Mac. Or you can just click “Add video” or “Add from folder” icon button to import ProRes files.

Step 2: Set desired output video format

Pavtube ProRes Converter for Mac offers a wide variety of output formats for users to choose from. For example:

  • For web uploading, you can choose “Format > Common Video > WebM Video Format (*.webm)” as target format
  • For creating Flash videos, you can select “Format > Flash Video > FLV, F4V or SWF” as output format
  • For editing in Sony Vegas, Adobe Premiere etc., ypu can select “Format > Adobe Premiere/Sony Vgeas > MPG or MOV” as output format
  • For computer playback, you can select MKV, MP4, MOV, H.264 as output format…
  • For transfer videos to Android Tablets/Phones, you can choose “Format > Android > …”

All in all, you can easily make your selection depending on the final usages of the output files.

Click “Browse…” and define which folder you want to put the converted video in.

Step 3: Custom output file quality (optional)

If you would like to custom image and sound quality of the output files, you can click “Setting” button and enter “Profile Settings” interface to do so. On the “Profile Settings” panel, you are allowed to adjust video and audio parameters like video codec, resolution, bit rate, frame rate, audio codec, sample rate, audio bit rate and audio channels (5.1 channels is available as well).

Step 4: Press big red “Convert” button to start rewrapping Apple ProRes files to your desired file format (e.g. MKV, MOV, MP4, AVI, MPG, H.264, FLV, WebM etc.) for playback, uploading, editing, managing or sharing.

Once the conversion is done, you can click “Open” button to get the generated files with ease.

Conclusion

With the help of Pavtube HD Video Converter for Mac, it is that easy to convert Apple ProRes MOV to MP4, encode Apple ProRes MOV to AVI, transcode Apple ProRes MOV to WMV, rewrap Apple ProRes MOV to MKV and other general video formats or convert to Android/Apple/Windows 8 devices for entertainment, why hesitate to download it and start experiencing now and to avoid wasting time to search the internet and usually it turns out no good results.

Comprehensive editing function:

Click “Crop” button in the main menu, you can crop video and set aspect ratio to 16:9, 4:3 as well as set the effect by changing brightness, contrast, saturation, volume of the video.

If you want to throw unwanted video part, click “Trim” button in the main menu to set start time and end time to keep the wanted video part.

Choose the specific “effect” model from Simple gauss blur, Simple laplacian sharpen, Aged film, Flip color, Invert and None.

In addition, you can horizontally and vertically reverse the picture.


Share

Dec 19

Batch convert multiple MTS clips to Apple ProRes 4444 for FCP 6/7 and FCP X

User Review:

“I have been using Pavtube MTS Converter for Mac. I am trying to figure out if I can convert multiple mts clips at once, without having to convert each clip one at a time then go back to the source clip in the edit window and select the next in-and-out point. The source files are long and that’s a lot of back-and-forth to get multiple clips, happy with the product….”

As one of our valuable customers mentioned above, we assume there are more people have the same need when handling numerous mts shots saved on a camera. If you only have one MTS video, it might be okay, but the thing is that you have hundreds of mts files, what to do? If there is no so-called batch conversion, how terrible it is! See the following problem description:

“I have recorded many MTS clips with my Sony NEX-VG30, and want to import to FCP 7 project which I am running on a Mac OS X. I am well aware that MTS is not an friendly format for FCP. I just want to make sure my workflow sounds good to you folks out there. I plan to transcode the MTS clips to ProRes 4444 footage in compressor and then reimport into my project with the sequence set at ProRes. Can you recommended some software that supports batch convert my MTS clips? Thanks.”

As we know, none camcorder or camera intends to save footage in one file only. Generally speaking, nearly all cameras automatically chop footage up into separate files when they hit 2GB or some sizes similar. As a result, back from a travel or concert, it’s usual to have lots of separate .mts files stored on your SD card or whatever media you are recording to. What’s a hair pulling thing if you have to deal with them one by one – import a clip, convert it to mp4, then import the same file again to convert to mov… If that’s the case, Pavtube MTS Converter for Mac is an ideal tool for you to do batch conversion. Various software programs are claimed to have the ability to process batch conversion, but regarding to the real batch conversion, Pavtube MTS Converter for Mac performs much better.

With the program, you can Encode MTS footage to ProRes 4444 MOV (or ProRes 422 MOV) for FCP 6/7 or FCP X editing, Transcode MTS viodes to AIC MOV for iMovie or FCE editing, Convert MTS to DNxHD MOV for Avid MC editing, Convert MTS files to Divx/Xvid AVI for playback and editing, free convert MTS footage to MP4 for YouTube/Fackbook/Vimeo, Free convert MTS to MP4 for iPad/iPod/iPhone/Android/Windows 8 Tablets and Smartphones and so on. This MTS Converter for Mac supports auto de-interlacing and batch conversion, enables you to keep 16:9 wide screen aspect rations.

Tutorial – How to batch convert multiple MTS clips to Apple ProRes 4444 for playing, editing and uploading on Mac?

Free download the Mac app from here.

Note: Here is a good news, if you want to convert multiple MTS files to MP4 for playing, uploading or more operation, the Pavtube MTS/M2TS Converter for Mac is Free on Apple Store, if you also need to convert MTS files to ProRes for FCP editing, you only need to click here to update, only $19.99 one time, original price $29, save $9.01 for you.

Step 1. Install and run Pavtube MTS Converter for Mac, click “Add” button or drag and drop the MTS clips to the program. It’s professional MTS to Apple ProRes 4444 batch converter tool, it also supports converting MTS clips to many other codecs to meet your need, batch converting is also available. Meanwhile, if you wanna merge multiple MTS clips into a single ProRes encoded .mov file, you can put a checkmark in the checkbox “Merge into one file”.

Step 2. Click “Format” bar to choose the format for output, you can click and choose Final Cut Pro -> Apple ProRes 4444 (*.mov), it’s best for high quality use in FCP 6/7 or FCP X, for common use, you can also choose ProRes 422, ProRes 422 proxy, etc.

Tips: you can click “settings” button to adjust the resolution, frame, etc. (Optional)

Step 3. Click “Convert” button on the main interface to start batch converting MTS clips to Apple ProRes 4444, or convert MTS files to more video format.

When the conversion finished, you can import the converted MTS files to FCP X for editing freely.

For more about FCP application, please visit my FCP column and MTS Column.

Apple ProRes 4444 – This codec offers the best quality for 4:4:4:4 sources and for workflows involving alpha channels. It features:

  • Full-resolution, mastering-quality 4:4:4:4 RGBA color, perceptually indistinguishable from the original material with excellent multigeneration performance
  • Mathematically lossless alpha channel (up to 16 bits) with real-time playback
  • High-quality solution for storing and exchanging motion graphics and composites
  • A remarkably low data rate compared to uncompressed 4:4:4 HD (the target data rate is approximately 330 Mbps for 4:4:4 sources at 1920 x 1080 and 29.97 fps)
  • Direct encoding of, and decoding to, both RGB and Y′CbCr pixel formats
Share
Page 27 of 37« First...1020...2526272829...Last »