AIC Converter,MTS to AIC,MTS to iMovie,MTS to FCE,MTS to Final Cut,AVCHD to AIC Converter,AVCHD to Final Cut Express,import AVCHD files to iMovie,MTS to ProRes 422,MTS to Final Cut Pro,MTS to FCP X,AVCHD and Final Cut Pro,Log and transfer MTS to FCP,edit MTS footage in iMovie,FCP transfer MTS files,transfer AVCHD files to iMovie

Dec 18

Panasonic Lumix AVCHD Lite footage and Avid Media Composer workflow on Mac

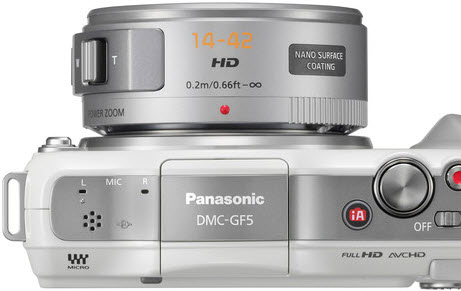
In addition to Motion JPEG images, the Panasonic Lumix series cameras can record high-definition motion images in AVCHD Lite. It features almost doubling the recording time in HD quality compared with the conventional Motion JPEG format. In movie recording, the Panasonic Lumix goes further than simply recording HD movies. A host of creative options including Creative Movie Mode, My Color Mode and Film Mode are available for more extended expression not only in photography but also in videography.

“One of my clients has a Panasonic Lumix GH2 camera which shoots video in the AVCHD Lite (.mts) format. Unfortunately he found his Avid Media Composer 5 does not support the AVCHD Lite files directly though MC5 does support the standard AVCHD (.mts) files. But he then found the M2T format file can be imported and rendered very well in Avid MC5. Does any one know how to re-wrap AVCHD Lite (.mts) file into M2T file?”

“Has anyone pulled in AVCHD lite files into composer 5? I am looking to mix standard def and these 720 files and want to know if it will work and how best to do it? Does it differ much from just AVCHD files? Thanks”

According our multi-testing, Avid MC5 is able to import the standard AVCHD MTS file directly, but unfortunately Panasonic Lumix cameras files are in MTS AVCHD-Lite. “Lite” a subset of AVCHD, and is not supported by AVID directly. I am not sure whether it is because the video your client shot is so special that it cannot be supported by MC5 directly. But it seems “DNxHD MOV codec” is currently the best choice for Avid Media Composer.

I search the difference of AVCHD and AVCHD Lite and find that the main differences between AVCHD Lite and the regular AVCHD: a maximum resolution of 1280 x 720p in AVCHD Lite compared to 1920 x 1080p in regular AVCHD and a less-intensive compression method – both of which make the format more suitable for less powerful camera hardware.

I do not think AMC 5 is able to support AVCHD Lite video from Panasonic camcorder.

I googled a program called Pavtube AVCHD Lite to Avid Converter which can handle AVCHD Lite video perfectly. And you can convert your AVCHD Lite files to Avid Media Composer(included Avid MC 5/5.5/6.0/6.5) compatible codec, such as: DNxHD MOV codec.

The thing is that most people have not figured out a simple and available way to do so. Some people use a video converter tool to convert AVCHD Lite to TS firstly, and then use ProCoder3 to convert the generated TS to M2T for using in Avid Media Composer. It’s workable, but complicated. Why not use a one-stop tool to finish conversion at one shot? Pavtube AVCHD Lite to Avid Converter is what you are looking for. The AVCHD Lite Converter for Mac can convert AVCHD Lite footage to Avid Media Composer supported file type in simple steps without help from third party software, which is really ease-to-use and straightforward. The following contents will demonstrate how to use it to process Lumix AVCHD Lite to Avid Conversion in detail.

DNxHD Quick Learn

DNxHD is a proprietary Avid format, which is a video codec intended to be usable as both an intermediate format suitable for use while editing and as a presentation format. DNxHD offers a choice of three user-selectable bit rates: 220 Mbit/s with a bit depth of 10 or 8 bits, and 145 or 36 Mbit/s with a bit depth of 8 bits. DNxHD data is typically stored in an MXF container, although it can also be stored in a Quicktime container. Here Pavtube AVCHD Lite Converter for Mac just packs it in a Quicktime (MOV) container for using with Avid Media Composer.

A detailed instruction – How to transcode Panasonic Lumix AVCHD Lite to DNxHD MOV for Avid Media Composer editing on Mac?

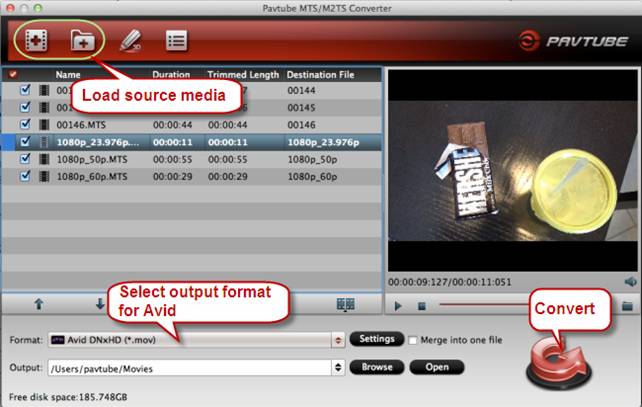
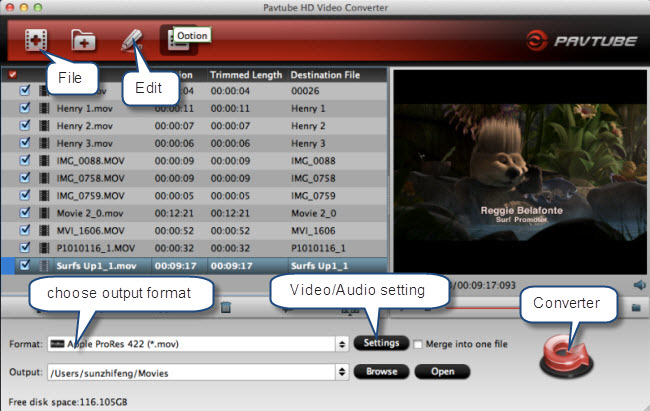
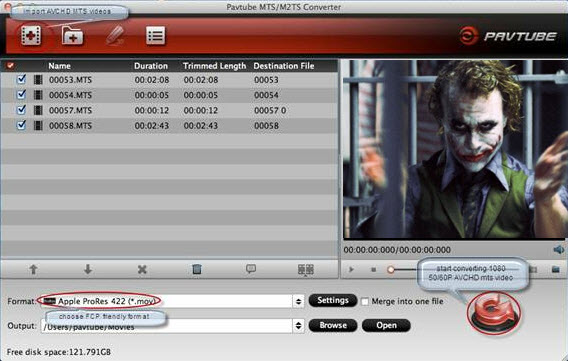
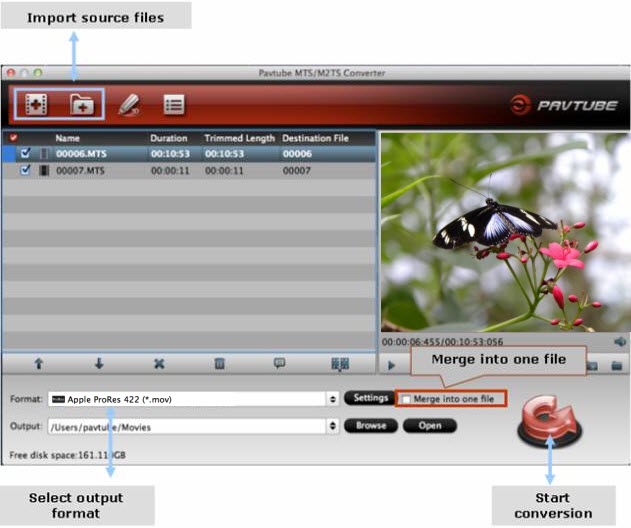
Step 1. Add Panasonic Lumix AVCHD Lite videos to AVCHD Lite Converter for Mac

Connect your Panasonic Lumix Camera to iMac/MacBook with USB 2.0 cable or use card reader to transfer the AVCHD Lite .mts files to Apple hard drive disk. Run AVCHD Lite Converter for Mac from Pavtube as the best Mac Panasonic AVCHD Lite to Mac editing software Converter, and click “Add video” or “Add from folder” icon to load your source files directly from your camera, or from a card reader, or from the file folder that contains the source MTS videos stored on your computer’s hard disk drive. This Panasonic Lumix AVCHD Lite Convetrer can also convert AVCHD/AVCHD Lite export lossless compression video/audio compatible with FCP (X)/FCE/iMovie/Adobe Premiere Pro, Kdenlive, Adobe After Effects CS6, Apple Aperture 3, etc on Mac. The software supports importing video clips in batch, so you need not waste time to add them one by one. To combine imported files into one file, you can simply tick off “Merge into one file” option.

Note: If you are working on Mountain Lion 10.8, you are suggested directly dragging and dropping your AVCHD Lite video files into the program.

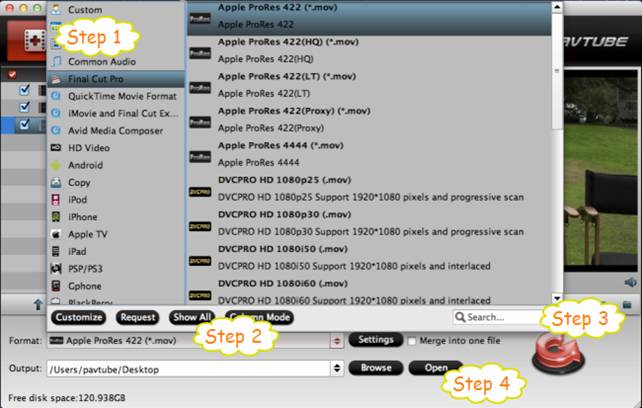
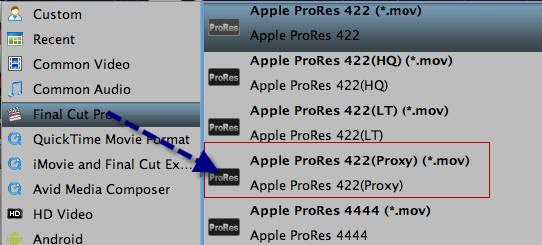
Step 2: Select output format for importing AVCHD Lite to Avid editing.

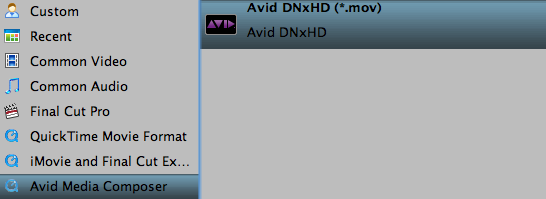
Click on “Format” menu and the profile list pops up. Move to “Avid Media Composer” column and choose “Avid DNxHD (*.mov)” as target format.

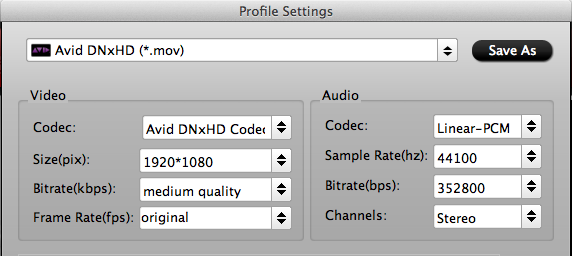
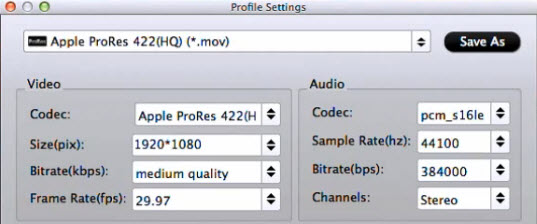
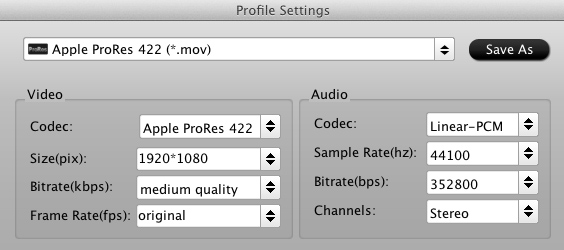
Optional – Tap the Settings icon, and you can adjust codec, bit rate, frame rate, sample rate and audio channel in the Profile Setting to get the output in best quality.

Step 3: All the settings have been done; you can start re-wrap Panasonic Lumix AVCHD Lite footage to DNxHD MOV for Avid Media Composer by clicking the “Convert” button. Once the conversion is done, you can click “Open” button to find out the generated QuickTime files for editing with Avid MC.

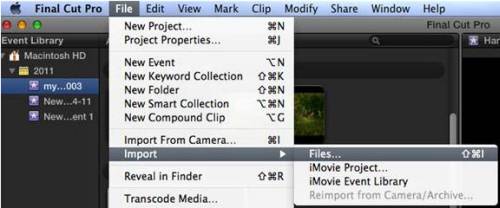
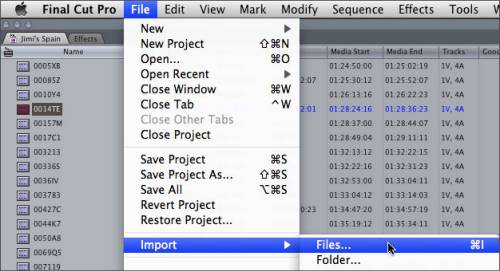
PS. What’s more, if you have no idea about import the converted AVCHD Lite video files to Avid Media Composer, you can follow Import media files to Avid to learn more.

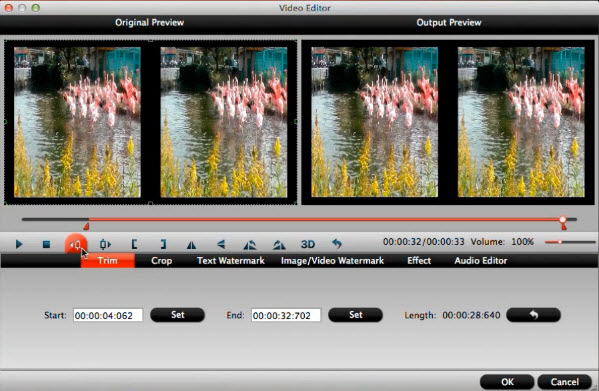
Additional Editing Features of the AVCHD Lite Converter for Mac: Trim, Merge, De-interlace Panasonic Lumix AVCHD Lite footage, capture frame.

Trim Panasonic Lumix AVCHD Lite clips: Click “Edit” to enter video editor, by default the “Trim” tab is activated, so just set start time and end time to include the duration you want to remain, cutting others out.

Merge Panasonic Lumix AVCHD Lite files: If you would like to join several files together, just select these files and check the Merge into one box.

De-interlace Panasonic Lumix AVCHD Lite: Some footage may be saved as interlaced video with Juggled edges and ghosting. In that case you can set deinterlace effect to eliminate the combing. Follow “Edit > Effect > Deinterlacing”.

Capture frame from Panasonic Lumix AVCHD Lite: To thumbnail video frame, you may click the “Snapshoot” button when it plays to your favorable frame.

Share

Dec 17

Cameras in 2013: what we can expect

During 2012, compact system cameras (CSCs) have been going from strength to strength and touchscreens are becoming more responsive and increasingly commonplace across a wider range of digital devices.

Innovative camera apps designed to streamline the process of editing, uploading and sharing your files are being continually enhanced and updated, plus there have been improvements to aspects such as Wi-Fi connectivity, remote camera control from smart devices and the debut of cameras running on Android.

With all this innovation, we can’t help but begin to speculate as to what 2013 could bring to the photography arena.

Read on for some of our ideas about what we might expect to see in the New Year, and add your own thoughts in the Comments section below.

Ultra HD and 3D image capture

With speculation surrounding the appearance of Ultra HD (previously known as 4K) displays, and further developments in the dissemination of 3D imagery in the future, it’s logical to expect more cameras that are capable of capturing the stills and movies to complement these technologies.

With 3D image capture becoming a de rigueur feature among many of the latest camera launches’ specifications, it’s possible that we’ll see the likes of Fujifilm continuing to build on its pioneering Real 3D-series. And recent adopters of 3D capture from other brands may perhaps expand upon the functionality currently offered by their own ranges.

In order for 3D technology to take hold, however, we ideally need to see advancements in the facilities available for printing 3D stills (how about an affordable device for the home user?), as well as a greater number of lenticular displays capable of showcasing 3D images and footage without the need for 3D glasses.

Wonderful Wi-Fi and GPS

The increasing availability of fast Wi-Fi services broadens the appeal of devices that are capable of taking advantage of this – cameras included. Similarly, built-in GPS connectivity has appeared in recent models’ feature-sets with increasing frequency.

While we have seen improvements in the speed at which these GPS systems acquire a positive lock (and their ability to hold it as the photographer moves around) we’re still waiting for the level of power these features consume to be reduced.

Likewise, the current drain on the battery that using built-in Wi-Fi results in has led to many models essentially touting a feature that’s impractical to use with any real frequency. As the availability of Wi-Fi expands, we expect to see a corresponding rise in the number of models sporting more effective – and less power-hungry – systems.

Android cameras

We’re intrigued by Nikon and Samsung’s initial attempts to integrate the popular Android operating system with a camera, in the shape of the Nikon CoolPix S800c and Samsung Galaxy Camera.

Neither manufacturer has managed to produce a flawless product – as is usually the case when pioneering anything new – but the potential offered by the combination of these two technologies is certainly promising.

We suspect the other big names in the camera world haven’t let this prospect pass them by, so it’s likely we’ll see further developments along these lines in the near future. With compact cameras being the logical starting point for the growth of this new idea, it will be interesting to see how successfully the OS can be married with the functionality of a camera in the future.

There could be further scope for expansion into the CSC and perhaps even DSLR sectors further down the line.

Voice control

We’ve seen an increasing number of phones adopting voice commands to access key features, so could we see this technology infiltrating the camera market too? If we did, it could offer the ultimate in hands-free photography and remote control over your device’s settings.

It wouldn’t take much of a leap of imagination for someone to integrate this functionality into the already pretty sophisticated apps and gadgets that enable us to adjust our camera settings and fire the shutter remotely. It might do this either using a dedicated piece of hardware or a software-based solution.

As well as extending the possibilities of remote camera control in a general sense, this could also be a useful advancement to aid visually impaired users and photographers with physical disabilities.

Touchscreen displays

The screens adorning the backs of our cameras have come on in leaps and bounds over the past year, firstly in terms of resolution and size, then we started to see improvements in the responsiveness of touch-sensitive devices.

Then touchscreens began to trickle out of the compact camera market to infiltrate the CSC sector, with the first-of-its-kind touchscreen finally making its debut on a DSLR with the recent launch of the Canon EOS 650D.

With the enhancements we’ve seen in the usability and responsiveness of capacitive touchscreens of late, we don’t think it will be long before we start seeing more of these on subsequent DSLR launches in 2013.

Wearable cameras

With the introduction of devices such as the Memoto wearable camera – designed to automatically capture snapshots of your daily life – we could see more products following along these lines.

With the continuing boom of social networking and file sharing websites – plus Wi-Fi innovations such as Cloud storage – and their influence on the way in which we all share key events in our lives, perhaps we’ll start to see more devices capable of capturing and wirelessly uploading content from small cameras worn every day.

The result could be a constantly updating record of your life – complete with GPS location data – with additional scope for users to tag and caption their shots, plus potential for integration of face recognition software and more besides.

New cameras in 2013

In addition to some of the more fanciful predictions we could make about the future of camera technology, there are a few things that are more certain: the fact that – barring global catastrophe – manufacturers are going to keep replacing old camera models with new ones.

Among the possible newcomers we’re hoping to see are a Nikon D400, Nikon D8000, Nikon D4x and a replacement for the popular Nikon D90 and Nikon D300s models.

Plus we’re expecting a Canon EOS 7D Mark II/Canon EOS 8D to replace the Canon EOS 7D, and a Canon EOS 60D substitute.

Olympus is also expected to continue to develop its superb range of petite-yet-powerful cameras, with advancements to its PEN series range on the cards. We know that the Olympus Pen P3 is ripe for replacement.

Panasonic too is about due to update its excellent G-series cameras, with hopes high for a Panasonic GX2 and a Panasonic GF6 in particular.

With the rise in popularity of more manageable bodied full frame DSLRs, we may also see the technology filtering down through the DSLR hierarchy and becoming more commonplace among the more affordable areas of the market. However, the latter isn’t likely to occur with any immediacy, due to current manufacturing costs.

Sony’s NEX range of CSCs and its pioneering DSLT cameras have both seen a real boost in terms of the level of versatility each system offers and their resulting overall popularity. We expect this success to continue for Sony in 2013, provided it continues to evolve the technologies it’s already grabbed our attention with in 2012.

Could we start to see CSCs and DSLT cameras finally truly matching DSLRs for their functionality and image quality, or even integrating full frame sensors? Time will tell…

Future or fiction?

A lot’s happened in the digital camera market over the past year, and it’s easy to get carried away with ideas about what the New Year might herald.

As well as the ideas already mentioned, we can see scope for further developments in EVF technology, bringing these closer into line with their optical rivals. We also see potential for wackier ideas, such as hybrid devices that integrate the functionality of a digital camera with that of a tablet running Android, and featuring a removable, wirelessly connected touchscreen interface.

Whether or not we see some – or any – of the above developments becoming reality remains to be seen: roll on 2013!

Share

Dec 14

2012 Best Compact System Camera – Sony NEX range

Although Sony NEX cameras aren’t the most compact on offer here, they sport a large APS-C sensorwith a crop factor of 1.5x. This means a 30mm lens is required to provide the same angle of view as a standard 45mm lens on a 35mm camera.

Larger sensors have a greater surface area available for reacting with light, which should improve performance at high sensitivities and dynamic range in high contrast situations. Having more surface area available also enables higher pixel counts to be achieved.

A decent number of additional lenses are available for the NEX system, with third-party lens manufacturers such as Tamron beginning to support the E-mount. Owners of Sony Alpha cameras can purchase an adaptor to enable A-mount lenses to be used with the cameras too.

1. Sony NEX-F3

Price: £410/AU$700/US$600

Spec: 16.1MP, 1080p video, 3-inch tiltable LCD screen, strong high ISO performance

The Sony NEX-C3 has been revised and replaced by the Sony NEX-F3, which has an APS-C sizedCMOS sensor, a resolution of 16.1MP and maximum sensitivity setting of IS0 16000.
A bulkier body and decent finger grip make controls easier to access. All the usual metering modes and manual functions are included too, along with two fully automatic picture-taking modes for those who wish to simply point and shoot.

Read Sony NEX-F3 review

2. Sony NEX-5R

Price: £670/AU$800/US$650

Spec: 16.1MP, 1080p video, 3-inch tilting touchscreen, Wi-Fi

The NEX-5R is the first Sony CSC with Wi-Fi connectivity, and is a significant upgrade on the Sony NEX-5N. The inclusion of downloadable apps enables quick and easy customisation, and the new hybrid AF system works well.

The Sony NEX-R5 shows how compact system cameras are really coming into their own. The design doesn’t have to rely on retro chic, but instead uses modern research and development to create a compact body shape that both fits the electronics and also feels comfortable to hold.

Read Sony NEX-5R review

3. Sony NEX-7

Price: £950/AU$1,500/US$1,350

Spec: 24.3MP, 1080p video, 3-inch tiltable LCD screen, EVF, direct manual control

A compact system camera with professional ambition. The Sony NEX-7 is the flagship model in the Sony CSC range, sporting a 24.3MP CMOS sensor, Full HD video recording and direct manual controls. The high pixel count should enable really large prints to be produced.
A 3-inch tiltable LCD screen provides extra flexibility when shooting, and the lightweight magnesium body feels reassuringly rugged.

A high-resolution OLED electronic viewfinder is included, enabling you to choose your preferred method for composing images. ISO sensitivities up to ISO 16000 are available, enabling images to be taken in very dark conditions.

The Sony NEX-7 wins our Best advanced CSC award.

Read Sony NEX-7 review

4. Sony NEX-5N

Price: £600/AU$1,100/US$700

Spec: 16.1MP, 1080p video, 3-inch tiltable LCD touchscreen, 10fps continuous shooting

With a more modest pixel count than its bigger brother, the NEX 5N sits in the middle of the Sony CSC range. Customisable controls on the rear enable the way the camera behaves to be set just how you prefer, and a tiltable 3-inch touchscreen makes navigating menus and shooting from awkward angles a breeze.

An improved Bionz processing engine has enabled Sony to raise the maximum ISO setting to an impressive ISO 25600, which will be ideal for taking images without flash in dimly-lit conditions. Full HD video at 30fps can be recorded at up to 50fps, which should produce smoother footage than standard 25fps footage.

The slim, compact body has a deep finger grip to provide a secure hold over the camera, which is dwarfed by the 18-55mm kit lens. Packages with a 16mm f/2.8 pancake lens are also available, making a more pocket-friendly kit for travel and nights out on the town.

Read Sony NEX 5N review

Sony Camera/Camcorder workflow on Mac

Share

Dec 14

Import Sony NEX-5R 1080p MTS to Final Cut Pro X without any rendering or incompatibility problem

Get the best AVCHD to FCP X Converter and you can convert Sony NEX-5R AVCHD clips to ProRes 422 MOV for importing Sony NEX-5R 1080p MTS to Final Cut Pro X without any rendering or incompatibility problem on Mac

Question 1 – “I shot footage using the Sony NEX-5R. When I import the footage into Final Cut Pro X, I found it cannot handle the AVCHD files well, and some the footage looks washed out and the preview is loggy. Is there anyway to solve the problem? Thanks!”

Question 2 – “I can’t get FCP 7 or FCP X to import AVCHD (with Sony NEX-5R) shot in 1080 60p. In FCP 7, when using Log and Transfer, I can see all the clips on my card (or FMU), but the material shot in 60p doesn’t have an icon present. When I click on it, it tries to transfer, but ends up with an error. In FCP X, when using Camera Import , it doesn’t even show my clips shot 60p.”

Sony NEX-5R’ Video is recorded in AVCHD format at up to 1080p60 quality, with 1080i60 and 1080p24 also supported. This is a step up from the video capabilities of the Sony NEX-F3, which is limited to 1080i60 or 1080p24 capture. The quality is excellent—footage is sharp, colors are accurate, and motion is smooth. Autofocus works during recording just as it does for stills, and the even though the sound of the lens focusing can be heard on the soundtrack, it’s not overbearing.

The Sony NEX-5R has much to recommend it as a top-flight large-sensor, interchangeable-lens camcorder and as a worth-the-upgrade successor to the Sony NEX 5N. It can shoot 1080 60p (50p for PAL)full HD resolution up to 24fps in short bursts. While, the 1080 60p/50p AVCHD files are not friendly for Final Cut Pro X(including Final Cut Pro 6/7), because when importing Sony NEX-5R AVCHD 1080P 50P/60P MTS files to Final Cut Pro X, it always need a long for rendering. In fact, Final Cut Pro X most friendly video format is Apple ProRes 422 (*.mov). So, you’d better transcode Sony NEX-5R MTS footages to Apple ProRes Codec for Final Cut Pro X or Final Cut Pro 6/7 first.

Although Final Cut Pro X has added some plug-ins, actually background converters for AVCHD editors, the importing process are unbelievably slow. To find a powerful and profession Mac AVCHD converter becomes more important. Here recommended the best Mac AVCHD to FCP X Converter. It’s great performance and all the FCP compatible formats included(Apple ProRes 422 HQ, Apple ProRes 422, Apple ProRes 422 LT, etc) make it easier for you to import and edit your 1080 50p/60p files from Sony NEX-5R in Final Cut Pro X with original quality. You can download an free trail version from below to give a try.

Free Download and Install the App

Note: The free trial version will generate files with PAVTUBE logo standing in the center of the output image. To bypass the watermark, you should pay for its full version.

Step 1. Launch AVCHD to FCP X Converter for Mac as a Sony NEX-6 AVCHD Converter for FCP X. Click “Add video” or “Add from folder” icon to load your source files directly from your NEX-6 camera, or from a card reader, or from the file folder that contains the source MTS videos stored on your computer’s hard disk drive.

Tip: If you want to join Sony MTS files into one for easier editing, please tick the box “Merge into one file”.

Step 2. Click the “Format” option, select the “Final Cut Pro > Apple ProRes 422 (*.mov)” as target format. And navigate to the Final Cut Pro group, you will notice that there are profiles with Apple ProRes 422 (*.mov), Apple ProRes 422(HQ) (*.mov), Apple ProRes 422(LT) (*.mov), Apple ProRes 422(Proxy) (*.mov), Apple ProRes 4444 (*.mov). Apple ProRes 422 (*.mov) format is specially designed for using in Final Cut Pro X (include FCP 6/7). (The Apple ProRes 422(Proxy) (*.mov) codec is intended for offline editing and contains 30 percent of the data rate of Apple ProRes 422).

Step 3. Click the “Settings” icon and you’d better set the video size as 1920*1080, video frame rate as 30fps(or 25fps PAL) for importing Sony NEX-5R 1080p MTS to Final Cut Pro X with the best quality.

Step 4. Click the button for “Convert” and start converting Sony NEX-5R AVCHD to ProRes 422 MOV on Mac OS X immediately.

Step 5. After the AVCHD to Apple ProRes 422 MOV conversion, you can get the output files via clicking the Open icon. Run your Final Cut Pro X and click “File > Import > Files” to import the converted Sony NEX-5R MTS files to Final Cut Pro X without any rendering or incompatibility problem.

PS.

Additional Contents

Pavtube HD Video Converter for Mac can also help you convert Canon EOS 6D MOV files to Mac Compatible Formats like ProRes 422(*.mov), Apple Intermediate Codec (AIC)(*.mov), Avid DNxHD, XDCAM MOV, HDV, DVCPRO, MOV(AVC), H.264 MOV for editing software FCP (X), iMovie, FCE, Avid Media Composer, Adobe Premiere Pro, Apple Aperture 3, Kendlive, etc or convert to other common formats such as MP4, WMV, MPG, MPEG, 3GP, AVI, and even H.264 MOV for other usages. Only need to change the “step 2″:

  • – choose “Avid DNxHD (*.mov)” for Avid Media Composer
  • – choose “Apple InterMediate Codec (AIC) (*.mov)” for iMovie or Final Cut Express
  • – choose “MOV (AVC) (*.mov)” for Adobe Premiere Pro
Share

Dec 11

Easy Steps – Free burn projects from Final Cut Pro to DVD on Mac

In recent years, camcorders and Cameras are very popular in people’s lives now, many users tend to use it to memorize unforgettable moments in life, like wedding ceremony, graduation ceremony, speech contest, singer contest and wonderful family get together.

You must have used cameras or camcorders recorded many HD videos which are in different video format, like AVI, MP4, MOV, MTS, M2TS, MXF, etc. You may have imported videos to FCP for editing, and then you can export videos from FCP and share with your family or friends. But, how to store the videos projects from final cut pro on Mac? Burn Final Cut Pro project MOV to DVD disc or backup or playback is very good choice. As many people don’t know how to burn FCP project to DVD on Mac (include: Mac OS X Leopard 10.5, Snow Leopard 10.6, Lion 10.7, Mountain Lion 10.8). For example:

Q1: How do i burn a dvd from final cut pro?

I’m in my final cut pro and i need to take what i have and burn it on to a DVD that i can play on any DVD playey?
what do i export it too? and so on !

Q2: How to burn a FCP project to a playable DVD?

so i have a project in my timeline i want to put on a dvd so that it auto plays when placed in a dvd player. I have gone into compressor and tried a few different options including the DVD mode to m2s or something but that still wouldn’t load on a dvd player. So, what do i have to do to get it to play automatically when the dvd is inserted into a dvd player? Thanks.

Q3: Burning Final Cut Project to DVD – PLEASE HELP!

Hey guys, i’m having major problems trying to burn my project to DVD-Video. I rendered the project, exported as Quicktime Movie & every time i try dragging it into IDVD it keeps saying there are errors in the project & it will not burn. I also tried using the freeware app – BURN & no luck. I do not know how to use DVD STUDIO PRO & i have to get this burned ASAP! I do not need menus or anything like that, just a straight DVD that will play in a DVD player. Please guys any help would be great! Thanks so much.

Easy Steps to Burn Final Cut Pro projects to DVD on Mac

If you want to burn video files from Final Cut Pro to DVD, then can play well on home DVD player, you should use the right software to create/burn standard video DVD from your videos, a Free Mac DVD burning tool is required since FCP doesn’t allow you to burn DVD directly:

– Free Pavtube DVD Creator for Mac is an ideal tool to burn Final Cut Pro video files to DVD with ease. You can just import videos (BTW, photos slideshow also available), author a DVD menu from template, and lastly burn movies to DVD disc that can be played any home DVD player with high quality. By the way, Free DVD Creator for Mac can also burn common videos (MKV, AVI, MP4, WMV, MOV, TiVo, MXF, MTS, etc.) to DVD with customized Menu and soundtrack. Step by step, this tutorial will show you how to burn Final Cut Pro videos to DVD on Mac. If don’t have a Mac, get the Windows version and burn FCP-exported MOV video to DVD in Windows. Two parts will be included:

Part 1: Export Video Edited by Final Cut Pro

Part 2: Burn Final Cut Pro video to DVD Disc on Mac

The procedure that should be followed to export or edit the video by using the FCP software is listed below:

1. Download the Final Cut Pro form the Mac App Store. Generally the software comes with a heavy bunch of instruction manual, which can be followed to install the software on your Mac.

2. After downloading and installing the software, open the software and drag and drop the videos over the list pane of the software in the sequence you want to organize them in you movie.

3. Perform the addition setting adjustments as per your need and desire. The software offers a wide range of video adjustments that will help you to build a better movie.

4. Lastly, save Final Cut Pro file to your hard drive by “File > Export> QuickTime Movie…to export your FCP project to MOV files on your Mac and enjoy it with the family and friends. If you have already saved it to .fcp file, open it with FCP and re-save the videos as QuickTime MOV files. If your DVD player supports playing VOB, you can convert Final Cut Pro exported video to VOB with a video converter, rather then burning FCP to DVD disc.

But the main limitation of the FCP is that you cannot watch the movie that has been edited or created by the software in any other device that does not run on the Apple or MAC platform. Suppose you want to watch the movie with your friends on a DVD home theatre system, but unfortunately the Final Cut Pro does not provide any facility that lets you burn FCP video to DVD. If you want to do so, you need to take the help of some third party software that enables you to convert the FCP movies to DVD format and burn to DVD disc for play on any home DVD players. This is why you need Free DVD Creator for Mac. The steps that you need to follow to create a DVD using this software are as follows:

Step 1. Import QuickTime movie to the Free DVD Creator for Mac

Start up Free Pavtube DVD Creator for Mac, click “Import” tab to browse your hard drive and load the FCP exported MOV files into the program. Or you can just drag & drop the MOV files into it for burning.

Step 2. Add Title
To create another Title, click the “Add Title” button and add more source videos. Please notice the size indicator at the bottom, if exceed the red line, you are suggested change to DVD9 or remove some videos. Edit movie clip and Customize your DVD menu. You can edit your videos with trim, crop, watermark, effect settings, audio replacing settings features.

Step 3. Author DVD menu

Pavtube DVD Creator for Mac enables you to custom a DVD menu to fully access your Final Cut Pro video on DVD disc. There are three built-in DVD menu templates under “Menu” tab for you to choose from.

Step 4. Free Burn projects from Final Cut Pro to DVD on Mac
Switch to “Preview” tab to have a look at the final playback effect of your DVD. If anything needs to be changed, go back to the former steps to do modification. Once you are satisfied, go to “Burn” tab to set settings like video standard (PAL or NTSC), audio channels (5.1 channels, Mono, Stereo), output settings, disc label, and DVD drive (please insert a blank DVD disc into your selected DVD writer). Press “Burn” button and the Free Mac DVD authoring program will start creating DVD from FCP MOV source files automatically.

What people are saying about Free Pavtube DVD Creator for Mac

“I like the option from file to “Quick burn” which ultimately allows me to burn the files to a dvd without having to re-author them. This is a feature most all dvd authoring software lacks.”

“A great program. Able to burn DVD’s of shows in my TiVo folder (Modern Family, Mike and Molly and so on). Only software I’ve found that will do that other than the Tivo Desktop Pro which costs money which I never wanted to pay, so I didn’t. Shows on the DVD are extremely high quality.”

More about FCP project file

The latest version of Final Cut Pro is Final Cut Pro X. It uses the FCPX as the project file extension and is not compatible with the previous FCP projects. That is to say, you need a correct version prior to Final Cut Pro X to export FCP project to MOV before burning to DVD.


Share

Dec 06

Final Cut Pro not compatible with Canon EOS 6D H.264 MOV file on Mac? How to do?

The tutorial is Final Cut Pro workflow for Canon EOS 6D DSLR camera, when you import or log and transfer Canon EOS 6D MOV files to Final Cut Pro (or FCP 6/7 and FCP X), you will find Final Cut Pro is not recongnize the Canon EOS 6D MOV files, so the best way to convert Canon EOS 6D H.264 MOV to ProRes 422 MOV and then import ProRes 422 MOV files to Final Cut Pro for editing on Mac.

The Canon EOS 6D DSLR camera is the ideal tool for unlocking your creative vision. It features a 20.2 Megapixel Full-Frame CMOS sensor, a wide ISO range of 100-25600, expandable to L: 50, H1: 51200, and H2: 102400, for incredible image quality even in low light, and a DIGIC 5+ Image Processor delivers enhanced noise reduction and exceptional processing speed. A new 11-point AF including a high-precision center cross-type AF point with EV -3 sensitivity allows focusing in extreme low-light conditions, and with continuous shooting up to 4.5 fps, you are ready to capture fast action. Full HD video with manual exposure control, multiple frame rates, and the benefits of a Full-Frame sensor provides stunning performance and creative flexibility. The built-in Wi-Fi transmitter allows you to wirelessly transfer your images to social networking sites through CANON iMAGE GATEWAY, or upload virtually anywhere from your iOS or Android smartphone. Compact, lightweight, brilliant low-light performance, and loaded with easy to use features, the EOS 6D is truly the Full-Frame DSLR camera for everyone.

Learn more Canon EOS 6D DSLR camera parameters – Specifications

You may have got this amazing Canon EOS 6D DSLR camera, it’s exciting for you to take photos and record full HD 1080p videos. Maybe you have a idea that edit Canon EOS 6D recording MOV videos with Final Cut Pro X on Mac, so you try to log and transfer Canon 6D MOV files to Final Cut Pro, but failed finally. Because you found the Final Cut Pro is not recongnize the Canon EOS 6D MOV videos, such as:

“I needed to edit my Canon EOS 6D MOV video using Final Cut Pro on my mac, but FCP could not properly import or “Log and Transfer” as it is normally supposed to do. I knew that I had to convert 6D MOV file to ProRes 422 or another FCP compatible format. Which did you recommend to help me? what is the best workflow that you have found? I need keep the original quality. All answers are very much appreciated! Thanks.”

Apple ProRes is one of the most popular and commonly used codecs in professional post-production. The Apple ProRes family of video codecs has made it both possible and affordable to edit full-frame, 10-bit, 4:2:2 high-definition (HD), 2K, 4K, and 5K video sources with multistream performance in Final Cut Pro (X).

The EOS 6D recorded file format is H.264 MOV, this format is supported by many editing software, but it can’t be supported perfectly, take FCP and FCP X for example. So, to import Canon 6D MOV files to Final Cut Pro successfully, i suggest you convert problematic H.264 MOV to ProRes MOV. I ever have problem to import separate MOV into Final Cut Pro, such a headache that I really want to change to AVID or other software. At last I find a third party program called Pavtube HD Video Converter for Mac to help me, now I combine pavtube with FCP to help me finish my job. FLAWLESSLY. I can’t make sure you the original quality, but I can’t see the loss. Get a free trail from below to make sure it helps you too. You are welcome.

Software Requirement

Pavtube HD Video Converter for Mac – in this tutorial it will perform as a Canon 6D MOV to FCP converter. Currently, many cameras and video products on the market save to .mov files. And almost every mov file format is different. Some of these MOV files can be imported into Final Cut Pro 6/7 or FCP X while other MOV files no audio or the video is scrambled. Pavtube HD Video Converter for Mac can recognize all kinds of MOV files and convert them to perfect ProRes 422 files to work with FCP (include FCP 6, FCP 7, FCP X). Best of all, users can import directly from a camera SD, which saves steps and time.

Here is the best workflow for all tapeless media, including Canon EOS 6D DSLR…

  • 1. Backup the FULL CARD…everything.
  • 2. Convert Canon 6D footage (Image data: H.264, Audio: Linear PCM) to an editing format such as Apple ProRes 422. The H.264 MOV format the Canon 6D camera records is not optimal for editing.

Step 1. Load Canon EOS 6D mov files.

After install, open up the professinal Canon 6D MOV to Final Cut Pro Converter. Click “Add video” or “Add from folder” tag to browse and load source MOV files from your Canon 6D camera directly or from an archived folder saved on your HDD. You are allowed to add multiple files to convert at a time.

Tip: If you have multiple MOV files, you can select the “Merge into one” box to join your MOV files into one single file.

Step 2. Select output format for Final Cut Pro 6/7/X.

Click “Format” column to choose the “Final Cut Pro -> Apple ProRes 422 (*.mov)” Apple ProRes 422 MOV as best output format for editing in FCP 6/7/X.

Step 3. You can click settings button to adjust the output video and audio’s parameters, such as resolution, bitrate, codec and frame rate, etc.

Step 4. Edit function is useful and convenient for you to use. You can trim, crop, adjust effects or add watermark to the video. such as “how to trim and maintain a certain section of a Canon 6D MOV clip?”

Click “Edit”, when the “Video Editor” interface appears, switch to “Trim” tab, on which you are allowed to trim your wanted section by setting Start and End time. When finished, click “OK” to confirm.

Tips: If you want to see more intuitive operation steps, please refer to the YouTube Video: http://youtu.be/7H4y5C6n7TA

Step 5. Convert Canon EOS 6D MOV to ProRes 422 MOV for FCP 6/7 or FCP X.

Click “Convert” button to start convert Canon EOS 6D H.264 MOV videos to ProRes 422 MOV for working within Final Cut Pro (or FCP 6/7, FCP X). When the conversion is done, click “Open” button to get the generated ProRes 422 files for using in FCP 6/7/X.

After converting Canon EOS 6D MOV files, just according to the following tutorial import the output Apple PreRes 422 .mov files to Final Cut Pro (X), Final Cut Pro 7 or Final Cut Pro 6 for editing the video. Optimize your workflow and save time with the Apple ProRes compression for Final Cut Pro X. You can also import the output videos to Final Cut Express 4 (FCE 4) for editing in full HD.

Additional Contents

Pavtube HD Video Converter for Mac can also help you convert Canon EOS 6D MOV files to Mac Compatible Formats like ProRes 422(*.mov), Apple Intermediate Codec (AIC)(*.mov), Avid DNxHD, XDCAM MOV, HDV, DVCPRO, MOV(AVC), H.264 MOV for editing software FCP (X), iMovie, FCE, Avid Media Composer, Adobe Premiere Pro, Apple Aperture 3, Kendlive, etc or convert to other common formats such as MP4, WMV, MPG, MPEG, 3GP, AVI, and even H.264 MOV for other usages. Only need to change the “step 2”:

  • – choose “Avid DNxHD (*.mov)” for Avid Media Composer
  • – choose “Apple InterMediate Codec (AIC) (*.mov)” for iMovie or Final Cut Express
  • – choose “MOV (AVC) (*.mov)” for Adobe Premiere Pro

PS. View “Canon Video Solution Column” on my blog, you can know more about how to import Canon files to other Mac Editing Software, i hope can help you learn more.

Good-fellowship clew: Here is a Free DVD Creator for Mac, it can help you free burn Canon 6D MOV video to DVD disc on Mac (include Mac Mountain Lion 10.8).

A happy work.

Share

Dec 04

Workflow for importing Canon EOS C500 MXF files to Final Cut Pro X on Mac

Canon has officially announced the EOS C500, a Super 35mm, 8.85-megapixel CMOS image sensor, our DIGIC DV III Image Processor and an expansive range of recording and output options specifically for 4K, 2K and HD image acquisition. It is available with either PL- or EF- mount options.

For 4K and 2K recording, uncompressed output is delivered to external recording systems via built-in dual 3G SDI ports. Dual HD-SDI monitor outputs support external live monitoring. Simultaneously, HD content can be written to dual onboard CF cards to provide proxy video for offline NLE systems.

The new Canon C500 is just hitting the streets, offering both internal 50 Mbps 422 recording, as well even higher quality outputs. The camera can output HD & 2K in 4:2:2 up to 120p, or 4:4:4 up to 60p, and uncompressed 4K Raw data up to 60p and 120p at half vertical resolution. It is released with plenty of applications where high image quality, extreme portability, and efficient workflow are of the great importance. The Canon EOS C500 shots videos with Canon’s XF Codec – a file-based MPEG-2 compression with an MXF File Wrapper. Although, there are some related plug-ins launched like Canon XF plug-in to solve the importing problems, when you transferring Canon C500 MXF files to Final Cut pro X, problems still come up. Such as: a Canon C500 user problem

“I’m working with a company that just invested in a few Canon C500 cameras which shoot in MXF format. We are trying to find a good workflow for making ProRess 422 Proxies from these MXFs. As it’s crucial to sync audio and video with timecode and relink back to the MXFs for editing on Final Cut Pro X. Is there any program you know can do such a job?”

According to the above problem description, The main reason for the importing issues is the MXF format is not compatible with Final Cut Pro X; the MPEG-2 codec and .MXF codec is not well for editing. To solve the problems, you just need a program to help you convert MXF files from Canon C500 to ProRes ProRes codec and keep original timcode, Good news that there is a program called Pavtube MXF Converter for Mac can help you do this. It not only converts Canon C300 MXF to ProRes 422 Proxy, but also keep the original timcode and without any video and audio problem. Plus, if you got 1080i MXF video from Canon C500, it can help you to deinterlace your files first for easier editing. You can download an free trail version from below to give a try.

Free Download and Install the App


Step 1. Run Pavtube Canon C500 MXF Converter for Mac, click “Add Video” button to load your source MXF clips or drag and drop the C500 MXF files to the converter. You are allowed to add multiple files to convert at a time.

Tip: If you wanna merge multiple MXF files, you can tick off the “Merge into one file” box.

Step 2. Click the “Format” option, select the “Final Cut Pro > Apple ProRes 422(Proxy) (*.mov) or Apple ProRes 422 (*.mov)” as target format. And navigate to the Final Cut Pro group, you will notice that there are profiles with Apple ProRes 422 (*.mov), Apple ProRes 422(HQ) (*.mov), Apple ProRes 422(LT) (*.mov), Apple ProRes 422(Proxy) (*.mov), Apple ProRes 4444 (*.mov). Apple ProRes 422 (*.mov) format is specially designed for using in Final Cut Pro X (include FCP 6/7). (The Apple ProRes 422(Proxy) (*.mov) codec is intended for offline editing and contains 30 percent of the data rate of Apple ProRes 422).

Step 3. Adjust video and audio parameters. (Optional)

Click “Settings” button to customize the output video and audio settings by yourself. But if you are not good at it, you’d better use the default parameters, they will ensure you a good balance between file size and image quality basically. You can change the resolution, bitrate, frame rate as you need.

Step 4. When above steps finished, you can click “Convert” button to start transcode Canon C500 MXF to ProRes 422 MOV for Final Cut Pro X with a super fast speed. with the excellent C500 MXF to FCP X converter, you can deal Canon C500 MXF files on Mac with best video and audio quality as you want.

After converting Canon C500 MXF files, just according to the following tutorial import the output Apple PreRes 422 .mov files to Final Cut Pro X, Final Cut Pro 7 or Final Cut Pro 6 for editing the video. Optimize your workflow and save time with the Apple ProRes compression for Final Cut Pro X. You can also import the output videos to Final Cut Express 4 (FCE 4) for editing in full HD.

Additional Contents

Pavtube MXF Converter for Mac can also help you convert Canon EOS C500 MXF files to Mac Compatible Formats like ProRes 422(*.mov), Apple Intermediate Codec (AIC)(*.mov), Avid DNxHD, XDCAM MOV, HDV, DVCPRO, MOV(AVC), h.264 MOV for editing software FCP (X), iMovie, FCE, Avid Media Composer, Adobe Premiere Pro, Kendlive, etc or convert to other common formats such as MP4, WMV, MPG, MPEG, 3GP, AVI, and even H.264 MOV for other usages. Only need to change the “step 2”:

– choose “Avid DNxHD (*.mov)” for Avid Media Composer

– choose “Apple InterMediate Codec (AIC) (*.mov)” for iMovie or Final Cut Express

– choose “MOV (AVC) (*.mov)” for Adobe Premiere Pro

PS. View “MXF to Mac Column” on my blog, you can know more about how to import MXF files to other Mac Editing Software, i hope can help you learn more. A happy work.

Share

Dec 03

How to import Canon C100 MTS to Final Cut Pro for editing without rendering

The Canon EOS C100 Digital Video Camera is the latest addition to the Cinema EOS family, bringing together the renowned technology of Canon CMOS sensors, DIGIC DV III Image Processor, and EF lens compatibility in a smaller, lighter body. Modular and compatible with a host of Canon and third-party accessories, the EOS C100 brings true cinema quality to independent event videographers and video production organizations.

Key features:

1080p 24Mbps up to 30p  AVCHD MPEG-4 AVC/H.264 codec
4:2:0, 15% smaller than the C300, EF mount version only
locking HDMI out, Canon Log Gamma,  Records to dual SD Cards
can also output uncompressed digital HD to an external recorder

However there is no perfect thing in the word. From Googling, I found users have some questions about the cam in forums. Here I am glad to help you solve your doubts.

FAQs:

Q1. I want to backup the clips from C100 to my PC for sharing with my family, who can tell me what codec or format does the EOS C100 record?

A1: The camera uses the MPEG-4, AVC/H.264 compression codec and shoots AVCHD (.MTS/.M2TS) footages. If you try to restore the recodings to your computer for playing, you’d better convert the video to WMV or MOV.

Q2. Hi, guys. I am using the Canon new camera C100. I tried to get the recorded MTS movies to Mac for editing with FCP 7, but the I got the incompatible information. Why?

A2: It is a pity that the EOS C100 does not surpport 720p recordings. It only captures 1920 x 1080 or 1440 x 1080 file at 60i. By default, the output video file is 1080 60i .mts. FCP’s surpported file is MOV instead of MTS.

If you plan to ingest the Canon C100 MTS files to Final Cut Pro 6/7 for editing, you’d better use a plugin or converter to convert it to a compatible format on Mac OS X.

As I far as I know, the Log and Transfer can import and transcode Canon C100 MTS to Apple ProRes for editing with FCP, but the converted video quality is bad. Then I went to google and found the a MTS Converter who used for converting to lossless quality video and audio. With the app, we can deinterlace 1080i to 1080p and encode MTS to ProRes 422 keeping original video and qudio qaulity on Mac OS X. Now, I will share the easy steps with you.


1. Load source mts files shot with your Canon C100 camera

Launch Pavtube MTS Converter for Mac as Canon C100 MTS Converter. Click “Add video” or “Add from folder” icon to load your source files directly from your Canon C100 camera, or from a card reader, or from the file folder that contains the source MTS videos stored on your computer’s hard disk drive. Or drag and drop Canon C100 AVCHD MTS file to the program. You can batch load several files to the program directly.

2. Select “Apple ProRes 422 (*.mov)” as output format for Final Cut Pro
Go to “Format” menu, move to “Final Cut Pro” option, and choose “Apple ProRes 422 (*.mov)” as target format for FCP 6/7 or FCP X.

Tip: If you want to get to a smaller file, you’d better choose ProRes 422(LT)(*.mov).

3. Do some settings as you want.

4. Click “Edit” to deinterlace 1080i MTS files for FCP.

5. Canon C100 MTS files Converter.

At last, hit the “Convert” button to Canon C100 MTS to ProRes 422 MOV for FCP 6/7 editing.

After the fast conversion process, you are able to get the converted file by clicking “Open”. Then you can import the converted C100 mts files to FCP 6/7 for editing.

Now, the video file from Canon C100 is comfortable and editable for FCP 6/7, you can share the movie with your family or smoothly ingest to FCP for further editing on Mac OS X.

With this Canon C100 MTS Converter, you can easily change Canon C100 AVCHD files to FCP X for editing, this software runs fast, so you can convert your Canon C100 AVCHD footages to FCP in less time, video and audio synchronization are perfectly guaranteed.

You can also find more tips and tricks in MTS column and FCP column.

Have a good time!

Share

Nov 29

How to Increase the Life of a Digital Camera?

Technology moves at a pretty fast pace. You can buy a brand new computer or camera, and it is, almost instantly, outdated. However, you can increase its lifespan by taking proper care of your camera.

Lens Care

1. The lens of your digital camera is its eye or window to the outside world. It is easily the most important component in any camera. To take care of the lens, make sure that you never, ever touch directly with your fingers. Also, make sure that you put on the lens cap when not shooting pictures.

2. If you really need to clean the lens, use good lens cleaning equipment. Investing in such equipment is really important. Always use a good lens brush, lens blower and lens cloth to do the job.

Temperature

The other thing to look out for is the temperature under which the camera is stored. You should always keep the camera out of sun. One mistake that newbies always make is to store the digital camera in the extremely hot temperatures (e.g. the car boot [trunk]). Don’t ever do that. It’s also important not to store the camera in extremely cold temperatures either.

Storage

1. When storing your digital camera, you need to keep it away from magnets of any form. Magnets will affect the circuitry of your digital camera and should not be placed near it.

2. Another point to note is to use silica gel to combat condensation. Many electronic products come with silica gel capsules. Keep these and put them in your digital camera storage box. It will prevent condensation.

3. The batteries of the camera should also be removed if you intend to store the camera away for a long time. The reason is that batteries can have corrosive leaks over time.

Protect Delicate Components

1. You also need to protect those delicate components. In particular, watch out for the memory card (whether it is a CompactFlash, SD or MMC card). Handle them with care because they are small and delicate.

2. Camera panels are also very delicate. In my Canon PowerShot S500, the panel for the USB connect and the battery is a tad flimsy. Make sure to handle it with care whenever you open it.

Conclusion

Your digital camera cost a lot of money and it pays to take care of it. Remember to apply the above tips to preserve your camera and it’ll last you a long, long time. Good luck!

Learn to Take Beautiful Photos

1. If you want to improve your digital photography skills, you may want to take a look at Digital Photography Success. This e-book package includes excellent step-by-step instructions on how to take pictures of beautiful landscapes, people, nature, fireworks, night scenes, etc. Learn how to shoot professional photos – just like those you see in glossy magazine covers.

2. You can also look around. Search on Google or your favorite search engine. One web site, with a lot of free, helpful tutorials[1] is very informative.

Warnings

  • Do not drop it.
  • Do not get food all over it.
  • Do not ever touch the Lens.
  • Do not get sand in it.
  • Do not get it near a magnet.
  • Do not get it wet.

PS: Learn Basic Photography Tips

Share

Nov 28

Import Sony NEX-7 AVCHD 1080p 50p/60p MTS to Apple Aperture 3/3.3 with 5.1 channels

First of all, I copy a few questions from discussions.apple.com, about how to import AVCHD files from Cameras to Apple Aperture 3.3 or Apple Aperture 3 for editing:

As far as I know, since Apple Aperture 3 or above, you can create a multimedia slideshow combining still photos, HD videos for presentation. However, if you have recorded AVCHD video with HD camcorders like Sony Nex-7, Nex-6, CX700, PJ30, Panasonic LX-5, Panasonic HC-X900/X800, etc., you may face problem of AVCHD and AVCHD 2.0, AVCHD 2.0 is 1080p 50fps/60fps and 3D (stereoscopic). If you shoot any AVCHD 2.0 formats it won’t appear in Aperture for import. (this is the same for FCP and iMovie). The Sony Nex 7 does shot AVCHD 2.0 so I would suggest test shooting in all the formats and sizes then import to see what ones are supported and what ones aren’t. I would expect you will see all the AVCHD but the 1080p at 60 and 50fps.

Here is the support article on AVCHD support: http://support.apple.com/kb/HT5301

Aperture 3.3 supports AVCHD clips in the following formats:

  • 1080p30
  • 1080p25
  • 720p60
  • 720p50
  • 720p30
  • 720p25

I have tested videos recorded by Sony Nex-7 and Panasonic HC-X900 in 60fps, but it still is disappointing not to have that in Aperture. So clips formatted at 1080p50 and 1080p60 are not supported, and are not visible in the Aperture Import window.

Below is the fast guide for you to fix the problem of importing Sony NEX-7 AVCHD 1080p 50p/60p MTS files to Apple Aperture 3.3/3 on Mac,  it’s a good choice to convert Sony NEX-7 AVCHD to Apple Aperture 3 best supported video formats, such as MOV. Then you can edit the converted MOV video in Apple Aperture 3 smoothly. You can follow the easy steps below.

The steps:

Step 1. Download the free trial version of AVCHD to Apple Aperture Converter. Install and launch it.

Read before try: The free trial version comes with the same features with the full version, but exports videos with watermark (Pavtube logo) standing in the middle of the image.

Step 2. Load source AVCHD files shot with Sony NEX-7 into the program

Click “Add video” or “Add from folder” icon to load your source files directly from your camera, or from a card reader, or from the file folder that contains the source MTS videos stored on your computer’s hard disk drive.

Step 3. Select output format

Click “Format” column and choose the output format. You are recommended to choose Final Cut Pro -> Apple ProRes 422 (*.mov), it’s great for editing in Apple Aperture 3.3/3 and FCP, iMovie.

Note: Click “Settings” button to adjust the output video’s parameters, such as bitrate, resolution, 5.1 channels, etc. (Optional)

Step 4. Start Conversion

Press the big button “Convert” to start transcoding Sony NEX-7 AVCHD 1080p 50p/60p MTS files to MOV format for using with your Apple Aperture 3/3.3. When the conversion is done, click “Open” button to find the generated files with ease.

Now, Run Apple Aperture 3.3/3, go to File -> Import -> Files…, and browse to where you save the converted AVCHD clips to. Choose the videos that you’d like to add, click here to view more Apple Aperture screenshots

you can load Sony NEX-7 video to Apple Aperture 3 for editing as you want, now you can have a try.

If you want to know more about how to import avchd to Mac editing software, click MTS Column.

Share
Page 28 of 37« First...1020...2627282930...Last »