AIC Converter,MTS to AIC,MTS to iMovie,MTS to FCE,MTS to Final Cut,AVCHD to AIC Converter,AVCHD to Final Cut Express,import AVCHD files to iMovie,MTS to ProRes 422,MTS to Final Cut Pro,MTS to FCP X,AVCHD and Final Cut Pro,Log and transfer MTS to FCP,edit MTS footage in iMovie,FCP transfer MTS files,transfer AVCHD files to iMovie

Oct 26

Import media to Avid-Encode Panasonic HPX255 P2 MXF to Avid DNxHD MOV and Burn recorded MXF to DVD on Mac with 50% OFF

Summary: Follow this guide to know how to use Pavtube MXF Converter for Mac to encode Panasonic HPX255 P2 MXF to Avid DNxHD MOV for Avid Media Composer and 50% OFF burn P2 card recording MXF to DVD on Mac as 2012 Best Halloween present.

The Panasonic AG-HPX255 P2 HD Handheld Camcorder is a compact professional camcorder that offers a bounty of capabilities in a small (5.5 lb) package. The HPX255 offers 10-bit AVC-Intra recording (at both 100 and 50 Mb/s). Based on highly advanced MPEG-4 AVC/H.264 compression, this codec employs intra-frame compression, which results in a high image quality.

If you have Panasonic HPX255 P2 camcorder, you may want to import panasonic media to Avid Media Composer on Mac. But, as we know, the MPEG-4/H.264 codec and MXF format is not well supported by AMC, you will encounter P2 MXF importing and editing problems.

In order to edit your Panasonic HPX255 MXF in Avid natively, you should transcode HPX255 P2 MXF to Avid DNXHD MOV format, which is best natively supported by Avid. This article will share the way to convert P2 MXF videos and 50% OFF burn MXF to DVD on Mac at Pavtube 2012 Halloween Sale.

Part 1: Convert HPX255 MXF to Avid MC

Pavtube MXF converter for Mac is the best choice, this software can deal nearly all kinds of MXF videos, it can convert Panasonic P2 MXF files natively for Avid Media Composer on Mac, that is to convert MXF video to DNXHD codec MOV format, and then you can edit HPX255 P2 MXF files natively in Avid MC 5/5.5/6. Just take a look at the brief guide below.

1. Download Pavtube Mac MXF Converter for Avid, follow the prompts to install the program.

2. Click “Format” bar to determine output format. For natively editing in Avid, you are recommended to choose Avid Media Composer -> Avid DNxHD (*.mov), this format is best for Avid Media Composer native editing.

3. If you would like to customize the video and audio parameters, you can click “settings”, adjust the parameters as you want, like Video Codec, aspect ratio, bit rate, frame rate, Audio codec, sampling rate, bit rate, channels.

4. Click “Convert” to start to convert Panasonic HPX255 P2 MXF to Avid Media Composer DNXHD codec for native editing on Mac.

Learn More at MXF Column

Part 2: How to burn HPX255 MXF to DVD on Mac with 50% OFF Halloween Special Offer 2012?

Now pavtube DVD Creator for Mac adds support for MXF files burning, it can burn single file or folder structure videos, you can burn Panasonic HPX255 P2 MXF to DVD in few steps, just follow it:

1. Install Pavtube DVD Creator for Mac, connect your DVD Writer and insert a blank DVD. Add your MXF videos into the free DVD Creator for Mac

2. Edit movie clip and Customize your DVD menu. You can edit your videos with trim, crop, watermark, effect settings, audio replacing settings features.

3. Preview Created DVD-Video and click burn button to start burning.

For detail steps, you can take this Free Burn Halloween Video to DVD guide as example. Now Pavtube starts the Halloween half-price promotion, you can get 50% off on this excellent DVD Creator for Mac. Click below:

Share

Oct 25

Import Sony FS700 AVCHD to Adobe Premiere Pro and Burn FS700 AVCHD to DVD on Mac as Halloween Gift

“I am a Sony NEX-FS700 user and use it shoots multiple AVCHD videos, it produces AVCHD videos for me very well. And it didn’t take long for me to find out that I am unable to edit my FS700 AVCHD recorded .mts in Adobe Premiere Pro CS5. With that said, will Premiere Pro edit the video in AVCHD or does it convert it to another HD format? By the way, once its all done can I burn a DVD?

Please help, I need to make a DVD as a Halloween present!”

Adobe Premiere Pro still can’t support MPEG4 AVC/H.264 encoded AVCHD files well. The file formats Adobe Premiere Pro supports include MOV (AVC), WMV (VC-1), MPEG-2, HDV, DV AVCHD (.mts), QuickTime files, etc. Thus, if you want to import AVCHD (.mts) to Adobe Premiere Pro on Macand PC, the easiest way to make AVCHD files editable in Adobe Premiere Pro is to transcode FS700 AVCHD recordings to Premiere Pro favorable format like MOV, MPEG-2, etc.

Part One: Sony FS700 workflow in Adobe Premiere Pro: How to transcode Sony FS700 AVCHD 1080/60p MTS to MOV for Adobe Premiere Pro editing on Mac with Pavtube AVCHD to Premiere Pro Converter for Mac.

To convert Sony NEX-FS700 AVCHD (.mts) to Adobe Premiere Pro compatible format on Mac and PC, you need to use a professional AVCHD (.mts) to Adobe Premiere Pro converter tool. Pavtube MTS/M2TS Converter for Mac is the best AVCHD to Adobe Premiere Pro converter for Mac for you to convert Sony NEX-FS700 AVCHD recording mts to Adobe Premiere Pro friendly videos so as to import FS700  AVCHD mts to Adobe Premiere Pro for editing on Mac Mountain Lion 10.8 (or Mac OS X Leopard 10.5, Snow Leopard 10.6, Lion 10.7). With this MTS to Adobe Premiere Pro converter, it would be quite simple and easy for you to edit Sony NEX-FS700 AVCHD (.mts) in Adobe Premiere Pro for Mac users.

If you are using a Windows users, then you can use Pavtube MTS to Adobe Premiere Pro Converter, which converts AVCHD (.mts) to Adobe Premiere Pro video on Windows 7/XP/2003/Vista with ease.

1. Start up Pavtube MTS/M2TS Converter for Mac as AVCHD to Premiere Pro Converter for Mac. Then click “Add video” or “Add from folder” tab to load source MTS files captured by your Sony FS700 camera.

2. Click on the pull down menu of “Format” to choose “MOV (AVC) (*.mov)” as output format for Premiere Pro CS 5 from “Adobe Premiere/Sony Vegas” catalogue.

3. Click “Convert” button to encode Sony FS700 MTS files to MOV for Adobe Premiere CS5 on Mac.

4. Click “Open” button to find the converted MOV files and get the files into Premiere Pro CS5 for further editing through “File” > “Import…” or “cmd + i”.

Part Two: Extended Reading – How to burn Sony FS700 AVCHD MTS to DVDs on Mac Mountain Lion 10.8?

Click below to get discount at Pabtube Halloween Promotion:

If you attempt to burn AVCHD MTS files shot by a Sony NEX-FS700 camera to a blank DVD disc, to an ISO image file, or to a DVD folder for storage or delivering use, Pavtube DVD Creator for Mac will do you a favor. It currently has a 50% off Halloween sale, which costs $17.5 USD only (the original price is $35). Hurry up and grab the chance to save money!

Further Reading:

Share

Oct 25

Free Burn Halloween recording video to DVD on Mac Mountain Lion 10.8

Another Halloween! Are you ready to photograph self-made Jack-o’-lanterns and shoot Halloween video? If yes, here we got good news for you. During the Pavtube 2012 Halloween Software Lowest Promotion (Oct 22- Nov 6, 2012) the DVD Creator for Mac is offered TOTALLY FREE!

What does DVD Creator for Mac do?

Basically this is an alternative app to iDVD, the most-used DVD authoring app on OS X 10.5, 10.6, 10.7 and 10.8 (Mountain Lion). Comparing with iDVD, the Pavtube DVD Creator supports more formats – it creates playable DVD from any source you can find – TV recordings, Camcorder footage (feature in paid version), DVD folder, ISO image, Blu-ray streams (feature in paid version), YouTube downloadings, and even your photos taken with a DLSL camera can be turned into video slide show DVD.

Take advantage of the 2012 Pavtube Halloween Special Offer Now:

Get Free Pavtube DVD Creator for Mac

Or get the even more powerful paid version with 50% OFF DURING 2012 Halloween Sale.

Compare Free version with Retail version

What kind of DVD does it make?

It burns Video DVD and Slideshow DVD that plays on any standard DVD player and computer DVD-ROM drive. If you’re wanting to burn data DVD — Sorry, this is not your choice.

FAQs:

– Does it let me set different transition effects for photo slideshow?
Yes. And you can set transition pause and rotate image 90° counterclockwise or clockwise to make best fit.

– Does it shrink big file to fit onto a single-layer DVD?
Yes. You can compress the file to whatever quality and final file size when the project exceed the capacity of a normal DVD.

– Can I split a large .mkv file over several DVDs?
Yes. You can trim any length you like to make a DVD.

– Can I keep Dolby Digital surround sound when burning DVD?
Yes. Only if there’s AC3(Dolby Digital) in your original source file.

– Can I set chapter marks at evenly spaced time intervals, for instance, 10 minutes?
Yes. You can add chapter mark to anywhere you like.

– Does it make DVD that works on my TV system?
Yes when/if you use NTSC or PAL system.

– Are there any custom options for me to create menu in my way?
Yes. You can set background image, background music, add any text you like. Or use one from the 4 preset menu templates.

– Can I set a first-play chapter?
Yes, it lets you set any chapter to start with. And you can set continuous loop as long as you like.

– What if I don’t want a menu without menu?
It’s easy. Just select the “No Menu” template.

The time-limited offer expires by Nov 6, 2012! For more discounts and money-saving bundles, please visit http://www.pavtube.com/halloween-software-promotion-2012.html

Free or 50% OFF Mac DVD Burning Related article:

Free burn Halloween videos and movies to DVD on Mac

Free make Camcorder recording video to DVD on Mac

Free Burn YouTube videos/Vimeo/Torrent movies to DVD on Mac

50% OFF Burn VIDEO_TS to DVD on Mac

50% OFF Burn ISO to DVD on Mac

50% OFF Burn MXF to DVD disc without Apple iDVD on Mac


Share

Oct 24

Encode AVCHD to iMovie 8/9/11 compatible format and 50% OFF Burn AVCHD to DVD from Canon HF G10 camcorder on Mac

Summary: Import AVCHD to iMovie is not as difficult as you think now, with our powerful AVCHD to iMovie Converter, import avchd to imovie is just a little case. Just several simple clicks you will import avchd video to imovie for editing by yourself.

Part One: How to encode Canon HF G10 AVCHD to iMovie 8/9/11 compatible format on Mac?

Question: Best Solution for AVCHD Editing?

I have a Canon Vixia HF G10 camcorder, which creates .mts video files (AVCHD format: MPEG-4 AVC/H.264). My goal is to convert these .mts files to .mov files so that I can edit my Canon G10 footage with iMovie 8.

Answer: iMovie 8 doesn’t support AVCHD folder import directly, only iMovie 11 support the AVCHD structure(but I find “iMovie 11 still does not support many AVCHD (.mts) files” on forums), you need to convert AVCHD to iMovie 8 compatible format, AIC is the recommended codec, you can download a free trail of Pavtube AVCHD to iMovie Converter for Mac, use it to convert AVCHD to AIC codec, there should be no problem to edit it in iMovie after conversion.

Tip:

You can see that iMoive is compatible with some AVCHD camcorders.

http://help.apple.com/imovie/cameras/en/index.html?lang=en_US

The problem is with these camcorders you can shot in 1080i 50/60 or 1080p50/60 mode, the 1080p 50/60 AVCHD video will not be supported in iMovie.


Step 1: Import Canon VIXIA HF G10 1080p AVCHD footages to the top AVCHD to iMovie Converter on Mac.

Connect Canon VIXIA HF G10 to your Mac and luanch the Pavtube Mac AVCHD to iMovie 8/9/11 Converter.

Click “” menu, choose “Add Video” to locate the M2TS/MTS files you want to add. Or if you have put your recordings to HDD, you can directly drag & drop AVCHD MTS/M2TS files from Canon HF G10 camcorder to the program. After that, you should double click files to see whether they can be previewed normally. Since the AVCHD to iMovie Mac app supports batch conversion, you can add more than one AVCHD file for converting. In addition, you are allowed to combine your files into one by checking “Merge into One File”.


Step 2: Select an output format for iMovie 8/9/11.

Click “Format > iMovie and Final Cut Express > Apple InterMediate Codec (AIC) (*.mov)” as the best output format for import AVCHD to iMovie 8/9/11 on Mac.

Step 3: Customize the settings as you need.

Click the “Settings” icon and you will be led to the “Profile Settings”, on which page you can customize the codec, bit rate, frame rate, sample rate and audio channel according to your needs and optimize the output file quality.


Step 4: Convert Canon HF G10 AVCHD to AIC MOV on Mac Mountain Lion 10.8.

Please click “Convert” to transcode VIXIA HF G10 1080p AVCHD to AIC for iMovie 8/9/11 on Mac. You can get the estimated time and video size in the “Conversion” interface.

After the AVCHD to AIC MOV conversion with the top AVCHD to iMovie Converter, click “Open” button to get the generated AIC MOV files, you can edit Canon HF G10 1080p AVCHD MTS files in iMovie 8/9/11 easily and effortlessly.

Import converted Canon HF G10 AVCHD MTS files to iMovie 8/9/11

Open up iMovie, and follow File > Import > Movies… to load the converted Canon HF G10 AVCHD MTS videos to iMovie then click “import”.


Tip: The top AVCHD to iMovie Converter for Mac can also help you convert AVCHD recordings to ProRes, DNxHD, MPEG-2, MOV(AVC) for FCP, FCP X, FCE, Avid, Adobe Premiere Pro, etc. You can link to Pavtube MTS Converter for Mac and get more info about it.

Part Two: How to burn Canon HF G10 AVCHD to DVD on Mac with 50% Coupon at Pavtube 2012 Halloween

1. Please download and install Pavtube DVD Creator for Mac for importing Canon HF G10 1080p MTS files to the software.

2.Click the import button to load your Canon HF G10 footages, you can click “Add title” button to add more titles.

3.Switch to Menu pane. Double-click a DVD menu beneath the Menu Template to apply it to your DVD. You can customize the background video/image, background music, text, title thumbnail and more for your DVD menu.

4.Click the “Burn” button to start burn Canon HF G10 AVCHD to DVD on Mac with 50% OFF at Pavtube 2012 Halloween Promotion. You can choose to burn Canon HF G10 1080p AVCHD MTS to DVD disc, or save Canon HF G10 AVCHD video as ISO file, or Generate videos to DVD Folder.

Breaking news: Pavtube has started the 2012 Halloween Coupons, for DVD Creator for Mac, you can get 50% off, now please take a look and grasp this opportunity!

Share

Oct 24

Apple updates Final Cut Pro X with slew of new features, now available for download


Amidst all the announcements made at the California Theatre earlier today, Apple very quietly pushed out a fresh version of its famed (and at times controversial) video editing software, Final Cut Pro. Inside v10.0.6 users can find an array of new additions and improvements that will most certainly be welcomed with open arms by the FCPX crowd, making this the most notable update since bundling in those multicam and broadcast monitoring features. Among these new traits are RED camera support for native REDCODE RAW editing, the ability to add freeze frames to the timeline with a simple keystroke, novel audio controls for use while tinkering with multicam clips and a revamped “Share” interface for exporting projects. The Final Cut Pro update can be downloaded now from the usual spot, and, of course, it comes at no extra cost for those who’ve already shelled out the $300. The full and hefty changelog can be found right after the break.

* Expand multichannel audio files directly in the timeline for precise editing of individual audio channels

* Unified import window for transferring media from both file-based cameras and folders of files

* Redesigned Share interface for exporting projects and range selections to one or more destinations

* RED camera support with native REDCODE RAW editing and optional background transcode to Apple ProRes

* MXF plug-in support that allows you to work natively with MXF files from import through delivery using third-party plug-ins

* Dual viewers, each with a video scope display, let you compare shots to match action and color

* Option to add chapter markers in the timeline for export to video files, DVD, and Blu-ray disc

* Range selection now preserves start and end points in the Event Browser and allows you to create multiple range selections on a single clip

* Paste attributes window lets you choose specific effects to copy between clips

* Flexible Clip Connections allow you to keep Connected Clips in place when slipping, sliding or moving clips in the Primary Storyline

* Add a freeze frame to your timeline with a single keystroke

* Drop shadow effect with intuitive onscreen controls to adjust position, edge falloff, angle, and more

* New controls for combining audio from multiple angles within a Multicam Clip

* Compound Clip creation in the timeline now saves the clip in the Event Browser for re-use in other projects

* XML 1.2 featuring metadata import and export for richer integration with third-party apps

Source: http://www.engadget.com/2012/10/23/apple-updates-final-cut-pro-x/

Share

Oct 23

H.264 vs ProRes – Why convert H.264 to ProRes codec?

Question 1: H.264 vs Apple ProRes 422 Question – Urgent for Film

Hello,

I’ve completed editing a film in FCP 7 with Apple ProRes 422 clips at 1920×1080. I sent a cut clip from the timeline to a SFX person via dropbox. He sent the polished clip (with the new SFX) back in H.264; he’s not working on a Mac because he doesn’t own one. I imported the new H.264 clip into my timeline and everything looks great. Question: Does this matter? Does it matter that a clip in the timeline is H.264, while all the others are in Apple ProRes 422 clips (the ones that didn’t need effects)? My guess is that it’s not because H.264 is a finishing format but I want to be sure. Thank you in advance for helping out. Much appreciated.

One of the most common questions that I get from people regarding the new breed of DLSR cameras is “What’s your post-workflow?”

Source: http://www.dvxuser.com/V6/showthread.php?269920-H-264-vs-Apple-ProRes-422-Question-Urgent-for-Film

Question 2: H.264 vs ProRes 422

Hey, i was reading this post the other day where you guys were talking about apple’s ProRes 422.

i want to know if there is a high difference working with them, i have done a few projects with final cut pro using the raw h.264 footage from my 60D without knowing about the pro res. Then i red the post and i wanted to test it out so i converted a few clips with compressor too see the difference while editing or rendering and i couldnt find much.

What do you think?

Source: http://forum.planet5d.com/index.php/topic/1027-h264-vs-ProRes-422/

Question 3: Apple ProRes vs H.264

What’s the difference between the Apple ProRess codec, the Apple ProRess HQ codec and the H.264 codec. I know the filesize of the ProRess is much more then the H.264, but what’s the real difference??

Source: http://forums.macrumors.com/showthread.php?t=473438

Question 4: Apple ProRes 422 vs. H.264 Editing w/ FCP X

I am editing a project on Final Cut Pro X and was curious what format my video files should be for editing. I know ProRes 422 is a codec that pros use to edit and it has a much bigger file size, but I don’t get the difference and which format I should be using to edit my project. Can someone please explain to me which format I should be editing on for my project! Thanks!

Source: https://discussions.apple.com/thread/3818621?start=0&tstart=0

Solution:

No matter you are a filmmaker, multimedia professional or still photographer, Canon or Nikon camera will be a choice due to its highly mobile, lightweight features including Canon 5D Mark, Canon EOS 650D, Canon PowrShot G1 X, Canon SX40, Canon ESO-1DX, Canon EOS 7D/5D, Canon EOS 60D, Canon EOS 550D, Canon EOS 500D, Nikon D5100, Nikon D3100 Nikon D800, and more. What these cameras have in common is that they can record 1080p H.264 codec MOV footages.

H.264 (an MPEG-4 variation) is an aquistion (camera) and distribution (web streaming) codec. It’s highly compressed, which means that the files are small, and Final Cut has to do extra work each time you play your timeline, make an edit, etc.

Apple ProRes 422 is an editing codec. It uses much less compression, which means that the files are big, but Final Cut can play it more easily.

Best practice is to edit in ProRes 422, especially if you have lots of layers and effects. That means you spend a little extra time optimizing your files to ProRes 422 before you start, but you save time in the long run.

As you got into more complicated editing such as adding multiple clips and transitions and effects you would start to see a more pronounced difference, i.e. FCP would need to render more often and editing wouldn’t be a smooth. H.264 is really optimized to be a delivery codec while ProRes is optimized to be an editing codec. That said, if you just need to do a simple edit and your Mac has the power to edit H.264 you can get away with it no problem, but if you plan to do a heavy edit with lots of transitions and effects and color grading you will be best served by ProRes.

Just an alternative solution: Pavtube H.264 to ProRes Codec Converter which is able to convert H.264 videos to Apple ProRes 422 HQ (*.mov), Apple ProRes 422 (*.mov), Apple ProRes 422 (LT) (*.mov), Apple ProRes 422 (Proxy) (*.mov) and ProRes 4444 (*.mov).

a. ProRes 422 (HQ): offers the utmost possible quality for 4:2:2 or 4:2:0 sources and provides target data rate of approximately 220 Mbps and higher quality than Apple ProRes 422;

b. ProRes 422: provides target data rate of approximately 145 Mbps and higher quality than Apple ProRes 422 (LT);

c. ProRes 422 (LT): provides roughly 70 percent of the data rate of Apple ProRes 422 (thus, smaller file sizes than Apple ProRes 422) and higher quality than ProRes 422 (Proxy);

d. ProRes 422 (Proxy): provides roughly 30 percent of the data rate of Apple ProRes 422 and high-quality offline editing at the original frame size, frame rate, and aspect ratio;

e. ProRes 4444: offers the utmost possible quality for 4:4:4 sources and roughly 50 percent higher than the data rate of Apple ProRes 422 (HQ).

Once your CF(CompactFlash) card or SD memory card is placed into a reader connected to your Mac, follow the instructure below to convert H.264 to ProRes by using Pavtube H.264 HD Video Converter for Mac.

Step 1. Free download the trial version of Pavtube Mac H.264 to ProRes Converter, install it on your Mac and import the H.264 files from HD camcorders to the Mac H.264 Video Converter, or drag recorded H.264 videos to the software.

Tip: If you have multiple recorded H.264 files, you can select the “Merge into one file” box to merge your files into one single file.

Step 2. Hit the “Format” box and select one of the Apple ProRes codecs on the dropdown list. You are advised to choose “Apple ProRes 422 (*.mov)” or “Apple ProRes 422 HQ (*.mov)” format. Due to the difference in the compresstion standard of AVCHD and ProRes 422, the converted files are significantly larger than the original ones. If you prefer smaller file size, please choose “Apple ProRes 422 (LT) (*.mov)” instead.

Step 3. Start converting recorded H.264 videos to ProRes 422 HQ by clicking on the “Convert” icon. Based on its multi-threading and transcoding technology, the whole conversion will be done within a short time. Batch converting is also supported by the Mac H.264 to ProRes Converter tool.

Tip: If you wanna shut down the computer after the conversion automatically, just click Option and tick the box “Shut down the computer after conversion” before conversion starts.

After the recorded H.264 video to ProRes conversion is 100% completed, please run the FCP and click “File > Import > Files” for editing H.264 video in FCP without any rendersing and quality loss. Besides the ability to transfer the recorded H.264 files to Final Cut Pro, the versatile Pavtube H.264 HD Video Converter for Mac users can help you copy/edit H.264 files into FCP X, iMovie, FCE, Adobe Premiere Pro CS6, Adobe Premiere Elements, Adobe After Effects, Avid Media Composer, etc.

Share

Oct 13

Convert Flash FLV/F4V to iMovie/FCE readable format with FLV to iMovie Converter

Summary: How to import Flash FLV or F4V to iMovie or FCE with FLV to iMovie converter and iMovie plugin.

How do I get .flv files to play in iMovie?

I already downloaded Perian, so I can play .flv files in Quicktime. However, I’m unable to import these into iMovie. Whenever I click the import button, the file I’d like to import is greyed out and I’m unable to play it.

I’m running Mac OS X, iMovie ’08, Quicktime 7.4.5, and Perian 1.1.”

FLV stands for “Flash Video”. It is a format designed for web video playback that offers high rates of compression and produces high quality videos. At present, FLV is the file format widely used by some famous websites, such as YouTube, Google Video, Myspace, Reuters.com, etc. However, many Mac users may not DIY Youtube FLV Video With iMovie. Because iMovie doesn’t support FLV format, you can’t directly import FLV to iMovie, how to solve it?

In order to edit FLV files on iMovie, you just need a FLV to iMovie converter to convert FLV/F4V to iMovie friendly format, such as AIC MOV format, this format is best codec for iMovie or Final Cut Express. Pavtube FLV to iMovie Converter for Mac may be your best partner to convert FLV to iMovie on Mac OS X. It’s a professional yet easy-to-use video converter for you to Convert FLV Video to iMovie, Final Cut Express, Final Cut Pro (X), Avid Media Composer, etc.

You’ll find that it is pretty simple to import FLV to iMovie with this step-by-step guide. This guide introduces two common ways to import FLV to iMovie for editing.

Part One: Convert FLV to iMovie readable format with FLV to iMovie Converter

The tool you need:
A FLV to iMovie Converter – HD Video Converter for Mac


Step 1. After install and run this FLV to iMovie Converter, import your FLV files into the software, or drag & drop FLV videos to the program.

Step 2. Select best output format for iMovie.

The Mac FLV to iMovie Converter provides a default setting for iMovie or Fina lCut Express. So you can directly click “Format > iMovie and Final Cut Express -> Apple InterMediate Codec (AIC) (*.mov)” as your output format, which will automatically set the resolution, bit rate and frame rate of the output file. It also allows you to set these figures by yourself.

Tip: If you have several FLV videos on your Mac and you want to combine them and export a continuous Final Cut Pro video, just check “Merge into one file” at the bottom of the program.

Step 3. Edit function is easy and useful, you can trim, crop, or add watermark to the video.

Step 4. Press the red “Convert” button to start convert FLV/F4V to AIC mov for iMovie editing on Mac OS X. This Mac FLV to iMovie Converter can convert FLV/F4V to iMovie or FCE with best video and audio quality.

When the FLV to iMovie Mac conversion is done, you can upload the exported FLV files to iMovie or FCE and create your own masterpiece!

Part Two: Install plugin to add the FLV files to iMovie

Perian is a plugin that allows you to play pretty much any kind of media through iMovie editor and QuickTime Player. It is a joint development of several earlier open source components based on the multiplatform FFmpeg project’s libavcodec and libavformat.

After you download and install Perian, run your iMovie and import the FLV videos directly. With this plugin, you can also play FLV on your QuickTime.

The Good: Support convert audio, video between all popular formats and for any devices, like etc.

The Bad: You can’t import the FLV files to other devices like iPhone, iPod Touch, iPad, PSP, etc, so the funny videos may not be viewable for your friends even though you’ve installed Perian.

If you want import both Blu-ray and DVD to FCP for editing, just click this Mac DVD to FCP Converter and Mac Blu-ray to FCP to made your only movie.

Share

Oct 10

Effortless Import Sony NEX-FS100 AVCHD to iMovie/FCE for Editing on Mac OS X

Q1 – “I just purchase a Sony NEX-FS100 camcorder, and shoot some mts video clips, when I try to import the mts videos to iMovie for editing, problem comes, iMovie cannot recognized the files, so how can I solve this problem, or rather, how can I effortless import Sony NEX-FS700 AVCHD to iMovie on my Mac OS X? Thanks.”

Q2 – “I literally just bought my Sony FS100 today, and shot a quick test using quick motion. I set to 4 fps, and output format was 1080 60p. When I attempted to import the FS100 footages to Final Cur Express for editing on Mac Mountain Lion 10.8, it gave me an error (unspecified, just a red exclamation point). FCE can’t import 60p? was that the issue?”

Q3 – “We recently purchased a Sony NEX-FS100. Great camera…

I’ve spent the past few hours trying to find the best workflow to get the footage into Final Cut. The bad news is that I haven’t found much. Should I just jump ship and migrate to Premiere Pro now, or is there a good way to transcode this footage to a format that Final Cut will work with? I tried mpeg stream clip, but it doesn’t seem to recognize the source footage. I also tried Final Cut’s log and transfer, but couldn’t get that to work either. Does anyone have any advice for me?”

Q4 – “We’re looking into getting a Sony NEX FS100 and I’m wondering if anyone has any experience working with the AVCHD codec shot with the FS100 and Final Cut Express? Seen some posts that suggest the workflow is transfer AVCHD to AIC MOV. Is this going to be more of a pain than it is worth? Any helpful suggestions are appreciated.”

By Google search, I seen some posts related to this topic, but no definitive answer/solution on the subject. Here I will provide a solution on “How to effortless import Sony NEX-FS100 AVCHD to iMovie/FCE for Editing on Mac OS X”.

Sony NEX-FS100 enables Full HD (1920 x 1080) progressive slow and quick motion. Frame rates are selectable from among 60fps, 30fps, 15fps, 8fps, 4fps, 2fps, and 1fps. But its the incompatibility of supplied PMB with Mac makes numerous Mac users frustrated. They are looking for the best solution to make NEX-FS100 generated AVCHD files playable and editbale on Mac iMovie, FCP (X), FCE and other non-linear editing software.

Full list of recording frame rates is as follows:
HD PS (28Mbps) 1920×1080/50p, HD FX (24Mbps) 1920×1080/50i, HD FH (17Mbps) 1920×1080/50i, HD HQ (9Mbps) 1440×1080/50i, HD LP (5Mbps) 1440×1080/50i, HD FX (24Mbps) 1920×1080/25p, HD FH (17Mbps) 1920×1080/25p, HD FX (24Mbps) 1280×720/50p, HD FH (17Mbps) 1280×720/50p, SD/STD HQ (9Mbps) 720×576/50i

Recommend Software Program:

Pavtube AVCHD to MOV Converter for Mac – A powerful application that can easily convert all AVCHD files from Sony, Canon, Panasonic, Olympus Camcorders to MOV for editing on iMovie, FCE, FCP, FCP X, Avid Media Composer with the least loss of original video quality. It works effortless and very fast to use and converts flawlessly. It not only can convert 1080p 60fps AVCHD files to iMovie/FCE friendly AIC codec but also provide some profile setting, edit fuctions etc. With it you can also convert AVCHD to other common format such as MP4, MKV, AVI, 3GP and so on. Welcome to download the free trial here and final purchase.


Guide – How to encode Sony NEX-FS100 1080 24p/60p .mts to AIC .mov for transferring iMovie or FCE editing on Mac OS X?

Step 1. Load Sony NEX-FS100 full HD videos to AVCHD to MOV Converter for Mac.

Use a card reader to copy and transfer the .mts files to iMac hard drive disk, run AVCHD to MOV Converter for Mac as the fast Mac Sony AVCHD Encoder, and click the “Add” button to load the .mts videos. You can also use the drag-and-drop method to load the 1080p .mts files to the application UI.

Step 2. Choose iMovie compatible MOV format.

Click “Format” column to choose “iMovie and Final Cut Express -> Apple InterMediate Codec (AIC) (*.mov)” as the best output codec for encoding Sony FS100 footage to MOV on Mac. The professional Mac Sony AVCHD to MOV converter will transcode Sony NEX-FS100 AVCHD to iMovie/FCE compatible MOV with AIC as video codec.

Tip: You can click “settings” button in the main interface to customize the output video’s parameters, such as resolution, frame rate, etc.

Step 3. You can edit the MTS video before you convert Sony FS100 AVCHD to MOV with AIC codec on Mac. By clicking “” button, you can trim, crop the video, or add watermark and adjust effect to the videos which you will convert.

Trim – Choose to reserve the part you need. Just choose the chapter which you need to trim, to set “start time” or “end time”, type the portion which you want to save.

Crop – Remove black edges of your video or just get the scale of this video you want.

Effect – Adjust the effects by adjusting the parameters, such as:

1) Deinterlacing – If there are some stripes on the picture, you can check this option to make a better picture effect. (Checked by default)

2) 3D effect – Just enable this fuction and do settings:

PS:

If you want to to limit the size and length of the video, just press on “Split the selected task” in the main interface by specifying the clip quantity, duration time and file size to cut the selected video file into required video clips.

Step 4. Convert Sony NEX-FS100 AVCHD to MOV for iMovie or FCE.

Press “Convert” button under the preview window, and start transcode Sony NEX-FS100 1080 24p/60p MTS to AIC MOV for iMovie 8/9 will start immediately. The converter works great for have a batch of files in the queue for conversion.

Step 5. Load the encoded Sony AVCHD files to iMovie.

After the conversion, you will get excellent results with the output MOV videos in iMovie on Mac OS X. Create a project in iMovie and import videos for editing. You can trim video and audio clips, add captions and titles, add narration and transitions, and create scrolling credits for the end of the movie.

Tip: If you want to burn Sony FS100 AVCHD to DVD disc, view the guide “Burn AVCHD clips to DVD without loss of quality“.

Share

Oct 10

Sony NEX-FS100 review

Welcome to the worlds first official full review of Sony’s all-new NEX-FS100E film-like HD camcorder. On Monday 21st March 2011 I took delivery of a Sony NEX-FS100E complete with lens and accessories, which I got to spend a few days with before Sony UK had it collected from me in Cambridgeshire.

I must point out that the FS100E that Sony UK sent me was a pre-production model and not the 100% finished product. There are several issues that I had with the camera; mainly build quality related. Whether or not these get fixed by the time they start rolling off the production line remains to be seen. From what I can see the FS100 I had appeared to be about as complete as it could get.

The cost of the FS100E will have a street price of approximately £5,000 for the body only. The FS100E is the model without a lens. The FS100EK (K standing for Kit) comes with a Sony E-mount 18-200mm F3.5-6.3 lens and will have an approximate street price of £5,500. The FS100E will be available to buy summer 2011 according to Sony UK. Sony are claiming that the target market for the FS100E is Education and Corporate, Event/Wedding and low-budget pop promo and documentary, but I’m sure it will find its way into other areas of video production too; especially the independent low budget filmmaker because of its large Super35mm sensor and interchangeable lens offerings.

After unpacking it, charging the battery and having a general look over the new FS100 I first made some adjustments in the menus to try to achieve the best possible picture by making some small tweaks to the picture profile setting and reducing the edge sharpness to -4. I then filmed my trusty chroma du monde resolution and colour charts to see how the camera performed in a scientific environment, before going out and getting down to some serious filming in Cambridgeshire.

Here, I will share with you my findings on the NEX-FS100 in the worlds first full review of this exciting new film-like camcorder.

Since Sony launched the more expensive and slightly larger bodied F3, budget conscious people have been shouting for something a little more affordable from Sony. Panasonic have had a good head start with their hugely popular AF101 film-like HD camcorder, which has been out since December 2010. Now Sony is about to enter the prosumer arena with their very own large sensor film-like solid-state HD camcorder; enter the NEX-FS100E.
FIRST IMPRESSIONS

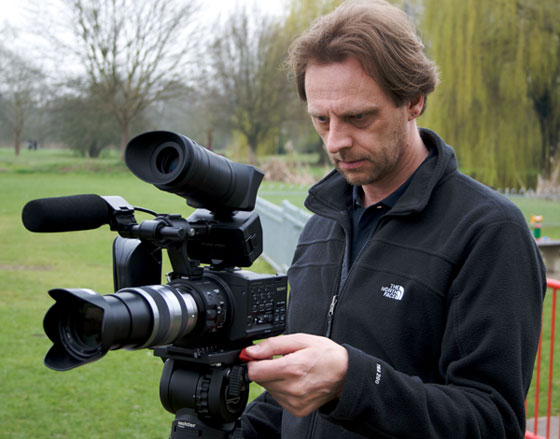
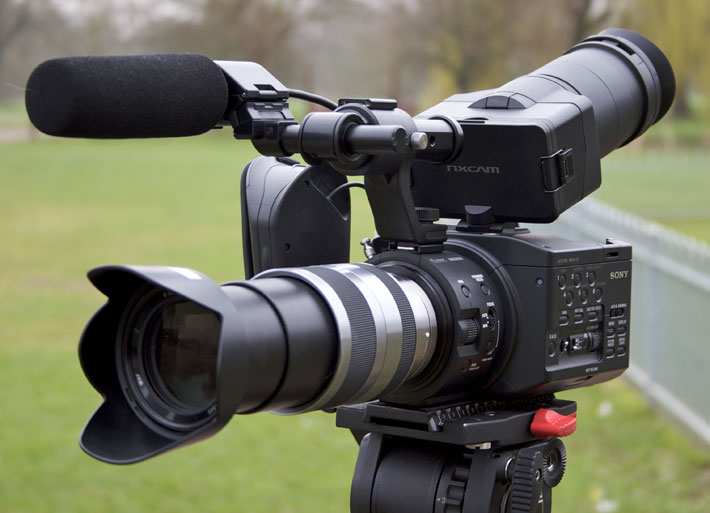
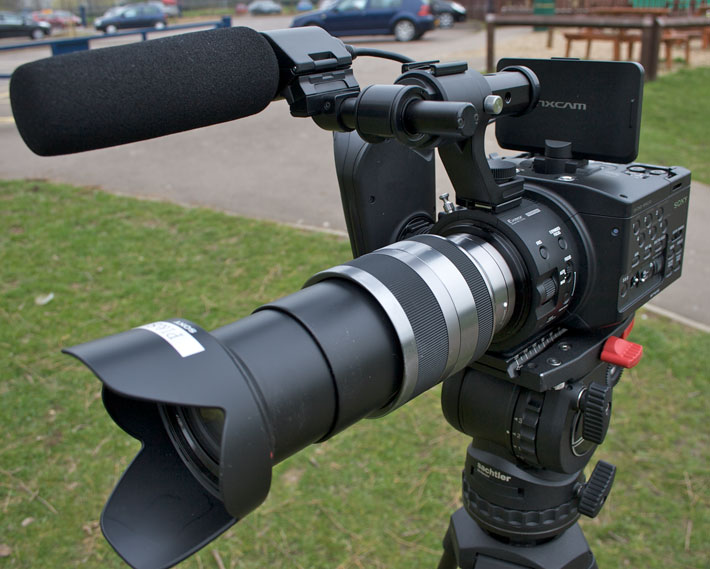
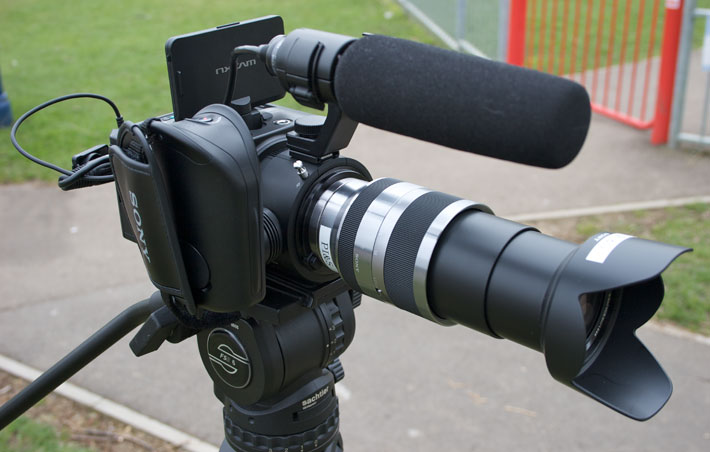
After taking the FS100 out of its box, my first impressions involved feeling a tad perplexed as I looked at the various pieces that make up the FS100’s modular system/design. The fact that you can remove the side grip and top handle and plastic viewfinder is an interesting idea. I can’t imagine too many people wanting to take the FS100 to pieces though. I’m not against modular designs and retro-styled camcorders, but I do feel that this one could have been a little bit better thought out. Some people will like it, others won’t. The parts consist of the body itself, a hand grip that is attached via a single thumb screw, a mic holder/handle which fastens onto the front hot-shoe then is locked in place with a knurled screw, another mic holder that slots into the first one to allow the mic to be positioned further away and off to one side of the body, a clip on viewfinder that clips directly onto the LCD screen, then of course a lens. In this case Sony sent me the Kit E-mount 18-200mm F3.5-6.3. This lens was hardly ideal as it is slower than a 1960’s London double-decker bus and I’m sure it doesn’t have the optical quality either; even if it does retail at around £700, but it was all I had so I had to make do. Assembling the various parts is fairly straightforward. The unit I had was a pre-production unit so it came with no instruction manual, I didn’t really need one either as assembling the camcorder is fairly self-explanatory, so too is Sony’s familiar menu system and picture profiles; of which there are six to chose from. The modular design of the FS100 allows it to be stripped down into a relatively small box.

BUILD QUALITY

I’m something of a fussy bugger when it comes to build quality, so the first thing I did was have a good check around the FS100 to get a feel for it’s overall build quality. After fitting all the parts together and playing around in the menu’s, fitting/removing the lens, messing with the LCD screen and generally pushing buttons and turning dials and flipping open socket covers etc, I soon got a feel for the overall build quality of the FS100. Plastic, ill-fitting fixtures and fittings, finicky switches and buttons, cheap feeling dials are just some of the things that spring to mind. Overall it did not inspire much confidence in the build quality department. It is worse than the EX1 or any other Sony camcorder that came before it. I got the impression that if I dropped the FS100, I would be left with several bits of shattered plastic parts. It certainly doesn’t feel like a product that costs nearly £6,000.

The side grip doesn’t feel 100% securely attached to the actual body, even after tightening up the screw as tight as I dare, it kind of wobbles a little and feels like it is coming lose. The same goes for the top handle/mic holder, it fastens loosely onto the cold shoe, then is secured with a single screw. Even after tightening it right up, it can be moved side to side a few millimetres and after shooting with it for a few hours I found it started to unscrew itself and I had to tighten it up again; if left, it could eventually detach itself leaving the camcorder to fall to the floor.

SWITCH LAYOUT & DESIGN

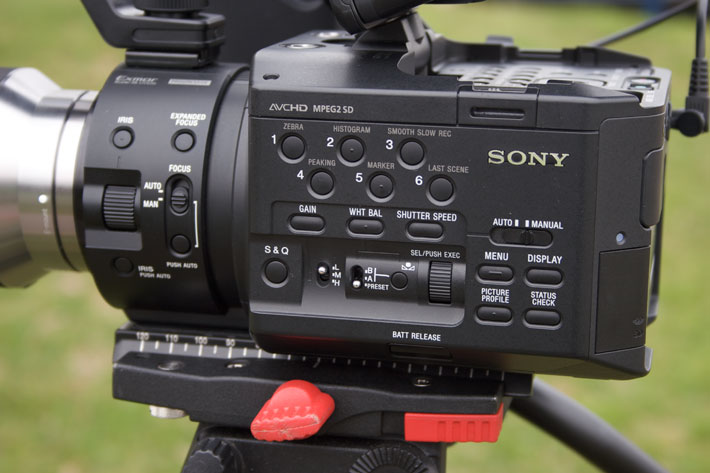
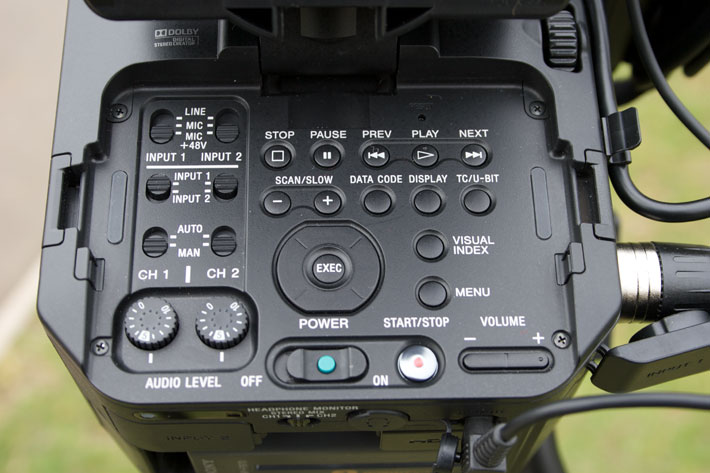
Looking around the FS100’s body, the switches, dials and numerous buttons are laid out relatively neatly. But they are just too small, ridiculously small in fact. Why is it that every time Sony brings out a new camcorder they strive to make the buttons and switches even smaller? I kid you not, the white-balance set button is so small I had to use a ballpoint pen to engage it, and my fingers are relatively slim. If you own an iPhone, you will now have a use for the sim-card removing pin. The minute size of some of the other buttons defies belief they are so small. Most of the buttons are also very vague in ‘feel’. You don’t get any kind of click type feel for feedback that the buttons have actually been depressed; you need to look at the LCD screen for some sort of visual feedback. I hated using this camera because of this; and other reasons too.

USABILITY

It was only when I got out in the car and drove to a few locations and actually put the FS100 on a tripod and started shooting that I could start to gauge how the camera handles; here I’m talking about the form-factor and ergonomics etc.

The mic holder that fixes directly onto the camcorders cold shoe also doubles as a handle. I personally found it to be too small to be able to attain any kind of purchase, only managing to get two fingers at the rear part, and another two under the cold shoe that forms part of the handle. This barely qualifies as a handle and it could have been better thought out. There are various mounting points and threads on the FS100 body, as well as on the mic holder/handle. I also found the side grip to be very poor from an ergonomics standpoint. The angle is all wrong. Although you can rotate the grip into any position, I found that having it pointed almost vertically was as comfortable as I could make it to relieve my wrist from stress, but at this angle if you have an on-board mic plugged into the side XLR socket, the XLR jack digs into the top of your wrist. This only acts as a dull aching reminder of how poorly thought out this grip and socket positions are.

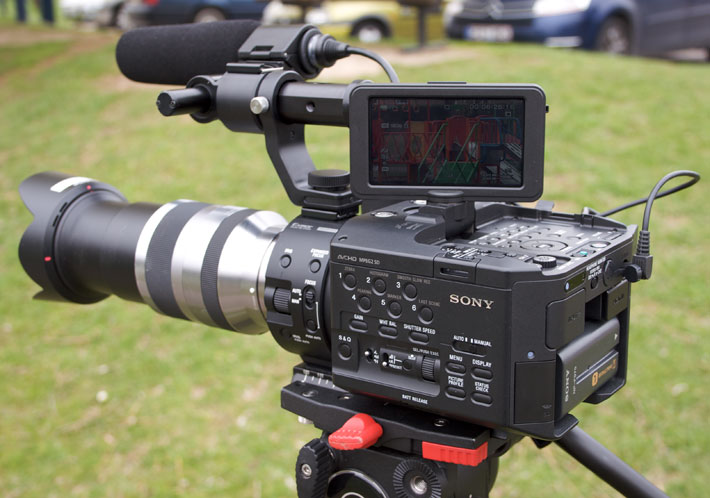
At first glance the LCD screen position seems logical enough, until you go to use the camcorder that is. Fine if you have it on a tripod, but for hand-held work things get a little more complicated. Also, Sony’s optional plastic shoulder support system (VCT-SP2BP) does nothing to help; it is more an appendage than an aid. It is almost impossible to hold the camcorder by the top handle/mic holder and have a decent view of the scene via the LCD screen as your hand and wrist simply obscure the a portion of the screen and you can’t angle the screen forward enough because the handle/mic holder is in the way; how frustrating.

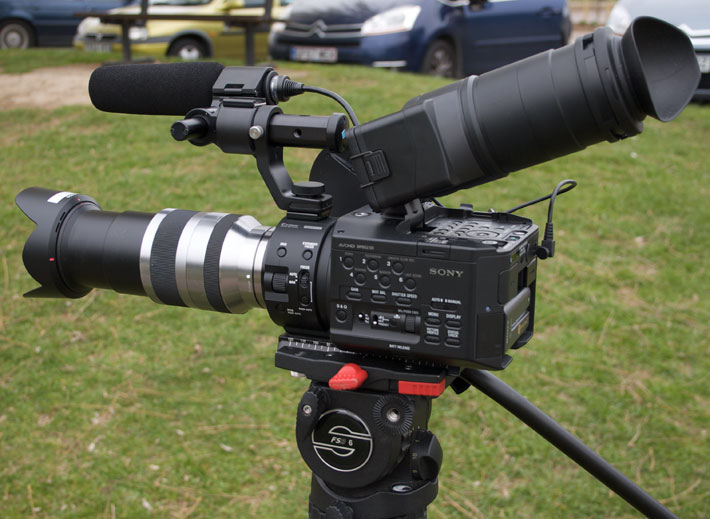
I spent most of my time shooting with the FS100 mounted on a Sachtler FSB6 tripod, where the camcorder feels most comfortable. The LCD screen can be turned sideways, which is handy if you are standing slightly to one side of the tripod as you can angle it directly towards you. The image quality of the LCD is good enough for general use, but in bright sunlight viewing becomes a bit more difficult. In bright conditions attaching the large viewfinder/eyepiece helps enormously. It is attached via two spring-loaded clips directly to the LCD screen. With this viewfinder attached, movement of the LCD/viewefinder is a bit more restricted, but this doesn’t really matter for general shooting. If you have the FS100 low to the ground you can’t tilt the viewfinder up as much as you would need to as the mic/handle restricts its movement.

Overall, on paper and in the brochure the FS100 looks pretty cool, but once you start using it, the dream that the brochure pictures and descriptions promise suddenly turn into a rather unpleasant nightmare. I found using the FS100 to be a rather lacklustre and frustrating experience. The FS100 is just as frustrating to operate as Canon’s EOS 5D MK2; only for a different set of reasons.

FORMATS

The FS100 records in the usual formats of 1080/50p, 25p (24p is going to be added via user firmware update later in 2011), 1080/50i, 1280×720/50p, 720×480/50i with audio available as high quality Linear PCM (2-channel) or Dolby audio. All are recorded to the AVCHD codec up to 28Mbps if you decide to record to the Memory Stick media in-camera. For the record, the AVCHD consortium states a maximum nitrate of 24Mbps, so Sony have pushed this further to 28Mbps, in an AVCHD compatible codec.

Full list of recording frame rates is as follows:

HD PS (28Mbps) 1920×1080/50p, HD FX (24Mbps) 1920×1080/50i, HD FH (17Mbps) 1920×1080/50i, HD HQ (9Mbps) 1440×1080/50i, HD LP (5Mbps) 1440×1080/50i, HD FX (24Mbps) 1920×1080/25p, HD FH (17Mbps) 1920×1080/25p, HD FX (24Mbps) 1280×720/50p, HD FH (17Mbps) 1280×720/50p, SD/STD HQ (9Mbps) 720×576/50i

RECORDING MEDIA

The FS100 records to either Memory Stick or SD/HC (class 4 or higher) and SD/XC cards, or Sony’s HXR-FMU128 flash memory recorder (optional). Or of course third party recording devices that can be connected via the HDMI output. AJA’s Ki Pro Mini is ideal for getting better image quality out of the FS100 if you are not a fan of the AVCHD codec. Recording with a 32GB memory card will give you 170 minutes recording time in AVCHD 24M (FX) mode, while the HXR-FMU128 (128GB if you haven’t guessed) will give you 700 minutes. It is possible to record simultaneously to the HXR-FMU128 and cards in the camcorder. For those who didn’t know, Sony also make SD/HC memory cards as well as MS cards. They make a 32GB SD/HC card; model number SF-32N4. Compatible Sony MS cards are: Memory Stick PRO Duo (Mark2), Memory Stick PRO-HG Duo and Memory Stick PRO-HG Duo HX.

LENSES

The FS100 has an E-Mount for its lenses, this is the same lens mount as Sony’s NEX-VG10. But it can take Sony’s own E and A series Alpha lenses along with many third party lenses with the use of optional adaptors from the likes of UK engineer Mike Tapa, see www.mtfservices.com for more details about lens adaptors. MTF adaptors are available for PL mount, Nikon and Canon FD, adding huge lens options for the FS100.

Current Sony E-Mount lenses include: 16mm F2.8, 18-55 F3.5-5.6 and an 18-200 F3.5-6.3. Not exactly fast by any means, but you can use other lenses from other manufacturers with an adaptor. Sony are brining out some more lenses for this camera during the course of 2011, these will include a Zeiss 24mm F2, 30mm F3.5 Macro, 40mm F2 and a 55-210.

You can use Sony A-mount lenses with a Sony LA-EA1 adaptor; this retains all electronic functions of the lens. There are currently about 30 A-mount Sony lenses to choose from. Add to this the ten Sony G Lens/Carl Zeiss Lenses and there is a huge range of optical options for the FS100.

FEATURES

The FS100 has all the usual features that you would expect from a HD solid-state camcorder of this price range (approximate street price is expected to be around £5,000 without lens), plus a few other neat features as well. The FS100 can record slow and quick motion at selectable frame-rates of: 50fps, 25, 12, 6, 3, 2 and 1fps. So when recording at 1080/25p with a frame-rate set at 50fps, images are recorded at 2x slow motion i.e. half speed. However, recording in slow or quick motion simultaneously to card and the flash drive is not possible. It can also record 1080/50p, but you will need something like a Sony PS3 that is capable of playing back 10080/50p footage, unless you play it back directly from the FS100 camcorder un-edited of course. Your display must be 1080/50P compatible also; Sony’s consumer Bravia range will fit the bill perfectly.

The FS100, like Sony’s NX5, also has a built-in GPS system that puts meta-data into with the clips to let you know exactly where you where when you shot the clip. Like a regular Sat-Nav, Sony’s GPS system is accurate to about 20 feet. Very handy if you are shooting a documentary and need to remember where you where when you shot certain clips.

The FS100 features a Histogram display for checking brightness levels, but it also has the usual Zebra function too. Focus can also be assisted with peaking assisted by either white, red or yellow colours, which can be set to high, medium or low levels. There is also a 2x expanded focus assist.

Sony have taken another idea straight from Panasonic’s popular AF101 by fitting a little hook onto the FS100 for focus pullers to attach their tape measures. But this looks like something of an an afterthought as focus pullers will struggle to get to it as the on-camera mic is in the way and prevents access from the top and the lens is in the way from the bottom. Grrrrrr. Of course you can reverse the mic holder and have the mic on the other side of the camcorder, but then the mic cable will have to take a bus ride around the left side and back of the camcorder, making a quick stop off at the battery compartment before arriving on the right side of the camera at the XLR socket. Sony would have been better off spending less time concentrating on the position of the “Exmor Super 35 CMOS” logo and more time on the location of the focus pullers hook, which should have been positioned right where the Exmor logo is.

I’m surprised that the FS100 has no built in ND filter wheel either, not even a switch like on the EX1; nothing. This is a big negative considering that this camera is supposed to be all about depth-of-field control. We all know that to control depth-of-field you need a lot more than just an aperture ring, or aperture control with a fast lens, when you open up the lens and the exposure burns out hotter than the sun, what do you call upon to compensate; exactly, the ND filter wheel. Sony tell me that they could not fit an ND filter wheel due to the very short flange-back, there is simply no room for an ND filter wheel to go in front of the sensor. The advantage to this short flange-back is it allows a huge range of lenses with the correct field-of-view, but the dissadvange is that you’ll need to buy a matte box with ND filters. So with the FS100 you will have nice shallow depth-of-field, but you won’t be able to correct it with shutter speeds as this is simply a big no-no. Better buy that matte box and a stack of glass 4×4 ND filters in various stops if you ‘truly’ want to control depth-of-field.
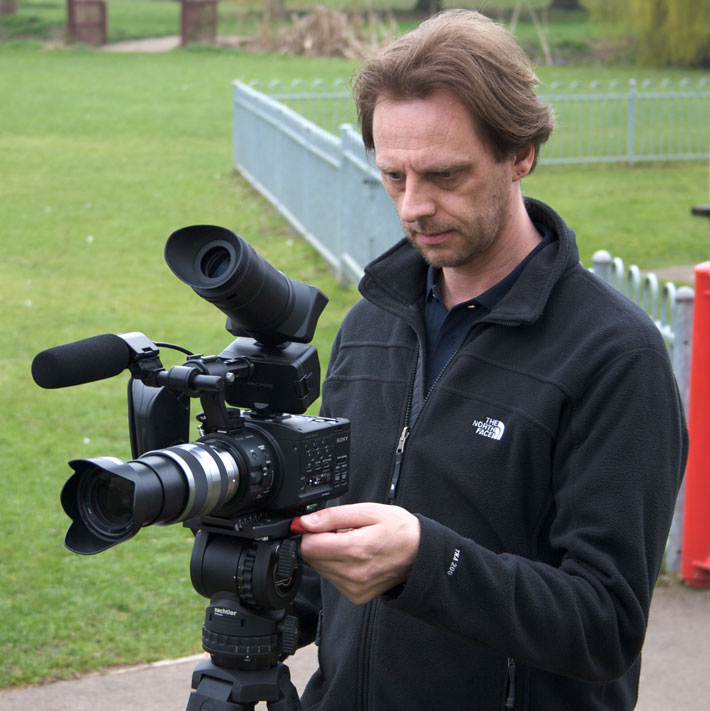

IMAGE QUALITY

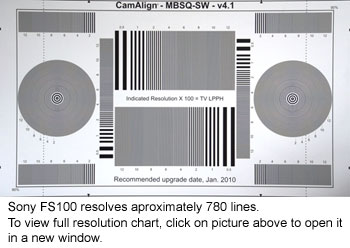
Now for the part you have all been waiting for. You can put very high quality glass on the front the FS100 and as it has a HDMI output, you can also up the quality even more by attaching a superior external recording device such as an AJA Ki Pro Mini for example; this way you can bypass the FS100’s AVCHD codec and processing system; vital if you are a serious independent movie filmmaker. My first test was to film my trusty chroma du monde resolution and colour charts to get an idea of the kind of resolution the FS100 can throw out. Then, more importantly I went out and about in Cambridgeshire filming swans, buildings, people and other general shots both moving and locked off to get an idea of image quality and general characteristics of the FS100.

The resolution chart showed the FS100 to produce about 780 lines, which is fine and more than enough for most applications. The image on the chart showed the FS100 to be relatively aliasing-free and pretty clean overall. There is some visible aliasing, but not as much as Panasonic’s AF101. I tried shooting the chart with the FS100’s detail levels set at 0, -4 and -6 as detail can often manifest itself on resolution charts and make things harder to read. The detail level didn’t have too much effect on the readings, but -4 is a good starting point for a nice clean image. With the FS100 locked off, aliasing is minimal on the chart, but gently panning across it and suddenly the aliasing springs into life; as to be expected on a large single chip camcorder.

Out and about in Cambridgeshire I filmed swans on the water and grass, close up and medium shots of plants and foliage, cars, gentle panning shots across buildings and people’s faces. Aliasing is not really evident in regular shooting like this and there were certainly no signs of serious aliasing on the brickwork of buildings as I panned across them. The footage looked nice and clean and quite natural; people’s skin tones looked very natural. Overall I really liked the look of the footage shot on the FS100. Indoors I shot some oranges and apples as the texture of fruit can be revealing; the FS100 looks really impressive here.


INPUTS & OUTPUTS

The first thing to note about the FS100 is that there is no HD/SDI output, but fear not, there is a HDMI output that can output 4:2:2 colour 8-bit to an external recording device. This HDMI output also allows embedded timecode. For the record, the FS100’s HDMI has an 8-bit output; even though Panasonic’s AF101 has a proper HD/SDI output, it too is 8-bit and not 10-bit. I personally don’t like HDMI outputs on camcorders for use with external recording devices as they are consumer-based and not robust enough for professional video applications. A HDMI lead should come out of the back of your television where it won’t ever be moved. Having a HDMI cable coming out the back of a camcorder and into a bolt-on recorder is too risky for my liking as the cable can get knocked or just come out. A HD/SID BNC-type socket keeps the cable locked via bayonet twist into place so there is no danger of it ever coming out. Other inputs/outputs include Component, Composite, USB, 3.5 stereo Headphone, 2x XLR, Remote, FMU interface and of course a single card slot. For such a large camcorder I’m surprised there are not two card slots like the Panasonic. However, it could be argued that with high capacity SD/XC cards and the HXR-FMU128 only one card slot is required; you decide.

HXR-FMU128 FLASH MEMORY RECORDER

The FS100 can record to Sony Memory Sticks, but you can also attach Sony’s HXR-FMU128 flash memory recorder. This allows up to 10 hours of non-stop recording, which is more than enough for even the most demanding days filming. The HXR-FMU128 cost £720 inc vat.

TECHNICAL STUFF

If you didn’t already know, the FS100 houses a single Exmor Super 35mm CMOS sensor, which is the same one that is used in Sony’s higher end F3 camcorder. This Exmore Super35 CMOS sensor has approximately 3,530,000 pixels, with 3,370,000 effective pixels when recording pictures in 16:9 mode. Sony’s Super35mm sensor is the standard format for movie cameras and with an E-mount to PL adaptor from Mike Tapa it allows use of a huge range of 35mm cinematic lenses from the likes of Zeiss and Cooke, with the correct field of view. This sensor allows excellent depth-of-field control, great low-light performance (with fast lenses of course), good low noise level and a wide dynamic range. The weight of the FS100 is 1.04 kg body only, or 2.66 kg with F770 battery, kit lens, eye finder and grip.

SONY FS100 vs PANASONIC AF101

There is absolutely no doubt that the Sony FS100 is aimed at the same market as Panasonic’s AF101. So how do the two camcorders compare in a head-to-head?

From a build quality point of view, the Panasonic AF101 is the clear winner. The AF101 just feels a lot tougher and more solid. The way the top and side handles fit onto the AF101 via both cold shoe and double screws is so much more secure than the FS100, which feels a little wobbly and feeble in comparison.

The switches on the AF101 are chunkier with a more positive ‘click’ when used. The Sony in comparison is somewhat vague with its switch operation. The FS100’s switches are also way smaller and more finicky to operate; especially the white-balance button; I had to use the tip of a ball-point pen to engage it.

The AF101 balances better when hand-held, be it via the top handle, or side grip. The AF101 just has a nicer ‘feel’ to it all around in comparison to the FS100, which is a bit higgledy-piggledy and flimsy in comparison; it’s kind of like “the camcorder that Jack built”. The fixtures and fittings of the AF101 are right up to standard at this price range; the Sony’s are not.

The Panasonic AF101 also has lots of features and functions that are a necessity to the serious filmmaker, such as HD/SDI out, a decent ND filter wheel, two card slots, an LCD screen and a separate electronic viewfinder, a built-in microphone, to name a few.

So does the Sony have anything over the Panasonic? Well the imager is a bit larger. The AF101 has a micro 4/3rd image sensor, while the Sony has a Super 35mm sensor that is approximately 30% bigger than Panasonic’s 4/3rd sensor. This 30% only gives you marginally more control over depth-of-field, but nothing really noticeable. For the Tech-Heads, the FS100 sensor is 23.4×13.2mm, while the AF101 sensor is 17x13mm. Technically speaking the 4/3rds is not a motion picture image format, but a still image format; Panasonic get around this by cropping ever so slightly the top/bottom of the sensor. The Sony FS100 also does this, just not quite as much. Both FS100 and AF101 sensors use CMOS technology.

RESOLUTION

The Sony FS100 managed to resolve approximately 780 lines resolution with a little bit of visible aliasing; but overall a nice clean image. The Panasonic AF101 manages to resolve approximately 680 lines maximum resolution with a bit more visible aliasing in the image compared to the Sony. The Panasonic is not quite as clean as the Sony with regard to aliasing. Having said that, this test was done filming a chroma de monde resolution chart in a somewhat scientific and technical environment, in the real world aliasing is much harder to see and from the footage I personally have shot on the Panasonic AF101 there is nothing there worth mentioning when shooting general footage.

TEST SHOTS


Here are three grabs taken off the timeline in Final Cut Pro. Click on each one to open a full 1920×1080 resolution version in a new window. The shot of the cafe in the park was grabbed from the timeline mid-pan at a moderate speed. The shot of the fruit was a locked off shot and the image of the swan was while gently tracking the swan. In all instances the FS100 was mounted on a Sachtler FSB6 tripod.

The shot of the resolution chart was locked off (obviously) and filmed with the Kit Sony E-mount 18-200mm F3.5-6.3 lens at the mid-point aperture and zoomed in approximately half way. The resolution chart shows the FS100 to be resolving approximately 780 lines with minimal aliasing. All recordings where done to a card using the FS100’s AVCHD codec.

CONCLUSION

All-in-all, the FS100 feels like a rushed camcorder. The ergonomics are frustrating, the fixtures and fittings are poor quality, the switches, dials and knobs are all way too small and they feel plasticky with a vague feel i.e. you don’t really know if you have actually pressed a button; you need LCD menu feedback to confirm. The hand-grip on the side wobbles, even when tightened up, so to does the top handle/mic holder, which feels like it is hanging on by its fingernails. Everything about this camcorder feels wrong to me; except the sensor and the quality of images it produces. Sony had the perfect chance to give Panasonic a run for their money, but the FS100 is not the camcorder to do it. Panasonic’s AF101 is a clear winner over the Sony FS100 in terms of build quality, usability, functionality and features. Sure it lags slightly behind in raw resolution and there is a tad more aliasing, but the AF101 is about £1,500 cheaper and generally a much nicer camera to work with and it has none of the frustrations of the FS100. The Panasonic AF101 is the clear winner by a country mile in my opinion and it would be my choice for any kind of work that required a large sensor and the ability to have a lot of control over depth-of-field. Other independent digital movie makers might disagree, it’s a personal decision at the end of the day.

There are just too many things missing from the FS100, no HD/SDI output, no ND filter wheel, only one card slot, no built-in microphone. The FS100 is stripped of all the sensible functionality a cameraman actually needs. Sony’s old VX1000 even had a built in ND filter switch and that camera is from the dark ages in the grand scheme of video camcorder technology. I really wanted the FS100 to be a great little camcorder, but it is just not to be. For me, the FS100 is something of a let down. The only thing it has going for it is it’s sensor and the image quality it produces, which is marginally better than the Panasonic AF101, but still not as good as Sony’s own EX1/3. Panasonic managed to put these required features onto their AF101, which is a similar size to the FS100, so I can’t really understand why Sony couldn’t do the same.

To download Sony’s NEX-FS100 Preliminary Brochure click here: NEX-FS100 Brochure

The original from http://www.dvuser.co.uk/content.php?CID=268


Share
Page 31 of 37« First...1020...2930313233...Last »