AIC Converter,MTS to AIC,MTS to iMovie,MTS to FCE,MTS to Final Cut,AVCHD to AIC Converter,AVCHD to Final Cut Express,import AVCHD files to iMovie,MTS to ProRes 422,MTS to Final Cut Pro,MTS to FCP X,AVCHD and Final Cut Pro,Log and transfer MTS to FCP,edit MTS footage in iMovie,FCP transfer MTS files,transfer AVCHD files to iMovie

Sep 12

Pentax DSLRs release: Pentax K-5 II and K-5 IIs on October, 2012

The news comes from: http://www.engadget.com/2012/09/11/pentax-launches-q10-K5-IIs/

Pentax launches Q10 interchangeable lens camera, K-5 II and K-5 IIs flagship DSLRs

It’s not every day that a camera company launches two major models the same day, but Pentax has done just that with the Q10 mirrorless interchangeable and the K-5 II / IIs cameras. The Q10 joins its equally tiny stablemate, the Q, to round out its line of mini-sensored, playing-card-sized cams that still let you change lenses. The new model boasts the same bokeh control and effects dial of the original Q, but adds a new grip and several color options, like the now-ubiquitous red shown above. Other features include a K-mount lens adapter, an included 15-45mm zoom telephoto, improved AF performance, full HD video recording, anti-shake technology, 5 fps continuous shooting capability and a pop-up flash. The new mini-shooter will go on sale in October at around $600 with the kit lens.

If you have bigger (and deeper) pockets for something more sporty, Pentax has also announced it’s top K-5 II and K-5 IIs models to replace the popular K5, which has been around since 2010. The weather- and cold-resistant, dustproof DSLRs retain the same 16.2-megapixel resolution of their predecessor, but Pentax claims the new SAFOX X AF sensor has improved sensitivity in low-light conditions and improved auto-focus. The K-5 IIs eschews the anti-aliasing filter found on its sibling, but is otherwise the same, with a 3-inch, 925k LCD, 7fps burst mode, magnesium alloy / stainless steel body and RAW data retrieve function. These models will also appear in October and dent your wallet to the tune of $1,200 and $1,350 for the K-5 II and IIs, respectively. All that might address some of the AF and light sensitivity beefs we heard before, but we’ll have wait for the next round of reviews to find out.

More about Pentax K-5 II spec, click here

The new mini-shooter will go on sale in October at around $600 with the kit lens.

The PENTAX Q10 comes equipped with a Full HD video capture function employing the H.264 recording format, allowing the user to capture high quality, extended movie clips (1920 x 1080 pixels) at a frame rate of 30 frames per second.

More about Pentax Q10 spec, click here

Share

Sep 11

Transfer 1080p footages from Sony XDCAM EX cameras to Final Cut Pro for editing

“I have recorded many 1080p footages from Sony XDCAM EX camcorder, which I borrowed from my friends. I haven’t shot or edited HD before now, so need some help setting up the project. when I import Sony XDCAM EX MP4 files to final cut pro, it says that the files are not supported, I searched the forum and many people say the MP4 footage need to be converted to prores codec, can you give me some suggestions and what software I need to use?”.

Sony XDCAM EX camcorder is professional camcorder which is great for us to take high quality full HD videos.

If you have got the Sony XDCAM EX and often use it to record 1080p video, you may have the need to edit Sony XDCAM EX MP4 in Final Cut Pro on Mac, but as the user stated above, FCP best supported video format is Apple ProRes 422 codec MOV format, so FCP doesn’t support Sony XDCAM EX MP4 footages well. The best method to solve this problem is to convert Sony XDCAM EX 1080p footages to ProRes for editing in Final Cut Pro 6/7, you can follow the steps below to transcode Sony XDCAM EX MP4 to ProRes for importing to Final Cut Pro editing.

1.Download Pavtube HD Video Converter for Mac. This professional HD Video Converter can help you convert Sony XDCAM EX to ProRes 422 MOV format for Final Cut Pro, more output formats are also supported.

2.Install and launch this XDCAM EX to ProRes Converter. Import Sony XDCAM EX MP4 footages to the converter.

3.Click format bar to choose the output format. Click and choose Final Cut Pro -> Apple ProRes 422 (*.mov).

4.You can click “settings” to customize the output parameters, adjust the resolution, bitrate as you want.

5.Start convert Sony XDCAM EX to ProRes for FCP editing on Mac.

When you get ready to convert the added MP4 videos on Mac, Click the “Convert” button to start conversion. The conversion processes will transcode MP4 to ProRes MOV videos to be compatible with FCP editing.

After conversion, you can Importing video files and projects into Final Cut Pro without any trouble. Congratulations! You have successfully taken the first step to make your own masterpiece.

With this Sony XDCAM EX to ProRes Converter, you can easily change XDCAM EX files to FCP for editing, this software runs fast, so you can convert your XDCAM footages to FCP in less time, video and audio synchronization are perfectly guaranteed. You can also find more tips and tricks on FCP and MXF column.

Share

Sep 07

Transcode Sony HDR-CX360V 1920×1080 50p/60p MTS to ProRes 422 HQ for Final Cut Pro on Mac

Summary: The article will give you the workflow for how to import Sony HDR-CX360V 1920×1080 50p/60p MTS footages to Final Cut Pro if your Log and Transfer is proved to be ineffective while ingesting MTS files from Sony HDR-CX360V.

I used Sony HDR-CX360V to record 1920×1080 50p/60p AVCHD MTS files, which are not compatible with FCP. So in order to edit .mts clips on Final Cut Pro, conversion from MTS in 50/60 progressive mode to ProRes is necessary.

I’ve tried Clipwrap, Toast and Pavtube to carry out the conversion. Clipwrap failed because it cannot export 50/60 progressive mode; Toast completed converting but the quality is badly affected.

Only Pavtube MTS Converter for Mac successfully converted the 50p/60p MTS to ProRes 422 with no loss of quality. I really want to say that it is the best software to transcode Sony HDR-CX360V 1920×1080 50p/60p AVCHD MTS footage for FCP that I’ve ever used.

Free Download MTS Converter for Mac Mountain Lion 10.8.

Here is the step-by-step guide to quickly Convert/Edit Sony CX360 50p/60p MTS to ProRes 422 (*.mov) on Final Cut Pro.

1. Import .mts files.

Run the professional Mac MTS Converter for FCP. Use a USB cable to Connect Sony HDR-CX360V to Mac. Click “Add” icon or drag and drop to load .mts files from Sony HDR-CX360V to Pavtube MTS Converter for Mac. Follow the popup window and wizard to complete the import.

Choose Apple ProRes 422(HQ) (*.mov) under Final Cut Pro as its output format and choose “50” (or 60) for the frame rate.

2. Choose Apple ProRes 422 (HQ) for editing on FCP.

Hit “Format” box and select one of the Apple ProRes codecs on the dropdown list. You are advised to choose “Apple ProRes 422 (*.mov)”or “Apple ProRes 422 HQ (*.mov)” format. Due to the difference in the compresstion standard of AVCHD and ProRes 422, the converted files are significantly larger than the original ones. If you prefer smaller file size, please choose “Apple ProRes 422 (LT) (*.mov)” instead.

Note: Since ProRes 422 (LT), ProRes 422 (Proxy), and ProRes 4444 have not been added to FCP 6, you’d better not set one of them as output if you happen to edit your H.264 files in FCP 6 before upgrading FCP 7.

Tips:

  • ProRes 422 (HQ): offers the utmost possible quality for 4:2:2 or 4:2:0 sources and provides target data rate of approximately 220 Mbps and higher quality than Apple ProRes 422;
  • ProRes 422: provides target data rate of approximately 145 Mbps and higher quality than Apple ProRes 422 (LT);
  • ProRes 422 (LT): provides roughly 70 percent of the data rate of Apple ProRes 422 (thus, smaller file sizes than Apple ProRes 422) and higher quality than ProRes 422 (Proxy);
  • ProRes 422 (Proxy): provides roughly 30 percent of the data rate of Apple ProRes 422 and high-quality offline editing at the original frame size, frame rate, and aspect ratio;
  • ProRes 4444: offers the utmost possible quality for 4:4:4 sources and roughly 50 percent higher than the data rate of Apple ProRes 422 (HQ).

    3. Setting the best profile for editing mts files on Final Cut Pro.

    By clicking the Settings buttion on the main interface. Adjust the video and parameters, including the Bitrate of Video and Audio, the Codec of Video and Audio, Video Size, Sample Rate, Frame Rate, Audio Channels, etc.,

    4. Convert MTS to ProRes 422 HQ for FCP X.

    Click the “arrow” button to start converting Sony CX360V 50p/60p MTS to ProRes 422 HQ on Mac Lion 10.8/10.7/10.6/10.5 immediately.

    After the MTS to ProRes conversion is 100% completed, please run the Final Cut Pro and click “File –> Import –> Files” for editing Sony CX360V MTS files in FCP without any rendering and quality loss. Besides the ability to transfter the Sony CX360V MTS files to FCP, the versatile MTS Converter for Mac can help you import/edit Sony CX360V MTS files into FCP X, iMovie, FCE, Avid Media Composer, etc. If you are interested, please link to MTS Column to get more info.

Share

Sep 06

Convert/Import Sony NEX-FS700 1080 50p/60p MTS to ProRes MOV for FCP 6/7/X on Mac

Sony NEX-FS700 can shoot full 1080p video in a range of frame rates up to 60p, it provides the option of recording AVCHD footage onto SD card/MemoryStick or via the FMU (flash memory unit) port, or it can output 4:2:2 video (with embedded timecode) via HDMI 1.4 or 3G/HD-SDI to an external recording unit. It is a fully professional large-sensor video camera. Hot on the heels of the FS100, this compact, highly modular camera uses a very similar-sized Super 35 CMOS sensor as the Sony NEX-FS100.

It is a pity that 1920 x 1080/60p AVCHD MTS/M2TS full recordings from Sony FS700 can’t be edited by Final Cut Pro 6/7 or FCP X directly via Mac. If you are the Sony NEX-FS700 users and get in the AVCHD to FCP importing troubles, please follow me and I will give you an easy way to help you convert Sony NEX-FS700 1080p MTS videos to editable format and see Sony NEX-FS700 clips in FCP 6/7 or FCP X 10.0.3 on Mac OS X.

Recommend Software Program:

Pavtube MTS Converter for Mac – A professional Mac MTS to ProRes Converter for Final Cut Pro 6/7/X, it works well and very easy to use and converts flawlessly. It not only can convert 1080p60fps files to FCP friendly Prores codec but also provide some edit fuctions. You can download the free trial here

Follow the guide below:

Step 1: Load Sony NEX-FS700 1080p MTS to Mac MTS to ProRes Converter.

Use a card reader to copy and transfer the .mts files to iMac hard drive disk, run Mac Sony MTS Converter as the fast Mac MTS to ProRes Converter, and click the “Add” button to load the .mts videos. You can also use the drag-and-drop method to load the 1080p .mts files to the application UI.

Step 2. Press “Format” option and navigate the mouse cursor to choose “Format > Final Cut Pro > Apple ProRes 422 (*.mov)” as the best codec for FCP 6/7 and FCP X on Mac. The Mac Sony MTS converter will transcode Sony NEX-FS700 MTS to FCP 6/7 or FCP X compatible MOV with ProRes as video codec in HD 1920×1080.

Step 3. You can click “settings” button in the main interface to customize the output video’s parameters, such as resolution, frame rate, etc.

Step 4. You can edit the MTS video before you convert Sony FS700 MTS to ProRes MOV. By clicking “” button, you can trim, crop the video, or add watermark and adjust effect to the videos which you will convert.

Trim – Choose to reserve the part you need. Just choose the chapter which you need to trim, to set “start time” or “end time”, type the portion which you want to save.

Crop – Remove black edges of your video or just get the scale of this video you want.

Effect – Adjust the effects by adjusting the parameters, such as:

1) Deinterlacing – If there are some stripes on the picture, you can check this option to make a better picture effect. (Checked by default)

2) If you want to get 3D effect, just enable this fuction and do settings:

PS:
If you want to to limit the size and length of the video, just press on “Split the selected task” in the main interface by specifying the clip quantity, duration time and file size to cut the selected video file into required video clips.

Step 5. Click the “Convert” icon under the preview window, and the Mac MTS to ProRes Converter will start transcode FS700 1080p 50p/60p MTS to Prores MOV for FCP(X) on Mac.

After the conversion,  click the “Open” button to locate converted files, then load ProRes .MOV files in FCP (X). Now you can successfully and easily import Sony NEX-FS700 1080 60p/50p MTS footage to FCP (X) for editing with best quality.

Tips:

  • If you are also a FCP X user, before you try to do the conversion, don’t forget to make sure that you have installed the Apple ProRes Codec manually since the FCP X asks users to install it by themselves.
  • If you want to edit AVCHD MTS in iMovie, you just need to choose the AIC format in the second step.
  • If you want to batch conversion, the professional iMedia Converter for Mac is the best choice for you.
Share

Sep 04

Tricks for Final Cut Pro, AVCHD and Panasonic, Sony, Canon etc. HD cameras

Summary: Problem for import AVCHD MTS from Panasonic, Sony, Canon cameras to Final Cut Pro 6/7/X editing on Mac:

Problem 1: Importing MTS files into FCP 7

I’ve just bought FCP 7 and I have a lot of rushes on an external drive that are AVCHD with the .MTS on the end of each file. I’ve just tried to import the MTS files into the project but it won’t recognize them and I can’t see AVCHD in any of the settings.

I bought the upgrade just for this reason as I was told that 7 handles the AVCHD codec. Any tips? The footage is no longer on the camera by the way.

Problem 2: .MTS files in FCP 7

I’ve created a timeline in FCP7. Most clips are from my Panasonic HMC150, with .mov files captured as ProRes422. However, a buddy also filmed the event with a couple of HiDef Canon cameras with files that capture as .MTS Well, FCP7 doesn’t seem to recognize .MTS files. What software do you use to convert .MTS to ProRes 422? Thanks for your help!

Problem 3: How to import MTS files in Final Cut Pro 6?

Hello we captured footage with the Canon HF20 Hi-Def Camcorder, transfered the video files onto an external drive. We’re now trying to import those MTS files into Final Cut Pro 6.0.5 but it seems they are not supported… how do you import them?

Problem 4: Cannot Ingest AVCHD .MTS files in FCP 7

I am trying to Ingest .mts files into Final Cut Pro 7.

I dragged all of the files from an SD card onto one of my External Hard Drives.

I open up Final Cut Pro 7, Go to Log and Transfer, Navigate to the AVCHD folder then to the BDMV folder then finally to the STREAM folder. In the STREAM folder sits all of the .mts files. They are all greyed out and I cannot Ingest them. They will not add to the Log and Transfer Window in FCP 7.

What am I doing wrong? How can I Ingest these files into FCP 7 so I can edit with them?

Thanks in Advance.

……

In addition, I also found a lot Problem about “How to importing/editing AVCHD MTS to Final Cut Pro” by Google. For example:

– Some videos are not imported to FCP

– FCP X quits/crash/not respond

– A long time transcoding when importing AVCHD to FCP 7

– MTS files without AVCHD structure could not be imported to FCP

– Can FCP ingest 1080 60p 50p AVCHD videos?

– Is there any way to avoid rendering?

– How to convert AVCHD MTS/M2TS to FCP native ProRes?

…..

Best Solution:

Transcoding AVCHD MTS to Apple Prores  (which is native formats for Final Cut Pro encoded .mov format) along with some help from the third-party software.

Required Software:

Free Download Mac AVCHD to FCP Converter

Why choose the professional Pavtube AVCHD to FCP Converter for Mac users?

1. FCP 6/7 can’t very well work in Panasonic, Sony, Canon, JVC etc. cameras  recording .mts files with H.264, MPEG, MPEG-2 codec etc. and video playing is not smooth. But the professional Mac AVCHD to FCP Converter can import various format, such as:

2. Final Cut Pro can only support under 30 frame rate.

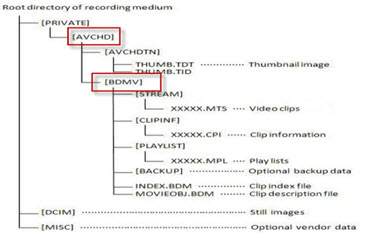
3. FCP only support into the whole folder, does not support into a single. MTS file, That means you should keep the BDMV folder within the AVCHD folder. The files shall include .cpi, .mpl, .mts or .m2ts. This will lead to software collapse, crash etc. However, Pavtube Mac AVCHD to FCP Converter can be. Below is the folder structure of the AVCHD videos on camcorder memory card.

4. This MTS Converter for Mac is a professional AVCHD to ProRes Converter on Mac Lion 10.5/10.6/10.7/10.8.

– Easy to use with fast conversion

– Output best HD quality for you with ProRes Codec that fits for Final Cut Pro well and saving rendering time, also keep original multiple audio tracks

– Provide simple video editing functions

Besides, it can work with HD videos from HD camcorders or DVs (like JVC, Panasonic, Sony, Cannon etc.) for editing in Final Cut Pro X, Final Cut Pro, Final Cut Express, iMovie, Avid Media Composer etc. Mac editing software.

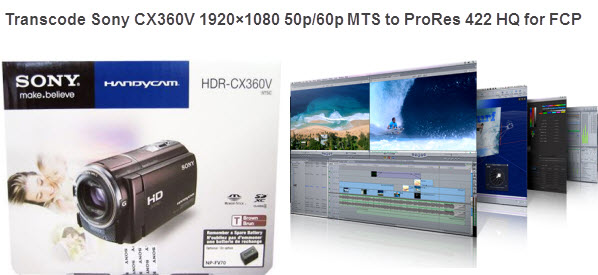
Guide: Transcode AVCHD MTS files from cameras to Apple ProRes MOV for FCP 6/7/X editing on Mac

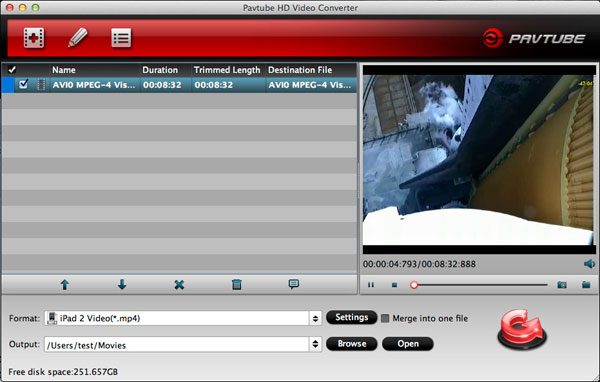
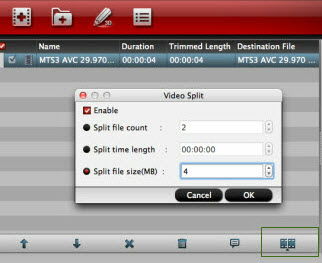
It’s considerate allowing you to directly drag and drop your camera files into the Mac app for start your MTS to FCP conversion. And also, you can click “File” or “” menu and then choose “Add Video/Audio”. If you have several MTS files and wanna merge them into one for getting a continuous file, you can check “Merge into One File” down the bottom of the main interface of the Mac AVCHD to Final Cut Pro converter.

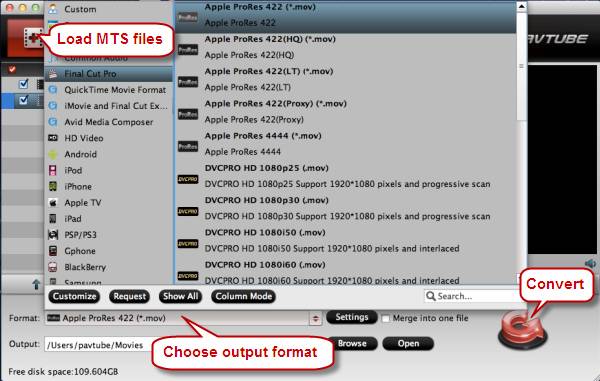
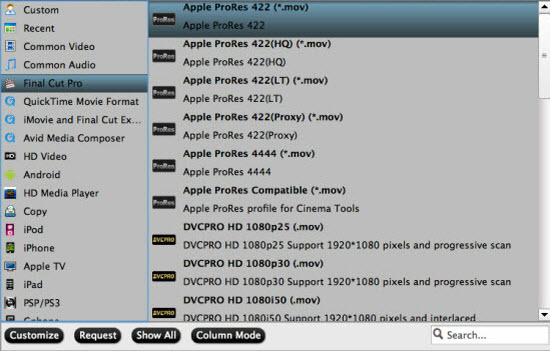
For the sake of saving your time, the MTS to FCP application provides an optimized preset for Final Cut Pro so that you can directly choose it under “Format > Final Cut Pro > Apple ProRes 422 (*.mov)” section as your output format. In addition, the smart program even offers you some helpful but easy-to-use edit functions which enable you to crop the black edge, rotate, adjust the brightness or apply cool effects to your video files.
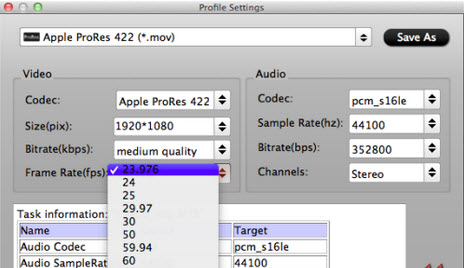
Settings” – click to set video resolution (1920×1080/1440×1080/1280×720/720×480), bitrate (from 1Mbps to 20Mbp) frame rate (24p/30p)

Press “Converter” and then the rest would be accomplished automatically. The Mac app works fine on Supported OS: Mac OS X Leopard (10.5), Snow Leopard (10.6), Lion (10.7), Mountain Lion (10.8).

So there you have it. Pretty simple. After the workflow, you can go to the output folder to find the converted video files. Now you are free to import and edit AVCHD files from cameras in Final Cut Pro 6/7/X under Mac without problems.

To learn more conversion solutions for AVCHD MTS files recorded by Canon, Panasonic, Sony cameras, you are recommended to visit MTS Column or FCP Column page.

Happy Every Day!

Share

Sep 01

Transcode DVD to ProRes MOV for FCP 7 and Burn MOV to DVD

Question:

“I am running Final Cut Pro 7 on Mac OS X Lion 10.7. From the age of 8, I would like to collect all kinds of DVDs or Blu-rays, and and some came from my friends, now I’m 20 years old, I want to extract part of the meaning from these DVD discs to Final Cut Pro X for editing, and then I can make DVD video as I want, as myself birthday gift, at the same time, also regard it as my childhood memories, a souvenir. So, is there a tool can convert movies from DVD to Final Cut Pro compatible formats? I’ve been hearing some free video converter tool and tried. However, the video quality is very bad after the conversion. Or FCP does not support the converted codec. Now, I only want a simple workflow with Final Cut Pro. Any suggestions. Thanks!”

For Mac users, Final Cut Pro 7 is really a very good tool to edit DVD movies. However, before loading DVD movies to Final Cut Pro 7 for editing, we need to do some work in advance.

As far as I know, the best compatinle video codec for working in Final Cut Pro is Apple ProRes Codec, which uses I-frame–only (intraframe) encoding, providing faster rendering and real-time playback performance, and has a generous color sample ratio and bit depth, allowing for higher-quality rendering of visual effects. So if you want to edit DVD movies in Final Cut Pro 7 without loss of quality, you may have to convert DVD to ProRes 422 or ProRes 4444 MOV under Mac OS X Lion 10.7. Here I recommend you a powerful Mac DVD to ProRes Converter – Pavtube Mac iMedia Converter, the program designed for Mac users to edit and rip DVDs to almost all other popular video and audio format.

Instructions

Mac iMedia Converter is a practical app helping you Covnert DVD to ProRes 4444 in MOV format. It supports convert Blu-ray, DVD, ISO files and 1080p cameras/camcorders footages to Apple ProRes 422, Apple ProRes 422 (LT), Apple ProRes 422 (Proxy) and Apple ProRes 4444, any of which would be nicely accepted by Final Cut Pro. It also can transcode all videos and movies to editable HD video formats for non-linear editing software like iMovie, Final Cut Express, Final Cut Pro X, Final Cut Studio, Avid, Adobe Premiere etc. The HD footage can be compressed to SD video clips for storage when you wanna save storage space.

ProRes 422 (Proxy) – For craft editing or offline editing on a MacBook or MacBook Pro.

ProRes 422 (LT) – For projects such as news, sports, and multicam events that require reduced file sizes at broadcast quality.

ProRes 4444 – For compositing and digital workflows that require the highest-possible image fidelity.

Guide: How to convert DVD movies to ProRes 4444 MOV for Final Cut Pro 7 on Mac OS X?

Free Download Mac DVD to ProRes Converter.

Step 1. Install and run this Mac iMedia Converter. Bring out your DVD disk movie, insert it into your Mac DVD Rom, click “” icon, load DVD files, you’ll see all the DVD info listed in the software.

Step 2. Check the needed chapter or titles to be transcoded, and then choose the ideal output video format. For example, you can select “Final Cut Pro” -> “Apple ProRes 4444 (*.mov)“, or “Final Cut Pro” -> “Apple ProRes 422 (*.mov)“, etc

If necessary, you can change the a/v parameters by entering into “Settings” window.


Step 3. Specify an output folder to store the final Apple ProRes MOV files, this step is optional, if you don’t set it, the final videos will be saved in the default folder.

Before transcode DVD to ProRes MOV, you can also make some simple DVD editing with the Mac iMedia Converter: Trim DVD, split DVD, crop DVD, merge DVD, effect DVD, etc.

Finally, click “Convert” button to start converting DVD to ProRes 4444 or ProRes 422.

When the conversion finishes, you can open the MOV video files, and import MOV to Final Cut Pro 7 for editing.

If you want to make fantastic video, you can refer to the article – How to burn MOV files to DVD on Windows?

Share

Sep 01

News! Samsung release Android 4.1 system Camera EK – GC100 Galaxy Camera

Samsung announces EK-GC100 Galaxy Camera with Android Jelly Bean, massive 4.8-inch display, 21x zoom, WiFi and 4G connectivity (hands-on)

During a visit to Samsung’s headquarters in Korea earlier this year, we had a chance to talk shop with company execs. The electronics maker’s existing mirrorless and point-and-shoot lineups were the primary topic of discussion, but we did catch wind of a Galaxy product possibly to come, from the camera division. A Galaxy camera? That could only mean Android, and a heavy heaping of touch and connectivity. At the time, reps admitted only that they were “considering” such a device, and declined to provide any hint as to design or functionality. And we haven’t heard a further peep, until today. As you may have gathered from recent rumors, Samsung’s Galaxy Note II is not the only product to be Unpacked this afternoon. Sure enough, the anticipated Galaxy Camera is also on order, and we have all the juicy details just past the break.

News source: http://www.engadget.com/2012/08/29/samsung-ek-gc100-galaxy-camera-hands-on/

Share

Aug 31

M2T files and FCP (X)-Transcode M2T footage to ProRes MOV for FCP 6/7, FCP X editing smoothly

Summary: The article will tell you how to transcode M2T footages to Final Cut Pro 6/7 or FCP X for editing smoothly via Mac M2T to MOV Converter.

What is M2T files?

M2T is High-definition video recording format used by many HD camcorders; commonly referred to as “HDV”; uses MPEG-2 compression to store HD video data on DV or MiniDV tapes; supports resolutions of 720p and 1080i.

There are many different digital video file types available out there, which can make file conversion difficult for the inexperienced. M2T files and MPG files are actually not completely dissimilar, as both are different types of MPEG2 video files. As a result, this is a much less complicated conversion than many other possible video conversions. If a quick file renaming trick doesn’t work, there are many conversion programs available on the Internet. I’d like Pavtube Mac M2T to MOV Converter.

The native format of HDV isn’t QuickTime, its .M2T.

Anyway, while working on my latest book, I needed to convert .M2T files to Final Cut Pro 6/7 and Final Cut Pro X compatible Formats. Apple Final Cut likes lots and lots of different files – but not .M2T.

This means that if someone captures an HDV file in another application, such as Adobe OnLocation or HDVSplit , then sends it to you, you’ll need to transcode M2T to ProRes MOV before importing M2T to Final Cut Pro (X) for editing on Mac.

Note: You can not use QuickTime Player to preview an M2T file. The Finder displays it as a generic document icon.

Download Pavtube Mac M2T to MOV Converter
.

Step 1. Install and run Pavtube Mac M2T to ProRes Converter. Copy your M2T footages to Mac, click on ““, load M2T file.

Tip: If you merge or combine various .m2t files into one file, click “Merge into one file”.

Step 2: Set Apple ProRes 422 MOV as output format.
When you’d like to specify an output format, you can choose “Format > Final Cut Pro > Apple ProRes 422 (*.mov)” as the best video format for FCP 6/7 and FCP X on Mac 10.8.

Step 3. Click “Settings” if you want to further customize video and audio parameters such as video codec, audio codec, frame rate, bit rate, video size, audio channels etc. Do not forget to click on “OK” to confirm your settings. In Export to box you could specify destination for the converted file.

Step 4. You can click “Edit” button to perform edit functions such as crop, trim, flip, effect, watermark and audio replace. To eliminate interlacing effect, simply check Deinterlacing box under Effect tab.

Tip: If you don’t want “3D effect”, please click on the pull down menu, choose “none”.

Step 5: Start converting M2T to ProRes 422 MOV for FCP 6/7 and FCP X.

Click on “Convert” button to start Conversion. The converter will generate MOV file with admirable video quality. The M2T files are HD video with huge file size, so the conversion of M2T to ProRes MOV may cost lots of time. You can set auto shutdown before conversion starts. Simply click on the “Option” menu and check the box of “Shut down computer after conversion”.

Step 6. Import converted video to FCP 6/7 or FCP Xfor editing on Mac Mountaion Lion 10.8.

After conversion you can click the “Open” button to locate converted files and load the ProRes MOV files to FCP (X). Now you are able to edit M2T footage in FCP 6/7 or FCP X freely.

Share

Aug 30

Compatible Panasonic G5 files with Mac-Especially iMovie, Avid MC and Apple Final Cut

Summary: Do you want to solve the Panasonic G5 and iMovie/Final Cut Pro/Final Cut Express/Avid Media Composer compatibility problem on Mac 10.8/10.7/10.6/10.5? This short article will tell you the most simple way, you only need to transcode Panasonic Lumix G5 1080/60p AVCHD to AIC MOV for iMovie and Final Cut Express – G5 AVCHD to ProRes 422 MOV for Final Cut Pro – G5 AVCHD to DNxHD mov for Avid Media Composer via using Mac Panasonic AVCHD Converter. Finally, you can import the converted G5 1080/60p AVCHD files to iMovie, FCE, FCP, Avid MC for editing on Mac Mountain Lion 10.8.

Panasonic Lumix G5 Introduction

Panasonic has launched the LUMIX G5 in 18th July, 2012. A new standard in digital single lens mirrorless camera image quality, with a new 16.05-megapixel Live MOS sensor; the Venus Engine VII FHD image processor; and an ISO range of up to 12,800, the LUMIX G5 provides stunning image quality, even in low-light situations. With highly precise, light speed Auto Focus and six FPS burst shooting at full resolution, you’ll never miss the perfect shot; With the in-built Electronic Viewfinder You can frame the perfect portrait with your eye close to the camera, while the 3.0-inch free-angle touch LCD screen means you can take shots from above your head and below your feet with perfect clarity.

For more information on Panasonic, its brand and commitment to sustainability, visit the company’s website at panasonic.net/

If you have got the Panasonic Lumix DMC-G5 in hand and tried to shoot with it, you will definitely be surprised by the fantanstic photo and video performance since you can get the great image quality, sharp details and excellent resolution and color production. After showing off your Full HD videos, you will be disappointed when you want to import Panasonic G5 1080p AVCHD footages to iMovie/FCP/FCE/Avid MC and find all MTS files are greyed out, which means that iMovie can not recognize your MTS files.

What causes makes iMovie/FCP/FCE/Avid MC and Panasonic G5 AVCHD does not compatible?

After testing, we found the 1080p AVCHD recordings from Lumix DMC-G5 can’t be surpported well by FCP/FCE/Avid MC/iMovie (include iMovie 8/9/11), especially 50p clips.

Firstly, the recordings with the codec H.264/MPEG-4 are highly compressed for saving storage space and smooth playback, but the H.264 files are not suitable for editing, so editing H.264 MTS files in FCP/FCE/Avid MC/iMovie is always a headaching problem for editors.

Secondly, up to now, FCP/FCE/Avid MC/iMovie can not always successfully recognize footages at 60fps. So if you want to put 1080/60p files to FCP/FCE/Avid MC/iMovie, you will sometimes meet the importing problem.

How to solve the importing problem without any loss of original quality?

To sovle the importing problem, the first thing you should know is that the Apple InterMediate Codec(AIC) is the best codec for iMovie 8/9/11 on Mac Mountain Lion 10.8, So you need a professional Mac Panasonic AVCHD Converter to convert Panasonic G5 1080p 50p/60p AVCHD to AIC MOV for editing. Here recommended the best Mac Converter – Pavtube MTS/M2TS Converter for Mac, applying which you are not only able to transcode 1080/60p AVCHD files to 1080/30p MOV files with AIC/ProRes/DNxHD codec, but also capable of combining several clips into one for easy importing/editing in iMovie/FCP/FCE/Avid MC, trimming videos, adding text/image/video as watermarks to your original files, replacing audios, adjusting brightness/contast/saturation of the imported files, etc.

Free Download Mac Panasonic AVCHD Converter

If you want to know detailed conversion step, please view:

For Final Cut Pro Users: please view “Convert AVCHD to ProRes 422 MOV for Final Cut Pro

For Final Cut Express Users: please view “Make MTS footages editable in Final Cut Express

For Avid Media Composer Users: please view “Get Avid Media Composer working with AVCHD MTS footage

Well, you can have a try.

Happy Every Days!

Share

Aug 30

Canon announces EOS C100 cinema camera, confirms October shipping for the C500

News reproduced: http://www.engadget.com/2012/08/29/canon-announces-eos-c100-cinema-camera/

Canon already gave those looking for a full-frame DSLR plenty to think about recently, and now it’s stirring up the movie-maker’s pot. It’s just announced a new member to its EOS digital cinema collection — the EOS C100 — and given us a better idea of when we can expect that C500 to land. The C100 essentially offers a new prospect for those with pockets not quite so deep. Unlike its 4K sibling, the C100 offers 1,920 x 1,080 AVCHD via its Super 35mm 16:9 CMOS sensor, has an ISO range of 320 to 20,000 and sports the EF mount system. Other features of interest include a push auto iris function, one-shot auto focus, a multi-angle 3.5-inch LCD and a locking HDMI output. The C500, meanwhile, has now been tipped for an October debut with that princely $30,000 price-tag. But, if the C100 sounds more your jive, then you can scoop one up in November for a slightly less tax-deductible $7,999. Canon also took the opportunity to offer up two new cinema lenses: the CN-E15.5-47mm T2.8 L S/SP wide-angle and the CN-E30-105mm T2.8 L S/SP telephoto.

Share
Page 34 of 37« First...1020...3233343536...Last »