AIC Converter,MTS to AIC,MTS to iMovie,MTS to FCE,MTS to Final Cut,AVCHD to AIC Converter,AVCHD to Final Cut Express,import AVCHD files to iMovie,MTS to ProRes 422,MTS to Final Cut Pro,MTS to FCP X,AVCHD and Final Cut Pro,Log and transfer MTS to FCP,edit MTS footage in iMovie,FCP transfer MTS files,transfer AVCHD files to iMovie

Dec 27

Convert Sony ActionCam XAVC S to Adobe Premiere Pro CC/CS6

Summary: The article will give you the best solution about Sony ActionCam XAVC S to Adobe Premiere Pro CC/CS6-edit XAVC S in Adobe Premiere Pro CC/CS6 in an effective way.

The Action Cam Mini from Sony is designed for capturing POV footage of adventures of all kinds. It features 1080p60 recording in the lower-compression XAVC S format at 50 Mbps. Well, for Sony AZ1 users, here comes the XAVC S to Adobe Premiere Pro incompatibility issues. Have you got XAVC S files from Sony ActionCam, and found that it is unable to import the XAVC S to Adobe Premiere Pro? Is it a Sony problem or more a problem of amateurs not understanding how to make it work?

However, when we import the XAVC S videos from Sony ActionCam to Adobe Premiere Pro for editing, the result let us down- the XAVC S footage especially in 4K are not recognized by Adobe Premiere. So what’s the available workflow for Sony ActionCam XAVC S and Premiere Pro?

To edit Sony ActionCam XAVC S in Premiere Pro CC/CS6/CS5 fearlessly, you need to transcode XAVC S to Adobe Premiere Pro more “edit” friendly codec for like MPEG-2. And based on multiple testing, Pavtube Video Converter /Mac Version is the solid tool to help users convert XAVC S to MPEG-2, which ensures the best results when using in Adobe Premiere Pro.

Hot SearchMXF files with Premiere | H.265 in Premiere | AVCHD in Premiere


Key Features of Pavtube Video Converter

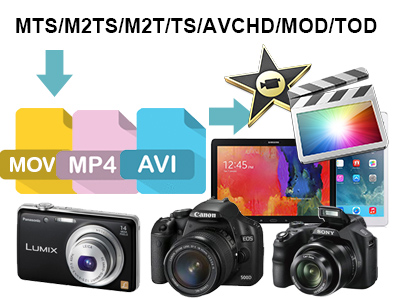
  • Three simple clicks to convert ActionCam XAVC S videos to Adobe Premiere Pro compatible formats, such as AVCHD, H.264, DV, QuickTime MOV, etc.
  • Aside from Adobe Premiere Pro, you can directly convert ActionCam XAVC S to iMovie, QuickTime, Windows Movie Maker and more video editors supported formats without additional settings.
  • Edit your ActionCam XAVC S videos before converting them. With the built-in editor, you can trim or crop your videos. And you are able to add subtitles and watermarks to the videos as well.
  • Perfectly compatible with Mac OS X 10.11 El Capitan, 10.10 Yosemite, 10.9 Mavericks, 10.8 Mountain Lion, 10.7 Lion and 10.6 Snow Leopard; Windows 10, Windows8, Windows 7, Windows XP .

How to convert ActionCam XAVC S to Adobe Premiere Pro?

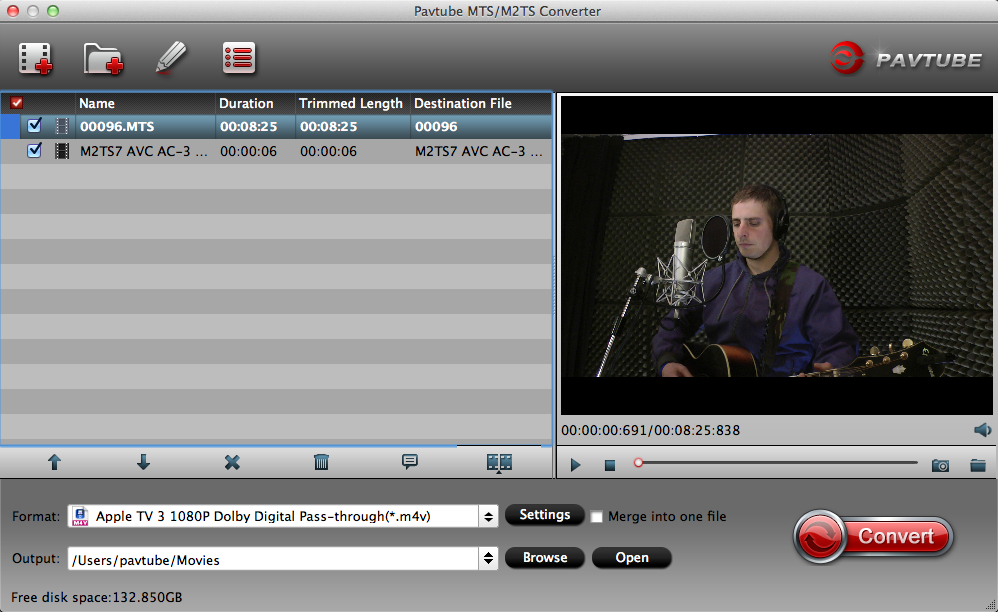
Step 1. Download, install and run the XAVC S to Premiere Pro Converter; click “Add Videos” icon to load your source XAVC S videos from Sony ActionCam.

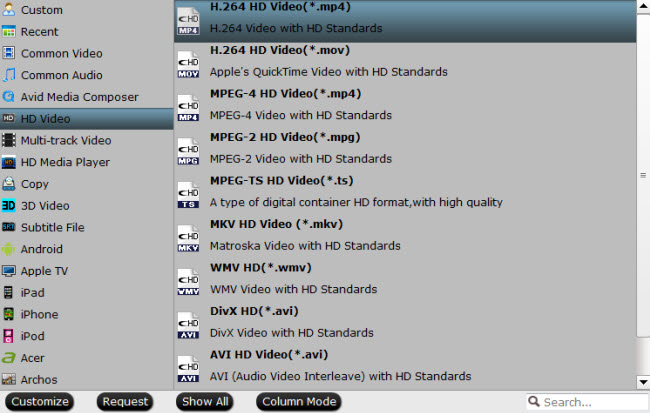
Step 2. Click “Format” pull down list to select Adobe Premiere/Sony Vegas> MPEG-2(*.mpg) as the best video format for Premiere Pro. WMV, MOV formats are the good choice as well.

Tips:
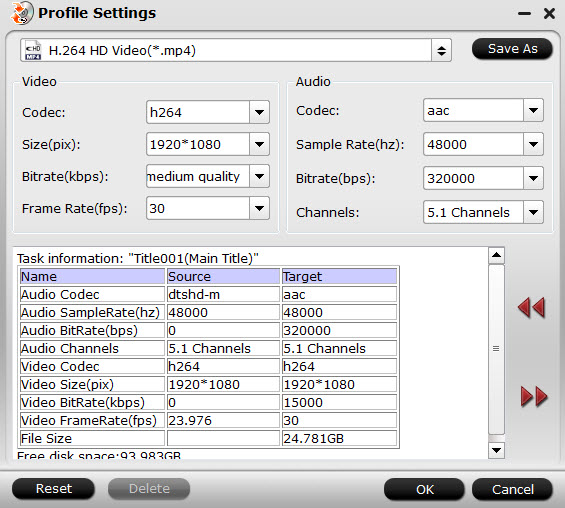
In case the default settings do not fit your requirement, you can click “Settings” button and enter “Profile Settings” panel to adjust video size, bit rate, frame rate, sample rate and audio channels.

Step 3. Hit the convert button, it will start converting Sony ActionCam XAVC S to  Premiere Pro immediately. Soon after the conversion, just click “Open” button to get the generated files for natively editing in Premiere Pro CC/CS6/CS5 perfectly.

Read More:

Share

Dec 26

MP4 to iMovie (iMovie’11 Included) – How to Import MP4 to iMovie?

Summary: The article will give you the best solution to slove the issue of failing to import MP4 to iMovie to ddit MP4 in iMovie 11/10/09/08/HD.

Why Sometimes Can’t Import MP4 to iMovie?

iMovie only supports importing MP4 formats with MPEG4/AAC or H.264/AAC data, not all kinds of MP4 formats. Some MP4 files from like Sony, Hybrid camcorders and other devices cannot be accepted by iMovie.

iMovie contains all the essential codecs to read MP4 files. Any different codecs included in audio and subtitle will cause the issue. In the circumstances, we still cannot successfully import MP4 files to iMovie.

To smoothly import MP4 to iMovie, you’d better to convert these MP4 files to iMovie totally compatible MP4 or MOV (QuickTime) formats.

Slove MP4 to iMovie issue(iMovie’11 Included)

Here, I highly recommend Pavtube Video Converter for Mac — MP4 to iMovie Converter for Mac to successfully convert MP4 to iMovie supported MP4 or MOV (QuickTime) formats.

Hot SearchAVCHD MP4 to iMovie | 4K Video to iMovie/FCE/FCP | Exporting iMovie projects in different ways


Pavtube MP4 to iMovie Converter for Mac has the following features:

  • Works on 10.11(El Capitan), 10.10(Yosemite), 10.9(Mavericks), 10.8(Mountain Lion), 10.7(Lion), 10.6(Snow Leopard), or Mac OS X v10.5(Leopard);
  • Except Converting MP4 to iMovie, Faasoft MP4 to iMovie Converter for Mac also supports nearly all kinds of video formats like MOV, AVI, WMV, MPEG, FLV, MKV, OGV, 3GP, MXF, WebM, AVCHD, MTS, M2T, M2TS, TOD, SWF, MVI, ASF, MOD, XAVC to iMovie;
  • Acts as an inbuilt editor: trim, crop, merge files into one, split by chapter, rotate, adjust sound volume, add or remove subtitles, add effect/watermark to video files, adjust video/audio bitrate, codec, channels, frame rate, sample rate, resolution, aspect ratio and etc.

Step by Step Guide to Convert MP4 to iMovie

Step 1 Add MP4 to Pavtube MP4 to iMovie Converter for Mac

Launch the program on your Mac, add MP4 files to the program by clicking the “Add Video” or “Add folder” button, or just simply drag and drop MP4 that you want to convert to the main interface of program.

Step 2 Set output format

From “Format” drop-down option, choose the output format according to your own preference, for iMovie editing, select “iMovie and Final Cut Ex…” > “Apple Intermediate Codec (AIC)(*.mov) to output.

Step 3 Convert MP4 to iMovie

Click the big “Convert” button of to start MP4 to iMovie conversion.

When the conversion finished, click “Open Folder” to get the converted files. Then start your iMovie, and choose “File” > “Import” > “Movies”. You can freely drag the converted MP4 files to iMovie.

Read More:

Share

Dec 22

MTS to MP4 Converter – How to Convert MTS/M2TS to MP4 on Mac

Summary: This article mainly concerns how to convert AVCHD video to mp4 format with shortest time and best preserved HD quality. By assistance of versatile AVCHD to MP4 converter software you can freely convert video from AVCHD to MP4 format. Moreover, you can even get enhanced video quality in extraordinarily short time.

Why Convert MTS/M2TS to MP4?

As we all kwon, MTS or M2TS are file extension for AVCHD video clips which is adopted by most HD cameras, like Panasonic Lumix DMC Series, Canon HG10, Sony Alpha NEX series, etc. MTS or M2TS file conversions to MP4 format is recommended for two main reasons. For one, MP4 is used widely on most of the popular portable devices. Secondly, MP4 offers high quality videos even though it has a smaller file size.

All in all, in order to play MTS/M2TS files more widely, converting them to MP4 is the wisest and easiest method.

If you want to convert your MTS files to MP4, you can find many free programs online. After finding a program, you can download and save the installation file to your computer. Next, open the folder with the conversion program, click on the installation file and follow the instructions on the screen. The conversion process could take a few hours or minutes to complete, depending on the length and size of the movie file.

With Best MTS to MP4 Converter

Working as a professional and powerful MTS to MP4 Converter, Pavtube MTS/M2TS Converter / Mac Version will help you convert MTS to MP4 or M2TS to MP4 just as easy as a pie. Better still, this wonderful MTS to MP4 Converter has both Mac OS X (Yosemite included) and Windows (windows 10 included) version.

Main Features of Pavtube MTS/M2TS Converter

  • Convert MTS/M2TS to MP4 to play MTS/M2TS in iTunes, iPad, iPhone, iPod and Apple TV;
  • Convert MTS/M2TS to MP4 to play MTS/M2TS in QuickTime or edit MTS/M2TS in iMovie and Final Cut Pro;
  • Convert MTS/M2TS to MP4 to play MTS/ M2TS in Android, BlackBerry, Xbox 360, PS3, Windows Phone, Samsung Galaxy, portable media player and more;
  • Convert MTS/M2TS to MP4 to upload MTS/M2TS to some video websites to share your video with your friends, family and more people;
  • Convert MTS/M2TS to MP4 while optimize MTS/M2TS like trim, crop, merge, rotate, add effect/subtitle/watermark/background music, change audio channel, adjust volume/bitrate, remove subtitle, etc;
  • Also supports converting MTS/M2TS to almost all other popular video formats like AVI, WMV, MOV, MKV, FLV, ASF, WebM, DV, RM, 3GP and more;
  • Besides, it enables to extract audio from MST/M2TS to save as MP3, WAV, AAC, AC3, M4A, ALAC, AIFF, CAF, DTS, AU, etc.

         
Other Download:
– Pavtube old official address: http://www.pavtube.com/mts-converter-mac/
– Amazon Download: http://www.amazon.com/Pavtube-MTS-M2TS-Converter-Download/dp/B00QIE3U0Y
– Cnet Download: http://download.cnet.com/Pavtube-MTS-M2TS-Converter/3000-2194_4-76177029.html

How to Convert MTS/M2TS to MP4

Step 1 Import MTS/M2TS to the program

Click “Add File” button of this MTS to MP4 Converter to import MTS/M2TS files to the program. It also allows you to drag and drop MTS/M2TS file to the main interface to load MTS/M2TS in double-quick time.

Tips: This App supports to batch convert MTS/M2TS files. Just drag and drop the folder where MTS/M2TS files are to the interface of the software and then follow step 2 and step 3, and you will convert MTS/M2TS to MP4 in batch mode.

Step 2 Set MP4 as output format
Click “Profile” drop-down button of this program to select “MP4 MPEG-4 Video (*.mp4)” as output format from “General Video” category.

Tips: Choose the output formats as you desire from different categories for different devices and players.

Step 3 Convert MTS/M2TS to MP4

Click “Convert” button to start converting MTS/M2TS to MP4 right away. Check “Open” bottom to get the converted MP4 file will be saved to the folder where the source MTS/M2TS clips are.

Conclusion

Now, just enjoy MTS/M2TS files on your iPhone, iPod, iPad, PS3, Xbox 360, Android and more portable devices or players without any hassle.

Read More:

Share

Dec 21

Exporting GoPro Cineform MOV files from GoPro Studio to Premiere/Avid/FCP

Summary: As a smart video editor, GoPro Studio provide a simple way to edit GoPro, Canon and Nikon video, however, so many people are still confuses on how to get MOV footage export from GoPro Studio and then import to Premiere/Avid/FCP for further editing, here we give the solution, about the GoPro Studio itself and the best support video footage for GoPro Studio export MOV footage into Premiere/Avid/FCP.

About GoPro Studio

Here I would like to show some more details on GoPro Studio, for the Canon, Nikon users, for whom interested in GoPro Studio.

GoPro Studio software makes it easier than ever to create professional-quality videos with your GoPro content. It would take taken your most popular videos and turned them into GoPro Edit Templates that help fast-track you to an incredible edit. The music, edit points, slow motion effects and more have been dialed—all you have to do is replace our video clips with yours. Or if you want to create your edits from scratch, you can do that too. Trim and mix clips. Adjust video playback speed for fast or slow motion. Add titles, music, audio tracks and more. It’s never been easier to make epic GoPro-style videos to share with your friends.

Exporting GoPro Cineform MOV files Premiere/Avid/FCP

Although powerful the GoPro Studio is, you have satisfied with the GoPro Studio, you would like to further edit the video clips in Premiere/Avid/FCP, now you just want to search for a professional video tool can help you import all the video exported from GoPro Studio into Premiere/Avid/FCP. We all know that every NLEs has the best compatible importing and editing format. For Avid, the best compatible format is DNxHD, if you want to edit the GoPro Studio exported MOV video in Avid smoothly, you just need to change the original video format into DNxHD. The same to FCP and Premiere, you need to change the original video format into Apple ProRes for FCP, or MPEG-2 for Premiere. Here you come to the right place, a professional video tools are recommended for you. Pavtube Video Converter for Mac(read the review), it can convert GoPro Studio exported MOV video into the right target format for each NLEs.

Hot Search4K Ultra HD with Premiere Pro CC | QuickTime Files to Avid | 4K Video with FCP X

In face, Pavtube Video Converter can convert almost all video and audio formats from one to another, including MOV, MP4, M4V, AVI, WMV, MKV, MPG, TiVo, MTS, M2TS, MXF, RM, RMVB, FLV, etc. With this Video Converter software, you can also enjoy your favorite video on almost all popular portable devices anywhere and anytime, like iPad, iPhone, iPod, Apple TV, Galaxy Tab, Samsung Galaxy S4, Kindle Fire, and more.

Exporting GoPro Cineform MOV files from GoPro Studio to Premiere/Avid/FCP 

Step 1: Input video files.

From “File” drop-down menu, select “Add Video/Audio” to import files to the software for conversion.

Step 2: Select output file format.

Click “Format”bar, from its drop-down list, select “Final Cut Pro”> “Apple Prores 422(*.mov)”as your desired output file format.

Or from “Format” drop-down panel, select “Avid Media Composer” > “Avid DNxHD (*.mov)” as the output file format for editing with Avid editing programs.

Or click “Format” bar, from its drop-down list, select “Adobe Premiere Pro/Son…” > “MPEG-2 (*.mpg)” to output for editing with Premiere Pro CC.

Step 3: Transcode files to Premiere/Avid/FCP compatible format.

Carry out video to Premiere/Avid/FCP Conversion process by clicking the right-bottom “Convert” button.

When the conversion is over, click “Open” on the main interface to locate the converted files to transfer and import into the Premiere/Avid/FCP without any problem.

Related program:

Pavtube Media Magician / Mac Version: A nice camcorder assistant manager, lossless camcorder video joiner, MTS/ M2TS/ MXF/ MOV/ MKV/ TiVo/ WMV/ AVI/ MPG converter and editor. Meamwhile it supported upload edited video to YouTube directly.

Read More:

Share

Dec 18

How to Edit Panasonic Lumix DMC-CM1Smartphone 4K Camera Recorded Videos in FCP?

Summary: Here we got the newest information of Panasonic Lumix DMC-CM1smartphone and it’s 4K camera, and then give you the solution about how to edit it’s video in the FCP.

Panasonic Lumix DMC-CM1Smartphone and It’s 4K Camera
It’s been quite some time since Panasonic was a big name in the smartphone space, but the Lumix DMC-CM1, which was first announced at Photokina 2014, certainly is an appealing mobile device, especially to mobile photographers.

That said, the CM1 and its spec sheet, it is quite hard to tell if this is a smartphone that puts a lot of emphasis on its camera or a digital camera with some bolted-on communication components.

Focus, aperture, shutter speed, ISO and white balance can all be adjusted manually via a mechanical click-wheel around the lens ‘barrel’ and the CM1 is also capable of recording 4K-video and Raw images.

With its impressive camera specification and unusual design the Panasonic Lumix DMC-CM1 is the closest thing we have seen to a true hybrid device and a unique product in the current marketplace.

What is Final Cut Pro?

Final Cut Pro on the other hand, focuses on more technical features, which clearly aim to a professional market. It once started as Macromedia’s effort to create the best professional tool for video editing which later continued to be developed by Apple itself. And they have quite made it. Yes, Final Cut Pro offers a collection of video effects, titles, animations, audio presets and others like iMovie does but much wider and with a superior quality. Also, you will find the capability to extract video from your devices or media easily, only in Final Cut Pro, you will be able to import simultaneously from several of them, or even create a common video source to share with your teamwork on a server, making it the most robust software to exploit the higher-end Mac’s potential.

Multi-cam support for syncing up to 64 simultaneous shots from different cameras, background rendering for your project to be processed as you work rather than after hitting export, professional coding and export options, color, video and audio correction, XML metadata support and many more are exclusives on Final Cut Pro that make it the most complete solution even for a full-lenght movie.

How to Edit Panasonic Lumix DMC-CM1 4K Video in FCP?

The Lumix DMC-CM1 professional captured 4k video in MP4 (MPEG-4 AVC/H.264) format, which is not a native editing codec for Final Cut Pro X. In addition, the 4K video footage compressed with MPEG-4 AVC/H.264 will still have big file size, it will take a lot of time for Final Cut Pro to render those 4k videos.

Hot Search4K Video to FCP X | 4K to FCP 6/7 | AVCHD to iMovie/FCE/FCP

You can perform Lumix DMC-CM1 4K video to FCP Apple Prores transcoding process on Mac OS X El Capitan with Pavtube HD Video Converter for Mac, the program allows you to output different types of Apple Prores Codecs, if you computer is old or slow, or you just want to do some rough editing, you can select to output “Apple Prores Proxy)(*.mov)”or “Apple Prores (LT)(*.mov)”format to save more space and bandwidth. However, if your computer are powerful enough to handle multicam and high-resolution video and you are going to do many effects editing work with FCP X, you’d better choose to output “Apple Prores 422(*.mov)”or “Apple Prores 422(HQ)(*.mov)”for better performance.


Other Download:

Step 1: Add Lumix DMC-CM1 4K files.

Click the “Add Video” button or “Add from folder” button to import source Lumix DMC-CM1 4K files to the program. You can join multiple video clips at one time.

Step 2: Choose output file format.
Click the “Format” bar and select “Final Cut Pro” > “Apple Prores 422 (*.mov)” as output format. If your Mac is a little old or slow, you can choose to select “Apple Prores 422 (LT) (*.mov)” or “Apple Prores 422 (Proxy)” to save your bandwidth, if your computer is fast enough or you wish to do some high performance editing work, “Apple Prores 422 (HQ) (*.mov)” or “Apple Prores 422 (*.mov)” is more preferable.

Step 3. Compression 4K video to 1080p.

On the main interface, click “Settings” to open “Profile Settings” window, from “Size(pix)” drop-down selection, choose “1920*1080” to downscale 4K video to 1080p for editing with Final Cut Pro 7 or its previous version.

Step 4. Convert Lumix DMC-CM1 4K to Apple Prores.

Click the “Convert” icon under the preview window, it will start to convert Lumix DMC-CM1 4K video to FCP supported 1080p Apple Prores format.

After the conversion, launch Final Cut Pro, choose File > Import > Files…, locate and find the folder where you save the converted Lumix DMC-CM1 4K clips. Then start editing Lumix DMC-CM1 4K  video in FCP X/7/6 with no difficulty.

Read More:

Share

Dec 15

Handbrake alternative: convert MTS files for Mac

Handbrake, the cross-platform, easy-to-use video ripping and encoding tool, took the top spot by a wide margin, with close to 70% of the overall vote. Those of you who praised it noted it’s availability on multiple platforms, its ease of use and presets for quick conversions (as well as its more detailed options for advanced users), and its speed.

At Times you need best HandBrake alternative software to achieve better MTS/M2TS Video conversion, and Pavtube MTS/M2TS Converter are recommended best HandBrake Alternative. There are plenty of reasons that make MTS/M2TS Video Converters surpass other competitive HandBrake Alternatives, even go beyond HandBrake itself. If your videos are a mish-mash of video types and formats, you’ll need a it to make them play on any device, anywhere you go.

For competing with other so-called Best HandBrake Alternatives, Pavtube MTS/M2TS Converter families bring about the possibility of cross-platform. They are capable of running smoothly upon Mac OS X Tiger, (Snow) Leopard, (Mountain) Lion, Mavericks, Yosemite, El Capitan, as well as Windows XP, Vista, Win 7/8/10 (32 & 64 bit). So you do not need to worry about which OS your computer running on.

As mentioned before, Handbrake only compatible with MPEG video as input and MPEG-4, MKV container format videos as output (with the issuing of HandBrake 0.10.2, they generously omitted AVI and Xvid videos, which still used by users in a large portion). Best HandBrake Alternative for video converting software can satisfy all you HD/SD video converting needs (even you want to convert HD camcorder video and Website video).

Key Features of Handbrake alternative: convert MTS files for Mac

An excellent MTS/M2TS/M2T/TS/AVCHD/MOD/TOD Converter

1. Fully support AVCHD/AVCHD Lite footage

Convert interlaced/progressive AVCHD/AVCHD Lite files at resolution of 1920*1080, 1280*720, and 1440*1080.

2. Various output video formats supported

Output multiple video formats such as H.264/MPEG-4, DivX, XviD, MKV, MP4, AVI, MPEG, WMV, FLV, SWF, F4V, MOV, Quick Time HD Video (*.mov), WMV HD Video (*.wmv), etc.

3. Video conversion for better editing in NLE programs

Ouput Apple ProRes for Final Cut Pro, Apple InterMediate Codec for iMovie/Final Cut Express, DNxHD for Avid Media Composer, etc.

4. Multiple mobile devices for end use

You’re free to enjoy output videos on devices such as Apple products, Android tablets/smartphones, game consoles, media players, Windows Phone 7/8/8.1 or later version, etc.

Powerful editing functions

1. Trimming & cropping

Accurately trim the video clip you want to keep, and cut off unwanted areas. The design of an original preview window and an output preview window allows you to carry out precise video editing.

2. Remove/Replace the original audio track

Need to process the original audio track? With Pavtube MTS/M2TS Converter for Mac, you’re allowed to remove the original audio track or replace with a new one.

Add text/image/video watermark

You can add watermarks in text, image and video to the original video file for better enjoyment. The video watermark can realize picture-in-picture effect.

Other warm-up functions.

1. Setup output parameters

Allows you to change parameters for your video file in case you’re satisfied with the default parameters.

2. Merging & Splitting

You can merge several video files into one and video splitting according to file count, time length, or file size is also possible.

3. Video image snapshot

You can take a picture of your favorite video image from your video file for purposes such as wallpaper and editing elements.

Click the button given below to get a free trail and Getting started with Handbrake alternative: convert MTS files for Mac:


You can click and visit the How to page when you need some more guide or some more information about this Handbrake alternative software.

Related program:

Pavtube Video Converter / Mac Version: An all-in-one program integrating conversion and editing 4K videos, 1080p/720p MKV, MXF, M2TS, etc.

Pavtube HD Video Converter / Mac Version: It is designed for converting HD videos from HD camcorders or DVs (like JVC, Panasonic, Sony and Cannon), non-protected HD or movies, DVR files (*.tivo) to other file types for playback on popular media devices like Apple TV, PS3, Xobx, Xobx360, WD TV HD Player.

Pavtube Video Converter Ultimate /iMedia Converter(Mac Version): An all-inclusive converter to complete 2D/3D Blu-ray, DVD, ISO, SD/HD/4K Video to m3u8, H.265 MP4, do H.265 to non-H.265 conversion on Mac OS X El Capitan.

Pavtube MXF Converter / Mac Version: can handle MXF/MXF footage produced by Canon, Sony and Panasonic camcorders and convert MXF video files to various video format supported by popular devices such as iPad Air/4/3, iPhone 5S/5C/5/4S/4, Apple TV 3, Google Nexus, Samsung Galaxy Tab S/3/2, Samsung Galaxy S5/S4/S3, Surface RT/Pro, PS4/PS3, WDTV, etc.

Pavtube MTS/M2TS Converter / Mac Version:The best MTS converter on the market, which can convert MTS videos and other HD formats to FCP X Apple ProRes codec MOV format, or convert MTS to Avid Media Composer/Adobe Premiere Pro/iMovie native supported video format.

Pavtube Media Magician / Mac Version: A nice camcorder assistant manager, lossless camcorder video joiner, MTS/ M2TS/ MXF/ MOV/ MKV/ TiVo/ WMV/ AVI/ MPG converter and editor. Meamwhile it supported upload edited video to YouTube directly.

All the related program will be only $9.9 on FB PROMOTION on Dec 28, 2015, Only 3 Day. Catch this big discount on that day!

Share

Dec 10

How to Import and Edit Christmas Party Video in iMovie

Summary: The Christmas bell has rung, but you were not happy at all. Best of failed to import the Christmas party in iMovie, not even to mention give all of your friends a surprise with vivid video clips after add effects. So you have come the right place, here I give the solution of editing all kinds of camcorder video in iMovie smoothly. 

As the most important part of the Christmas Party, recording with a camera become the symbol of fashion. However, all the happy time is always short, you want to memorize the happy moving moment with your camcorder, you are not happy any more when you have problems of importing the Christmas video clips into iMovie.

No matter what kind of the video format of your recorded video, such as AVCHD, XAVC/XAVC S, MXF, MTS AVCHD, MOV, MP4, MVI, etc. It is good at storage into SD card but not friendly with iMovie.

As we all know that like other professional non-linear video editing program, iMovie also has its own native editing codec – Apple Intermediate Codec (AIC), which is specially designed for nonlinear editing and complex multi-generation composing in post production. To create iMovie Apple Intermediate Codec editing codec, you can download Pavtube HD Video Converter for Mac(read the review), a professional Mac video decoder to beneficially encode all kinds of your Christmas Party recorded video to iMovie optimized Apple Intermediate Codec.

Hot SearchXAVC S with iMovie | Halloween Theme Songs in iMovie | MP4 with iMovie

Moreover, Pavtube Video Converter for Mac also allows you to customize profile settings to get a desired and better output. Movie creation with this program is no big deal. You can edit your video files by trimming, cropping, attaching external subtitles, adding watermarks, change video effect, etc

By the way, if your are a one hundred percent Windows user, please turn to Pavtube HD Video Converter. It has the same ability as Mac version.


Other Download:

Related program:

Pavtube Media Magician / Mac Version: A nice camcorder assistant manager, lossless camcorder video joiner, MTS/ M2TS/ MXF/ MOV/ MKV/ TiVo/ WMV/ AVI/ MPG converter and editor. Meamwhile it supported upload edited video to YouTube directly.

How to Get iMovie to Work with Christmas Party video on Mac?

Step 1: Add Christmas Party video files.

Launch the program on your computer, add Christmas Party files to the program by clicking the “Add Video” or “Add folder” button.

Step 2: Choose output file format.

From “Format” drop-down option, choose iMovie best compatible editing format from “iMovie and Final Cut Ex…” > “Apple Intermediate Codec (AIC)(*.mov).

Step 3: Start the conversion process.

After all the setting is over, go back to the main interface and hit right-bottom “Convert” button to start Christmas Party footage to iMovie AIC conversion process.

After the conversion, following the steps in the following articles to Import Media Files (Video/Audio/Photo) to iMoviefor fast and fluid editing.

Read More:

Share

Dec 09

Best Way to Memory the Christmas Video on your phones?

Summary: Christmas is nearer and nearer, and you want to memory the moving part on your phone so that you can watch it any time when you missing a person at time. Here we show you how to memorize the moving video clips with your phone, especially transfer the camcorder video to your phone with high definition.

Of course, the best and easiest way is to recording the Christmas video with your phone itself if your phone has a powerful digital camera such as iPhone 6s(plus) or Samsung Galaxy s6, and your phone has the enough storage to handle or keep the video.

The second method is to transfer the camcorder recorded high definition video to your phone with playback smoothly. Here comes the question, not all the camcorder video codec are compatible with your phone and it always failed to transfer no matter how hard you try. In this case, you need to convert the camcorder video format such as XAVC/XAVC S, AVCHD, MXF,MOV, MTS,ect. to your phone, for example, the h.264 .mp4 for Samsung brand phones, the .mov format for Apple devices.

Here the Pavtube Video Converter / Mac Version can make it easily. This program allows you to convert video types such as SD videos, HD footages from camcorders as well as TiVo/DVR recordings to almost any audio/video format for free entertainment on mobile devices, HD media players, as well as free access to video editing software.


Steps of How to Convert Camcorder HD/4K video to Phones 

Step 1: Import Camcorder HD/4K video.

Download and install the program on your computer. Get it running and click “File” > “Add Video/Audio” or “Add from folder” to import Camcorder HD/4K video files to the program.

Step 2: Choose output file format.

Click the format bar to follow “HD Video” > “H.264 HD Video (*.mp4)” or “MPEG-2 HD Video (*.mpg)”, or “MKV HD Video (*.mkv)”, or “WMV HD (*.wmv)” or “DivX HD (*.avi).” Or you can choose the format depends on your devices from the Android, Apple devices and other brand devices.

Step 3. Adjust settings before converting.

Click “Settings” near the format bar to go to “Profile Settings” interface where you’re allowed to change parameters like bitrate, frame rate, sample rate, and audio channels according to your requirements.

Step 4: Start Camcorder HD/4K video conversion process.

Hit right-bottom “Convert” button to start to convert Camcorder HD/4K video phones supported format conversion process.
When the conversion is completed, you can transfer the converted purchased or downloaded top Christmas movie to the portable device via USB or add the converted files to iTunes library, then sync files from iTunes to Apple Devices.

Read More:

Share

Dec 08

Top MTS/M2TS Converter Review–Smoothly Edit MTS/M2TS Files

Summary: You had looking for a top MTS or M2TS video converter for edit your camcorder video which record videos in MTS/M2TS codec since you have Christmas holidays soon and you want memorize the moving moment in the holiday party.

MTS and M2TS are file extensions for AVCHD, the HD digital video camera recorder format, and they support 720p and 1080i HD video formats. They all play in great quality in 1080i direct on the PC or to a Sony TV using composite video or HDMI. MTS and M2TS files are all forms of MPEGs, Ted.

But they are lightly distinguishing. According to Wikipedia, HD cameras record mts but export as m2ts. The file extension of AVCHD video is “MTS” on camcorder that contains raw footage and will become “M2TS” if imported to computer. MTS is the format not collected by specific software, and will change into the video file with “m2ts” as the file extension after collection.

Both MTS and M2TS files can be accepted by Windows Media Player, VLC, as well as Apple’s Final Cut Pro by using the AVCHD plugin in the Log and Transfer window. Daminion Media Management Software also allows importing and managing .MTS & M2TS files. If needing to play, watch or edit MTS or M2TS files on many more programs, one may have to seek to a MTS/M2TS converter.

Pavtube MTS/M2TS Converter/Mac version will be your best choice,both have the ability of handling 2D/3D MTS/M2TS/M2T/MOD/TOD/TS files and you’ll get common video formats such as AVI/WMV/MP4 for free playback. In addition to AVI/WMV/MP4, Pavtube MTS/M2TS Converter can also output various video formats supported by iDevices, Android and Windows tablets/smartphones (including iPad/iPhone, Google Nexus 7, Kindle Fire HDX, Samsung Galaxy Tab 3/Galaxy Tab S/Galaxy S5, Surface Pro 3 and so on.), editing programs (such as Avid Media Composer, Avid Xpress Pro, Adobe Premiere Pro, Adobe After Effects CS6, Adobe Creative Suite 6, Cyberlink PowerDirector, DaVinci Resolve, Magix Movie Edit Pro, Kdenlive, Keynote, Sony Vegas, Windows Movie Maker…), game consoles, media players, etc.

As an excellent video converter, Pavtube MTS/M2TS Converter also allows you to adjust video size, bitrate, frame rate, codec and other video/audio parameters according to your need. It is a perfect combination of video converter and video editor.

So don’t hesitate to choose the right version(since all of our softwares are platform-independent ones but not cross-platform.) and get one for your Christmas holiday. Get the details and tutorial please feel free to click here.


Windows version please click http://www.multipelife.com/mts-converter and go to visit our offical website, I am sorry I lost the windows purchase button.

Share

Dec 07

What Should I Get Her(TV girly) for Christmas?

Summary: Christmas is coming, do you still worry about to choose a good present for her, here we give the gift for you to enjoy her.

If you want to be a good (or better) influence in her life, I would recommend taking her on outings with you– day trips to a library, a zoo (as mentioned), an activity centre (like the YMCA for example– you could attend a class, go for a swim), and lastly a department store, to get an idea of what she likes and has interest in, as well as provide exposure to more things/people/ideas she could develop an interest in.  You will get a better idea of what she wants for Christmas by asking her directly (and whether or not you decide to buy it for her will be up to you– it may or may not be within your budget or appropriate– that’s a call only you can make), but you will get more clues about what she likes by going on these outings with her, and they will enhance both of your lives.

I’d take a new look at her interests instead of dismissing them. For example:

Someone who likes watching TV might have a desire and a talent for the performing arts. Maybe she could look into taking acting or singing or dancing lessons, and get involved in theatre productions. She could BE in shows instead of watching them. Learning how to get up in front of people and perform is a skill that translates into other fields as well. There are also other career avenues in the performing arts that are not performance related as well she could look at: cameraman, director, producer, sound production, makeup, etc.

Depending on your budget, you could ask her what she would like to do together, encourage her to try doing something new, as your Christmas gift to her. Now that she was interested in movies and TV, why not give her a gift enable she can be watch the TV shows and movies in any time and anywhere?

Here Pavtube give the special offer in the Christmas promotion, we pick Pavtube Video Converter / Mac Version as example, it is an easy-to use, functional video converter and video editor, enables you convert multiple audio and video sources to the desired audio/video format. This program allows you to convert video types such as SD videos, HD footages from camcorders and TiVo/DVR recordings to almost any audio/video format for free entertainment on mobile devices, HD media players, as well as free access to video editing software.

You can also realize her movie director dream with the built-in video editor. Make personal video by trimming, cropping, adding text/image/video images, inserting SRT/ASS/SSA subtitle into source video, etc.

Don’t hesitate to get it as the Christmas gift for her, once you purchase you will get upgrades free for lifetime. The only thing you should remember is choose the right version from Windows version or Mac version.


If it is not the one you like please click and go to Pavtube Studio or the recommend list below to choose the one you want.

Pavtube HD Video Converter / Mac Version: It is designed for converting HD videos from HD camcorders or DVs (like JVC, Panasonic, Sony and Cannon), non-protected HD or movies, DVR files (*.tivo) to other file types for playback on popular media devices like Apple TV, PS3, Xobx, Xobx360, WD TV HD Player.

Pavtube Video Converter Ultimate /iMedia Converter(Mac Version): An all-inclusive converter to complete 2D/3D Blu-ray, DVD, ISO, SD/HD/4K Video to m3u8, H.265 MP4, do H.265 to non-H.265 conversion on Mac OS X El Capitan.

Pavtube MXF Converter / Mac Version: can handle MXF/MXF footage produced by Canon, Sony and Panasonic camcorders and convert MXF video files to various video format supported by popular devices such as iPad Air/4/3, iPhone 5S/5C/5/4S/4, Apple TV 3, Google Nexus, Samsung Galaxy Tab S/3/2, Samsung Galaxy S5/S4/S3, Surface RT/Pro, PS4/PS3, WDTV, etc.

Pavtube MTS/M2TS Converter / Mac Version:The best MTS converter on the market, which can convert MTS videos and other HD formats to FCP X Apple ProRes codec MOV format, or convert MTS to Avid Media Composer/Adobe Premiere Pro/iMovie native supported video format.

Pavtube Media Magician / Mac Version: A nice camcorder assistant manager, lossless camcorder video joiner, MTS/ M2TS/ MXF/ MOV/ MKV/ TiVo/ WMV/ AVI/ MPG converter and editor. Meamwhile it supported upload edited video to YouTube directly.

Share
Page 7 of 37« First...56789...2030...Last »