AIC Converter,MTS to AIC,MTS to iMovie,MTS to FCE,MTS to Final Cut,AVCHD to AIC Converter,AVCHD to Final Cut Express,import AVCHD files to iMovie,MTS to ProRes 422,MTS to Final Cut Pro,MTS to FCP X,AVCHD and Final Cut Pro,Log and transfer MTS to FCP,edit MTS footage in iMovie,FCP transfer MTS files,transfer AVCHD files to iMovie

Dec 04

Why are a Mac and FCP the best for video editing?

No matter Windows or Mac, you always can edit video smoothly 

Summary: Which editor should you choose to edit video? Mac or Windows computer can do the work better? May be you puzzled by the problem for a long time. From now on, depend on this article, you have no confuses on editing video any more.

Generally speaking, video editing work can be done on either Mac or Windows computer in any portable editor, however, people always hope can got one of the best methods to handle the issues. Almost people think that Mac and FCP would be the best for video editing. Indeed, in some aspect it should be absolutely right.

What I mean is, an average Windows computer cost around $500. It has basic configuration to do basic stuff. But Macbook usually starts with $1000. Now if you charging double, then people will defiantly expect a powerful system. Right ? This is why MACs are better in video editing and overall more stable then Windows. Thought it lack the gaming part.

Well, for Windows users, FCP ain’t their cup of tea. But, AVID has always been industry standard and now Premiere is catching up too.
FCP 7 was the best in the Final Cut Pro era, but unfortunately with FCP X and it’s very close relation to iMovie made it an amateurish software. And, FCP’s userbase is steadily declining when Adobe is making their software cheaper and better while Apple is still building on the failed idea.

Then again, AVID and Premiere works on both Windows and Mac. FCP is like the “Do what I say” kind, while as Avid and Premiere is “I am yours master”. That said, you can do the same thing on any Windows computer. Simply make a custom $1000 PC with powerful CPU and install Adobe premier pro. It will do the same job as FCP running on Mac.

You cannot just say FCP and Mac are the best combo, if you importing all the best supported format for each editor, such as the Apple ProRes for FCP, MPEG-2 for the Premiere, or the DNxHD for Avid, Windows or Mac with the editor running smoothly would be able to do editing work smoothly.

Here is a professional video converter for you, named Pavtube HD Video Converter for Mac(read the review), it can convert any video for every editor best suitable format for smoothly editing. So here comes the problem: how to import video to any editor no matter Windows or Mac version?


Other Download:

Here choose Mac version as example, Windows version has the same ability as Mac version. Please choose the right version for you.

Windows version please turn to Pavtube HD Video Converter.

Here give the step by step tutorial of how to convert any video to the best suitable format for whatever editor with few simple click.

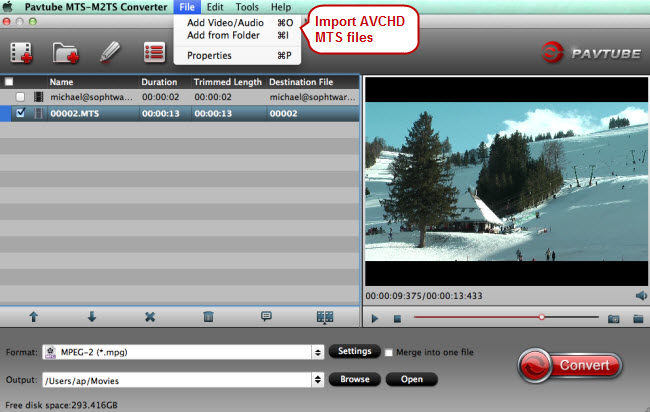
Step 1: Import video to the program.

Transfer the footage to local Mac hard drive, then input the files from your local to the program.

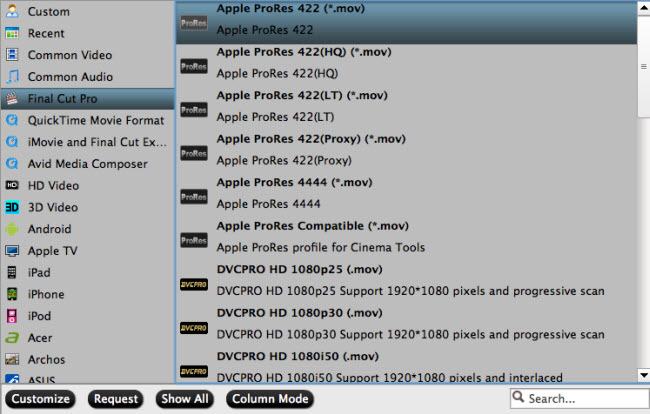
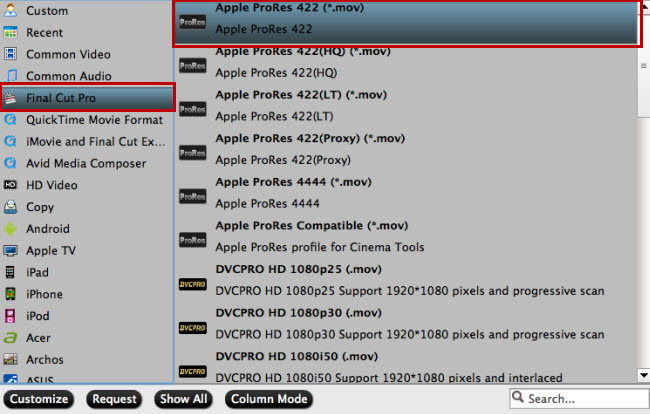
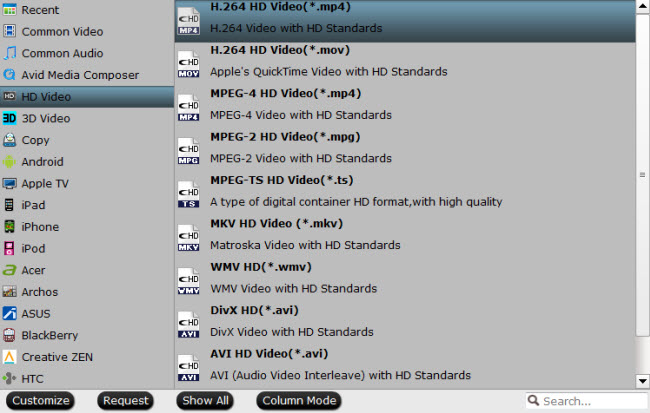
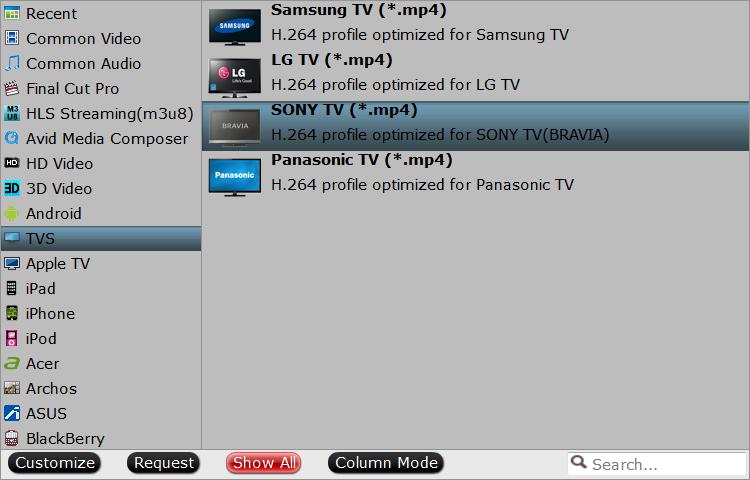
Step 2: Choose output format.

Click “Format” bar, from its drop-down options, move your mouse to “Final Cut Pro > Apple ProRes 422 (*.mov)” to select it as the output file format.

For Avid, from its drop-down options, move your mouse to “Avid Media Composer” > “Avid DNxHD(*.mov)” to select it as the output file format.

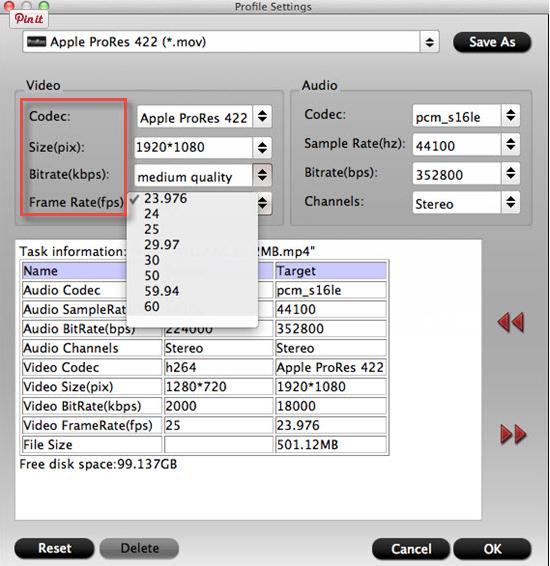
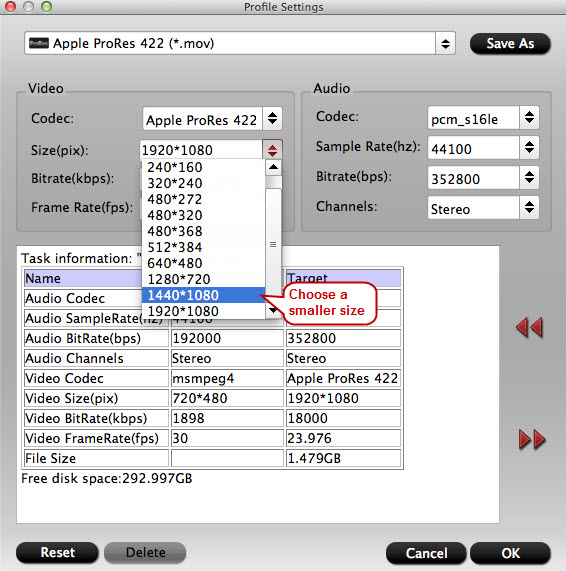
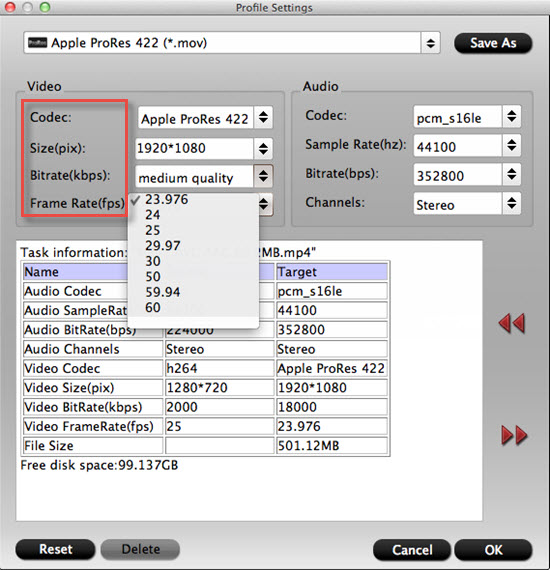
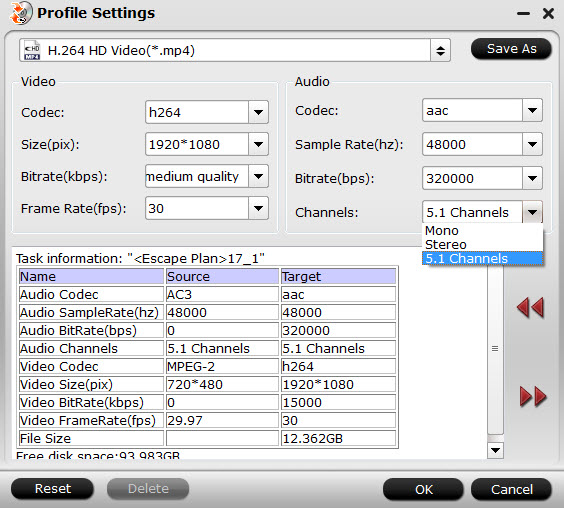
Step 3: Customize output ProRes parameters.

Open “Profile Settings” window to adjust the output video codec, size, bit rate, frame rate, audio codec, sample rate, bit rate and channels.

Tips: other format for other editor as the same, try DIY your own hobbits.

Step 4: Start conversion.

Hit the convert button under the preview windows, the program will conversion immediately.

When the conversion is completed, run your favorite editor and import the converted footage for post production workflow.

Read More:

Share

Dec 03

How Can I Put Youtube MP4 footage into Avid Media Composer?

Summary: Trouble editing or playing video in Avid Media Composer with Youtube MP4 footage because of compatibility issues? Your troubles are over.

As a quite hot file extension, MP4 is widely used for saving media data and can be found in lots of places online or off line, which means, you can get MP4 videos from YouTube, or shared MP4 videos from others.

However, you may run into a situation where you can’t edit MP4 files in Avid Media Composer. The Media Composer deals with the MP4 files at quite a slow speed and some MP4 files even cannot be recognized. So what’s matter? What is the available way to use MP4 files in Avid Media Composer?

Actually, this is probably due to the MP4 file codec. Avid might not work with some MP4 files sometimes due to the codec issue or other reasons. Fortunately, there is an easy way to fix the issue. To get Avid Media Composer work well with MP4 videos, you could adjust MP4 to Avid MC supported video format.

Hot SearchQuickTime Files to Avid | H.265 to Avid | XAVC S to Avid

Along with some help from third-party software like Pavtube Video Converter for Mac (Yosemite, Mavericks, Mountain Lion, Lion included), you can easily get the problem solved. With it, you can transcode MP4 to Avid native editing-friendly format – DNxHD – ensuring maximum editing quality and efficiency when working with Avid Media Composer. An Avid preset is included for easy access. If you are running a Windows PC, get Pavtube Video Converter.


Other Download:
– Pavtube old official address: http://www.pavtube.com/video-converter-mac/
– Amazon Store Download: http://www.amazon.com/Pavtube-Video-Converter-Mac-Download/dp/B00QIBK0TQ
– Cnet Download: http://download.cnet.com/Pavtube-Video-Converter/3000-2194_4-76179460.html

Now download the program and follow the step-by-step gudie below to convert MP4 files to Avid DNxHD for smoothly editing.

Step 1. Import YouTube MP4 files into the program

Here you can directly drag & drop the YouTube MP4 files to the converter, or click “Add Video” button to load your video files.

Step 2. Choose DNxHD as the output format

You can directly choose the DNxHD preset from “Editing Software” category for Avid Media Composer which has been supplied by the MP4 to Avid Mac Converter. The settings also works for Avid MC 8, Avid MC 7, Avid MC 6 and Avid MC 5 etc.

Step 3. Start YouTube MP4 to Avid DNxHD conversion on Mac.

When everything is ready, click the Convert button and all the imported YouTube MP4 video files will be converted to DNxHD MOV files.

After the conversion, simply click the “Open” button to find the converted videos. Now you can ingest the converted YouTube MP4 files to Avid Media Composer for editing smoothly.

Read More:

Share

Dec 02

How Did I Edit video Clips in FCP X from a Drone with Video Camera

Summary: If you want to edit a drone video in FCP X but don’t know how to import the video from your drone to FCP X or have no idea to make all this video can be editable in FCP X smoothly, then you’ve come to the right place.

With the real time live-view on your mobile device allows you take photos and videos from a completely new perspective. However, there must be not all the video clips you needed, then you want to cut some of them or you just want to add video effects for some clips so that them looks more vivid while share on the website with your friend.

When you prepare to import this drone videos into FCP X on your mac, you find that your mac doesn’t recognize the video or part of the video at all, in the other word the FCP X can’t edit the video smoothly. In generally, the most compatible format for editing in FCP X is Apple Prores, while almost camera(drone video camera included) recording video with other easy-to-record format like XAVC, XAVC S, AVCHD, MTS, MXF, ect.

Hot SearchEdit DJI Phantom 3 in FCP X | MXF to FCP X | Tivo/MKV/MTS/MPG/MXF/MP4 to FCP X

In order to edit the drone video in FCP X without can not import issues, you need to convert all the non-ProRes codec video clips format into Apple ProRes format. Here I would recommend you a professional any video to FCP X compatible Apple ProRes converter–Pavtube HD Video Converter for Mac(read the review). It can provide quite effective solution for you to convert almost all the videos such as Xvid, DivX, MKV, MTS, TiVo, VOB, etc. to Apple ProRes for smoothly editing in FCP X. It also allows you to adjust the video, audio parameter to get a decent output video that you want. Barely several steps are enough.


Other Download:

How to import and edit Drone video with Final Cut Pro X on Mac?
Step 1: Transfer drone recorded footage to Mac computer.

The drone records footage on an SD card, you can remove the SD card from the drone, insert the SD card to a card reader, then plug in the card reader into your Mac computer USB Port for transferring the video footage to your Mac local hard drive.

Step 2: Import drone videos.

From “File”drop-down option, select “add Video/Audio”to add source video files to the program.

Step 3: Select output file format.

Click “Format”bar, from its drop-down list, select “Final Cut Pro”> “Apple Prores 422(*.mov)”as your desired output file format.

Step 4: Convert drone video to Apple Prores format.

Go back to the main interface and press the “Convert”icon on the right-bottom to start drone video to Final Cut Pro Apple Prores process.

When the conversion is done, you can easily import the converted video to FCP X for furthering professional editing.

Related program:

Pavtube Media Magician / Mac Version: A nice camcorder assistant manager, lossless camcorder video joiner, MTS/ M2TS/ MXF/ MOV/ MKV/ TiVo/ WMV/ AVI/ MPG converter and editor. Meamwhile it supported upload edited video to YouTube directly.

Read More:

Share

Dec 01

Convert M2TS files to edit in Final Cut Pro X

Summary: Have some interesting footage in your HD camcorder in M2TS but have no idea to import into Final Cut Pro X for editing? Here we introduce an easy way to convert M2TS to FCPX supported video format for editing smoothly.

I purchased FCPX to edit SONY Z7 m2ts files. I though this could be possible as the FCPX web site indicates Native editing support for AVCHD. But disappointedly this is not the case. I can’t load the m2ts into FCP X.

It’s easy to access lots of M2TS videos from a capture device, for example the SONY Z7, Roxio Game Capture HD Pro, or a Panasonic, Canon, Sony full HD AVCHD camcorder. However, M2TS is an acquisition format and wasn’t really designed for editing. If the M2TS files grey out when you try to import them to FCP, you need to convert them to FCP friendly formats.

Hot SearchAVCHD to FCP | MTS/M2TS/M2T/TS to Apple ProRes | Canon C100 to FCP X

Of course, to do the video conversion, you need a professional app. Here the professional M2TS Converter for Mac(read the review) is strongly recommended. Which regarded as a top M2TS to ProRes Converter under OS X Snow Leopard (10.6), Lion (10.7), Mountain Lion (10.8), Mavericks(10.9), Yosemite(10.10), El Capitan(10.11). With it, you can effortlessly transcode M2TS files to ProRes 422 encoded MOV for Final Cut Pro 7/X, and it works well and converts flawlessly. Meanwhile, the Mac MTS conversion tool can create files compatible with various non-linear editing systems including Avid Media Composer, FCE, iMovie, and Adobe Premiere Pro, Premiere Elements, After Effects, etc. just in a few clicks you could successfully upload M2TS videos to FCP. Meanwhile, M2TS Converter for Mac is able to import MTS/M2TS files and convert to your specified video format, like MOV, MP4, DV, etc.


Other Download:
– Pavtube old official address: http://www.pavtube.com/mts-converter-mac/
– Amazon Download: http://www.amazon.com/Pavtube-MTS-M2TS-Converter-Download/dp/B00QIE3U0Y
– Cnet Download: http://download.cnet.com/Pavtube-MTS-M2TS-Converter/3000-2194_4-76177029.html

How to Transcode M2TS to Apple Prores for editing with FCP X?

Step 1: Transfer M2TS footage to computer.

You can directly connect the camera to the computer for transferring the footage out or remove the SDHC/SDXC card from the camera and insert it into an card reader, then plug the card reader into your computer’s USB port for transferring the footage to computer hard drive.

Step 2: Load video files to the program.

Start up the video conversion tool on your Mac computer, on the main interface, click “File” menu, select “Add Video/Audio” or “Add from folder” to import source M2TS footage files from the to the program.

Step 3: Choose output file format.

From “Format” bar drop-down list, choose “Final Cut Pro” > “Apple Prores 422(*.mov)” as the high quality output format for editing in Final Cut Pro or output “Apple Prores 422(LT)(*.mov)” to get small file size video from original video.

Step 4: Start the conversion process.

Hit the “Convert” button on the main interface to start to convert M2TS to FCP Apple Prores 422 format.

When the conversion is completed, feel free to Import Video Files to FCP X for post-production workflow.

Related program:

Pavtube Media Magician / Mac Version: A nice camcorder assistant manager, lossless camcorder video joiner, MTS/ M2TS/ MXF/ MOV/ MKV/ TiVo/ WMV/ AVI/ MPG converter and editor. Meamwhile it supported upload edited video to YouTube directly.

Read More:

Share

Nov 30

Adobe Premiere, Final Cut Pro, AVID? Which one should I Choose?

Summary:Adobe Premiere, Final Cut Pro, AVID? Which video editing software you ultimately choose is going to depend on a number of factors ranging from what capabilities you need to how much you are willing to spend. 

These days, professional video editing software often means one of Avid Media Composer, Adobe Premiere Pro or Apple Final Cut Pro. Each of these are packed with features to get you from a collection of source footage to a final cut as quickly as possible and with the highest quality possible. There must be a best one in everyone’s mind. Here listed the main features of Adobe Premiere, Final Cut Pro, AVID objectively.

Adobe Premiere

Adobe Premiere is a software program for editing video and uses timeline to accomplish that. Its presence in the market has surely revolutionized the video editing industry thanks to its standout features. One of such features is its support for high resolution editing. This has been one of the biggest headaches for many video editors but Adobe Premiere gives you a way out. In other instances, the program has support for 3D editing and that makes it possible to view such material with 2D monitors. If you want to have adjustments made to the right and left eyes, you can with this program.

Final Cut Pro

You can edit your videos smoothly with Final Cut Pro program and can handle more than one stream with maximum resolution. Its playback is very powerful and that adds to the easy editing experience. You will like the user-friendly interface because it comes with four windows for editing. With the timeline, editing is taken a notch higher with this program. If you want to edit one file at a time or many, the timeline makes that possible. It can handle up to 99 files at a go.

AVID

AVID is the best software to help you connect with other people in a very efficient, powerful and collaborative manner. It has very many features to allow you customize your video during editing and you must get maximum value in return for that. It might not measure up to other popular programs but it’s well suited for video editing.

Every editor has its own features. Make sure you have chosen that which suits you best. Here give the a tutorial about importing video into each for smooth editing.

Pavtube HD Video Converter for Mac(read the review) would help you do this task. It can convert any video into Apple ProRes 422 for Final Cut Pro, Avid DNxHD for Avid Media Composer, WMV(VC-1)(*.wmv)”/“MPEG-2 (*.mpg)”/“MOV (AVC) (*.MOV).”for Adobe Premiere.


Other Download:

Simple Tutorial to Make Any Video Editable in Adobe Premiere, Final Cut Pro, AVID

Step 1. Import source video to HD converter

Download and launch this Mac HD video converter, and click “File” and “Add Video/Audio” to add source videos.

Step 2. Choose FCP/Avid MC/Premiere supported video format

To make it easy and smooth to import source videos to these professional editing systems, you’d better choose an output format fully compatible with Final Cut Pro, Avid and Adobe Premiere.

Click the format bar to follow “Final Cut Pro” > “Apple ProRes 422 (*.mov)”, “Avid Media Composer” > “Avid DNxHD (*.mov)” and “Adobe Premiere/Sony V…”>“WMV(VC-1)(*.wmv)”/“MPEG-2 (*.mpg)”/“MOV (AVC) (*.MOV).”

Step 3. Compress source videos (Optional)

If you want to reduce the size of the recorded source videos not only for smooth editing but for other purposes like uploading to Youtube, this HD video converter can definitely meet your demand. In addition to high definition videos, large FLV files can also be compressed.

Hit the button “Settings” near the format bar, and you’ll brought to the “Profile Settings” interface where you can compress source videos by choosing a smaller video size from the “Size” dropdown list.

Step 4. Convert source video to FCP/Avid/Premiere

Once everything is settled for conversion, click “Convert” on main interface to make your source videos converted. After conversion, you’ll get the expected and desired video format well accepted by Final Cut Pro, Avid and Adobe Premiere.

Step 5. Import converted videos to FCP/Avid/Premiere.
Run the editing software installed on your Mac, and import the converted videos to FCP, Avid or Premiereas you usually do.

Related program:

Pavtube Media Magician / Mac Version: A nice camcorder assistant manager, lossless camcorder video joiner, MTS/ M2TS/ MXF/ MOV/ MKV/ TiVo/ WMV/ AVI/ MPG converter and editor. Meamwhile it supported upload edited video to YouTube directly.

Read More:

Share

Nov 27

How to Import AVCHD to Final Cut Pro

Summary: What is the best solution for editing AVCHD and AVCHD Lite MTS/M2TS footage in Final Cut Pro? This is a frequently asked question by FCP users. This article give you the best solution of importing AVCHD/MTS video into FCP for smoothly editing.

AVCHD is an HD video format jointly developed by Sony and Panasonic that uses Advanced Video Coding (AVC) compression (also known as MPEG-4 part 10 or H.264) to achieve high-quality images and low data rates. Generally speaking, AVCHD footage is usually saved in MTS or M2TS container format, which are widely used by Sony, Panasonic, JVC, Canon camcorders.

However, AVCHD files are not natively supported by Final Cut Pro and must be transcoded to FCP friendly codecs such as QuickTime movie and Apple Intermediate Codec before importing to FCP.

First method you could try

Thankfully, FCPX can import AVCHD footage from a hard drive, but you need to make sure you preserve the original file structure. Copy the whole card just as it is, onto your drive. Then from within the FCPX import window, navigate to the folder, and voila, you’ll see the video clips and be able to import then as normal (They’ll be converted to H.264 .MOV files and copied to the “Original Media” folder.) You’ll notice that you won’t have the option to uncheck “Copy Media to Events Folder.” That’s because FCPX reads the archive as if it were a card. That means in essence you will be duplicating your footage.

The second best method

To lower the quality loss during transcoding, Apple introduced in 2008 the Apple ProRes family to help Final Cut Pro works more efficiently with HD contents. By transcoding/converting AVCHD to Apple ProRes codec, the possible best quality is retained in post-production workflow and you can then edit the resulting media files just as you would edit in QuickTime Movie format. Besides, the rendering time is saved as Apple ProRes codecs are natively supported by FCP.

Hot Search4K AVCHD to iMovie/FCE/FCP | Play AVCHD on VLC Player | Import Media Files to Final Cut Pro

Pavtube HD Video Converter for Mac(read the review) will be the best choice for you. This is an AVCHD/AVCHD Lite transcoding tool for Mac. It can deals with AVCHD footage straightly from Sony, Panasonic, JVC and various other camcorders and exports HD contents encoded in various codecs for editing and playing back. The FCP friendly codecs includes Apple ProRes family (ProRes 422, ProRes 422 LT, ProRes 422 HQ, ProRes 422 Proxy, ProRes 4444), DVCPRO, HDV, Apple Intermediate codec, etc.

Meanwhile, this software can help you convert any HD video to Apple ProRes 422 for Final Cut Pro editing on Mac, or to Apple InterMediate Codec for FCE, iMovie. You can also convert videos between so many video formats.

If you are windows user, please turn to Pavtube HD Video Converter. It has the same features as Mac version.


Other Download:

Encode  AVCHD to ProRes 422 for FCP

Step 1. Download Pavtube HD Video Converter for Mac.

This professional HD Video Converter can help you convert AVCHD files to ProRes 422 MOV format for Final Cut Pro, more output formats are also supported.

Install and launch this AVCHD Converter. Import AVCHD footage to the converter by clicking “File”>”Add Video/Audio”.

Step2. Click format bar to choose the output format.

Click and choose “Final Cut Pro”>”Apple ProRes 422 (*.mov)”. If you don’t care about the generated file size while just pursuit the video quality, then you can totally go for “Apple ProRes 422 HQ (*.mov)”. (Differences among Apple ProRes codecs)

Step 3. You can click “settings” to customize the output parameters, adjust the resolution, bitrate as you want.

If you just want to keep the original video quality, you can choose “original “, or if there is no proper parameters for you to choose, you can just type them by yourself.

Step 4. Click convert button to start.

After you deinterlace AVCHD/MTS to FCP ProRes 422 codec, you can import the converted footages to Final Cut Pro, iMovie/Final Cut Express for editing without rendering, now please take a try.

Userful tips:

-“Interlaced” to “Progressive”

If you want to change the “interlaced’ into “Progressive”mode, then you can go to this “Edit” UI.

By this function, you can have the “Progressive” mode to get a better quality of your videos.

-Transfer files into FCP X

For many new users of Final Cut Pro, how to load files into Final Cut Pro smoothly without unknown problems may be very needed for them.

Read More:

Share

Nov 25

Convert and Transfer Panasonic FZ300 AVCHD Video on Samsung TV

Summary: Wonder how to convert and transfer Panasonic FZ300 AVCHD Video to your Samsung TV for watching? Here are going to talk on the details of the supported video and audio formats for Samsung TV you can take a good reference.

The Panasonic Lumix DMC-FZ300 is the update to the very popular FZ200. 4K video support, capturing 4K/UHD video at 30p.

With this 4K/UHD video you recorded by Panasonic FZ300, many users are confused with how to watch it on the Samsung TV. Therefore, the issue will be solved with this article.

As we mentioned above, Panasonic FZ300 recording videos with 4K format. Or more accurately, the 4K video was encoded with AVCHD format. There, we’ll receive a big, fat “NO” when trying to import 4K video to Samsung TV, because some of them fail to accept AVCHD format video from Panasonic FZ300. In this regard, we will have to get rid of the format issue with the help of third-party software.

Hot SearchTOP 10 4K TVs | XAVC S on 4K UHD TV | H.265 4K to Ultra HD TV

Pavtube HD Video Converter / Mac Version(read the review)- 4K TV video converter, is a genius in handling all 4K problems: convert 4K video to Samsung TV acceptable format, transcode 4K to any other videos, transfer 4K to most portable media devices like iPhone 6/6 plus/5/4s/4, Galaxy S6/S5, iPad Air 3, etc., and any other tasks that you would like to assign.


Other Download:

First things first:The Mac Version as example, Windows Version has the same Steps except the main interface logo.

How to Watching Panasonic FZ300 Recorded Videos to Samsung TV?

Step 1. Import source video from Panasonic FZ300 to this app by clicking the “Add video” button on the main UI. Or choose to add multiple videos from the same folder on your computer hard drive.

Step 2. Choose UHD TV playable “HD Video” > “H.264 HD Video” from “Format” bar drop-down selections.

You can also choose HDTV compatible video format from “TVS” extended selections, here you can select the Samsung TV optimized format according to your TV brand.

Step 3. Adjustments like video size, bitrate, frame rate, sample rate, and channels are available. The 5.1 channel allows you to enjoy sounds from different directions and turns your home to a grand concert.

Step 4. After you have properly set up all the output profile parameters, start the conversion process by hitting right-bottom convert button.

You can find the generated files by clicking “Open output folder” when the conversion is completed. Transfer them to an external USB hard drive and plug the drive into your Samsung TV, you will have no difficulty to watch Panasonic FZ3008 Recorded Videos on your large screen Samsung TV.

Read More:

Share

Nov 24

Pavtube Rolls out 2015 Black Friday & Cyber Monday Sales with 50% OFF for All Blu-ray/DVD/Video Softwares

Pavtube Facebook Rolls out 2015 Thanksgiving & Black Friday & Cyber Monday Crazy Promotion with 50% OFF for All Blu-ray/DVD/Video Softwares

Are you ready for a crazy online shopping after Thanksgiving Coupons in the next few days on Black Friday and Cyber Monday? These meaningful major festivals is best the best chance for people to find out the best deals to reserve for upcoming Chrismas.

The discount offering is to show gratitude to valued customers and potential users of Pavtube software, so we Roll out 2015 Black Friday & Cyber Monday Sales with 50% Discount for top-selling Windows/Mac Blu-ray/DVD rippers and Video converters, which can help you move favorite Blu-ray/DVD movies or convert digital videos to any home devices for home use! Pavtube video products can also assist you to creat special timeless memories for this year’s festivals.

What can Pavtube do?

1) Convert common, HD, 3D, 2K/4K Videos and Blu-ray/DVD into H.265/HEVC, M3U8, MP4, Apple ProRes, DNxHD, MOV, M4V, MOV, MKV, AVI, Xvid, Divx, VOB, MPEG-2, SWF, FLV… for playback on smartphone, tablet, TV set, HD media player, streaming server, Hard drive, Game console, or edit in Final Cut Pro, iMovie, Adobe Premiere Pro, Avid Media Composer, etc.

2) Convert Canon/Sony/Panasonic/Nikon/JVC/Blackmagic shooted H.265, XAVC, XAVC S/L, MXF, MOV, AVCHD, AVI, MP4, VOB footages into common video formats, so you can watch or edit them on PC/Mac.

3) Convert MXF, P2 MXF, XAVC MXF, XACAM MXF with Multiple audio track/channel preserver or mixer.

4) 1:1 Backup Blu-ray/DVD without region code or protection limit in two clicks.

5) Convert Blu-ray/DVD movies to MKV/MP4/MOV with multiple audio tracks and subtitles

Expire on Dec 6.

Part 1. 50% Discount for Top-selling Windows/Mac Video Converters

Top 1. 50% OFF Video Converter Ultimate

Original Price: $65
Now: Only $32.5
Free Trial          Limit Purchase
How-To

Top 2. 50% OFF iMedia Converter for Mac

Original Price: $65
Now: Only $32.5
Free Trial          Limit Purchase
How-To

Top 3. 50% OFF Video Converter for Windows

Original Price: $35
Now: Only $17.5
Free Trial          Limit Purchase
How-To

Top 4. 50% OFF Video Converter for Mac

Original Price: $35
Now: Only $17.5
Free Trial          Limit Purchase
How-To

Top 5. 50% OFF HD Video Converter for Windows

Original Price: $35
Now: Only $17.5
Free Trial          Limit Purchase
How-To

Top 6. 50% OFF HD Video Converter for Mac

Original Price: $35
Now: Only $17.5
Free Trial          Limit Purchase
How-To

Top 7. 50% OFF MTS/M2TS Converter for Windows

Original Price: $29
Now: Only $14.5
Free Trial          Limit Purchase
How-To

Top 8. 50% OFF MTS/M2TS Converter for Mac

Original Price: $29
Now: Only $14.5
Free Trial          Limit Purchase
How-To

Top 9. 50% OFF MXF MultiMixer

Original Price: $45
Now: Only $22.5
Free Trial          Limit Purchase
http://www.multipelife.com/mxf-multimixer/tips

Top 10. 50% OFF iMixMXF: $22.5

Original Price: $45
Now: Only $22.5
Free Trial          Limit Purchase
How-To

Top 11. 50% OFF MXF Converter for Windows

Original Price: $29
Now: Only $14.5
Free Trial          Limit Purchase
How-To

Top 12. 50% OFF MXF Converter for Mac

Original Price: $29
Now: Only $14.5
Free Trial          Limit Purchase
How-To

Part 2. 50% Discount for Top-selling Windows/Mac Blu-ray/DVD ripping & copying Softwares

Top 1. 50% OFF BDMagic for Windows

Original Price: $49
Now: Only $24.5
Free Trial          Limit Purchase
How-To

Top 2. 50% OFF BDMagic for Mac

Original Price: $49
Now: Only $24.5
Free Trial          Limit Purchase
How-To

Top 3. 50% OFF ByteCopy for Windows
Original Price: $42
Now: Only $21
Free Trial          Limit Purchase
How-To

Top 4. 50% OFF ByteCopy for Mac

Original Price: $42
Now: Only $21
Free Trial          Limit Purchase
How-To

Top 5. 50% OFF DVDAid for Windows

Original Price: $35
Now: Only $17.5
Free Trial          Limit Purchase
How-To

Top 6. DVDAid for Mac

Original Price: $35
Now: Only $17.5
Free Trial          Limit Purchase
How-To

Learn more at Pavtube Facebook: https://www.facebook.com/pavtubefans/?sk=app_186981981345123

If you have any problem to buy or use Pavtube, pls feel free to contact support@pavtube.com (for Windows user),macsupport@pavtube.com (for Mac user).

Read more
Click here get more Pavtube programs
Click here to get 20% off for Pavtube Facebook Fans
Click here to get Blu-ray/DVD/Video/DRM software bundle Promotions
Click here to get HD/MXF/MTS/DVD Creator software bundle Promotions
Click here to get Weekend Special offers

Share

Nov 24

Import MTS/M2TS Videos to Final Cut Pro for Smoothly Editing

Summary: This tutorial will give you a step by step instruction about how to import MTS/M2TS files in FCP supported Prores codec.

While you are pleased with the video quality of the recordings, the trouble with this is that Final Cut Pro can not recognize MTS/M2TS files, whether you transfer them directly from your camera/camcorder or from the folder which has been copied to Mac. How to import MTS/M2TS files into final cut pro turns out to be the first problem that MTS/M2TS camera/camcorder users need to figure out.

Here is an easiest and most effective solution: converting MTS/M2TS to ProRes- Final Cut Pro native format, then you can edit the converted ProRes MOV files in FCP and edit them on Mac.

Hot SearchAVCHD Files on VLC Player | MTS/M2TS to HD MKV | AVCHD/MTS/M2TS to QuickTime

No worries, this Mac MTS to FCP Converter(read the review) is the top MTS/M2TS Converter for Mac from Pavtube, that can easily help you out with reliable efficiency and simple frank interface; no jitter, no slitter, all you need to do is a few clicks. Come and download Pavtube MTS/M2TS Converter for Mac and let’s start!


Other Download:
– Pavtube old official address: http://www.pavtube.com/mts-converter-mac/
– Amazon Download: http://www.amazon.com/Pavtube-MTS-M2TS-Converter-Download/dp/B00QIE3U0Y
– Cnet Download: http://download.cnet.com/Pavtube-MTS-M2TS-Converter/3000-2194_4-76177029.html

How to convert MTS/M2TS video clips to FCP Proes MOV on Mac

Step 1. Install and launch this MTS/M2TS Converter for Mac, click top left two icons to load individual videos or load the entire folder.

Step 2. Apple ProRes MOV is the best format for Final Cut Pro, here you just need to choose “Final Cut Pro” option and select “Apple ProRes 422(*.mov)” or “Apple ProRes 422(H1) (*.mov)”.

P.S.

If you need to edit in iMovie, please choose iMovie and Final Cut Express -> Apple InterMediate Codec (AIC) (*.mov). And for Avid MC, please choose Avid Media Composer -> Avid DNxHD (*.mov).

And you can also click Settings to change the output video bitrate, frame rate, size, etc. all according to your needs.

Step 3. Click the big red circle at the bottom right to start converting MTS/M2TS video to FCP MOV on mac. Wait for a while, the video will be ready to be edited with FCP 6/7/X on mac smoothly and freely.

Read More:

Share

Nov 23

What the Best Way to Play Sony Alpha SLT-a68 Recorded Videos to 4KTV?

Summary: Are you have no idea of how to watching the Play Sony Alpha SLT-a68 Recorded Videos on 4KTV? Here just the right place you come.

Inheriting many pro-style features from the acclaimed A77 II, the A68 features Sony’s unique ‘4D FOCUS system’ that delivers extraordinary AF performance under any shooting conditions. Full HD movies use the efficient XAVC Sv format for high bit rate recordings at up to 50 Mbps with outstanding detail and low noise.

And thanks to Sony’s unique Translucent Mirror Technology, you can enjoy non-stop continuous autofocus that effortlessly tracks moving subjects for crisp, professional looking footage, whichever format you choose to record in.

With this non-stop high quality video you recorded by Sony Alpha SLT-a68, many users are confused with how to watch it on the 4KTV. Therefore, the issue will be solved with this article.

Hot SearchTOP 10 4K TVs | XAVC S on 4K UHD TV | H.265 4K to Ultra HD TV

4K, also known as ultra HD, is the biggest thing in TV nowadays — literally. This format offers four times the pixels of HDTV, plus better color, and is designed especially for very large TVs.

As we mentioned above, Sony Alpha SLT-a68 recording videos with XAVC-Sv format. There, we’ll receive a big, fat “NO” when trying to import 4K video to Samsung/Sony/VIZIO/LG/Panasonic 4K Smart 3D/LED TV, because some of them fail to accept XAVC-Sv format video from Sony Alpha SLT-a68. In this regard, we will have to get rid of the format issue with the help of third-party software.

Pavtube HD Video Converter / Mac Version(read the review)- 4K TV video converter, is a genius in handling all 4K problems: convert 4K video to 4K TV acceptable format, transcode 4K to any other videos, transfer 4K to most portable media devices like iPhone 6/6 plus/5/4s/4, Galaxy S6/S5, iPad Air 3, etc., and any other tasks that you would like to assign.


Other Download:

First things first:The Mac Version as example, Windows Version has the same Steps except the main interface logo.

How to Watching Sony Alpha SLT-a68 Recorded Videos to 4KTV?

Step 1. Import source video from Sony Alpha SLT-a68 to this app by clicking the “Add video” button on the main UI. Or choose to add multiple videos from the same folder on your computer hard drive.

Step 2. Choose UHD TV playable “HD Video” > “H.264 HD Video” from “Format” bar drop-down selections.

You can also choose HDTV compatible video format from “TVS” extended selections, here you can select the specific TV optimized format according to your TV brand.

Step 3. Adjustments like video size, bitrate, frame rate, sample rate, and channels are available. The 5.1 channel allows you to enjoy sounds from different directions and turns your home to a grand concert.

Step 4. After you have properly set up all the output profile parameters, start the conversion process by hitting right-bottom convert button.

You can find the generated files by clicking “Open output folder” when the conversion is completed. Transfer them to an external USB hard drive and plug the drive into your 4K TV, you will have no difficulty to watch Sony Alpha SLT-a68 Recorded Videos on your large screen Ultra HDTV.

Read More:

Share
Page 8 of 37« First...678910...2030...Last »