

Tricks for Trimming/Cutting and Converting Gopro MP4 files to MOV, AVI, WMV etc. for importing to Avid Media Composer, Sony Vegas, Adobe Premiere, Pinnacle Studio, Windows Movie Maker etc. editing or playing on iPad, iPhone, Apple TV 3, PS3, Android devices, Windows 8 devices, etc.
As the best “wearable” adventure video/photography camera, the new GoPro Hero 3 continues the legendary line with three new models. Now the entry-level White Edition supports 5MP still capture with 3 fps burst and 30fps 1080p video, the middle-range Silver Edition spots 11MP stills with 10fps burst, and the premiere model the Black Edition features a 12MP camera that can shoot 4K video at 12fps or 1080p video at up to 60 fps.
GoPro Hero 3 records video in H.264 and saves footage as .mp4, which is a good streaming media format for sharing with iPad, Android devices and posting to YouTube. There’s a problem though. When you wear a Gopro camera and let it roll for an hour, it results in enormous files with only a few minutes of really good footage that you really want to keep, so you may need to import the Gopro MP4 video to Windows Movie Maker or other editing app for rough cutting and special effects, while the editing app is likely to reject the Gopro .MP4 because it’s not a editing-friendly format.
Here I’d recommend Pavtube Media Magician to anyone that is seeking for an easy solution to keep only the good bits and delete the rest from Gopro .mp4 video. This is not a substitute for full-featured video editing software if your goal is professional looking videos. If you’re just doing home movies of summer vacation for the family, and you want to take an hour’s footage and extract only five minutes’ worth for fun, this makes it very quick and easy to do that. It also does a “conversion” and lets you exports editing-friendly format for Windows Movie Maker, Adobe Premiere, Sony Vegas, etc. Below is a short guide showing you how to cut out junks from Gopro .mp4 and export AVI, WMV, MOV, etc video.
Get Media Magician | Get Media Magician for Mac
How to Trim/Cut and Convert Gopro MP4 files to MOV, AVI, WMV, etc.?
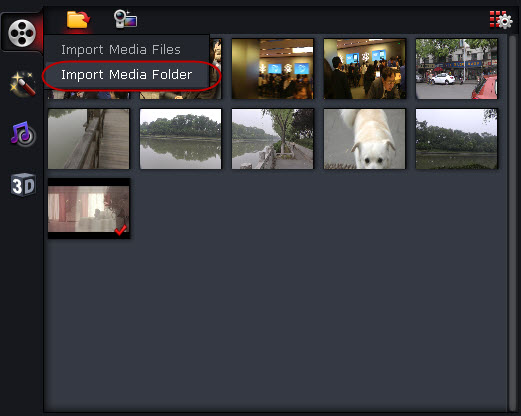
Step 1. Click on the Import file icon, and select “Import from folder”, browse to the folder that you save the Gopro recordings.
Step 2. Drag and drop video clips to timeline and extract key frames. Here you can remove unwanted clips and trim out unwanted frames by frame-accurate. Also, you may trim, cut, delete, rearrange order, and merge videos.
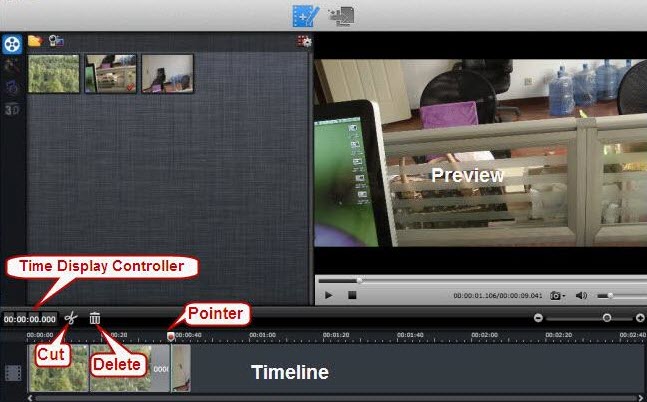
1. Time Display Controller: Move your mouse cursor on timeline, the opposite time point will be displayed here. Once you entered a time point into the time display box and click enter, the Preview Window and Timeline will switch to the frame of this time point. This helps to locate to the accurate frame that you want.
2. Zoom in and Zoom out: Drag the bar on top-right of timeline to Zoom in or out for better view.
3. Preview: Highlight a clip on timeline and click Play button, you can preview. Double click on a clip can also begin preview.
4. Trim: Put your cursor to the start or end point of a clip on timeline until it changes to trimmer. Drag the trimmer and you can trim off unwanted starting or ending.
5. Cut: Drag the pointer to the right place; Put your cursor to process bar under preview window and select the right frame; Click the Scissors button and you can cut the clip. And then you can rearrange order or delete.
6. Delete: Highlight the unwanted clip on timeline, and click Delete button. You can also delete it with right-click menu.
7. Rearrange order: Drag and hold a clip to the right place until the place line shows. Drop the clip and it will be placed right there.
8. Merge & join: All files placed on timeline will be output as one file. So if you want to merge and join several clips, just drag them to timeline in right order.
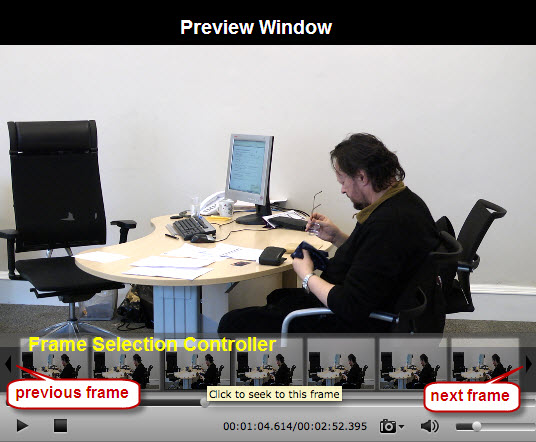
On the preview window, you can use Frame Selection Controller to seek to the corresponding frame of the current image, or seek the previous frame/next frame, which helps to locate frames accurately.
Step 3. Click the Output button on the top and switch it to output interface.
Here you can set common video format like AVI, MKV, MP4, MOV, MPG, etc as well as intermediate codec for non-linear video editing apps. Decide your output format, choose it, and then click on the + sign to add it as a conversion task.
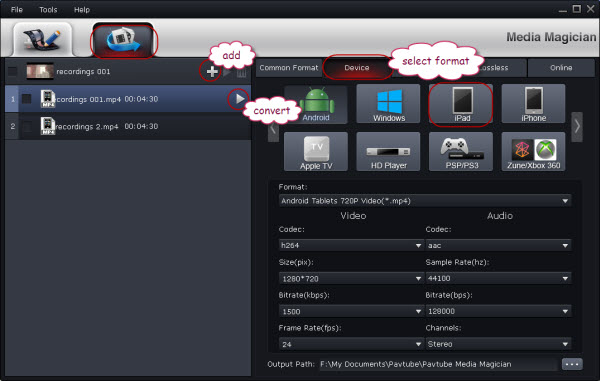
Step 4. Select the task(s) and click on the triangle sign to start exporting MP4/AVI/WMV/MOV video for playing on iPad, iPhone, Apple TV 3, PS3, WD TV, Android device or importing them to Avid Media Composer/Sony Vegas/Adobe Premiere/Pinnacle Studio, Windows Movie Maker etc. for editing and uploading.


Recent Comments