

Summary: Free MTS to YouTube Converter is a useful application to help you convert your AVCHD MTS videos shot by Canon, Sony, Panasonic AVCHD MTS camcorder to MP4, H.264 for uploading to YouTube or Vimeo on Mac.
If you are attempting to upload MTS shootings onto YouTube or Vimeo for displaying on the Internet, there are a few things you need to notice to make the video look great on the computer screen.
1. YouTube and Vimeo now support both 1080p and AVCHD.
That means you can upload a raw MTS clip directly onto the two sites as long as you are a registered user. The thing is that YouTube has 2GB and 15 minutes limitations and Vimeo Non-Plus users can only upload up to 500 MB of videos per week, while the MTS footage in 720p or 1080p always have large file size. To reduce your MTS file size as well as keep good video quality, you are suggested to convert MTS to MP4 for upload. The converted MP4 files will be processed much faster than the raw MTS files.
2. YouTube recommended settings.
* H.264, MPEG-2 or MPEG-4 format;
* 640×480 (SD) or 1280×720 (HD) for 4:3 & 16:9 aspect ratios. YouTube recommends dimensions of 640 x 480 for standard-definition videos and 1280 x 720 for high-definition videos that will dance around the site with the HD logo. Original videos of 640 x 480 will have black bars on the side in the video page;
* Frame rate should be the same as original video;
* Sampling rate: 44.1KHz for MP3/AAC audio;
3. Vimeo recommended settings for the best results.
* H.264 MP4 format;
* Frame rate: If you know at which frame rate you shot, it is best to encode at that same frame rate. However, if it exceeds 30 fps (frames per second), you should encode your video at half that frame rate. For example, if you shot 60 fps, you should encode at 30 fps. If you’re uncertain what frame rate you shot at, set it to either “Original” or 30 fps;
* Bit Rate: 2000 kbps (SD), 5000 kbps (HD);
* Resolution: 640×480 (SD), 1280×720 (HD);
* Audio codec: AAC;
* Audio Bit rate: 320 kbps is the highest quality audio data rate Vimeo currently support;
* Sample rate: 44.1 kHz is the highest audio sample rate Vimeo currently support.
4. Recommended free choices for converting MTS to MP4 for YouTube/vimeo upload on Mac.
* Free MTS M2TS Converter for Mac from Mac App Store released by Pavtube Studio;
* Pavtube Buy One Get One Free Back to School Deals
– Buy Blu-ray Ripper for Mac Get Free Mac MTS M2TS Converter at $39.20
– Buy DVD Ripper for Mac Get Free Mac MTS M2TS Converter at $35.00
5. What to do if you wanna merge and edit your MTS files?
The following content shows you details by using Pavtube MTS/M2TS Converter for Mac.
Merge multiple MTS clips into one file
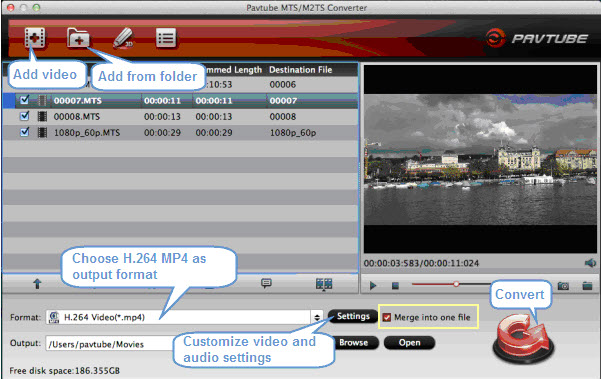
You can click “Add video” button to load separate MTS clip into the program one by one, or click “Add from folder” button to import all the .MTS files stored in your folder at a time. To merge multiple MTS files into one file, simply tick off the checkbox of “Merge into one file” before conversion.
Split a selected MTS file
To start splitting, check the file that you want to split, then hit the option “Split selected task”.
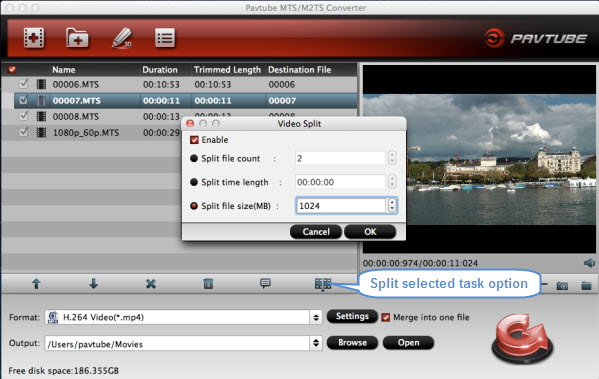
When the Video Split window pops up, tick off Enable > Split file size (MB), and either enter the desired maximum size of each file chunk or choose an appropriate size from the available drop down option. Besides splitting by file size, you can also split the selected MTS video by specifying output file quantity and duration time for each chunk. Do remember click “OK” to confirm your selection.
Trim a selected MTS file
The “Trim” feature allows users to decide where to start and where to end when converting the selected MTS clip, so that unwanted segments will be cut out after conversion.
To trim an MTS video, select it in the file list, then click “Edit selected task” icon and switch to “Trim” tab in “Video Editor” interface and follow any of the methods below:

1. Drag the control sliders “![]() ” to include the segment you want to remain.
” to include the segment you want to remain.
2. Click the left square bracket “ ” to set start point, and click the right square bracket “
 ” to set end point when previewing the video.
3. Input specific values to Start and End box.
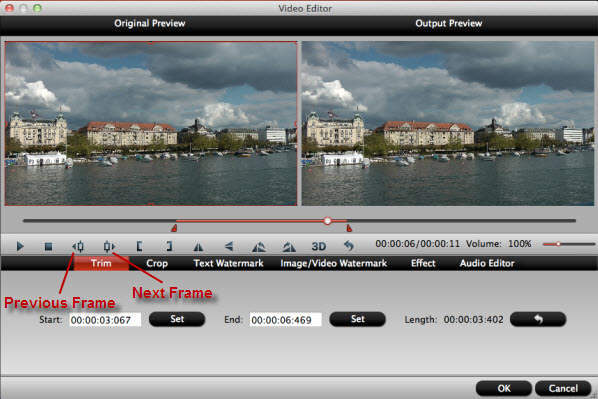
What’s more, Pavtube MTS/M2TS Converter for Mac software offers “Previous Frame” and “Next Frame” options for users to select frames and trim MTS video accurately.
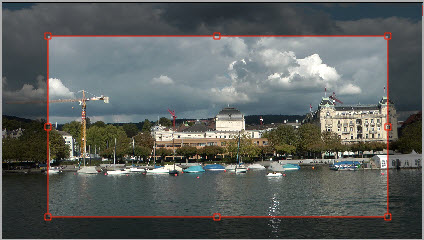
Crop a selected MTS file
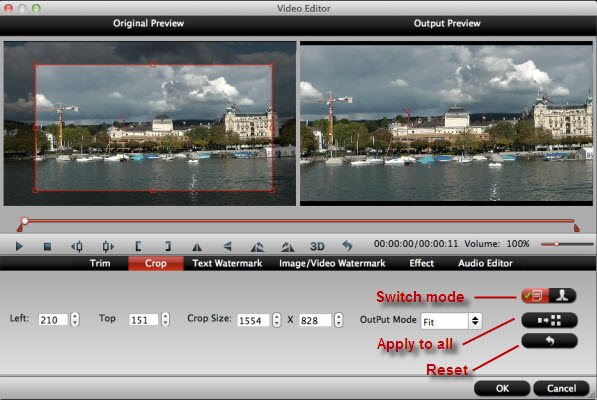
The “Crop” facility enables users to get rid of the black edges and unwanted area of the image. Switch to “Crop” tab, and follow the below methods to crop selected MTS video:
a. Crop video by dragging and dropping the crop frame
Simply move your mouse cursor to drag and adjust the four corners of the red frame to desired position.
b. Crop video by setting values
There are “Simple Mode” and “Advanced Mode” under Crop feature. In “Simple Mode”, you can customize values in the box of “Left”, “Top” and “Crop Size” to make your crop decision.
Under “Advanced Mode”, there are four value fields: Left, Top, Width and Height. You can either type in specific values to the fields or adjust sliders to crop the source file.
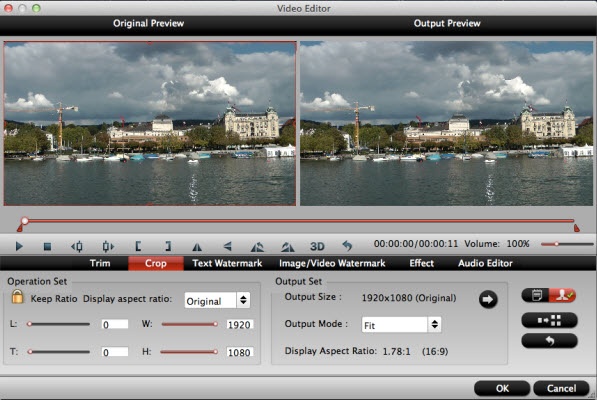
Keep original aspect ratio and cropped aspect ratio
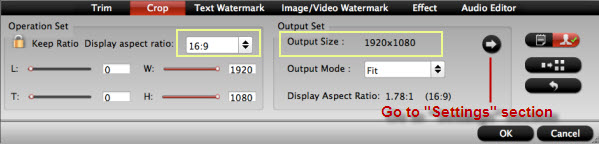
To keep original aspect ratio, users need to make sure the “Display aspect ratio” and the “Size (pix)” in “Settings” option are all set as “Original” (Actually, keep original aspect ratio is checked by default). If you want to keep the cropped aspect ratio, Pavtube MTS Converter for Mac software offers several aspect ratios for you to choose from, including 16:10, 16:9, 5:4, 4:3, 3:2, and 2:1.

Once you selected a “Display aspect ratio”, the “red crop frame” will keep this ratio to crop video and you are able to preview the final effect in real time. If you want to keep the same aspect ratio in your final output files, do remember to set the Video “Size (pix)” in “Settings” section as the same ratio as display aspect ratio. For example, if you want to export a file with “16:9” aspect ratio, firstly, you choose “16:9” in “Display aspect ratio”, and then go to “Settings” section to adjust the Video “Size(pix)” as 1920×1080, 960×540, or things like that. After finished, click “OK” to confirm.
Tips:
1. It’s very important that you keep an aspect ratio of 4:3 or 16:9, otherwise the quality of your video will be degraded. Flash 7 codec performs best when the frame width and height use multiples of 16. This is optimal for video playback.
2. If you want to fit the YouTube player perfectly, encode at these 16:9 resolutions:
1080p: 1920×1080
720p: 1280×720
480p: 854×480
360p: 640×360
240p: 426×240
Try our recipe settings and you’ll be on your way to optimize the quality of your MTS videos for YouTube/Vimeo upload on Mac.


Recent Comments