AIC Converter,MTS to AIC,MTS to iMovie,MTS to FCE,MTS to Final Cut,AVCHD to AIC Converter,AVCHD to Final Cut Express,import AVCHD files to iMovie,MTS to ProRes 422,MTS to Final Cut Pro,MTS to FCP X,AVCHD and Final Cut Pro,Log and transfer MTS to FCP,edit MTS footage in iMovie,FCP transfer MTS files,transfer AVCHD files to iMovie

Aug 28

Edit Sony CX730E/CX760/GW77V 1080p MTS in Final Cut Express 4 with 5.1 channels

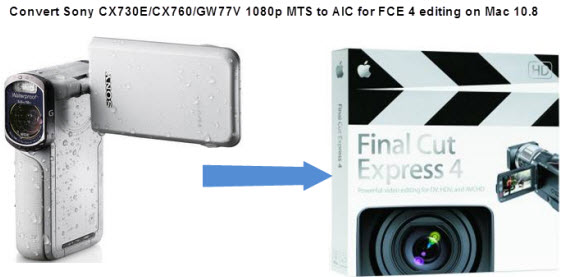
Summary: The article will help Sony camera fans to solve “How to import Sony CX730E/CX760/GW77V 1080 MTS files to Final Cut Express 4 for editing on Mac Mountain Lion 10.8 via a professional Mac MTS to FCE 4 Converter?”

What is Final Cut Express?

Final Cut Express is a non-linear video editing application created by Apple Inc. It is the consumer version of Final Cut Pro and is designed for advanced editing of digital video as well as high-definition video, which is used by many amateur and professional videographers. Final Cut Express is considered a “step” above iMovie in terms of capabilities, but a “step” underneath Final Cut Pro and its suite of applications. The latest version is Final Cut Express 4 which now supports the latest AVCHD cameras, features an open format Timeline, provides iMovie ’09 compatibility, and offers sophisticated effects and filters.

MTS files are video file extension produced by AVCHD camcorders like Sony CX350, Sony CX550, Sony CX160, Sony CX730, Sony CX760, Sony GW77V and Panasonic HDC-TM900/TM800/TM700 and HDC-HS900/HS800/HS700 etc. As these camcorders produce the video in MTS file format there you may find it difficult to play in other portable media. MTS video format is not preferred by FCP (X), FCE(4), iMovie(8/9), etc. You may find it difficult to transfer this MTS video. You need to convert MTS to AIC (Apple intermediate code) to view it on other portable media.

While, when they wanna import Sony CX350/CX550/CX160, Sony CX730, Sony CX760, Sony GW77V MTS to FCE 4 for editing on Mac Mountain Lion 10.8, most of them would encounter some annoying troubles. To help so many Sony Camera users resolve the troubles, we finally find the ultimate reason that the latest FCE 4 can import HD file AVCHD natively, but only on Intel Macs, not PowerPC Mac. Besides, FCE 4 will only handle AVCHD files when it finds them in their original file structure either by connecting the camcorder or using a memory card reader. If you are not Intel Macs users, or you have lost the original file structure of Sony CX730, Sony CX760, Sony GW77V 1080p MTS files, don’t worry. Here we recommend you the best Sony MTS to FCE 4 Converter – transcode MTS to FCE 4 compatible formats like AIC MOV, it can help you convert Sony CX730E 1920*1080p MTS to AIC MOV for FCE 4,  Sony CX760 1080p MTS to AIC MOV for FCE 4, Sony GW77V 1080p MTS to AIC MOV for FCE 4. So when you import Sony CX730, Sony CX760, Sony GW77V MTS to FCE 4 for editing, you will no longer have any more trouble.

Please follow its step-by-step instruction below to learn how to encode Sony MTS to AIC MOV for Final Cut Express 4 on Mac Mountain Lion 10.8.

Preparation for converting Sony CX730E/CX760/GW77V MTS to FCE 4:

1. Software: the best Mac Sony MTS to FCE Converter, Free download for trial version:

2. System requirement:

Mac OS X Leopard (10.5), Snow Leopard (10.6), Lion (10.7), Mountain Lion (10.8)

1G Hz or above PowerPC G4/G5 or Intel processor.

512 MB physical RAM (memory) or more

1024*768 or higher resolution display.

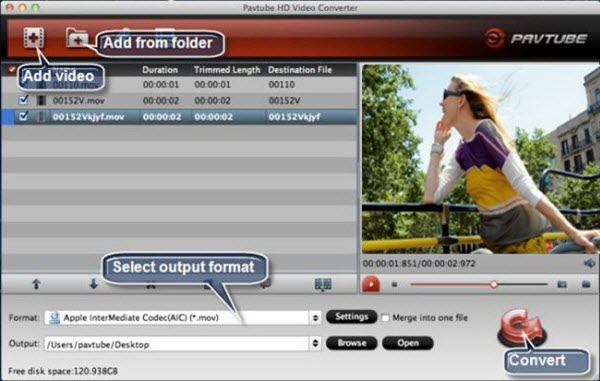
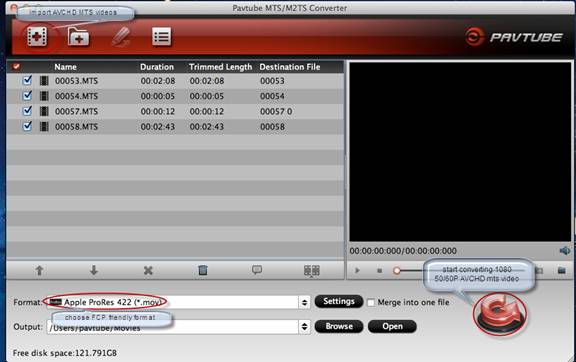
Step 1. Connect your Sony HDR-CX730E(or Sony CX760, Sony GW77V, Sony CX550 etc.) to Mac with USB2.0, ingest MTS/M2TS clips from CX730E, run Pavtube MTS Converter for Mac and add Sony 1080p .mts/.m2ts to it.

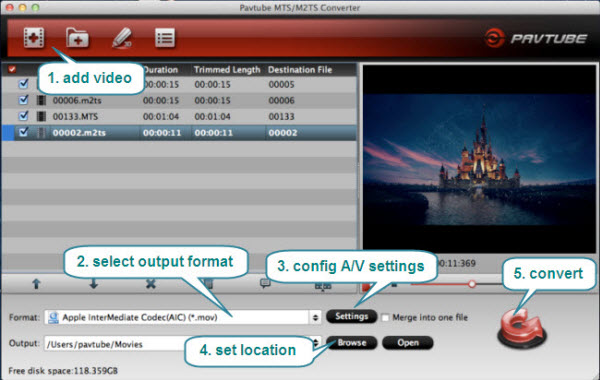
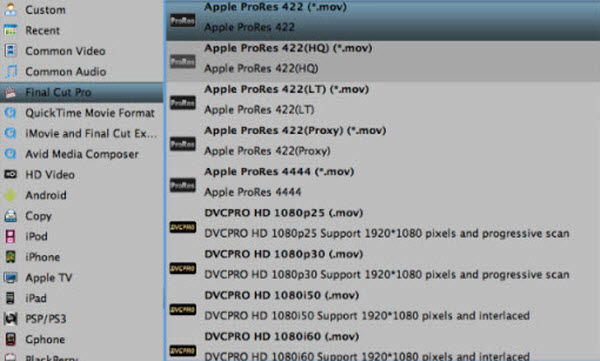
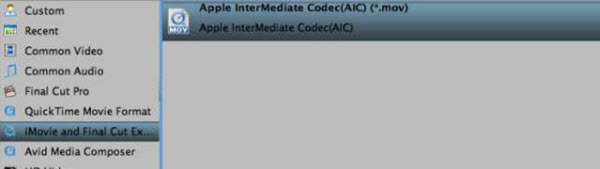
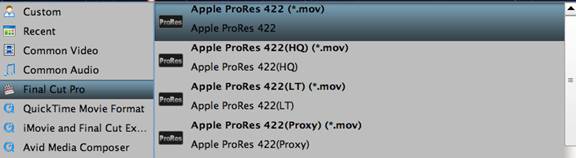
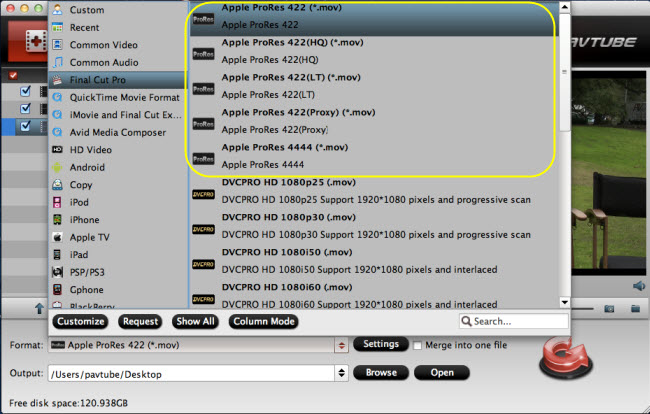
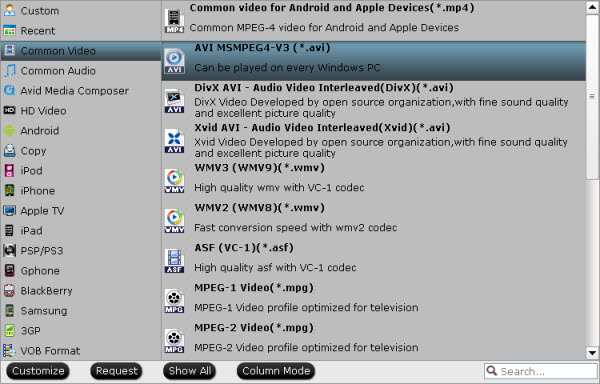
Step 2. Click on the “Format” and get the dropdown menu, then move you pointer to “iMovie and Final Cut Express” and choose “Apple Intermediate Codec(AIC) (*.mov)” format.

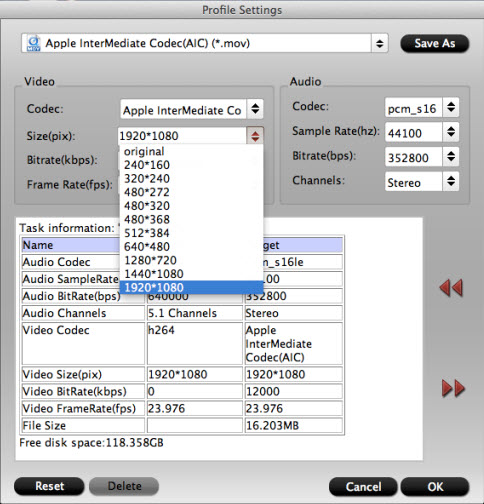
Step 3. Click the “Settings” icon and set bit rate, frame rate, sample rate and audio channel in the interface according to your needs.

Tip: You’d better set the video frame rate as 25fps, video size as 1920*1080 and keep 5.1 channels to keep the best quality for importing to FCE 4 or iMovie.

Step 4. Click the “Browse” button next to the Export to field and select a location on your HDD for the output video file.

Step 5. Click “” button, start convert Sony CX730E/CX760/GW77V MTS to AIC MOV on Mac Mountain Lion 10.8.

After conversion you can click the “Open” button to locate converted video files, and you can easily and smoothly copy Sony CX730E, Sony CX760, Sony GW77V AVCHD MTS to Final Cut Express 4 for editing on Mac.

If you want to know more about convert AVCHD MTS/M2TS files on Mac, please click MTS Column.

Share

Aug 27

Hot Topic Reprint: World First Android Powered Camera – Nikon COOLPIX S800c

COOLPIX S800c For moments worth sharing, in an instant

  +  

Introducing the first COOLPIX that’s also an Android™ smart device. All the imaging power of a Nikon—superior optics, telephoto zooming, a high resolution image sensor and much more, meets the endless possibilities of the Android™ OS and Wi-Fi connectivity. Create exceptional photos and Full HD videos, then edit, style and share them easier and faster than ever before.  

* The imaging power of a Nikon, the connectivity of an Android™ smart device

Introducing the most connected COOLPIX yet, S800c with the superior imaging power of a Nikon point-and-shoot camera and all the capabilities of an Android™ smart device. Create beautiful photos and Full HD videos, then instantly share them right from your camera—email them to friends, post them on Facebook, upload them to my Picturetown or wirelessly transfer them to your laptop, smartphone or tablet. You can even install popular Android™ photography and social networking apps from Google Play™! It’s an all-in-one smart device that will change the way you create and share memories.


* Photos and Full HD videos only a Nikon can capture

The brilliant image quality of a Nikon camera

So many moments deserve the superior image quality and zoom power of a camera. With the COOLPIX S800c, you no longer have to choose between great photos and connectivity—you get both! Shoot beautiful 16.0 megapixel photos and Full HD (1080p) videos, even in low light conditions. With a 10x optical Zoom-NIKKOR ED glass lens, zoom in to telephoto distances (25-250mm) and make faraway objects appear right in front of you. Forget about blurry images—Optical VR image stabilization means a little camera shake won’t keep you from taking sharp photos. And when you’re in a tricky shooting situation, let Scene Modes optimize the camera settings for you.

* Share every great moment instantly

Wi-Fi® connectivity for instant photo and video sharing—anytime, anywhere

Your friends and family love seeing what you’ve been up to. Now you can share all your stories through beautiful Nikon-quality photos and videos. Capture the moment in 16.0 megapixels of brilliant clarity and then instantly share to Google+™ social service, Facebook, Twitter, Nikon’s my Picturetown, with your email contacts—however you normally share online! Plus, you can wirelessly back up your photos and videos or offload your memory card contents in an instant and keep shooting. It’s simple, it’s fast and it’s totally wireless. …..

* Endless possibilities and inspiration

The advanced capabilities of an Android™ smart device

The COOLPIX S800c is more than a camera—it’s also an Android™ smart device with a 3.5-inch high-resolution touchscreen. That means you can do all the things one can do with an Android™ smartphone or tablet. Check your email and Facebook. View photos and videos from your friends. Browse the web. Stream music. The possibilities are endless. Plus, you get access to all the amazing Android™ apps on Google Play, including thousands of photography and video apps for taking, editing and sharing photos and videos. …..

* Express your creative side

Fun and creative in-camera effects and apps

Explore black & white photography, selectively highlight one color within a composition, create wider-than-possible Fisheye shots or give your photos an antique feel with Nostalgic Sepia. For even more options, browse thousands of popular Android™ photography and video apps. How will these exciting new possibilities inspire you?

A world of apps, at your fingertips. Do you heart it?

Share

Aug 25

Topics: Dealing with Nikon 1 V1 1080p HD MOV and FCP (X), FCE, iMovie, Avid Media Composer compatible problems on Mac

Nikon 1 V1 Pursue and Express Life’s Moments

Nikon 1 V1 for your pursuit to express every moment of life. Your photography sparks conversations—the Nikon 1 V1 helps you interpret all. Set your creative freedom free with an imaging system designed for today and tomorrow. Nikon 1 for sharing the very incredible world that is yours.

Type: Advanced Camera with Interchangeable Lenses

Sensor Size 13.2mm x 8.8mm

Image Sensor Type: CMOS

Dust-reduction system: Image sensor cleaning

Viewfinder: Color LCD viewfinder, 0.47 inches(1.2cm) TFT LCD approx 1.44m dot with diopter adjustment function

Lens Aperture: electronically controlled .

Eye Sensor: Camera switches to viewfinder display when it detects that viewfinder is in use

Shutter type: Electronically-controlled vertical-travel focal plane mechanical shutter; electronic shutter

……

More about Nikon 1 V1 Product information, please click here.

Question: How to import Nikon 1 V1 1080p HD MOV in Final Cut Pro 6/7, Final Cut Pro X, Final Cut Express, iMovie on Mac?
“Many Nikon users use Nikon 1 V1 to record 1080p HD footages, but many of them have problems when they want to import Nikon 1 V1 1080p HD MOV in Final Cut Pro 6/7, Final Cut Pro X, Final Cut Express, iMovie, Avid Media Composer for editing on Mac (include Mac OS X Leopard 10.5, Snow Leopard 10.6, Lion 10.7, Mountain Lion 10.8), Nikon 1J1 H.264 MOV video doesn’t seem compatible. What’s the reason? Any solutions?”

Answer: convert Nikon 1 V1 1080p HD MOV to Mac Editing Sofeware compatible format with Mac Nikon MOV Converter.

Nikon 1 V1 Work with both high resolution photos and Full HD (1080p) movies to bring even more creative expression to life. Elevate production with the addition of varied frame rates in 30/60/400/1200 fps. And this MOV video format came from Nikon 1 V1 is a long GOP format that is highly compressed, it is not a good editing format. So you will not playback or edit smoothly the highly compressed MOV on your Mac with FCP 6/7, FCP X, FCE, iMovie, Avid Media Composer. You need to convert the 1080p HD MOV footage to ProRes/AIC MOV with Pavtube HD Video Converter for Mac, It support Mac OS X Leopard (10.5), Snow Leopard (10.6), Lion (10.7), Mountain Lion (10.8).

Step 1. Download, install and run Pavtube Mac Nikon MOV Converter.

Step 2. Load MOV files from Nikon 1 V1 camera to Mac Nikon MOV Converter.

Connect Nikon 1 V1 to Apple iMac with the in-box USB cable, copy and transfer the 1080p .mov files to the Apple hard drive disk. Run Nikon MOV Converter for Mac as the best Nikon 1 V1 MOV to ProRes/AIC Converter on Mac, and click the “Add” button to load .mov videos.

Step 2. Setting the best video format.

* For Final Cut Pro and Final Cut Pro X

Click the “Format” option and navigate the mouse cursor to “Final Cut Pro > Apple ProRes 422 (*.mov) as output format”. The Mac Nikon 1 V1 MOV to FCP Converter will convert MOV to Apple ProRes 422 MOV with high quality.

Tip: You may notice that there are also other options like Apple ProRes 4444, Apple ProRes 422 (HQ), Apple ProRes 422 (LT), Apple ProRes 422 (Proxy), DVCPRO HD 1080p30, HDV, etc.

* For iMovie and Final Cut Express

Click the “Format”, choose “iMovie and Final Cut Express > Apple InterMediate Codec(AIC) (*.mov)” as best output codec for loading Nikon 1 V1 1080p MOV to iMovie and FCE on Mac.

* For Avid Media Composer

Click the “Format”, choose “Avid Media Composer > Avid DNxHD (*.mov)” as best output format for importing Nikon 1 V1 1080p MOV to Avid MC on Mac.

Step 3. Edit video size as original. (Optional)

To get the original video size, just click the “Settings” button and choose the right option like 1920*1080 from the video size drop-down box.With this option, the output video will be kept as high definition1920×1080. If necessary, you can aslo customize Video size, Bitrate and Frame Rate. Or set “original” in video bitrate drop-down list to keep best quality. You may skip this step as well as default format works well with FCP (x), FCE or iMovie too.

Step 4. Merge Nikon 1 V1 MOV files. (optional)
Tick the checkbox for “Merge into one file”, and the Mac Nikon 1 V1 1080p MOV converter will join and merge several mov clips into a single file as output.

Step 5. Click the “” button under the preview window, you can start convert Nikon 1 V1 1080p HD MOV on Mac for editing:

For FCP or FCP X users: Convert Nikon 1 V1 1080p HD MOV to ProRes 422 MOV;

For iMovie or FCE users: Transcode 1080p MOV to AIC MOV;

For Avid Media Composer users: Convert 1080p HD MOV to DNxHD MOV.

When the conversion is done, just import the output videos to FCP, FCP X, FCE, iMovie, Avid Media Composer to enjoy fast editing without rendering in video or audio.

If you are Nikon 1 J1 users, you can refer to “Hot Topics: Handle Nikon 1 J1 H.264 MOV and FCP, iMovie, Avid Media Composer, FCE Compatibility problems“.

Share

Aug 22

News! Canon announces PowerShot SX500 IS, SX160 IS superzoom cameras ahead of Photokina

Digital imaging buffs are certain to experience a whirlwind autumn, but there’s nothing on the books saying that manufacturers need wait for the biennial Photokina expo to roll out new models. Just in time for the back-to-school season, Canon is announcing two new superzoom cams — the SX160 IS will serve as the successor to the SX150, while the SX500 IS is an entirely new camera, set to sit alongside the company’s SX40 HS and SX260 HS point-and-shoots. Both new models include identical 16-megapixel 1/2.3-inch CCD sensors, intelligent image stabilization, a relatively modest ISO range of 100-800 and the ability to capture 720p video at 25 frames-per-second.

As you may have guessed the SX500 IS is the higher-end flavor, offering a 30x, 24-720mm lens with a maximum aperture range of f/3.4-5.8. That model boasts autofocus improvements of 32 percent and decreased shutter lag of 33 percent over the SX40 HS, Canon’s former top model in this category. The SX160 IS, for its part, packs a 16x, 28-448mm f/3.5-5.9 lens and offers 22 percent faster autofocus and 46 percent less shutter lag than the SX150 it replaces. It’s also powered by AA batteries, which some users may find to be an advantage, considering wide availability during trips abroad. Both cameras include 3-inch LCDs — 461k-dot for the SX500 and 230k-dot with the SX160 — and are set to ship in September, with the black SX500 IS priced at $330 and the SX160 IS available for $230, in both red and black.

About the above information, you can Read original at: http://www.engadget.com/2012/08/21/canon-announces-powershot-sx500-is-sx160-is-superzoom-cameras-a/

Canon PowerShot SX500 IS: 30x, CCD 16MP, vidéo 720p

With a 24mm wide angle lens and an incredible 30x optical zoom (up to 720mm) packed into a compact design, the PowerShot SX500 IS enables users to pull subjects in close and capture stunning, high-quality images with a 16.0 megapixel sensor and powerful DIGIC 4 image processer. With such incredible zoom capabilities, the camera is also equipped with Canon’s Intelligent IS system for rock-steady images and HD video even at full-telephoto zoom. A 3.0-inch LCD screen makes operation easy and intuitive, and displays the scene with brilliant clarity. In addition, the camera is equipped with a Zoom Framing Assist feature – a Canon technology that makes zooming-in and framing subjects quick and effortless. This feature is a tremendous benefit for those times when you lose sight of your subject after zooming in. By simply pressing the Zoom Framing Assist button located on the lower front left of the camera, the lens will quickly zoom out to help you re-locate and frame your subject. A frame box appears on the LCD as a guide to place your subject in and releasing the button quickly brings the camera back to the initial “zoomed-in” range. The lens retraction and extension is faster using the Zoom Framing Assist button than the zoom lever, and allows the photographer to keep the camera more stable for the shot, this is particularly helpful for those trying to zoom in and shoot pictures of animals or moving subjects.

Main features of Canon Powershot SX500 IS
– 16 megapixel sensor (CCD)

– Objective 30x (24-720mm)

– Stablisation Canon Image Intelligent IS

– Video 720p

– Smart Auto: fashion scene detection, from 32

– Screen 3 ”

– HDMI-CEC

– Framing Assist

– Creative Filters

– PSAM modes

Canon PowerShot SX160 IS

With its compact design and powerful 16x optical zoom, the PowerShot SX160 IS is a versatile camera with a dynamic optical zoom range from 28mm wide up to 448mm, perfect for everyday use. This model also features a 16.0-megapixel sensor, DIGIC 4 image processor and Canon’s Intelligent IS system – providing ultimate functionality in a compact, easy-to-carry design. The camera is always ready to shoot video with its dedicated movie button to start and stop recording HD video instantly and uses the full range of optical zoom when recording, without sacrificing HD resolution. The camera’s large 3.0-inch LCD provides a beautiful display when shooing and recording video or simply scrolling through menu options. Powered by AA batteries, the PowerShot SX160 IS is ideal for easy and convenient shooting on-the-go even when charging a battery may not be an option. The PowerShot SX160 IS digital camera will be available in red or black.

Both the new PowerShot SX500 IS and PowerShot SX160 IS digital cameras are expected to be available in September 2012 for an estimated retail price of $329.99, and $229.99, respectively.

Share

Aug 20

The best friendly format for iMovie and Final Cut Express is AIC MOV on Mac

AVCHD was jointly developed by Sony and Panasonic in 2006, it is a high definition (HD) digital video camera recorder format recording 1080i and 720p signals onto MiniDVD discs, MiniDV tape, Hard Drive, and digital camera Memory Cards, by using advanced Video Coding (AVC) compression (also known as MPEG-4 part 10 or H.264) to achieve high-quality images and low data rates. AVCHD camcorders record on a variety of file-based media, including 80 mm DVDs, hard disks, and flash memory (such as Secure Digital cards and memory sticks).

The AVCHD specification allows most SD and HD dimensions and frame rates, though each camcorder usually supports only a few formats. The AVCHD color sample ratio is 4:2:0, with 8 bits per sample. Audio can be recorded in 5.1-channel surround sound with Dolby Digital (AC-3) compression or up to 7.1-channel surround sound (uncompressed). Some camcorders, such as the Panasonic HDC-SD5 camcorder, use a two-channel built-in microphone.

New trademarks:

The AVCHD Format has been updated to Version 2.0 by adding new specifications for 3D and 1080/60p,50p. New trademarks; “AVCHD 3D”, “AVCHD Progressive” and “AVCHD 3D/Progressive” are introduced.

Resolution of AVCHD:

1920 x 1080: This format is sometimes called Full HD because it contains the full 1920 horizontal pixels of the 1080-line HD format.

1440 x 1080: This is a horizontally subsampled image with 1080 lines.

1280 x 720: This is a full-resolution 720p format.

Tips: The SD AVCHD formats are not supported by iMovie, Final Cut Express, Adobe Premiere Pro, ect.

The best codec for Final Cut Express and iMovie is AIC MOV format, therefore, if you plan to edit AVCHD in iMovie or Final Cut Express, it is a good idea for you to convert AVCHD to AIC MOV. Then, you will need to a AVCHD to AIC Converter to convert AVCHD to AIC MOV for importing AVCHD to iMovie or Final Cut Express.
Requriements:


Instructions:

Pavtube MTS/M2TS Converter for Mac is an ideal application that can work smoothly with Final Cut Express, iMovie, convert AVCHD to AIC MOV files native supported by iMovie/FCE on Mac Mountain Lion (10.8), Mac OS X Lion (10.7), Snow Leopard (10.6), Leopard (10.5).

Step 1. Import AVCHD files to the program.

Install and run Mac AVCHD to AIC converter. Click “File” menu, choose “Add Video” to locate the AVCHD files you want to add.

Step 2. Select Apple InterMediate Codec(AIC)(*.mov) format for Final Cut Express or iMovie best output format.
Click “Format” bar and and set a AIC friendly codec in dropdown-list. You are advised to follow “iMovie and Final Cur Express > Apple InterMediate Codec(AIC)(*.mov) as best video format for iMovie or FCE.

Step 3. Set possible best quality for Final Cut Express or iMovie editing.

Click the “Settings” button and customize proper video/ audio parameters if necessary. Video size, Bitrate and Frame Rate are flexible and can be adjusted as you like. E.g. Set video size to 1920*1080 when you feel like to keep 1080p as the source file features. Or set “original” in video bitrate drop-down list to keep best quality. You may skip this step as well as default format works well with FCE or iMovie too.

Step 4. Convert AVCHD to AIC MOV for FCE or iMovie workflow on Mac.
Press “” icon, let this smart AVCHD to AIC Converter for Mac to do the rest for you! This avchd converter is specifically designed for Mac users, including Mac Mountain Lion 10.8, Mac OS X Lion 10.7, Mac OS X 10.6 Snow Leopard, Mac OS X 10.5 Leopard, etc.

When the conversion is done, you can import the output files to iMovie and FCE without any trouble. Congratulations! You have successfully taken the first step to make your own masterpiece.

Now, start to create your masterpiece in iMovie and Final Cut Express!

Easy to use and very powerful.

Most popular AVHCD Camcorders:

Sony Handycam HDR-CX190 Camcorder: January 2012 – Sony – FullHD 1080p – HD 1080i – AVCHD – MPEG-2 – 1.5 megapixel sensor – Night Vision – USB – HDMI – Composite – 25 x optical zoom – Automatic Focus – Manual Focus – Image Stabilizing – 5.9 ounce

Sony Handycam HDR-XR260V Camcorder: January 2012 – Sony – FullHD 1080p – AVCHD – MPEG-2 – Hard Drive – 5.4 megapixel sensor – Night Vision – USB – HDMI – Composite – 30 x optical zoom – Automatic Focus – Manual Focus – Image Stabilizing – 7.2 ounce

Panasonic HDC-TM900 Camcorder: February 2011 – Panasonic – FullHD 1080p – AVCHD – 3 megapixel sensor – Night Vision – USB – HDMI – Composite – Component – 12 x optical zoom – Automatic Focus – Manual Focus – Image Stabilizing – 13.9 ounce

Canon XA10 Camcorder: March 2011 – Canon – FullHD 1080p – AVCHD – 2.4 megapixel sensor – Night Vision – USB – XLR – HDMI – Composite – Component – 10 x optical zoom – Automatic Focus – Manual Focus – Image Stabilizing – 1.7 pound

……

Share

Aug 18

AVCHD to Final Cut Pro-Log and Transfer TM900 50p/60p MTS to Final Cut Pro on Mac

The Panasonic HDC-TM900 is the successor to the lauded HDC-TM700, it offers the same fantastic video performance as its predecessor, particularly with its widely-praised 1080/60p mode. You can shoot Full HD 50/60P AVCHD videos with Panasonic TM900. However, bad news is currently the Panasonic 50/60P AVCHD format is nearly impossible to be edited in Final Cut Pro. Even with the lastest update of FCP X, we have not seen the expected support for 50/60p AVCHD MTS. So how to import Panasonic TM900 AVCHD 50p/60p videos into Final Cut Pro for editing smoothly on Mac?

As far as I know, the best method to solve these problems is to transcode Panasonic TM900 AVCHD 1080p 50p/60p footage to Apple ProRes for Final Cut Pro on Mac, as it’s best/natively supported by FCP 6/7 and FCP X. Of course, we need to get some help from a 3rd-party tool. If you looking for a solution for this problem likewise, check out Pavtube’s MTS/M2TS Converter for Mac which is entitled as a top Mac MTS to Final Cut Pro Converter. It supports encoding all Panasonic 1080p 50/60P AVCHD MTS files to Apple ProRes 422 so that you can easily import the Panasonic 50p/60p AVCHD footages to Final Cut Pro X, Final Cut Pro 6, Final Cut Pro 7 for editing on Mac. This will help you import the file correctly and saving the rendering time. If you have the same problem about editing Panasonic AVCHD 50/60p videos in Final Cut Pro, check out the brief guide below.

Convert/Load Panasonic TM900 AVCHD to Apple ProRes 422 for Final Cut Pro editing smoothly on Mac

1. Free Download and install Pavtube AVCHD to Final Cut Pro Converter to your Mac. It’s excellent Canon video converter which can convert nearly all canon cameras’ videos to any formats you need, such as Apple Prores 422 MOV, Apple InterMediate Codec MOV, QuickTime MOV, etc.

2. click format bar to choose output format for use in FCP 6/7 or FCP X. click and choose Final Cut Pro -> Apple ProRes 422 (*.mov).

Here we recommend the Apple ProRes 422. In the settings you will find Pavtube allows you to keep the original frame rate 50/60fbps in the final ProRes files.

3. Click “Convert” button to start Convert Panasonic AVCHD 50/60p footage to ProRes 422 MOV for editing on Final Cut Pro on Mac OS.

So there you have it. Pretty simple. After the workflow, you can go to the output folder to find the converted video files. Now you are free to Log and Transfer Panasonic TM900 AVCHD 1080p 50p/60p videos to Final Cut Pro 6/7 or FCP X for editing on Mac without problems.

Tips: Before you try to do the conversion, if you are also a FCP X user, please make sure that you have installed the Apple ProRes Codec manually since the FCP X asks users to install it by themselves.

HOT News: Pavtube’s MTS/M2TS Converter (Windows and Mac) is on sale (20% Off) now, never miss the chance to get the program during its 2012 Summer Special Offer

Share

Aug 10

Nikon 1 J2 mirrorless camera: minor control tweaks, $549, ships in September

News Source: http://www.engadget.com/2012/08/09/nikon-1-j2-mirrorless-camera-pricing-release-date-ship-official/

Not even a year after Nikon ceremoniously entered the mirrorless world, it’s issuing the followup to the J1: it’s the Nikon 1 J2, and it’s — at most — a gentle revision to a camera that was near-universally hailed as being one of the more disappointing ILC options. Disappointing, of course, because it’s Nikon. A company that quite clearly knows a thing or two about photography (D3S / D4, anyone?), but seemed to miss the mark in terms of price, performance and lens compatibility. With the J2, it sort of feels like a do-over. Outside of a slightly tweaked orange color and a reimagined exterior finish, the J2 is identical in size to the J1. You’ll find the same 10.1 megapixel CMOS sensor (1-inch), the same autofocus system and support for the same lens collection. What’s new are the additions to the Mode Selector dial, which add a smattering of creative options and access to P/S/A/M exposure modes. The rear LCD has seen its resolution double (to 921,000 dots, same as on the D4), and the camera has been intelligently designed to turn on when extending a 1 Series lens out, and turn off when retracting it into storage.

Perhaps most importantly, Nikon’s finally on the same playing field in terms of asking price. The J2 will ship in September for $549.95, and that includes the same 10-30mm f/3.5-5.6 kit lens that shipped with the J1. If you’ll recall, the J1 kit started at $100 more, yet offered far less punch than Sony’s cheaper NEX-C3. It’s also worth noting that one other player has joined the ILC movement since the J1: Canon. Arguably, the EOS M still beats the J2 in practically every way; the thing that really needed an overhaul in the J2 was the meager 1-inch sensor, yet it remains. Perhaps the best news out of this ordeal is that the J1 isn’t immediately going away. Nikon confirmed that it’d remain on store shelves for an undetermined amount of time, likely at a nice discount. If it’s offered low enough, it may be easier to live with the shortcomings.

In terms of accessories, Nikon’s also introducing an optional 11-27.5mm f/3.5-5.6 lens ($189.95; ships next month) for the 1 Series. Though similar (on paper) to the 10-30mm kit lens, this guy is nearly 30 percent smaller from a physical size and weight standpoint. And on the other extreme, there’s the WP-N1 waterproof case. This one’s engineered to encase both the J1 and J2 for beneath-the-sea action up to 140 feet deep, but the staggering $749.95 (!) price tag is bound to attract jeers, chuckles and blank stares. Now, underwater cases of merit aren’t ever “affordable,” but offering an enclosure that’s a full $200 more than the hardware it protects? Questionable. That said, we’d certainly relish the chance to test one out, but you best be sure that Nikon’s J1 / J2 is going to be your underwater cam of choice for a long while before plunking down that much coin.

Share

Aug 08

Canon EOS FAQ: HD Videos converting, importing, editing and burning on Mac

Vendor: Canon

Models: EOS 5D Mark II, new 5D Mk III, EOS 1D, EOS 7D, 60D, 550D(Rebel T2i), 600D(Rebel T3i), 650D(Rebel T4i), etc.

For Cinema EOS C300, see Pavtube Canon Column

Compatible: Recent high-end IXUS cameras

Status: Routinely repaired.

Canon EOS 5D Mark II and EOS 7D are digital single-lens reflex cameras with notable video capabilities.

The first DSLR to feature 1080p video recording, the EOS 5D Mark II has gained traction among indie film makers, that find the shallow depth of field and low-light recording to give a remarkable “film look”.

Canon EOS 5D and 7D cameras can record at 1920x1080p resolution up to 30 frames per second, and 1280x720p up to 60 fps.

Canon Cameras FAQ: 


Q1: Canon 7d MOV and ProRes codec.

I have captured files from Canon 7d ( h264), these are captured at 720p 50fps;

My deliverable is 720p 25fps, I normally take my 50fps file and open with CineTools and conform to 25 fps – effectively making the file slow motion.

I used a video tool to convert 7D .mov footages to Prores. I convert these to ProRes and they play in quicktime correctly- the information window shows them to be ProRes codec. But when I tried to conform them, it puts all files in “Skipped” folder.

I am using Final Cut Pro studio.

I cannot see how to do so that CineTools will recognise the file, any ideas ?
Matt.

A: If Cinema Tools is unable to complete the conform process for a clip, that clip is moved into a Cinema Tools–created subfolder named Skipped.

The following are three reasons why clips can not be conformed:

1. a clip is not processed if it doesn’t contain a video track

2. the frame rate is not supported,

3. no codec is found for the video track.

The video plays well in QT, so the video has nice video and audio track. I do not test your video, so I am not sure which one is the right reason. Maybe the parameters or codec of converted prores videos do not conform to Cinema tools conformable ones. Try another video converting tool to get another prores videos. The program I recommend is named Pavtube Mac Canon MOV Converter which I used to convert 5D Mark II videos. The output ProRes videos WERE successfully conformed without any problem. Download its free trial version to test if it works for you.


Q2: EOS 5D MARK II, Best Codec, 720p or 1080p

Hello all

I am beginning to use my 5D Mark II not only for pictures but also for movies. I have gone and purchased a copy of FCP 7.

Now I have a question, since the file that comes out of the camera is not very good for editing, which codec should I use to convert it?

Is it a good idea to stay in 720p instead of trying to go up to 1080p?

Is 1080p feasible in FCE as I only see 1080i?

Thanks for the help

A: This camera shoots at 30fps if I read the information correctly. This is not a standard video frame rate. The material needs to be converted to QuickTime using the Apple Intermediate Codec at 29.97fps. You can use Pavtube HD Video Converter for Mac to do this.

BTW, it’s been discussed a lot of the forum. I’m sure you can find a lot about it with a forum search.


Q3: Burn Canon MOV footages into DVD directly without any conversion

Hi guys,

I recorded some family videos in my new Canon EOS 650D. Now, I want to burn my homemade video onto a DVD so I can play it on a DVD player at a reception.  I can’t figure out how to do this, but I assume it is possible. I have read plenty articles which tell me to convert Canon footages first and then burn them into DVD. This is too complicated for me. I want to get an easy solution. Can you help?

Thanks, Melanie

A: Well, in the word of video converting there are so many ways to go about this because so many video converting tool can help you encode recorded MOV videos. After conversion, a DVD burning tool is needed for DVD burning. BUT I think you will get lost in this way.

An easy solution is to get a DVD authoring software which supports Canon Long-GOP MOV videos loading. I have ever purchased program from Pavtube which supports my canon 5D ii MOV videos perfectly. Yesterday, I received a newsletter from Pavtube to tell me that its newly released DVD Creator is able to burn Canon MOV videos to DVD directly without any conversion. I haven’t tested it. Go ahead to download and test if it is helpful.


Q4: How to compress Canon C300 mxf files to FCP X?

We are trying convert MXF files produced with a Canon C300 camera, into an Uncompressed video file that can be edited in FCP X. I tested one freeware. However, the resulting .mov (Apple ProRes 422) file is not the quality I’m looking for. I want a 1 to 1 copy of the orignial not a compressed output. And it seems that I lose my Timecode stamp in the process.

Is there anyway to accomplish this result? And what tool should I use?

Ammon Wiese

A: As far as I know, few program provides Apple Prores video output. And I have tested one program named clipwrap for my Panasonic TM700 videos. For some reason, the video and audio of output files are not sync. And this program only works in AVCHD and HDV videos.

The program I chose finally is Pavtube HD Video Converter for Mac. This program works in both 1080p MTS videos from my Panasonic TM700 and MXF videos from Canon C300. Actually, I did not notice any difference between output file and original files.

As for the timecode issue you mentioned, yes, this program performs well in keeping its timecode stamp. This is the first MXF tool which achieves this task, so far.

Hope these helps.  


Q5: Burning Cannon HF R11 MTS to a DVD with a free DVD burning software

Hi,

I downloaded a freeware and converted my movie from my new Cannon Vixia HF R11 Camcorder to a *.VOB format, then I burned a DVD with a free DVD burning software so I can watch on my HD TV. Everything looked great except the sound was not really synced with the picture, there was about a 2 second delay. Did I do something wrong?

A: Why didn’t burn original Canon MTS footages directly into blank DVD? That is to say, without converting or burning software. In my experience, video conversion always brings quality drop. So a DVD Creator natively supports MTS videos will give you great help. Here a freeware named Pavtube Free DVD Creator is recommended. This program is totally free while it is fully functional. I have downloaded it from pavtube.com to author my TIVO recordings and Panasonic MTS videos. It gave me quality DVD burning. Moreover, it allows me to adjust the DVD menu template, menu text, display aspect ratio and background for the DVD menu. Take your time because you have to pay for it once its giveaway is expired.


Q6: Converting Canon T4i on Mac?

Q: My Canon T4i is somewhat new. I just started using the video clips for my sons soccer.  I use smugmug and this is what I want to ultimately upload them to.  My son would also like to email a few.  But, the T4i format is not converting or allowing me to do much of anything with. I can export a clip from the memory card to my Mac- to Aperture- to desktop and then slowly load them to smugmug.  But, there has to be an easier way. Thank you for your time and attention.

Carolyn

A: I looked around and found that it looks like smugmug re-compresses the video. So the video quality is not good enough. Then I found a Canon T4i MOV Video Converter which helps to convert MOV video to Smugmug preferred AVI videos. In the process of converting, I set output video bitrate the same with bitrate of original MOV video, and the output videos show really high quality. The program I use is Pavtube HD Video Converter. Please check if it is helpful for you.
 

. . . . . .

Share

Aug 07

Convert Sony CX200 1080/60i AVCHD MTS to AIC for iMovie with 5.1 channels on Mac Mountain Lion

Summary: Pavtube Mac MTS Converter for iMovie – a prfessional MTS to AIC Codec Transcoder is the ideal tool to transcode Sony Handycam HDR-CX200 recording AVCHD MTS to iMovie compatibly format Apple Intermediate Codec (AIC).

Sony Handycam HDR-CX200 specs: http://reviews.cnet.com/digital-camcorders/sony-handycam-hdr-cx200/4507-6500_7-35127841.html

If you have a Sony Handycam HDR-CX200 camcorder and use it to record some of the MTS videos as the memory, then edit HDR-CX200 1080/60i AVCHD MTS in iMovie on Mac to get better effect, share the memory with with your friends and families, but worse, when you intend to import the 1080/60i AVCHD to iMovie on Mac, you will depressedly find that iMovie cannot ingest 1080/60i AVCHD MTS from Sony CX200 camera, the reason that the MPEG-4/H.264 is a compatible codec for playback but not so good for editing with iMovie. Thus, how to import Sony HDR-CX200 1080/60i AVCHD MTS to iMovie on Mac for editing successfully and easily?

In fact, the best compatible video format for iMovie is MOV in AIC (Apple InterMediate Codec) while the Sony CX200 recording is H.264 MTS, M2TS format. That means we need to transcode CX200 1080i MTS recordings to AIC for iMovie on Mac Mountain Lion via an easy-to-use and professional  Mac MTS Converter for iMovie is vital in solving the incompatibility problem. I believe Pavtube MTS/M2TS Converter for Mac is the best choice for you. Which not only can transcode Sony MTS clips to iMovie with original quality, also can deinterlace the 1080i files to make it more smoothier on HDTV and iMovie, split long clip for easy uploading to YouTube, Vimeo etc., repalce the orginal audio in added MTS files, etc. So, the top MTS Converter for iMovie is your best choice. It is as easy as 1, 2, 3.

Now the conversion starts with…

1. Connect the Sony Handycam HDR-CX200 to your Apple with USB2.0. Download and run Pavtube Mac AVCHD Converter for iMovie. Click “add” to load your MTS videos to the top MTS to iMovie Converter for Mac. If your MTS files have already been transferred to your Apple hard drive, you can easily drag them to the best Mac MTS to AIC Converter.

Tip: If you have multiple Sony CX200 1080/60i MTS clips, you can select the “Merge into one” box to merge/combine the Sony CX200 MTS clips into one file for iMovie, so that you can play these files without interruption.

2. Select the best output format for iMovie and set the output folder.
Click “Format” and you will get a dropdown menu. Move you pointer to “iMovie and Final Cut Express > Apple Intermediate Codec(AIC) (*.mov)”. The AIC is the compatible format for you to copy Sony 1080/60i MTS to iMovie on Mac Mountain Lion. Then you can set the output folder by clicking “Browse” icon as you need.

3. Click the “Convert” button to start Convert CX200 1080/60i AVCHD MTS to AIC for iMovie with 5.1 channels on Mac immediately.

After conversion, you can upload Sony MTS videos to YouTube, Vimeo etc., you can also stream the AVCHD videos to your friends and families for sharing. As long as you want, you can also do the more you want to do.

Tip 1: The professional Mac MTS Converter for iMovie is the best application for Sony CX series users for the reason, that it not only can convert AVCHD MTS files to iMovie, but also can transcode Sony CX200 MTS to FCP or FCE.

Tip 2: Pavtube Mac AVCHD Converter for iMovie is offering a discount now – 20% OFF, if you are interested in purchasing, never miss the chance.

Share

Aug 04

MTS to AVI Converter-How to Convert AVCHD MTS to 1080p/720p AVI video

Part 1. What are MTS files?

The *.mts format was developed jointly by Sony and Panasonic for use in their camcorders. Support for the format has grown and is now supported by Canon, JVC and Sanyo video camcorders. The format itself is based on the popular MPEG4 video codec and supports both 1080i/p and 720p video modes.

MTS files are encoded with the most effective AVC codec, which is good for streaming, but not widely accepted by Video Editing software like Windows Movie Maker, Sony Vegas, Adobe Premiere, etc.

Part 2. How to Convert AVCHD MTS files to AVI on Windows or Mac?


Step 1: Get MTS files from HD Video camera/camcorder to PC.
Connect an HD Camcorders to your PC with a USB cable. Once connected and powered on, the camcorder should appear on the desktop as a new disk. It is desirable that you copy the videos to your PC’s hard-drive before converting or editing them.

Step 2. Load the MTS files to Pavtube MTS Converter.
Install and run Pavtube MTS to AVI Converter on your computer. When the below interface pops up, click “Add” image button to browse your computer hard disc and add the .MTS files you want to convert to the program. Batch conversion is supported by this MTS converter, so you can load several MTS files at one time.

Step 3. Edit your MTS files on MTS to AVI Converter (optional).
This MTS to AVI Converter can help you set video brightness, contrast, saturation; trim and crop video, trim video; Add text, image, and video watermark, etc.

Note: If you would like to merge multiple .mts clips into one file before the conversion, please tick off the checkbox “Merge into one file

Step 4. Customize output Settings.
To convert MTS to 1080p AVI video, you can click the “Format” bar, and choose HD Video -> AVI HD Video(*.avi) or DivX HD (*.avi) as output format.

If you wanna convert M2TS to Xvid, just choose Xvid AVI as output format from “Common Video”.

To further improve the video quality, you may click on “Settings” and set video bit rate up as “high quality” or “original” to avoid quality loss. To shrink the output file size, you may set video bit rate and frame rate down.

Step 5. Start converting MTS to AVI video.
Once the above mentioned steps are finished, you can click “Convert” to start convert MTS to 1080p/720p AVI video with the MTS to AVI Converter. When the conversion task is completed, you are able to get the final output files by clicking “Open” button with ease.

Tip 1. Pavtube MTS/M2TS Converter takes full advantage of NVIDIA’s CUDA technology and ATI Stream (AMD APP) technology to largely accelerate conversion speed.

Tip 2. Due to the huge file size of MTS movie, it usually takes a long time to convert MTS to AVI. You may check “Shut down computer after conversion” in the conversion progress window and leave it be.

Tip 3. Pavtube Studio has put the great MTS/M2TS Converter on its Summer Sales Special Offer list, which means you can save up to 20% on the excellent MTS compressor and importer tool! Go ahead and click the below links to get your coupon:

http://www.pavtube.com/2012-summer-sale.html

Share
Page 35 of 37« First...102030...3334353637