AIC Converter,MTS to AIC,MTS to iMovie,MTS to FCE,MTS to Final Cut,AVCHD to AIC Converter,AVCHD to Final Cut Express,import AVCHD files to iMovie,MTS to ProRes 422,MTS to Final Cut Pro,MTS to FCP X,AVCHD and Final Cut Pro,Log and transfer MTS to FCP,edit MTS footage in iMovie,FCP transfer MTS files,transfer AVCHD files to iMovie

Nov 13

Edit Panasonic P2, Sony XDCAM, Canon MXF footage in CyberLink PowerDirector with AVI/MPG/MOV/WMV format

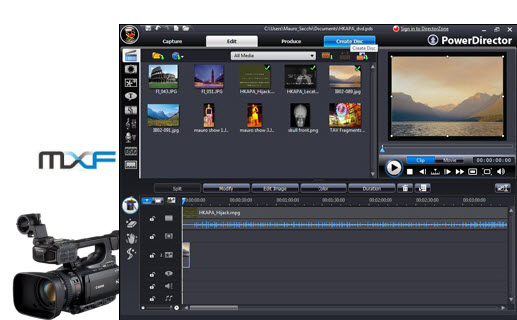
CyberLink PowerDirector is a video editing software application for non-linear video editing, published by CyberLink Corporation. PowerDirector allows users to capture, edit and output from within the software and has semi-professional features suitable for the consumer level.

In the forum, many users have the problems to import MXF files to CyberLink PowerDirector 9/10, their MXF footages are recorded by canon high end camcorders, like Canon XF series, Panasonic P2 card, Sony XDCAM etc. MXF videos are not well supported by PowerDirector due to the codec. Such as:

Q1. “How to ingest and convert P2 footage on pc with powerdirector 9?

Hello, I am trying to edit a movie that was filmed a little bit ago. : It was filmed on a panasonic p2 camera which has mxf file extensions. That was dumped onto an external hard drive which is accessible on both pc and mac(exFAT) so I can see the 50gb. On Final Cut Pro I would do a”log and transfer” and click on the particular p2 folder.

How would something like this work in powerdirector 9? Is there a third party plug-in or something that would allow PD9 to read it like this. I saw that it will read rw2, but this isn’t the format.  Moreover, it just has a lot of folders that some how that “log and transfer” deal puts them together for the actual footage.”

Your help is appreciated. Thanks in Advance.

Q2. “I get a Canon XF305 camcorder and recorded some video clips, when I try to import the files to Cyberlink PowerDirector to edit, I find the files could not be recognized, so what is the problem and how can I solve it? Thanks”

Through the above questions, you will find they can hardly import the MXF footage output from these camcorder to CyberLink PowerDirector.

CyberLink PowerDirector can easily import files in various formats, the supported file formats are as follows:

Video formats: MPG, MPEG, MP4, MOV, AVI, Divx, WMV, FLV, AVCHD, DV, Canon/Nikon DSLR video files as well as DSLR video in H.264 format, HD video from HDV camcorder, WMV HD, RealVideo, Blu-ray Disc

Audio formats: WAV, MP3, WMA, M4A, AAC, Dobly, DTS, WAVE and MPEG-1 Layer III audio formats

Image formats: RAW, JPG, GIF, PNG, BMP

May be you are looking for the best way to import and edit Panasonic P2, Sony XDCAM, Canon MXF files in Cyberlink PowerDirector. Fortunately, your problems can be solved with MXF Conversion tools. MXF to CyberLink PowerDirector Converter is the terrific program that has full support to convert Sony XDCAM/Canon XF/Panasonic DVCPRO HD P2 MXF to CyberLink PowerDirector compatible formats, like WMV, MPG, MPEG, MP4, MOV, AVI, Divx. WMV format is best for use in PowerDirector on Windows platform.

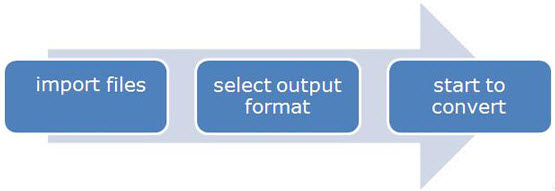
Below is a guide for you, you can follow it to convert MXF to PowerDirector support format.

Before conversion you need

1. Transfer the .mxf clips to hard disk.

2. Get MXF Converter ($29). Click here to download a trial. A trial won’t expires but it converts MXF with Pavtube logo on the screen.

(Good News, now if you buy Pavtube MXF Converter for Windows or Mac products, you can get a Free DVD Creator for Windows or Mac in the 2012 Thanksgiving Giveaway (Nov. 14- Dec. 10), please take a look!)

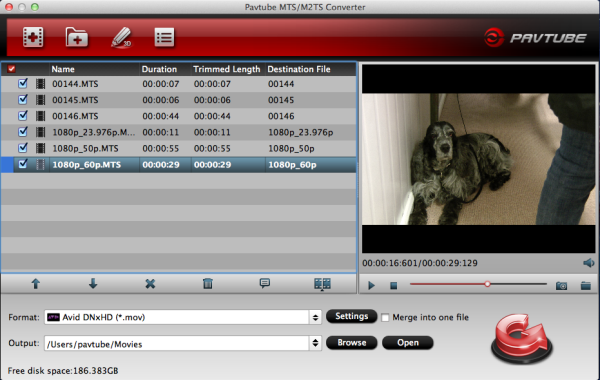
Step 1. Add MXF files.

Launch MXF to Cyberlink PowerDirector Converter. Click the button “File > Add Video/Audio” to add MXF files to the professional MXF Converter. Or drag and drop .mxf clips to file list.

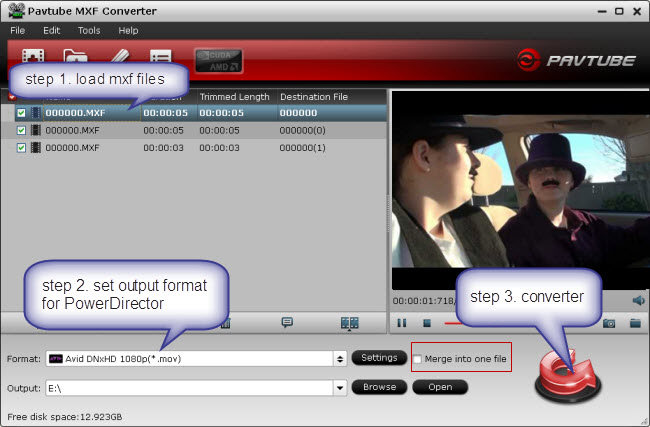
(Note: While importing the P2 MXF files, please make sure you have the original P2 MXF file structure as it saved on your camcorder. If you only have some random MXF clips, your files will have image only without audio.) If it is necessary, you can double click the each file to have a preview.

Tip: If you wanna join AG-HVX200 P2 MXF files for CyberLink PowerDirector 10, just check the “Merge into one file” box.

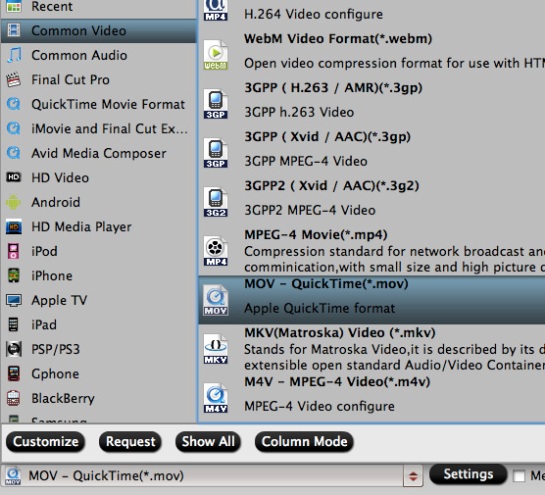
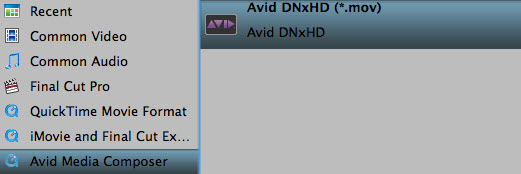
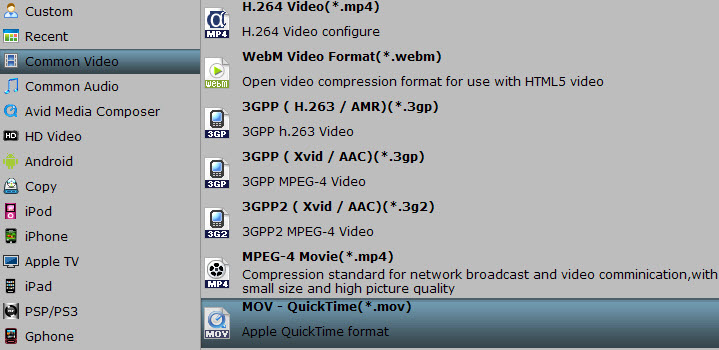
Step 2. Select WMV as the output format for CyberLink PowerDirector 10 and set the output folder.

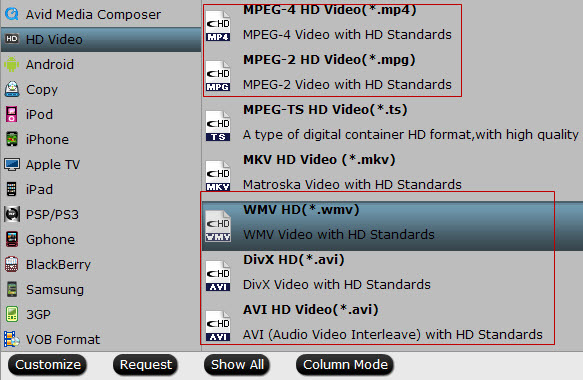
Click on the “Format” and get the dropdown menu, then move you pointer to “HD Video”, from the sublist, you can easily find the “WMV HD(*.wmv) or MPEG-2 HD Video(*.mpg)” which is the compatible format for you to import Panasonic P2, Sony XDCAM or Canon MXF files to CyberLink PowerDirector 10 for further editing. Of course, you can also set the AVI, MOV, MP4, MPG etc. CyberLink PowerDirector support format as the output format.

Useful Tips:

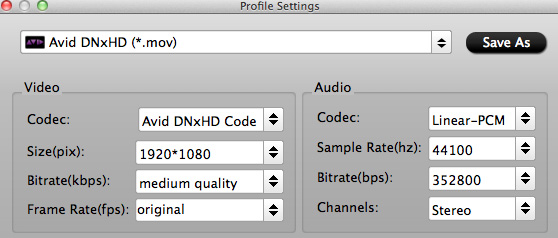
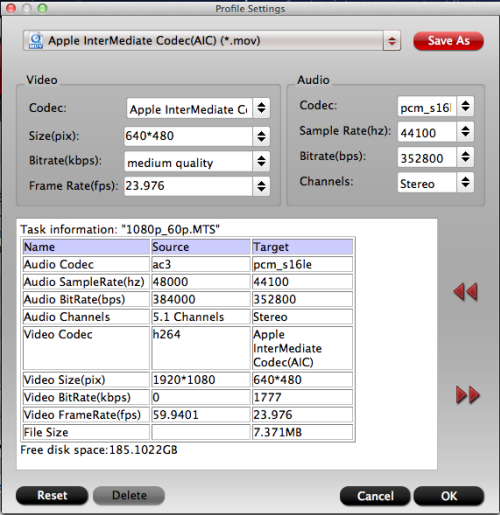
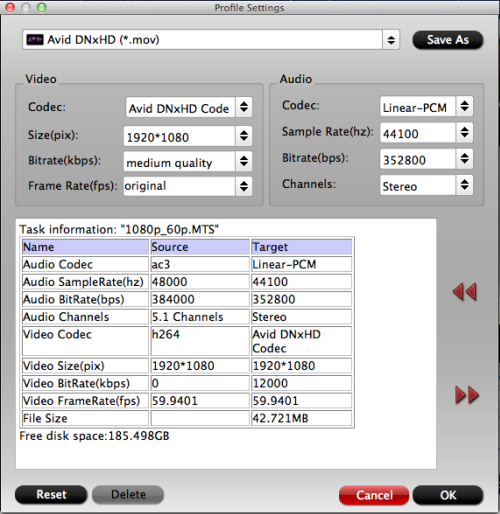
Settings – click the “Settings” icon and you will go into a new interface named “Profile Settings”. You can adjust codec, bit rate, frame rate, sample rate and audio channel in the interface according to your needs and optimize the output file quality. You can set the video size as 1920×1080; set bitrate from 1Mbps to 20Mbps; set frame rate as 24p or 30p to get best output video for CyberLink PowerDirector 10.

Step 3. Click the “Convert” button, start converting your Panasonic P2, Sony XDCAM, Canon MXF files to WMV/HD MPEG-2 for CyberLink PowerDirector 10 with the NVIDIA CUDA and AMD APP acceleration technologies support. You can find the process in the “Conversion” interface.

After the conversion, you can easily import/edit MXF to CyberLink PowerDirecor for editing. Then feel free to create brilliant movies like a pro with the powerful set of integrated tools.

How to load/import converted MXF footage to Cyberlink PowerDirector

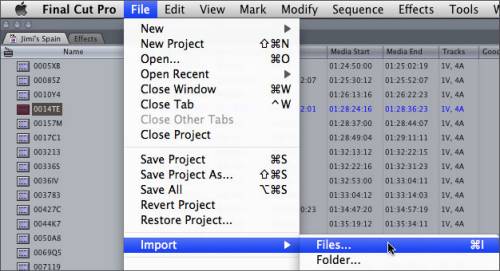
Step 1. Start up Cyberlink PowerDirector, follow “Open Folder>>Import Media Files” to import individual video clips.

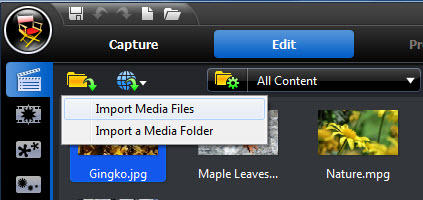
Step 2. Browse to the converted .mov video and press “Open”.
Now the MXF footage is successfully converted and imported to Cyberlink PowerDirector and you can get down to video editing. Read more from MXF Column page.

Supported MXF camcorder models by MXF Converter

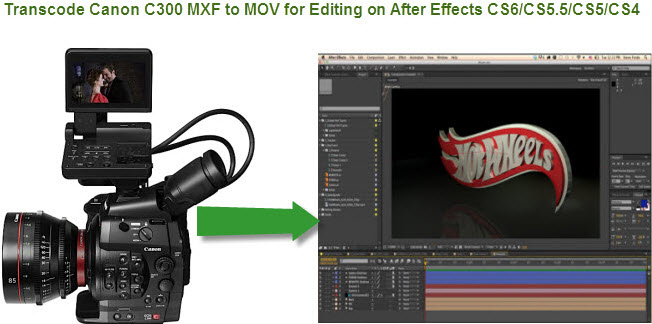
Canon: Canon C300, Canon XF100, Canon XF105, Canon XF300, Canon XF305

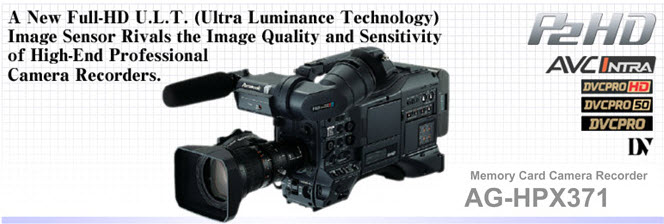
Panasonic DVCPRO HD P2: AJ-HPX3700, AJ-HPX2700, AJ-HPX3100, AJ-HPX2100, AJ-HPX2000, AG-3DP1, AG-HPX500, AG-HPX370, AG-HPX250, AG-HVX170, AG-HVX171, AG-HPX371, AG-HPX600, AG-HPX255, AG-HVX200, AJ-HPM100, AJ-HPM200, AG-HPX300, AJ-HPX3000

Sony XDCAM: Sony XDCAM SD, XDCAM HD and XDCAM HD422

Share

Nov 12

Import Panasonic HC-X900/X800 AVCHD 1080/60p MTS to iPhoto 8/9/11 for editing on Mac OS X

Expert HD Camcorder HC-X900/X800 with 3MOS System Pro bringing Panasonic’s Highest-Ever Image Quality. The 3MOS System Pro achieves a dramatic improvement in performance with a totally re-engineered lens, sensor, and engine. This allows the new system to produce Full-HD images with breathtaking color, detail and gradation. 3MOS System Pro is a next-generation imaging system that exhibits outstanding effects even under dim lighting, and produces bright, beautiful images with minimum noise.

The Panasonic X900/X800 records 1080/60p AVCHD videos. However, iPhoto 8/9/11 does not import the AVCHD MTS/M2TS videos. You can not easily open, play and edit them on Mac. So if you want to log and transfer the Panasonic X900/X800 1080/60p AVCHD to iPhoto on Mac OS X for editing without rendering, you need a Mac AVCHD to iPhoto Converter to convert the Panasonic X900/X800 1080/60p AVCHD MTS/M2TS to QuickTime MOV for iPhoto 8/9/11 editing on Mac.


Steps to convert AVCHD MTS to iPhoto mov, mp4 or h.264 on Mac

1. Load files to the professional Mac AVCHD to iPhoto 8/9/11 Converter.

Run the AVCHD to iPhoto 8/9/11 Converter for Mac, click “Add Video”, load the 1080p .mts videos from Panasonic HC-X900 camera through the PRIVATE > AVCHD > BDMW > STREAM folder. Or drag and drop the AVCHD files to the Mac Software.

2. Set QuickTime MOV as output video format

Click “Format > Common Video > MOV QuickTime (*.mov)” as output video format. You can click the “Settings” button to set the output video’s parameters. The Mac Panasonic AVCHD to iPhoto converter will transcode Panasonic HC-X900/X800 1080/60p AVCHD files to MOV with original 1920×1080 HD definition as H.264 as QuickTime codec.

3. Start converting X900/X800 1080/60p AVCHD MTS/M2TS to QuickTime MOV for iPhoto.

Click “Convert” to start ConvertPanasonic X900/X800 AVCHD MTS to QuickTime MOV for iPhoto 8/9/11 format when everything is ready.
The Mac AVCHD to iPhoto Converter supports batch conversion so you may load multiple AVCHD MTS/M2TS files and convert them to QuickTime MOV at one time.

When the process is finished, import the converted video file to iPhoto 8/9/11 for editing on Mac.
Hope this article will help you to import Panasonic X900/X800 1080/60p AVCHD footage to iPhoto 8/9/11 for editing.

To import photos or videos from a hard disk:

Do one of the following:

Drag one or more photos or videos from the Finder to the iPhoto main window.

Drag one or more photos or videos from the Finder to the iPhoto icon in the dock.

In iPhoto, choose “File > Import to Library”. Then select the photos or videos you want to import and click Import.

Tips:

1. You can use Pavtube DVD Creator Mac to burn X900/X800 AVCHD to DVD on Mac. Now if you buy Pavtube converter products, you can get a free DVD Creator (Win or Mac) in the Thanksgiving promotion (Nov. 14-DEC.10), please take a look!

2. The Panasonic AVCHD to iPhoto Converter for Mac also works with other Panasonic AVCHD camcorders like HDC-TM700/HS700/SD700/SD600/HS900/SD800/SD900, etc and Panasonic Lumix cameras like DMC-ZS3/TZ7, DMC-TZ10, DMC-FZ40, DMC-FZ45, DMC-FZ35, DMC-TZ20, DMC-TS1/FT1, DMC-TS2/FT2, DMC-FX75.

Share

Nov 08

Nano Flash Workflow-How to Import nanoFlash MXF to Avid Media Composer on Mac

“I have MC 5.01 seeing mxf files created with my Nanoflash in AMA mode, but upon trying to export via Avid Codec, Avid advises it cannot export Long-GOP without transcoding first. Yet, the files were created in I-frame mode with Nanoflash. I am updating now to 5.03, but does someone know why Avid thinks this stuff is long gop? The big reason for me buying nanoflash was to use mxf with Avid in a way that would avoid that transcoding issue, as that is a major downside to the AF100 avc workflow for me.”

nanoFlash is the world’s smallest, lightest, lowest-power, professional HD/SD recorder/player. The nanoFlash from Convergent Design represents a huge leap forward in tapeless workflows. Easily mounted to your camera, nanoFlash is designed to record higher quality images than the camera itself, by capturing never-compressed video/audio from the HD-SDI or HDMI output. nanoFlash utilizes the very high-quality Sony XDCAM 422 CODEC, recording the video/audio onto affordable and readily available Compact Flash Media, at up to 160Mbps (Long-GOP) or 220 Mbps (I-Frame). The footage can be stored in either Quicktime (MOV), MXF, or MPG file formats, providing near-universal NLE support as well as DVD / Blu-Ray authoring formats.

MXF format is great for record high-definition videos, it can keep the high quality. But, MXF format video is not easy to use because many editing software doesn’t support this format, like Avid Media Composer on Mac.

Part One: Import nanoFlash MXF to Avid Media Composer with download Avid AMA MXF plugin

You will need to be running Avid Media Composer 3.1.1 or better to take advantage of Nano Flash recordings. Ideally you should be running Media Composer 5.0.3.2 or later which is when AMA file link support was introduced (no SD file support with AMA linking). Some pointers to follow

– With Media Composer 3.1.1 you can only import files.

– When using Media Composer you should record i-frame only MXF Files on the Nano Flash.

– MC also supports Long-GOP 50 Mbit but this is more taxing on the system so best avoided.

– 720p 24/25/30 frame rates are supported but only up to 50 Mbps rate.

As with Avid Media Composer can playback (decode) files up to 280Mbps but will render any effects work down to 50Mbps. With the introduction of Avid Media Composer 5.5 you will need to download the Avid AMA MXF plugin from the address below: http://www.avid.com/US/products/Avid-Media-Access/plug-ins

Learn More: http://www.root6.com/blog/index.php/2011/07/nano-flash-workflow-guide/

Part Two: How to convert nanoFlash MXF to Avid Media Composer suitable format?

If you use nanoFlash with your camcorder, you can export QuickTime files or MXF files to a flash card. It is great for camcorders without too much space for storage. However, you may sometimes face the problem that Avid Media Composer does not recognize the MXF files you get. How would you import the nanoFlash MXF to Avid Media Composer then?

MXF Converter for Mac is the recommended nanoFlash MXF to Avid Converter, which supports converting nanoFlash .mxf to DNxHD MOV or QuickTime MOV for Avid Media Composer. This Mac nanoFlash MXF to Avid converter also helps you easier merge, join and convert recording MXF with perfect synchronization. Here is the step-by-step guide for converting nanoFlash MXF to MOV for Avid Media Composer.


1. Install and run MXF to MOV Converter for Mac. Click “Finish” when the installation is complete, and Pavtube MXF to MOV Converter for Mac will launch automatically.

2. Click “Add” to load nanoFlash MXF video files or directly drag the files into file list. By default, the files are selected. If you would like to join all the selected files together, check the box of Merge into one. You could view the files in preview window, simply highlight the file and click play button.

3. Click “Format” bar to determine output format. The program offers particular output formats for Avid. Just click the format bar and choose “Avid Media Composer -> Avid DNxHD (*.mov)”.

4. You can click “Settings” if you’d like to customize advanced audio and video parameters like video Codec, aspect ratio, bit rate, frame rate, Audio codec, sampling rate, bit rate, channels. Do not forget to click “OK” to confirm your settings. Then type in a desired output location in the “Output” box.

5. Click “Convert” to start to convert nanoFlash MXF to MOV video for editing on Avid Media Composer. You can set auto shutdown in progress window or leave it there and come back later.

After the conversion is finished, just run Avid MC and import the .mov files for editing. You will find the output video work perfectly on Avid Media Composer.

You can use Pavtube DVD Creator for Mac to burn MXF files to DVD on Mac easily, you can get 50% off.

PS: If you are using Adobe Premiere Pro as your preferred Non-leaner editing tool, you can also use the converter to export Adobe Premiere compatible .wmv, .mov files.


Share

Nov 07

Sony HDR-TD20VE 3D Camcorder reviews: Import Sony HDR-TD20VE 3D AVCHD files to Final Cut Pro X

Sony HDR-TD20VE 3D Camcorder Key Features:

2 x 1/3.9in Exmor R CMOS with 5.4Mpixels; Full HD AVCHD 2.0 at up to 28Mbits/sec; 3D recording using MVC format; 17x Extended zoom (2D mode); 12x Extended zoom (3D mode); 64GB Flash memory

Sony HDR-TD20VE 3D Camcorder Pros:

Great image quality
Comprehensive manual features
Control knob

Sony HDR-TD20VE 3D Camcorder Cons:

Expensive
No lens ring
Proprietary accessory shoe

The HDR-TD20VE is rare, like the JVC Everio GS-TD1, in that it is built for 3D from the ground up. Instead of requiring any kind of 3D accessory, as with Panasonic’s 3D-capable models such as the HC-X900, the TD20VE can shoot 3D whenever you like – simply flip a switch on the rear. The TD20VE incorporates two identical lens paths leading to two identical CMOS sensors, each 1/3.9in in size with 5.4Mpixels apiece and sporting Exmor R technology. This is Sony’s equivalent of back-side illumination, which gives sensors greater light-sensitivity for improved image quality, particularly in low light.

3D AVCHD to FCP X solutions:

You may have use HDR-TD20VE camcorder and recorded many 3D AVCHD footages, after recording, you may want to import Sony HDR-TD20VE 3D AVCHD to editing software on Mac, such as Final Cut Pro, Final Cut Pro X, etc. but, as we know, AVCHD is not the best format for use on Mac, users will encounter many problems when they try to import HDR-TD20VE 3D MTS to Final Cut Pro X, because the AVCHD format/codec is not friendly to Mac application, the best format is MOV.

The best method to solve these problems is to change Sony HDR-TD20VE 3D AVCHD footage to FCP X best supported video format and codec. Apple prores codec is the best for FCP X. Now you can follow the steps below to transcode Sony HDR-TD20VE MTS/M2TS to FCP/FCP X best codec with Pavtube MTS converter for Mac.

Step by step guide to transcode Sony HDR-TD20VE 3D AVCHD to ProRes MOV for FCP X

1.Download Pavtube 3D AVCHD to FCP X Converter. This professional MTS Converter for Mac can help you convert Sony HDR-TD20VE AVCHD files to ProRes or AIC codec for editing software on Mac, more output formats are also supported.


2.Install and launch this 3D AVCHD to FCP X Converter for Mac. Drag and drop your Sony HDR-TD20VE footage to the converter.

3.Click “Format” bar to choose the output format. For editing in FCP, FCP X, you can click and choose “Final Cut Pro -> Apple ProRes 422 (*.mov)”.

4.You can click “settings” to customize the output parameters, adjust the resolution, bitrate as you want.

5.Click convert button to start.

With this professional Mac 3D AVCHD to FCP X converter, you can easily convert Sony TD20VE 3D AVCHD files to Mac editing software for editing, this software runs fast, so you can convert your HDR-TD20VE footages in less time, video and audio synchronization are perfectly guaranteed. You can take this “how to import video to FCP X guide” as example to import video files to FCP X. You can also find more tips and tricks in MTS column and FCP column.

Except convert 3D AVCHD to FCP X, if you need to burn Sony TD20VE 3D AVCHD to DVD disc/ISO/folder on Mac, you can try Pavtube DVD Creator for Mac, now you can get 50% off on this product.

Breaking news: If you buy Pavtube converter products in the Thanksgiving promotion (November 14 – December 10), you can get a free DVD Creator (Win or Mac).

Related guides:

Play 3D MTS files

Edit 3D MTS on Windows

Transcode Panasonic 3D AVCHD on Mac

Share

Nov 07

Share a camera user experience: How to convert avchd to different codec for editing, playing, uploading, etc

The following article is a camera user experience sharing:

The original from http://xa10forums.com/pc-editing-and-workflows/how-to-convert-your-camera-files-into-different-codec-to-edit-or-play/msg3023/#msg3023

“I am posting this new info here, from another post I made.

Many of you have problem editing this AVCHD codec straight out of your camera. It’s a very difficult codec for the computer to edit and it will JITTER and SPUTTER during the timeline play. Unless you have a super fast computer and editor, this is a problem for most of the people with older systems. So, convert the AVCHD codec into something a bit friendly and your editing will be much better.

There are so many converters and no one has the time to play around with hundreds of them and find the best software for lower cost.

Buy a video converter software and it will convert your AVCHD footage to any format; IE: youtube, vimeo, any iPhones, etc.

All of them works well and some PRIMITIVE editing you can do with either one of them. You can also JOIN the clips together as well in its editor. Your files comes in 2Gb segments and if you drop it in sequence it will be joined.

A) http://www.pavtube.com/hd-video-converter/ (my favorite one and I purchased it)

B) http://www.wondershare.com/pro/dvd-converter.html

If you just wish to convert AVCHD to popular editors and to files, check this one out… A,B links do the same but this one is much nicer for this specific purpose.

C) http://www.pavtube.com/convert-mts-avchd-files.html

A note to all members who are interested to convert the hard-to-edit camera footage (AVCHD) to something a bit more friendly to use the above suggested software. There are a thousands of free software similar to that, but I have personally checked out these and looks OK for a playback on your TV or burn a DVD without hassle as in some of the editor. Just drop the file in it and select whatever format you wish. There is more to this, if you have more questions, please ask.

Download a FREE to try from the above links and play around with it. There is a mark on the output video until you buy it.


Share

Nov 06

Transcode Sony Alpha A57 1080p MTS to AIC for iMovie editing on Mac Mountain Lion 10.8

Q: “I recently bought a new Sony Alpha 57 camera. I use an iMac with iMovie for my videos. I shot some video on the AVCHD 60p format and cannot open in iMovie.

I am trying to convert the file to iMovie compatible format. But seems no software can read my videos, I am using the latest Mountain Lion, it’s that the problem?”

A: If you are using Mountain Lion, you need to pay attention to AVCHD files, as there is something changed on Mac 10.8. It shows AVCHD as a jpg not a folder, so many converters on the Market will not read the files due to structure changed. I am an older user of Pavtube MTS Converter for Mac, I just got update from Pavtube that they have added AVCHD support on Mac 10.8, you can download a trail version from below to give a try.

http://www.pavtube.com/mts-converter-mac/
________________________________________________________________________________________

The Sony Alpha A57 SLR Digital AVCHD Camera with innovative Translucent Mirror Technology. With a 16.1MP APS-C Exmor HD CMOS sensor, directs incoming light to the CMOS image sensor and the AF sensor at the same time, allowing full-time continuous AF during both still and video shooting. Thus, you can sharpness when recording full HD 1080p video or photographing at up to 12 fps. If you want import and edit Sony Alpha A57 1080p file in iMovie and solve some trouble about incompatible format on your Mac, the professional MTS Converter for Mac is the best choice for you, which is also proved to be compatible with Mac OS Mountain Lion. It can not only transcode A57 AVCHD files to AIC for iMovie, but also provide you with some simple editing features, such as merging several videos into one file, deinterlacing the original footages, cropping video size, trimming video clips, adding special effects and text/image/video watermarks to output videos, thus it will be on the top of your list.

The best MTS/M2TS to iMovie Converter review from a User: I have been very satisfied with the conversion performance. I usually just get it set up with a large batch and let it run over night. The next day all of my files are ready to go. Bellow is the user steps sharing, please follow it.

First Free Download AVCHD to iMovie Converter for Mac


Step 1. Load 1080p MTS/M2TS files from Sony A57 to the professional AVCHD to iMovie Converter for Mac.

Connect the Sony Alpha SLT-A57 to your Apple with USB 2.0. Launch AVCHD to iMovie Converter for Mac and then click the “Add video” button to import your Sony A57 1080p MTS/M2TS files. You can tick the box in front of the file you want to convert. If your MTS/M2TS files have already been transferred to your Apple hard drive, you can easily drag them to the best Mac AVCHD to iMovie Converter.

Tips:
1. If you have multiple 1080p MTS/M2TS files, you can select the “Merge into one file” box to merge them into one single file for iMovie so that you can play these files without interruption.

2. Double click the selected file and you cam preview it.

Step 2: Select an output format for iMovie and set the output folder.

Click on the “Format” and you will get a dropdown menu. Move you pointer to “iMovie and Final Cut Express > Apple Intermediate Codec(AIC) (*.mov)”. The Apple Intermediate Codec(AIC) is the compatible format for iMovie and FCE. Then you can set the output folder by clicking “Browse” icon as you need.

Step 3: Click on the “Settings” icon to adjust audio and video parameters.

Click the “Settings” icon and you will go into a new interface named “Profile Settings”. You can adjust codec, bit rate, frame rate, sample rate and audio channel in the interface according to your needs and optimize the output file quality.

Tips:

1. 1920*1080 as video size and 30fps/29.97fps as video bitrate are the most suitable video parameters for editing in iMovie.

2. If you want to reduce the video size, you can change video size from 1920*1080 to 1440*1080 or 1280*720.

3. Deinterlacing has been chosen as default, so you needn’t worry about how to deinterlace 1080i videos.

Step 4. Transcode Sony A57 AVCHD MTS files to AIC for iMovie with 30fps and 5.1 channels on Mac.

Click the “Convert” button, start convert Sony A57 1080p MTS files to AIC on Mac immediately. You can find the process in the “Conversion” interface.

Step 5: When the Mac AVCHD to iMovie conversion is 100% completed, open “iMovie” and click “File > Import” to transfer the converted Sony A57 MTS footages to iMovie.

The best AVCHD to iMovie Converter for Mac is not only helpful to get footages from Sony A55 into iMovie on Mac, but also does a great job in converting AVCHD to ProRes 422 for FCP, MPEG-2 for Adobe Premiere Pro, DNxHD for Avid Media Composer, AIC for FCE, etc.

Share

Oct 31

FCP Workflow – Transcode/Import Panasonic AG-HPX371E MXF to ProRes for FCP 6

Question: How to import p2 .mxf files from Panasonic AG-HPX371E to FCP 6 for editing?

I filmed with two Panasonic AG-HPX371E camera’s movies earlier this week. Everything was filmed on P2 cards in 1080-50i (AVC I 50/50i). The program itself was a single shot of just over 65 minutes. On the P2 card it was broke down in separate files, six files of 10 minutes and 9 seconds (4,27 Gb) and one file with the final couple of minutes (about 1 Gb). How can import these files into FCP 6 for editing?

Answer: Transcode Panasonic AG-HPX371E P2 MXF to FCP 6 compatible codec.

I know Apple ProRes is the best codec for FCP, so you need to convert your Panasonic AG-HPX371E .mxf files for working in Final Cut Pro. I just find a program called Pavtube MXF Converter for Mac to convert your Panasonic AG-HPX371E P2 MXF files to Apple ProRes 422 format. Brilliant! You can give a try.

After conversion, once the format conversion is done, open up Final Cut Pro, choose “File > Import > Files…” to select and load the generated ProRes 422 MOV files to FCP for editing use.

Of course, if you want to import MXF Footage to Final Cut Pro directly from a P2 card, using a P2 card reader, the PCMCIA CardBus slot in your laptop, or the HVX200 camera itself. You can also import footage from a P2 card image that was offloaded to a hard drive. Final Cut Pro sees the P2 card as a volume and also sees the path to the card. The process for importing P2 clips is similar to standard importing, with some important differences. For example, importing P2 footage actually copies the media from the P2 card into your Capture Scratch folder and places a QuickTime wrapper around it to edit in Final Cut Pro. The following article link detailed shows how it works: http://www.pavtube.com/guide/importing-p2-footage-into-fcp-from-p2-card.html

Notes:

1. When converting MXF footage using Final Cut Pro oriented format templates(e.g. Apple ProRes), please ensure that your computer has Final Cut Pro installed, otherwise the converted files will have audio only without image.

2. If you are using FCP X, please make sure you have installed ProApps QuickTime Codecs, or you may get files with sound only without video. The FCP X does not install the ProApps QuickTime Codecs automatically, so you need download and install the codec manually from http://support.apple.com/kb/DL1396.

Product Introduction:

Pavtube MXF Converter for Mac is an easy-to-use and professional Mac tool for camcorder users. It is good at converting MXF recordings shot by Panasonic P2 camcorders, Canon XF series, Sony XDCAM cameras to formats compatible with your video editing software like Final Cut Pro, Final Cut Pro (X), Final Cut Express, iMovie, Avid Media Composer, Adobe Premiere Pro, Adobe After Effects and more.

What’s more, Pavtube MXF Converter for Mac supports 1080/60i, 1080/50i MXF/P2 MXF deinterlacing to bring a better video effect and easier editing in multiple video editing programs. Plus, it’s available for you to edit MXF files with its preset video editing functions. You can crop MXF file, add a text/image/video into MXF file as watermark, adjust video effects(including 3D effect), etc as you like.

* Support any MXF footage from Panasonic P2 camcorders, Canon XF series, Sony XDCAM camcorders

* Transcode MXF files to Apple ProRes, AIC, DVCPRO, HDV, Avid DNxHD, etc.

* Convert MXF files to MOV, MP4, MKV, VOB, FLV, AVI, FLV, etc.

* Convert MXF to editable format for iMovie, FCP, FCP X, Avid, Adobe Premiere Pro, FCE, etc.;

* Support 1080/60i, 1080/50i MXF/P2 MXF deinterlacing

* Fully compatible with the iPad Mini, iPad 3, iPad 4, iPhone 5, Microsoft Surface, Nexus 7, Apple TV 3, PS Vita, Galaxy Tab 2, etc.

System requirements:

1G Hz or above Intel processor

Mac OS X Leopard (10.5), Snow Leopard (10.6), Lion (10.7), Mountain Lion (10.8)

512 MB physical RAM (memory) or above

1024*768 or higher resolution display

If you want to know more, visit MXF Column.

Share

Oct 30

Fix: Canon C300 .MXF won’t render correctly in After Effects CS6/CS5.5/CS5/CS4

Summary: MXF to After Effects Converter for Mac can best and fast encode Canon C300 MXF files to Adobe After Effects CS6/CS5.5/CS5/CS4 supported AVI, MOV, MPEG, FLV files for editing Canon C300 MXF footage in Adobe After Effects on Mac.

“I’m having trouble getting footage form a Canon C300 to play correctly in AE CS6. It was shot at 1080i/25. The footage jitters on pans as if it were shot at 24p and there is a lot of moiré on diagonal edges of objects.”

“Need help. I shot a project with the Canon C300 in 24p mode. I uploaded the files on my hard drive, but when I drag a clip to After Effects CS4 the audio is out of sync with the footage. Please help is there any way to fix?”

Does the Adobe After Effects CS6/CS5.5/CS5/CS4 support Canon MXF footage?

Much to the disappointment of filmmakers that are not familiar with the .mxf format, the footage created with Canon C300 could neither be imported to Final Cut Pro, nor the latest Adobe Premiere Pro/ After Effect CS6. If you’re stuck with editing Canon C300 footage After Effects CS4/CS5/CS6, the professional and powerful Pavtube MXF to After Effects Converter for Mac may help. The solution is simple – just convert Canon C300 .mxf to .avi or .mov or other formats that After Effect can handle well. Below is a quick guide of converting C300 .mxf to .mov for editing in AE CS6/CS5.5/CS5/CS4.

Before processing:

1. Back up/Transfer the C300 footage to Mac computer – copy the whole XF video folder to your computer hard drive, not just the individual .mxf files.

2. Install Pavtube MXF Converter for Mac ($29). Click here to download a free trialfor test.

Step-by-step Guide: Convert Canon C300 .mxf to AE CS6/CS5.5/CS5/CS4 supported format with best possible quality

Note: this is a Mac oriented solution. For Windows users the Pavtube Studio offers alternative MXF Converter for PC, which is very similar to the Mac MXF Converter.

Step 1. Launch the Mac MXF to After Effect Converter. Click “Add Video” and browse to a Canon .mxf clip and the software will add it to file list. Repeat the operation to load multiple mxf videos. Or you may click the “Add Folder” button to import all the .mxf files in the XF file structure.

Step 2. Click on “Format” and choose “Common Video > MOV – QuickTime (*.mov)” format as the best codec for editing Canon C300 MXF in Adobe After Effect CS6/CS5.5/CS5/CS4.

Tip: QuickTime MOV format is recommended simply because it also work with Final Cut Pro, iTunes, QuickTime Player and iOS devices (iPad/iPhone). You may also use AVI, MP4, MPG, TS or any other format that AE supports.

Step 3. Click on “Settings” to redefine output quality. You can also set a different video resolution (1920×1080/1440×1080/1280×720/720×480), frame rate (24p/30p), bitrate, audio channels, etc. For users who would like to retain exactly the same settings (without any quality loss), set target settings the same to source video.

Step 4. Click “Convert” to start transcode Canon C300 MXF to MOV for After Effect CS4/CS5/CS6 editing on Mac.

After conversion click “Open” to find .mov videos and import converted .mov files to Adobe After Effect CS6/CS5.5/CS5/CS4 for editing.

This Mac MXF Converter also includes Apple ProRes 422 codec for filmmakers to convert C300 MXF to FCP and Avid DNxHD MOV codecfor encoding MXF to Avid Media Composer. Priced at $29, it is a good buy.

Further Reading:

Share

Oct 29

Encode Humax recording 1080p TS to Avid DNxHD MOV-Burn TS to DVD for sharing, storing or managing on Mac

Humax popular products include FOXSAT-HDR, FOXSAT HD, HDR-FOX T2, HD-FOX T2, PVR-9300T, PVR-9300T/500, Humax PVR-9150T, PVR-9150T, HDCI-5000 and HR24/H25 for USA. With these devices, you can record 2 channels at the same time, freesat HD and SD channel recording, or simultaneous viewing of one channel and recording another channel.

“How to import recording .ts files from Humax PVR-9300T to my Avid 6.0?

I have use Humax PVR-9300T to record some .ts files and upload it to my mac.

Sometimes the recordings needs to be edited but importing these .ts files is not possible.

Anybody knows how these files can be changed to a file that can be imported ?”

I have read many forum posts on how to covert .ts from a Humax PVR to a more widely compatible format for using on Windows/Mac Editing Software, Popular Tablets or other. In order to help Humax HVR users to convert, edit, trim and play Humax recorded TS files on Mac Mountain Lion 10.8 (include Mac OS X Leopard 10.5, Snow Leopard 10.6, Lion 10.7). You need to use a professional TS files to Avid Converter. Pavtube TS to Avid Converter for Mac is the 2012 best TS files to Avid converter for you to encode Humax recording TS files to Avid Media Composer compatible videos so as to import TS files to Avid Media Composer for editing on Mac 10.8. With this Humax TS to Avid converter, it would be quite simple and easy for you to edit Humax PVR-9300T TS files in Avid Media Composer.

If you are a PC users, then you can use Pavtube TS files to Avid Converter for Windows, which converts Humax PVR TS files to Avid Media Composer support video on Windows with ease.

Now please follow the easy steps below to transcode Humax recording 1080p videos to Avid best supported Avid DnxHD MOV codec on Mac, and burn Humax recordings TS/MTS to DVD on Mac.

Part 1: Convert Humax recording 1080p videos to Avid DNxHD MOV for Avid Media Composer editing on Mac.

1. Download Pavtube Humax 1080p Video to Avid Converter. This professional Humax TS to Avid Converter for Mac can help you convert Humax PVR-9300T recording TS files to Avid DNxHD MOV format for Avid Media Composer, or more output formats are also supported.


2. After transferring .TS files from Humax PVR-9300T to Mac. Install and run this Humax TS Converter for Mac. With the Mac TS converter, you can directly drag & drop the TS files to the converter, or choose “Add” to locate the TS files you want to load.

3. Choose Avid Media Compser compatible format as the output format.

Click “Format” bar, choose “Avid Media Composer -> Avid DNxHD (*.mov)”.

4. You can click “settings” to customize the output parameters, adjust the resolution, bitrate as you want.

Besides, you can use this software to edit your recordings, you can trim, crop, add watermark or adjust effect to the video, just need to click the “” button.

5. Batch Convert Humax PVR-9300T recording 1080p videos to Avid DNxHD MOV on Mac.

Click convert button to start. Pavtube MTS/M2TS Converter for Mac will convert Humax recording 1080p videos to Avid Media Composer with best video and audio quality. After converting, you can import the converted TS videos to Avid Media Composer for editing as you want.

Tip:

Here I recommend a powerful conversion tool – Pavtube iMedia Converter for Mac (Now 20% OFF), it can convert recording 1080p footages to editable HD video formats for non-linear editing software like Final Cut Pro, Final Cut pro X, iMovie, Final Cut Express, Final Cut Studio, Avid Media Composer, Adobe Premiere Pro CS6 etc. The HD footage can be compressed to SD video clips for storage when you wanna save storage space. The Mac iMedia Converter is also able to extract audios from Blu-ray discs, DVDs and videos for media players with high quality and fast conversion speed.

Part 2: Burn Humax MPEG-2 recording TS files to DVD on Mac Mountain Lion 10.8.

1.Please download and install Pavtube DVD Creator for Mac, import Humax recording 1080p TS/MTS files to the software.


2.Click the import button to load your HD footages, you can click Add title button to add more titles.

3.Switch to Menu pane. Double-click a DVD menu beneath the Menu Template to apply it to your DVD. You can customize the background video/image, background music, text, title thumbnail and more for your DVD menu.

4.Click the “Burn” button to start burning Humax recorded 1080p TS videos to DVD. You can choose to burn Humax recorded 1080p TS to DVD disc, or save Humax video as ISO file, or Generate videos to DVD Folder.

Tips: The usage for converting Humax devices recording TS files

1. Convert/Encode Humax recording TS files to WMV for WMP, Zune, Archos, Xbox 360, etc.

2. Convert/Encode Humax recording  TS files to MOV for QuickTime Player, iMovie, FCE, FCP (X), Avid Media Composer, iDVD, etc.

3. Convert/Encode Humax recording  TS files to H.264 MP4 for iPad 3, iPad Mini, iPhone 5, iPod, Galaxy Note 2, Google Nexus 7, Kindle Fire HD, XBMC, Apple TV 3, Popcorn Hour 200, etc.

Share

Oct 26

How to direct import media files to Avid Media Composer on Mac?

You can import media into your Media Composer so that you can work with images, video or audio clips stored on your computer. When you import any media clip into Media Composer, a new file is created in a folder called the Avid Media File, which is the Managed Media Files folder. This file will be according to the Media Creation settings you specify, and even if your original file gets deleted, you still have the imported copy in the Managed Media Files folder. Let’s see how the import is done:

Step 1: Specify the Drive with the Media Creation Setting

Click on the Tools tab in the main menu on the top of your screen and choose Media Creation. Alternatively, you can pres Ctrl+5. This will open the Media Creation window, where you can choose the drive where you want to create the files which you are going to import. Click OK.

Step 2: Go to Project Window

Click on the Format tab in your project window and under Project Type, select the quality you want for your imported files. The highest quality possible is 1080p/23.976. This will again depend whether you are importing a video, audio or HD file.  

Step 3: Highlight and Right Click Import Bin

When you are working in Media Composer, you will have the Import bin window just below the Clips window, on the left of the Source Viewer panel. Click on the Import Bin to highlight it, and then right click inside the Import Bin. Choose Import from the drop down menu.

Step 4: Choose Location of Your Media File

The Import dialogue box will open and you can browse and select the file you want to import. There is a box at the bottom of the dialogue box named Video Drive/Audio Drive, where a particular drive is selected. Make sure that the drive appearing in this box is the same as you chose in Step 1. In the Video Resolution box, you can again choose a quality which you prefer for the imported file. You can ignore this if you are importing an audio file.

Step 5: Choose Options in Import Settings

Click on the Options button in the Import dialogue box, and it will open a window for Import Settings. There are different tabs here, and you may click on each tab to specify all the particular settings you want. These settings cover various areas as to how your image is sized and to what channel it is played on. You can experiment with these settings to get your file just the way you want it. Once you have chosen your settings, click on OK.

Step 6: Load Imported File

You will find your imported file in the Import bin, and it has also been created in the Manage Media Files location. You can load it into the Source Viewer by clicking on the file in the Import bin and dragging it into the monitor panel.

When you can not import your media files to Avid Media Composer directly, you can try to transcode media files to Avid DNxHD MOV for Avid Media Composer editing on Mac.

Share
Page 30 of 37« First...1020...2829303132...Last »