AIC Converter,MTS to AIC,MTS to iMovie,MTS to FCE,MTS to Final Cut,AVCHD to AIC Converter,AVCHD to Final Cut Express,import AVCHD files to iMovie,MTS to ProRes 422,MTS to Final Cut Pro,MTS to FCP X,AVCHD and Final Cut Pro,Log and transfer MTS to FCP,edit MTS footage in iMovie,FCP transfer MTS files,transfer AVCHD files to iMovie

Nov 27

Ingest Canon XF300 footage onto HDD and Import Canon XF300 .mxf to Avid Media Composer

With every new camera, comes many new questions about workflow. The term ‘workflow’ can be fairly broad, but today I am looking at importing Canon XF300 footage into various non-linear editing systems (NLE). The Canon XF300 uses the same workflow as the Canon XF series of cameras (which includes the XF305, XF300, XF105 and XF100), because it records in the same .mxf format. Below, I outline how to ingest footage onto a hard drive, and how to import into Avid Media Composer.

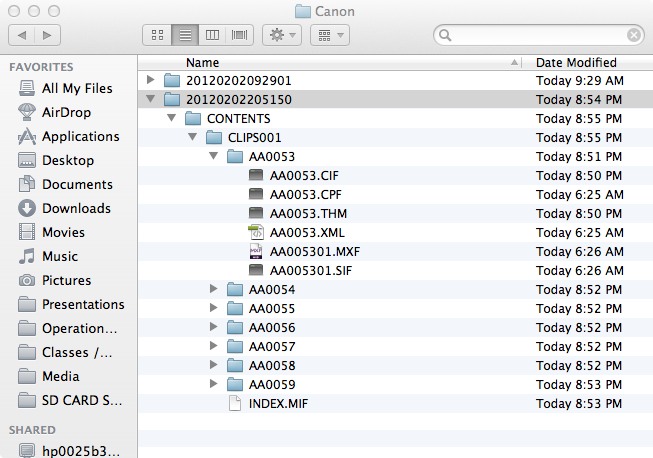
1. Back Up Canon XF300 footage to computer hard drive

Canon  provides a piece of software called the Canon XF utility, which is used to playback and download clips off their original media. The footage on the CF card can be backed up with the XF Utility by clicking on the ‘Backup’ button on the upper left corner. Before doing so, make sure you set the location to store your footage in the Preferences menu.

2. Import Canon XF300 footage to Avid Media Composer

To bring your Canon C300 footage into Avid Media Composer, it’s advised that you convert Canon XF300 footage to a native editing format for Avid. Native HD camera compression formats (including .mxf) are efficient, but simply aren’t engineered to maintain quality during complex post production effects processing. Uncompressed HD delivers superior image quality, but data rates and file sizes can stop a workflow dead in its tracks. Avid DNxHD delivers both efficiency and quality without compromises. And it is supported on Media Composer, NewsCutter, Symphony, Avid DS, and Interplay Assist. Here’s how to convert Canon XF300 .mxf to Avid DNxHD video:

Required ToolMXF Converter for Windows | MXF Converter for Mac

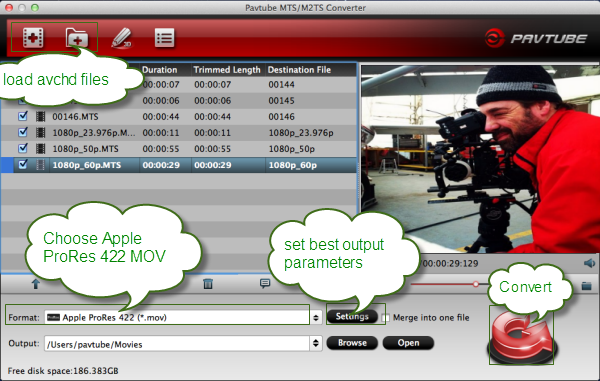
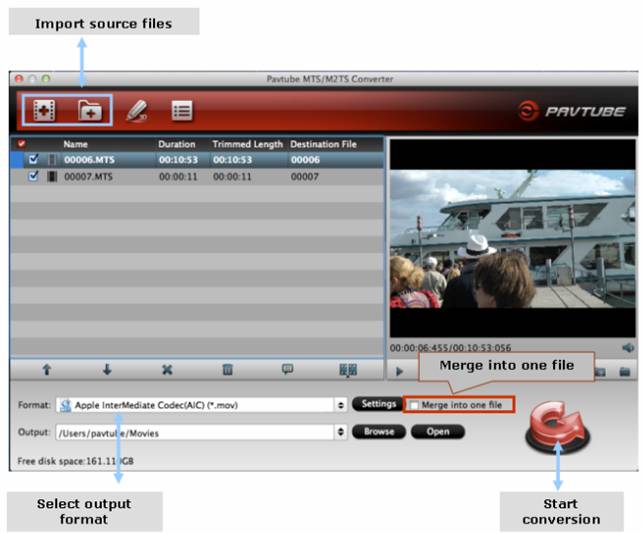
Step 1. Add Canon MXF footage to the Canon MXF Converter.

Click “Add” to load the source Canon MXF files. When the Canon MXF files are loaded to the MXF Converter, you can view the videos from the Preview window.


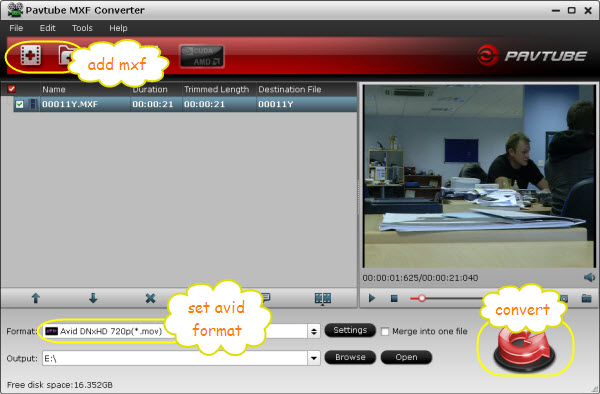
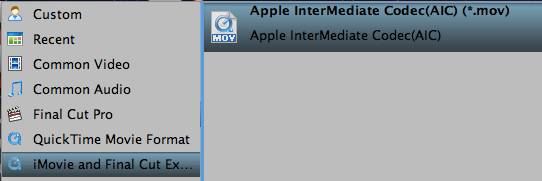
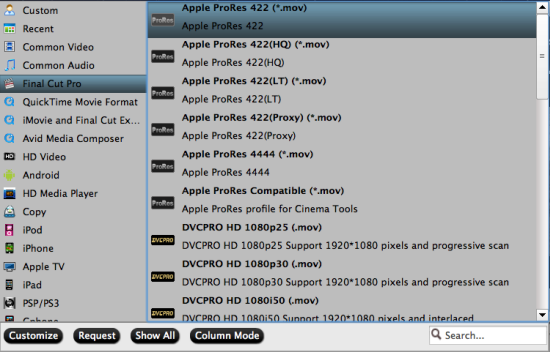
Step 2. Set Avid DNxHD MOV as output format for Canon MXF to Avid MC conversion.

Click on “Format”, and select output format from the drop-down list. Follow “Avid Media Composer” > “Avid DNxHD 720p(*.mov)”. This format creates videos of medium quality, if you feel like keeping higher visual quality, choose “Avid DNxHD 1080p(*.mov)” format.

When set output folder, or click the icon folder in Output box and browse to the destination folder.

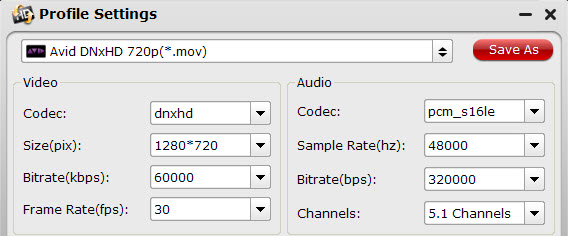
Step 3. You can click settings button to adjust the output video’s parameters, such as resolution, bitrate, codec and frame rate, etc.

Step 4Convert Canon XF300 MXF to Avid DNxHD MOV for importing to Avid Media Composer.

Click “Convert” button and the selected Canon XF305 MXF files will be converted to Avid DNxHD MOV. You may check the converting progress and set auto shutdown in the convert window.

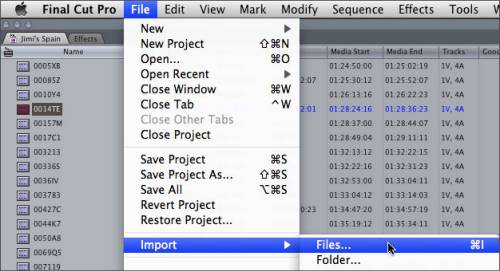
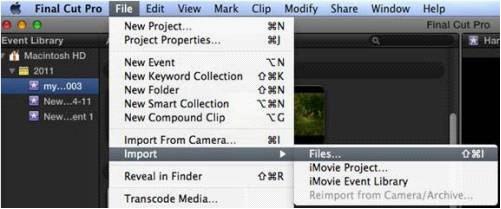
After conversion, click “Open” folder to find converted Canon XF300 footage for importing to Avid Media Composer. The importing steps reference here:

How to import and manage your videos, projects, and media onto Avid Media Composer

How to direct import media files to Avid Media Composer on Mac

Additional Editing Features of the MXF Converter for Mac

– Trim, combine, de-interlace Canon MXF footage, capture Canon XF300 frame.

Trim Canon MXF clips: Click “Edit” to enter video editor, by default the “Trim” tab is activated, so just set start time and end time to include the duration you want to remain, cutting others out.

Combine/Join Canon MXF files: If you would like to join several files together, just select these files and check the Merge into one box.

De-interlace Canon MXF: Some footage may be saved as interlaced video with Juggled edges and ghosting. In that case you can set deinterlace effect to eliminate the combing. Follow “Edit”-> “Effect”-> “Deinterlacing”.

Capture frame from Canon MXF: To thumbnail video frame, you may click the “Snapshoot” button when it plays to your favorable frame.


Share

Nov 26

Workflow for importing Sony NEX-VG900 AVCHD to Final Cut Pro 6/7 or Final Cut Pro X on Mac Mountain Lion

Summary: In the following guide, i will demonstrate how to encode/log and transfer Sony NEX-VG900 AVCHD to Final Cut Pro 6/7 or Final Cut Pro X preferred ProRes 422 codec to make your gorgeous masterpieces.

The Sony NEX-VG900 camcorder is the first Handycam camcorder with a 35mm sensor for high-quality HD video with a truly professional look, which exploits the artistic potential of interchangeable lenses. More than the new 35mm sensor, the Sony NEX-VG900 camcorder also offers you creative control to deliver image and videos the way you envision it, even in dimly-lit environments. The NEX-VG900 captures gorgeous high quality video in 1080 Full HD in 24p, 60p and 60i, thus astounding film-like results can be achieved easily. However, users often stumped on importing issues when loading Sony NEX-VG900 AVCHD footage into Final Cut Pro 6/7 or Final Cut Pro X for post-production on Mac Mountain Lion 10.8. What’s more, Sony NEX-VG900 camcorder records AVCHD format video, and it uses MPEG-4/H.264 codec, this codec is not good for editing in Final Cut Pro X/7/6.

Symptom:

  • “I have a new Sony NEX-VG900 interchangeable lenses camcorder on hand. It created some AVCHD footage in 1080 60p quality. My objective is importing these files into Final Cut Pro X for editing use. But I haven’t figured out how to do this. So my question is how can I edit the 1080 60p AVCHD clips after shooting them with the Sony NEX-VG900 camcorder?”
  • “Hello guys, I shot with a Sony NEX-VG900 camcorder and I’d like to import its AVCHD footage into Final Cut Pro X for editing use. The VG900 camera was not mine and I did not have easy access to it. I googled for a solution, many people suggested to decode the AVCHD footage to Apple ProRes codec. I tried it, but the converter app I used on my MacBook Pro did not work at all. It refused to convert my large 1080p60 materials. Any hints on an available Mac converter? I don’t want to loose much quality in the conversion process. Thanks in advance.”

Solution:

Although Apple claims that Final Cut Pro has native support for AVCHD files, users still have problems one or another when trying to edit those footage within FCP 6/7 or the latest FCP X. To solve this problem directly, you can transcode Sony NEX-VG900 MTS to Apple ProRes – the FCP preferred editing format in advance by using a Mac Sony MTS to Final Cut Pro Converter. Below is HOW-TO.

Free Download Sony MTS to Final Cut Pro Converter for Mac


1. Load Sony NEX-VG900 AVCHD footage.

Open up Sony MTS to Final Cut Pro Converter for Mac, hit “Add video” or “Add from folder” tab to load AVCHD files directly from your camera or from the HDD that stored your Sony VG900 footage.

2. Choose output format

Hit the “Format” menu to choose “Apple ProRes 422 (*.mov)” as output format from “Final Cut Pro” catalogue. Apple ProRes as Final Cut Pro 6/7/X compatible codec for editing AVCHD MTS files in Final Cut Pro X/7/6 smoothly.

3. You can click “settings” to customize the output parameters, adjust the resolution, bitrate as you want. Set video size as 1920*1080, video frame rate as 30fps is better.

4. Convert Sony NEX-VG900 AVCHD to Apple ProRes 422 MOV

Hit “Convert” tab to encode Sony NEX-VG900 AVCHD to Apple ProRes 422 MOV on Mac Mountain Lion.
Once the conversion task is done, click “Open” button to get the generated ProRes MOV files.

How to transfer video files to Final Cut Pro

1. Import videos to Final Cut Pro 6/7: from the File menu > Import > Files…

Detailed steps please read: http://www.pavtube.com/guide/import-avchd-to-final-cut-pro-7.html

2. Import videos to Final Cut Pro X: from the File menu > Import > Files…

Detailed steps please read: http://mts-to-aic-converter.com/import-camera-videos-to-final-cut-pro-x/

More Related Information at MTS Column.

Friendship remind: If you buy Sony MTS Converter for Mac during Nov. 14 – Dec. 10 2012, you can get a Free DVD Burner for Mac, it can free burn AVCHD Clips to DVD on Mac or Windows. If necessary, please hurry action


Share

Nov 24

How to transfer Sony NEX-6 AVCHD 1080 50p/60p MTS to Final Cut Pro 6/7/X, iMovie, FCE for smoothly editing without any issue on Mac

Description: Who says you can’t have it all? The Sony NEX-6 features a wish list of features and still fits in your pocket. And it’s fast, too. Make quick changes with a handy DSLR-like dial. Focus and track fast-moving subjects with the speed and accuracy of phase and contrast detection. It even shoots 16.1MP photos at a blistering up to 10fps.

The Sony Alpha NEX-6 16MP enthusiast mirrorless interchangeable lens camera builds on the features first seen on the NEX-5R, including Wi-Fi, in-camera apps and on-sensor phase detection. In addition it gains the high-resolution, 2.3M dot OLED viewfinder previously seen on the NEX-7, plus an external mode dial. In addition, the NEX-6 becomes the first NEX camera to feature the Sony’s revived Quick Navi interactive control panel and an ISO-standard hotshoe. The NEX-6 is launched along with a 16-50mm F3.5-5.6 retractable power zoom lens creating a much smaller zoom kit than was previously possible with the NEX system.

Product Features
Style: Body Only

  • Pocket camera with professional-grade performance
  • 16 MP APS-C sensor with up to 10 fps shooting and Full HD video
  • Fast Hybrid AF includes phase-detection for DSLR-like focus
  • Bright XGA OLED viewfinder for 100% coverage
  • Wi-Fi® sharing and downloadable camera apps

For those who love customizing movies, editing movies is necessary. However, if you get a Sony NEX-6 camcorder and want to edit the MTS files on Mac, you will find it is not so easy as neither Final Cut Pro 6/7 nor Final Cut Pro X can edit the AVCHD directly. To solve this problem, there are so many converters if you search on google. Here i recommend you to choose Sony AVCHD Converter for Mac according to my rich experience of converting. This kind of software is professional and easy-to-use. You can convert your files without quality loss.

As in known to us, Apple ProRes MOV is best codec for Mac editing software such as Final Cut Pro 6/7, Final Cut Pro X, FCE and so on, if you need to edit Sony NEX-6 AVCHD 1080p/6p MTS on Mac, you can convert them to MOV first. Just free download Pavtube Sony AVCHD Converter for Mac, follow the guide below to import Sony Nex-6 AVCHD MTS videos to Final Cut Pro 6/7, Final Cut Pro X.

1. Load MTS files from Sony Alpha Nex-6

After running the Sony AVCHD converter for Mac, hit “Add” to load AVCHD files from your Sony Alpha Nex-6 camera. You can drag multiple file to the program one time.

Note:

  • If necessary, you can click “” to edit the file- trim, crop and add special effects, add watermark etc. to the file.
  • If necessary, you can imput several files to the converter one by one to combine them as one file using “Merge into one” functional button

2. Choose MOV as output format

Click the “Format” bar, you will see the “Final Cut Pro” menu. The menu has several formats for choosing as the best output format. You’d better choose Apple ProRes 422(HQ)(*.mov) to keep the original video qaulity.

  • Settings – Click the “Settings” icon and you will go into a new interface named “Profile Settings”. If your source file is 1080p, you’d better keep the video frame rate as 30fps, video size as 1920*1080 and keep 5.1 channels to keep the best quality for editing Sony NEX-6 AVCHD MTS videos in Final Cut Pro 6/7 or Final Cut Pro X. Pay attention, if your original recordings are 1080 50p, then you should choose 25fps as the frame rate.

3. Convert Sony NEX-6 AVCHD 1080p MTS videos to MOV

Hit the “Convert” button; it will convert Sony NEX-6 AVCHD MTS to ProRes 422(HQ) MOV on Mac immediately. You can find the process in the “Conversion” interface.

As soon as the Sony NEX-6 AVCHD to MOV conversion process is 100% completed, please click “Open” to find the converted video.

4. Transfer AVCHD MTS files to Final Cut Pro 6/7/X

Launch Final Cut Pro 7/FCP 6/FCP X, choose File > Import > Files…, and browse to where you save the converted AVCHD clips to. Choose the videos that you’d like to add. Now you can read How to import the converted AVCHD to Final Cut Pro 6/7/X for smoothly editing without any issue for get more information.

Tips for Sony AVCHD Converter for Mac Useage:

1. If the supposed size of the input files is 1GB, then the memory space should be up to 40GB.

2. Auto shutdown: Click Option and tick the box “Shut down the computer after conversion” before conversion starts.

3. Plus, if you attempt to burn your Sony NEX-6 AVCHD files to a blank DVD, a DVD folder, or an ISO image file on your Macintosh computer, Pavtube DVD Creator for Mac is a good choice. This Mac DVD burner comes with an absolutelyFree Version at during 2012 Thanksgiving Promotion. See how tofree burn AVCHD (.mts) to a playable DVD on Mac and how to free Burn AVI, MKV, MP4 to DVD on Mac.

4. If you intend to edit Sony NEX-6 AVCHD files with iMovie 8/9/11 or Final Cut Express 4, only need to change the step 2, you should choose “Apple InterMediate Codec (AIC) (*.mov)” as output format from “iMovie and Final Cut Express” catalogue.

  • a. After the completion of all steps, start up iMovie, choose File > Import > Movies…, and navigate to the source folder to import files.

  • b. Open up Final Cut Express, follow File > Import > Files… to browse and load the files you need to edit.

Share

Nov 24

Sony NEX-6 – with Leica M wides

Bit the bullet and bought a Sony NEX 6 to use with Leica M glass.

I am using it with 21 SEM, 35 Lux FLE (and 50 Lux ASPH and 90 AA).

Wanted to report there is no smearing or colour shift issues with these lenses. I know Sony tinkered with the sensor for optimising the AF, so there was a doubt in relation to how this may perform with wides compared with NEX 5N. Can’t comment on how this performs with other wides thought.

I am blown away by the camera. I have the 5D II , plus Zeiss glass and am considering downsizing. Initially I was very dissappointed with the images using the Sony software, the images looked very soft. I am used to Canon’s DPP software which is much better in comparison. I am using LR4 now and am impressed.

The camera is great. It feels and operates really nicely. The build quality is great. Unlike the NEX 7, it features a lot of rubber and speccled paint. Feels very much like my 5DII build wise.

The mf experience is awesome with focus peaking and magnification.

This is my first NEX camera, and I’m just really impressed with the it. The EVF is awesome, the menu, and camera layout is straight forward.

The eyecup is close to the flash mount and it can get a bit crammed when mounting an external flash.

Here are some test shots, these are processed with the Sony software. Most are in very harsh midday sunlight, will post more shots when I get a chance. Thanks.

SEM 21:

35 FLE:

Share

Nov 24

Sony NEX-6 Review: Sony NEX-6 VS Sony NEX-7

Introduction

Sitting between the high-end Sony NEX-7 and beginner-to-enthusiast level Sony NEX-5R, the 16.1 million pixel Sony NEX-6 is compact system camera aimed at DSLR and DSLT customers who are looking for high image quality in a much smaller body.

A couple of key features distinguish the Sony NEX-6 from the Sony NEX-5R below it. First up there’s a 2.359k dot OLED electronic viewfinder (EVF) built in, offering an alternative to the 3-inch 921,600-dot LCD screen for composing and reviewing images.

The camera is also compatible with apps that can be downloaded from Sony’s PlayMemories camera apps service. This include apps such as Picture Effects, Remote Control and Direct Upload (to Facebook or PlayMemories Online). More apps will become available over time.

The NEX-6 has built-in DNLA-compliant Wi-Fi and on-camera apps. While the app collection is rather limited at announcement, Sony has made clear it plans to expand offerings in the near future. And the possibility of enhancing your camera’s current capabilities through user-friendly app downloads, as opposed to firmware updates is one that could be worth the wait. As it stands, you can can push images from the NEX-6 to an iOS or Android smartphone, or straight to Facebook (or Sony’s PlayMemories site) across a Wi-Fi network. You can also use your smartphone as a remote viewfinder/trigger.

Sony NEX-6 specification highlights

16.1MP CMOS sensor
2.3 million dot resolution OLED EVF
ISO 100-25600
Control dial
Dedicated Fn button
‘Quick Navi’ display
Multi interface hotshoe (supports standard contacts and proprietary connector)
Wi-Fi for connection via Wi-Fi networks or to smartphones
Proprietary in-camera apps
Built-in flash (GN 6)
Electronic First Curtain shutter
1080p 60p HD movies in AVCHD (50p on PAL region models)

Sony NEX-6 VS Sony NEX-7

There is precious little other than sensor size (16mp versus 24MP) and price to separate the NEX-6 from Sony’s flagship NEX-7. If you have no need for output beyond 16MP and are willing to trade the NEX-7’s Tri-Navi control interface and external mic socket for a mode dial, Wi-Fi connectivity and a Quick Navi menu, you can get the NEX-6 with a co-announced 16-50mm F3.5-5.6 OSS power zoom for an attention-grabbing MSRP of $US 999. In discussions with us, Sony has acknowledged it expects the NEX-6 to have a direct impact on sales of the higher-priced NEX-7.

The NEX-6 is virtually indistinguishable from the NEX-7, being marginally taller only due to its protruding mode dial. It has more gently rounded edges along its top plate and lacks the metal construction of Sony’s flagship model, but is still a solid-feeling camera.

Both cameras incorporate the same 3 inch LCD and OLED EVF. Button layout is very similar, with differences only in the placement of the movie record button (which has been much-criticized on the NEX-7). The NEX-6 has two control dials (versus three on the NEX-7) and a mode dial. It also lacks an AF/MF switch. The NEX-6 is shown here with the included rubber eyepiece cup.

Along the top plate there is little meaningful distinction between the cameras other than the dial arrangement. Yet the small power zoom kit lens, which covers nearly the same focal length range as the older 18-55mm lens on the NEX-7, offers a much more compact package.

With a full price of around £769/AU$1,099/US$849.99 body-only or £899/AU$1,299/US$999.99 with the kit lens.

ePhotozine posted the full chart test pictures while the dutch Pixelmania (translation here) posted the full NEX-6 review and gets recommended by the reviewer team. There is also a camera test with the 16-50mm pancake lens test at Lesnumeriques (translation here). And also German reviewers are testing the Sony NEX-6 like at Chip.de(translation here). Now four Sony cameras are on the top 5 list at Chip.de. French readers may be happy to learn about the Sony deal described at Lemondedelaphoto.

Finally the Sony NEX-6 is hitting all worldwide stores (but not in US) and click those direct links to check out price and in Stock status: AmazonAdoramaBHphotoWex UKWex Germany Sonystore DEUKFRITESNLSEFICH and more links at Alphacameradeals.

Plenty of auctions are available on eBay (here on Slidoo).

Knowledge expansion:

  • 1. Records in up to 29 minutes segments.
  • 2. Attaching Sony A-mount lens requires LA-EA1 (note: Autofocus available with SSM and SAM series lenses when using LA-EA1) or LA-EA2 adaptors (sold separately).
  • 3. Requires compatible BRAVIA? HDTV and HDMI? cable sold separately.
  • 4. Requires an active 802.11 Wi-Fi network (802.11n recommended) or PlayMemories Mobile? app installed on compatible Android? or iOS device. PlayMemories camera apps require download with existing Sony Entertainment Network account. Download available in all countries/areas where Sony Entertainment Network is available.
Share

Nov 22

Tutorial for beginners: How to import Sony NEX-VG30 AVCHD MTS files to Final Cut Pro (X), iMovie, FCE on Mac

Sony has announced the NEX-VG30 interchangeable lens camcorder. The NEX-VG30 camcorder features the same sensor format that Sony builds into its standard size DSLR cameras. With approximately 19.5 times the surface area of conventional camcorder sensors, the 16.1MP Exmor APS HD CMOS sensor makes capturing high-quality, cinematic video with a shallow depth of field a breeze.

Whatever your genre, whatever your shooting style, take your moviemaking to the next level with the Sony NEX-VG30 interchangeable lens HD camcorder and lens.

You may like shooting video with Sony NEX-VG30, it’s wonderful for us to use this excellent camera to record beautiful landscapes and record exciting moments. After recording, you may need to import the Sony NEX-VG30 footages to Final Cut for editing, but, Sony NEX-VG30 recorded videos are in AVCHD format, the AVCHD MTS/M2TS format is not compatible with many editing software, such as FCP, FCP X and FCE on Mac. Final Cut software doesn’t supports AVCHD well, it takes much time to render.

What’s the best solution to import Sony NEX-VG30 AVCHD files to FCP, FCP X, FCE for editing without rendering? The best way is to convert Sony NEX-VG30 AVCHD MTS footage to ProRes codec MOV format, Apple ProRes 422 MOV format is best supported by FCP or FCP X, AIC MOV is best format for FCE and iMovie, the below is a brief guide for beginners.

Click the below button to buy or free download Pavtube MTS Converter for Mac


1. Open Pavtube MTS to Mac Converter for Mac, it’s an professional AVCHD converter on Mac which can convert Sony NEX-VG30 AVCHD files to different formats. Click “Add Video” to load the .mts files from Sony VG30 Camcorder to the Mac Converter.

2. Click “format” bar to choose output format:

Choose “Final Cut Pro – Apple ProRes 422 (*.mov)” as the best video format for importing Sony VG30 MTS files to Final Cut Pro (X) editing.

Choose “iMovie and Final Cut Express > Apple Intermediate Codec(AIC) (*.mov)” as the best video format for importing Sony VG30 AVCHD files to iMovie or Final Cut Express.

Then you can set the output folder by clicking “Browse” icon as you need.

3. If you want to customize the output parameters, you can click settings button. Adjust the resolution and others as you need.

4. Click “convert” button to start the Sony NEX-VG30 AVCHD to ProRes 422 or AIC conversion.

With Pavtube MTS/M2TS converter for Mac, you can easily convert Sony NEX-VG30 AVCHD files to MOV with Apple ProRes or AIC Codec for Final Cut Pro, Final Cut Pro X, Final Cut Express editing.

After converting, you can import videos to Final Cut Pro X/FCE/iMovie for editing as you want.

Share

Nov 16

Workflow for importing JVC Everio GS-TD1/GY-HMZ1U AVCHD 3D Files to Final Cut Pro X

JVC Everio offers Full HD image quality throughout the lineup. So every new Everio is capable of recording 1920×1080 resolution AVCHD video. What’s more, all new Everio models support 1080P output. Enjoy uncompromising picture quality on a TV that accepts 1080P input.

GS-TD1, the world’s first consumer-grade camcorder to shoot two frames of Full HD in 3D mode, using a pair of parallel lenses and CMOS sensors. The GS-TD1 can record in either side-by-side AVCHD format or Full HD MP4 MVC 1920 x 1080/50i, an iteration of the MultiView codec used for 3D Blu-ray. It can also take 3D still images in .MPO format. Another famous 3D camcorder announced from JVC is GY-HMZ1U which records 3D by combing two lens and sensors into one small package which makes it easy to capture great images.

However, for Mac users, they will have some further work to deal with the 3D AVCHD footage. For example, import/edit the footage with Mac’s common editing software FCP(X), it is essential to convert 3D AVCHD to more mac compatible format. The reason lies on the AVCHD video format is not supported well by FCP X. Many people explained that there are many problems when import JVC Everio GS-TD1/GY-HMZ1U 3D AVCHD to FCP X. According to the test, the Apple ProRes format is compatible for editing on FCP X.

Pavtube 3D MTS Converter for Mac can help you transcode JVC Everio GS-TD1/GY-HMZ1U 3D AVCHD to Apple ProRes MOV for FCP X editing, please follow the steps below.


Step 1. Install and Run 3D AVCHD to FCP X Converter for Mac, drag and drop JVC Everio GS-TD1/GY-HMZ1U 3D AVCHD files to the program. Then the files will be listed on the file list tab, you can choose to check the properties of the video or preview it.

Step 2. Choose best output format for the JVC Everio GS-TD1/GY-HMZ1U 3D AVCHD to ProRes MOV conversion.

Click the “format” bar, and there will be many output formats on the format list. You are recommended to choose “Final Cut Pro -> Apple ProRes 422 (*.mov)”.

Step 3. Convert JVC Everio GS-TD1/GY-HMZ1U 3D AVCHD MTS/M2TS video footages to FCP X.

Click the “Convert” button and start convert JVC Everio GS-TD1/GY-HMZ1U 3D AVCHD to ProRes for FCP X. Then you can edit JVC Everio GS-TD1/GY-HMZ1U 3D AVCHD videos on FCP X, FCE and iMovie as you want.

When the conversion ends, you can easily import converted ProRes MOV files to FCP X/FCE/iMovie to have easier editing on your Mac system.

You can also use DVD Creator Mac to burn 3D AVCHD to DVD disc. Now Pavtube starts the Thanksgiving promotion activity, if you buy converter products, you can get free DVD Creator, please take a look.

Share

Nov 14

Transcode Blackmagic Design HyperDeck Studio recorder MXF DNxHD (185X) to Apple ProRes for Final Cut Pro X editing

Overview:

The Blackmagic Design HyperDeck Studio recorder is a file-based deck that records uncompressed in QuickTime and compressed in ProRes and DNxHD, storing the files onto two 2.5″ SSDs. Two SSD slots are available and allow continuous recording–the second disk automatically begins recording when the first becomes full. The disks can afterwards be hooked up to a computer by USB.

Recording:

A diverse set of connections consists of 3G SDI, component, HDMI, XLR, RCA, Thunderbolt, USB and RS422. SD, HD, and 2K formats are supported, and capacity is additionally available for 4K playback from an SSD in ProRes. Color options are SD and HD 10-bit 4:2:2 and 4:4:4. Recording in 4:2:2 uncompressed offers higher dynamic range and thus more precision in color correction. Alternatively, recording in compressed ProRes or DNxHD allows five times longer recording and all the same maintains 10-bit color and full frame 1920 x 1080 sampling.

HyperDeck Studio Key Features:

  • Record and playback to Apple ProRes 422 (HQ), Avid DNxHD MXF (Material EXchange Format) A file format from the Pro-MPEG Forum for the interchange of video production information. MXF files include audio/video content and related meta-data (production notes, camera settings, time code positions, etc.  or 10-bit uncompressed QuickTime formats.
  • Uses high speed off the shelf Solid State Disks (SSDs) available from computer resellers at low cost.
  • Includes dual SSD slots allowing disks to be changed while recording for unlimited record duration.
  • 3 Gb/s SDI(1) and HDMI inputs and outputs, including SDI loop through and monitoring outputs.
  • Familiar broadcast deck VTR design and functionality, including jog/shuttle wheel and RS-422 deck control.
  • A high resolution LCD screen displays timecode and transport information plus a full color preview of the current clip in record and playback.
  • 1 rack unit design saves valuable rack space when mounting multiple units.

About Blackmagic

The Blackmagic Design HyperDeck Studio Pro creates files that are perfect for any broadcast and post production workflow! HyperDeck Studio’s uncompressed video files are recorded in QuickTime format to provide universal compatibility with leading video software. Both HyperDeck Studio models also support Apple ProRes and Avid DNxHD industry standard file compression so you can record directly to your preferred video format. DNxHD and ProRes provide 5 times longer recording than uncompressed HD video, while maintaining 10-bit color and full frame 1920 x 1080 sampling.

MXF DNxHD to ProRes conversion

From the above information, you can see the software can records Apple ProRes and Avid DNxHD codec. In your editing, if you need to transcode MXF DNxHD to Apple ProRes or transcode video to DNxHD, you can use Pavtube MXF DNxHD to FCP X Converter for Mac, which has presetted profiles for ProRes and DNxHD. You can learn more in MXF column.

MXF to FCP X Converter has been hailed as the best MXF converter Mac OS X Lion 10.7 compatible to convert MXF file to Apple ProRes 422, AIC, MOV, HDV, DV, MP4 that can be imported by FCP X, FCP 7 for editing. Whether you need to re-compress, transcode, import or convert mxf to Final Cut Pro X, transfer MXF to iPad, iTunes, iPhone devices, all can be done beautifully.

MXF to FCP X Converter also batch converts MXF to FCP X so that you can import mxf to FCP X with least effort, the program helps you merge multiple video into one, cut off unwanted part and convert. As the best Video Converter OS X Lion, MXF to FCP X Converter enables you upload your video to Youtube, Vimeo, Facebook by converting mxf file to flv, swf.

Key Features of Pavtube MXF transcoder for FCP X

Turn MXF files into editable footage in FCP X, FCP 7, iMovie, FCP, FCE, Avid Studio.

Convert MXF to ProRes/DVCPRO/HDV/Avid DNxHD/AIC output.

Recode MXF recordings to MOV, MP4, MKV, TS, VOB, etc. for different uses.

Transfer MXF to Apple TV, iPad, iPhone and more devices.

Upload MXF to Youtube, Facebook, Vimeo…

Add multiple MXF files to convert at a time and merge them into one file.

Easy steps:

1. Download, install and run MXF Converter for Mac, drag and drop your Blackmagic Design HyperDeck Studio recorded MXF (DNxHD) files into the professional Blackmagic MXF DNxHD to FCP Converter for Mac. The program support batch load and convert video file.


2. Choose format that you need. To convert MXF DNxHD to Apple ProRes, you can click and choose “Final Cut Pro -> Apple ProRes 422 (*.mov)”.

3. You can adjust the ProRes parameters according to your need. (Optional)

4. Edit video file. (Optional)

You can click Editor button to customize the video before converting videos. Six tabs are available: Trim, Crop, Text Watermark, Watermark, Effect and Audio Replace, etc.

5. Start Conversion.

Click the “Convert” button to start transcode Blackmagic Design HyperDeck Studio recorder MXF DNxHD to ProRes for Final Cut Pro X.

As soon as the format conversion is completed, you can import the converted MXF video to FCP X for editing on Mac OS X, etc.

Share

Nov 13

About MXF(Material Exchange Format) file format

Material eXchange Format (MXF) is a container format for professional digital video and audio media defined by a set of SMPTE standards. MXF is a file format for the exchange of programme material between servers, tape streamers and to digital archives. Its contents may be a complete programme as well as complete packages or sequences. There are basic facilities available for cuts between sequences and audio crossfades. This way the sequences can be assembled into programmes. MXF is self-contained, holding complete content without need of external material. Read the rest of this entry »

Share

Nov 13

Samsung EK-GC100 Galaxy Camera hit stores in the UK

Samsung’s much-anticipated EK-GC100 Galaxy Camera finally hit stores in the UK late last week and we’ve managed to get our hands on one of the very first samples to cross the assembly line. We’re putting the Android-powered hybrid through its paces at this very moment, but since this is the company’s first entry in a brand new category, we wanted to have you along as we opened the box. This may be a camera, but it’s very much a Galaxy device, and that’s immediately evident when you first see the packaging.

The cam ships just as any premium smartphone, with a very thin selection of accessories — you get an AC adapter, USB cable, a wrist strap and a pair of pocket guides (there’s no user manual to speak of). Much like Samsung’s latest round of point-and-shoots, it uses microSD cards and charges via a micro-USB cable and AC adapter. Even the 1,650mAh battery looks like a smaller version of Samsung’s smartphone offering, rather than something that ships alongside the company’s traditional camera lineup. Rest assured, we’ll have much more to share later this week, but for now, we invite you to join as we unbox the Galaxy Camera in our video just past the break.

News source: http://www.engadget.com/2012/11/12/samsung-galaxy-camera-unboxing/
 

Share
Page 29 of 37« First...1020...2728293031...Last »