AIC Converter,MTS to AIC,MTS to iMovie,MTS to FCE,MTS to Final Cut,AVCHD to AIC Converter,AVCHD to Final Cut Express,import AVCHD files to iMovie,MTS to ProRes 422,MTS to Final Cut Pro,MTS to FCP X,AVCHD and Final Cut Pro,Log and transfer MTS to FCP,edit MTS footage in iMovie,FCP transfer MTS files,transfer AVCHD files to iMovie

Jun 15

Import 2016 UEFA European Championship MTS recordings to Sony Vegas Pro

Sony claims that Vegas Pro 10/11/12/13 supports most commonly-used video codecs, including the AVCHD MTS. However, problems like Sony Vegas won’t read MTS files” come up from time to time. In fact, it is easy to fix the issue. Keep reading a brief how-to on the simple process, guaranteed you to edit the 2016 UEFA European Championship MTS recordings in Sony Vegas Pro 12/13 smoothly.

Hot search: European Cup 2016 (4K) recordings to 4K TV2016 UEFA European Championship recordings To YoutubeEuropean Cup 2016 Recordings to MP4

Sony Vegas Pro is one of the most popular video editing software owned by almost everyone, pro-alike and green hand. You may have could not help importing your MTS file to Vegas Pro 12/13. Importing MTS into Sony Vegas is not a strange thing for most Windows users, and we can easily import MTS into Sony Vegas for editing in most cases. However, Sony Vegas doesn’t allow you to select the MTS file sometimes. So what is the matter on earth? And how can we successfully import MTS to Sony Vegas Pro 12/13 at any time? This article aims to solve the above questions in two parts.

Why people always meet difficulty in importing MTS into Sony Vegas?

The headache issues with Sony Vegas dealing MTS files may causes by hardware issue or codec issue. Just make sure your computer is powerful enough and has enough disk space as Sony Vegas requires your computer be powerful enough and have enough disk space for video editing at first. Then you should know, Vegas only supports a few audio and video codecs in MTS container. If the MTS file is not encoded with Sony Vegas support codec, Sony Vegas Pro 12/13 will refuse to import this kind of MTS video.

Then how can we successfully import any MTS file to Sony Vegas?

The best solution for it is encoding 2016 UEFA European Championship MTS to Sony Vegas more editable formats.

To get Sony Vegas work with MTS video files beautifully at any time, I found this really easy and effective way- encoding MTS to Sony Vegas supported video formats.

Pavtube Video Converter (Pavtube Video Converter for Mac) is just the right MTS to Sony Vegas Converter which can encode various MTS to Sony Vegas readable formats like WMV, MPEG-2 or AVI. Besides encoding MTS to Sony Vegas, it also helps to transcode camera shootings in different formats (XAVC, XAVC S, MOV, MP4, MXF, MTS etc.) to video editing software compatible file types, i.e. MPEG-2 for Premiere Pro, DNxHD for Avid Media Composer, WMV for Windows Movie Maker, AVI to Pinnacle Studio to meet your different needs. The following will introduce a detailed guide on how to encode Sony Vegas Pro 12/13 unsupported MTS to Sony Vegas supported one. If you’re facing the issues, read on to find the answer.

Other Download:
– Pavtube old official address: http://www.pavtube.com/video_converter/
– Amazon Download: http://download.cnet.com/Pavtube-Video-Converter/3000-2194_4-75734821.html
– Cnet Download: http://download.cnet.com/Pavtube-Video-Converter/3000-2194_4-75734821.html

Step-by-step Guide to Convert UEFA European Championship MTS recordings to Sony Vegas Pro formats for editing

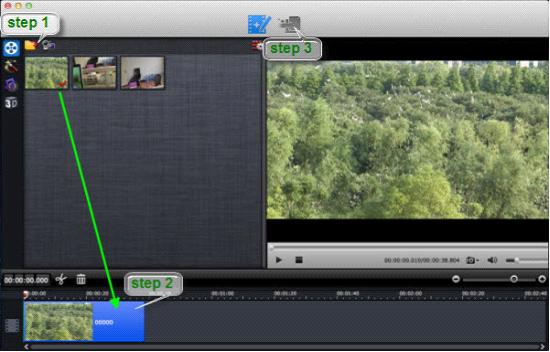
Step 1. Load MTS files

Install and launch the Pavtube Video Converter and add MTS files to it. Click “Add video” button to load MTS files. Or directly drag and drop the source MTS file you want to the sftware. Then you can preview the whole videos in the preview window on the right.

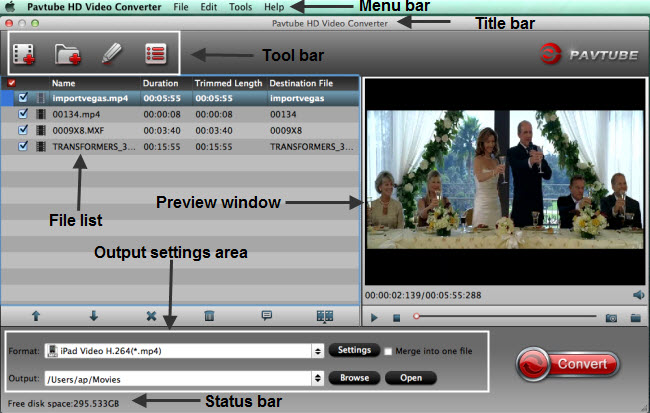
Step 2. Choose Sony Vegas Pro format

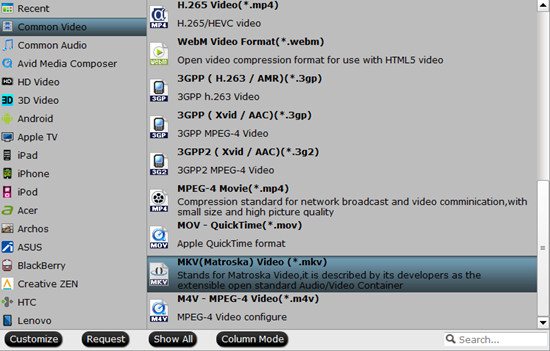
Click “Format” option to choose the output format. To make your Sony Vegas Pro 13/12 to read MTS files, just choose the most Sony Vegas accepted “mpeg-2” under “Adobe Premiere/Sony Vegas” option as output format.

Tips:

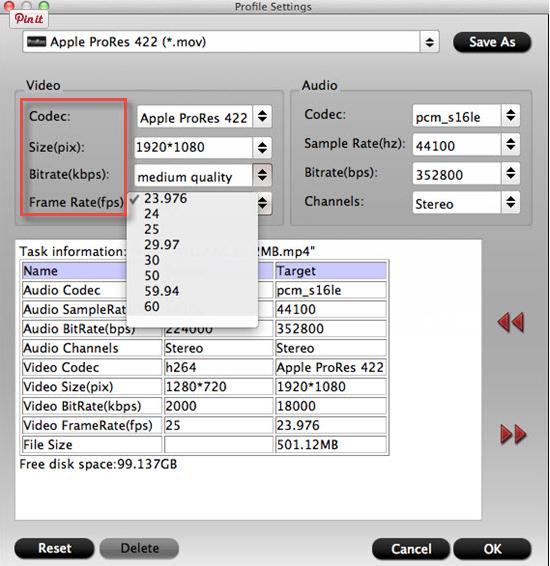
a. If the default settings do not fit your needs, you can click “Settings” button to customize output video parameters like bitrate, channels, frame rate, etc, such as to set higher bitrate to get much better image quality. In general, the higher video bit rate, the larger output file size, and vice versa.

b. You can use the video editor designed in this MTS Video Converter to edit your original videos. Click “Edit” on the main interface, and edit your videos by trimming (get/cut off video clips), cropping (remove unwanted areas), adding text/image/video watermarks, inserting subtitles, adding special effects, etc.

Step 3. Encode MTS to Sony Vegas 

Hit the “Start conversion” button at the bottom right corner to start encoding MTS to MPEG-2 for Sony Vegas. Once finished, hit “Open” button to get the generated files, and then drag it to the Vegas Pro timeline or into the Trimmer window where you can mark you in and out points before you add it to the timeline.

Read More: 

Share

Jun 13

Father’s Day Best Gift – Get 50% OFF HD Converter to convert all movies

Started with a memorial story which happened in 1909: a young lady called Sonora Dodd thinking of the love and nurturing she and her siblings received from their father while growing up on a farm during there youth time on mother’s day, so they celebrated the first Father’s Day on their father’s Birthday in the next year. Later in 1966 the President Lyndon Johnson declared that the third Sunday in June would officially be Father’s Day.

So Have you already prepared the Father’s day gift for your dear Dad? If not, Pavtube gives you the best idea. You can record the happy time with your father, help your father deal with the videos which captured during his traveling, you can also add your thanks in the video using a video editing program. Pavtube  prepares Father’s Day Special Offer where you can get the best HD Video Converter  tool with 50% off to help you achieve the video produce.

Pavtube HD Video Converter(Win/Mac) , a powerful video/audio converting software developed by Pavtube Studio, is now on sale at a special discount price for all windows and Mac users from now on to June 30, 2016 as an unlimited giveaway. (Read review)

Pavtube HD Video Converter or Pavtube HD Video Converter for Mac (Only $17.5 each now) offers an all-in-one video solution to handle any commercial 4K/SD/HD movie in any format with ultra fast speed. It can export H.265, M3U8, MP4, MKV, AVI, MOV, M4V, WMV, etc video for various portable device, game consoles, tablet, laptop, cloud storage, NLEs, etc..

The most surprising part is that it can offer you the optimized preset for your Samsung/Sony/LG/Panasonic TV, iPad, Surface, Xbox One, PSP/PS3, etc in case you don’t know the most compatible specs of your multimedia players. In addition,you can freely add subtitle (.srt) files to videos, crop/trim/merge videos. Once you have it, the format incompatibility issue of media playback is gone forever. Window 10 and Mac OS X El Capitan compatible.

Price and Availability:

Pavtube HD Video Converter/Mac, at regular price $35, becomes available for free due to Thanksgiving deals before 6.19 2016. Please grab your channce and get this Ultimate Video Converter with lowest discount? Anyway, this app not only can make a wonderful Thanksgiving holiday for you, but enrich your media life later! What are you waiting for? Have fun!

Get the Pavtube HD video converter /Pavtube HD video converter for Mac below:


Note: Bear in mind that all software programs will go back to original prices once the Father’s Day special offer 2016, catch this promotion and show your great love to your dear father! Time limited, don’t miss it!

Related Articles:

Source: http://digisns.com/2016/06/pavtube-fathers-day-promotion/

Share

Jun 08

Make Sony Cyber-shot DSC-HX80 XAVC S edited by After Effects CC

The Sony Cyber-shot DSC-HX80 is a point and shoot camera, which in general means it is more portable than DSLRs but takes lower quality pictures. Within point and shoot cameras, the Cyber-shot DSC-HX80 is classified as a basic compact camera, which are designed to give users decent image quality (above that of a smartphone) with optical zooming capabilities at a reasonable price point. They’re one of the most portable options on the market as well, with the exception of ultra compact models. While editing with After Effects CC, many folks have high wishes for After Effects CC to add support for 4K XAVC-S footages from Sony Cyber-shot DSC-HX80. If you’re in such a situation, you can read on to learn more.

Granted, up to now, After Effects CC supports Sony XAVC Intra encoding without much problem, but in fact, editing Sony FS7 4K XAVC-S in After Effects CC. Thankfully you probably don’t have to buy a new computer… but you’d better to convert such high definition 4K XAVC-S videos from Sony FS7 to After Effects CC using mpeg-2 as primary delivery format to solve the incompatible trouble.

Pavtube Video Converter for Mac (read review) is the versatile 4K XAVC-S to After Effects CC transcoding software on Mac, the one used here can meet your demands with its simple interface, but rich functions:

  • Transcode Sony Cyber-shot DSC-HX80 XAVC S files to After Effects CC editable formats with keeping video quality.
  • Convert MXFMTS, MOV, MP4, MKV, H.265, 3GP, etc to After Effects CC.
  • Provide simple editing function like trimming, cropping, adding special effect and inserting subtitles.
  • Compress 4k XAVC videos to 1080p files with smaller size for smoothly editing
  • Allow you to set the video/audio output parameters to get customized video effect.
  • Convert SD/HD/4K XAVC-S files to editable footage for Avid Media Composer, FCP, FCE, iMovie, Avid Studio, Adobe Premiere, After Effects, iPhoto, Kdenlive, Keynote, etc.
  • Rewrap 4K videos for playback on iPhone (6S/6S Plus), iPad (Pro/Mini 4), Galaxy Note (5), Roku (4), Apple TV (4), etc.

All these are reasons why this 4K XAVC-S video Converter for Mac worth a try. Thus, it is highly recommended on many forums. So, what does the workflow look like?

Other Download:
– Pavtube old official address: http://www.pavtube.com/video-converter-mac/
– Amazon Store Download: http://www.amazon.com/Pavtube-Video-Converter-Mac-Download/dp/B00QIBK0TQ
– Cnet Download: http://download.cnet.com/Pavtube-Video-Converter/3000-2194_4-76179460.html

How to Transcode Sony Cyber-shot DSC-HX80 XAVC S to After Effects supported file formats?

Step 1: Load Sony Cyber-shot DSC-HX80 XAVC S files

Launch the Video Converter on your Mac, and you can either click “File” button to import Sony Cyber-shot DSC-HX80 XAVC S files, or directly drag and drop the files into this program.

Step 2: Select MPEG-2(*.mpg) as output format

Click the “ Format ” button to choose output format from the dropdown list. For better editing on After Effects CC, choose “ Adobe Premiere/ Pro/Sony.. ” > MPEG-2 (*.mpg) is one of the best compatible video formats for you to choose. You also can choose WMV (VC-1)(*.wmv)/MOV(AVC)(*.mov).

Tip: Click the Settings icon to adjust video and audio parameters on the Profile Setting as you need to get the best quality video.

Step: 3. Start Sony Cyber-shot DSC-HX80 XAVC S to AEF conversion

Hit the “Start conversion” button at the bottom right corner, let this smart Video Converter to do the rest for you! If you have added quite a bunch of video files, it would take some time to convert. In such case, you can click Option and tick the box “Shut down the computer after conversion”. When the conversion is finished, you can click “Open” button to get the generated MPG files effortlessly. Launch AE on your PC, choose “File > Import” to get converted MPG files into After Effects CS5/CS6/CC for further editing beautifully. Now using your After Effects to edit Sony Cyber-shot DSC-HX80 XAVC S is so easy!

Share

Jun 01

Can Samsung TV play MTS?

It is a wonderful idea to watch your impressive mts footages on Samsung TV. However, MTS files can’t be accepted by Samsung TV by default. So how can you make .mts files playable on Samsung TV?

Recently we can hear much news about Samsung TV on CES 2016, the arrival of Samsung TV 2016 SUHD TV lineup can actually let us experience what amazing things this platform brings, allowing the TV itself to act as the controller for the entire smart home. The Samsung Smart View mobile app allows users to share their favorite content instantly with their family. In order to play MTS video on Samsung TV 2016 SUHD TV or other models like Samsung Smart TV, OLED TV, UHD TV, 3D TV, LED TV, etc., we need to convert MTS to Samsung TV supported formats.

There are a huge amount of tools out there that allow you to convert MTS files to Samsung TV friendly formats. While in view of converting speed and quality, here I highly recommend you try Pavtube Video Converter, which can fast help you convert MTS to Samsung TV accepted MP4 videos without any quality loss.

Besides MTS, the program can also convert any SD/HD/4K M2TS, AVCHD, MKV, AVI, VOB, MPEG, MPG, [UR=http://www.pavtube.com/guide/play-h265-hevc-on-lg-samsung-philip-tv.html]H.265[/URL], MXF, WMV, etc. video formats to play on Samsung TV smoothly. This easy-to-control mobile phone video converter is aimed at making various video formats perfectly played on your Samsung TV with the optimized presets provided. This software can also convert 3D MTS video files to 3D format or 2D format, it can also convert 2D to 3D! If you’re a Mac user, simply turn to the Mac version – Pavtube Video Converter for Mac. Here is how to do it.

Other Download:
– Pavtube old official address: http://www.pavtube.com/video_converter/
– Amazon Download: http://download.cnet.com/Pavtube-Video-Converter/3000-2194_4-75734821.html
– Cnet Download: http://download.cnet.com/Pavtube-Video-Converter/3000-2194_4-75734821.html

Converting MTS to Samsung TV best video format for nice playing

1. Import MTS video files

Launch the MTS to Samsung TV converter. Click “Add video” button to import the .mts files copied on your hard drive which you like to play on Samsung TV. You can also use the drag-and-drop method to load the .mts files to the application UI.

Tip: If you want to merge multiple MTS files into one for easy editing, please tick the box “Merge into one file” to merge all the imported clips.

2. Set Samsung TV compatible format

Click the “Format” drop-down button to select Samsung TV compatible “Samsung TV (*.mp4)” from the “TVS” category. Or follow the path “3D Video > MKV Side-by-Side 3D Video (*.mkv)” if you need to play 2D/3D MTS footage on Samsung 3D TV.

Tip: Video, Audio settings

Before start the video conversion for Samsung TV, you can click the Settings icon and adjust the video bitrate, codec, frame rate, audio sample rate, etc parameters. If you original videos are in 4K resolution, you can keep the video size as original for Samsung 4K Ultra HD TV. Or set the video size as 1920*1080p to compress 4K MTS files for better playback on Samsung TV.

3. Start MTS to Samsung TV conversion

Click the “Start conversion” button to start converting MTS to Samsung TV more supported MP4 video. When the conversion is finished, you can click “Open” button to get the generated MP4 files effortlessly. Just transfer and play MTS clips on Samsung SUHD TV, Samsung Smart TV, OLED TV, UHD TV, 3D TV, LED TV, etc. from a USB, memory card or a streaming Device like Roku, Chromecast, PS3, Xbox.

External Reading:

What is MTS/M2TS/AVCHD?

MTS/M2TS is a file name extension used for the Blu-ray Disc Audio-Video (BDAV) MPEG-2 Transport Stream (M2TS) container file format. This container format is commonly used for HD video on Blu-ray Disc and AVCHD. MTS is developed by Sony and Panasonic together as the recording format for the HD camcorders, commonly the 4K video recorded by the trending Sony, Canon, Panasonic 4K cameras or camcorders is in MTS format.

AVCHD (Advanced Video Coding High Definition) is a video format designed for high definition camcorder. It uses a disc structure designed for Blu-ray Disc standard compatibility. Sony, Panasonic, Canon, JVC all produced some high-end HD camcorders including some best 4K camcorders enabling you to record 4K UHD video file in AVCHD format.

Read More: 

Share

May 18

Best Alternative to Ezvid Video Editor for Mac

Ezvid really easy-to-use video maker with video editing and slide show creation features. It is flexibility that enables you to control almost every aspect of your video while doing the editing.

But Ezvid is only available for Windows PC. If you’re a Mac user, i’m sorry to tell you that there isn’t any Ezvid Video Editor for Mac released yet. The compensation is to find an Ezvid Video Editor alternative for Mac.

Well, instead of edit video on Windows PC, how about making your own short film and posting it to YouTube with  Ezvid Video Editor alternative for Mac? Here we seeking for an all-in-one but easy-to-use video editor to get start with, here’s one I’d recommend:

Pavtube Media Magician for Mac

Being released as an entry-level video editor, the Media Magician comes up with some impressive features that you may concern:

 Camcorder Manager – Capture, transfer and backup HD footage from camera/camcorder to your Mac fast and easily.

 Timeline Editing – Frame by Frame accurate clipping, merging, snapshooting, voice muting, etc.

 Special Effects – Adding 3D and other special effects to clips on timeline.

 Lossless output – keeping original format of source media, and rewrapping source video to MKV container without quality loss.

 YouTube Uploading – Directly upload camera videos onto YouTube by using your already-have YouTube account.

 Support to iOS and Android – Exporting files best suited for playing on Android devices, Windows devices, iPad, iPhone, Apple TV, HD Player, PSP/PS3, and HDV.

Here’s a basic workflow showing how to transfer, clip, convert and upload Christmas video to YouTube:

Step 1. Import files to Pavtube Media Magician for Mac.

If you have already stored footage on your HDD, you can choose to “Import Media Files” to browse and load video files from computer. If your footage is in camera/camcorder, just connect your cam to Mac and follow the auto wizard to transfer camcorder recordings to Mac.

Step 2. Drag and drop videos onto Timeline for editing.

Here you can preview, trim, cut, delete, rearrange order, and merge videos. Also, if you like, it’s easy to set special effect to image and audio. Find some helpful instructions in below guides:

 How to split/cut/trim MTS in frame accurate editor without re-encoding on Mac?

 How to do timeline editing and select frames accurately using frame selection controller?

Step 3. Click the Output button on the top and switch it to output interface, where you set output options such as Lossless output and YouTube upload.

Step 4. Set it to upload video to YouTube.

1. Find and click “Online” output option on the upper right part.
2. Choose “YouTube”.
3. Put in you YouTube user name and password.
4. Put in video information so that people can find your video via Google search.
5. Decide video quality. You can choose SD 640×480, HD 720p or 1080p Full HD for output. The higher quality you set, the longer time it takes.

Step 5. Have Media Magician export and upload your film.

On the upper left of the interface, find and click the plus sign to add YouTube output as a conversion task. Then click on the triangle sign on it to start encoding/converting YouTube ready MP4 video.

The software will upload the video to YouTube automatically after video conversion completes. Just take some coffee and leave it there. When you’re back, your film should have been posted to YouTube.

Read More:

Share

May 11

Sony RX10 III XAVC S 4K/UHD Video to Avid Media Composer Workflow on Mac El Capitan

Sony Cyber-shot DSC-RX10 III can support MPEG-4, AVCHD, XAVC S video formats; while, UHD 4K video up to 30 fps in XAVC S format is the favored format for most of its users, for it brings better quality and convenient for broadcasting. The only problem usually occurred during the editing process, such as edit this 4k XAVC S video in Avid Media Composer Workflow on Mac El Capitan.

Incompatibility issues working with Sony RX10 III XAVC S video in Avid Media Composer always annoy RX10 III users. Although Media Composer has already had 4K and “high-resolution” (i.e., higher-than-4K) support via Avid Media Access (AMA) in previous versions and now the 4K to Avid Media Composer workflow has been even improved in Media Composer 8. Actually, UHD 4K XAVC S from Sony RX10 III still cannot fully supported by some video editors including Avid Media Composer.

In this case, in order to import Sony Cyber-shot DSC-RX10 III XAVC S 4K/UHD video to Avid and edit natively you should convert them to Avid supported format DNxHD MOV. Different from 720p/1080p videos, the conversion of 4K video is in a higher standard, a professional 4K Video Converter is what you need. Pavtube HD Video Converter for Mac (read the review) is high recommended here. It is a splendid application to help you to transcode Sony XAVC S 4K/UHD to Avid Media Composer natively supported DNxHD codec without quality loss.

It provides hundreds of output format presets for NLEs, such as DNxHD for Avid, Apple ProRes for Final Cut Pro, Apple InterMediate Codec for iMovie, MPEG-2 for Adobe Premiere. Besides, this 4K converter is also available to customize the output resolutions to any size like 1080p, 2K as users want. If you are working on Windows(Windows 10 included), please turn to Pavtube HD Video Converter.

Here we are going to guide you through to solve all your problems concerning editing MP4 on Avid Media Composer. Just download and achieve your goal smoothly.

How to Convert Sony RX10 III XAVC S 4K/UHD Files to DNxHD for Avid Media Composer

Download and install Pavtube HD Video Converter on Mac (compatible with Mac OS X 10.11 El Capitan, 10.10 Yosemite, 10.9 Mavericks, 10.8 Mountain Lion, 10.7 Lion, 10.6 Snow Leopard, 10.5 Leopard and lower versions). Run this program, you will find the interface is very brief, this program is very easy to use.


Step 1. Add XAVC S 4K/UHD files

Click “Add Video” button to load XAVC S 4K/UHD files to the program. You can also directly drag the video files into the program directly.

Step 2. Select output format

From “Format” drop-down lists, you can select Avid Media Composer preferable editing codec from “Avid Media Composer” > “Avid DNxHD(*.mov)” as the output format.

Tip: If you like, adjust video and audio parameters, including the Bitrate of Video and Audio, the Codec of Video and Audio, Video Size, Sample Rate, Frame Rate, Audio Channels, etc., by clicking the Settings button on the main interface for getting the best quality.

Step 3. Start the conversion

Finally, simply hig the big Convert button to start converting XAVC S 4K/UHD to Avid Media Composer friendly video formats.

Within several minutes, you can find the converted file on your computer by clicking the “Open” button. And then you can import the converted files to Avid Media Composer easily.

Read More:

Share

May 06

Happy Mother’s Day up to 30% off HD Video Converter and Editor

There are always some videos that witness the love between your mom and your family. Do you want to make personalized videos which are of memory value for your mom? Let Pavtube HD Video Converter edit and share the videos of your own to make a perfect gift for your mom.

For sure there are literally thousands of options to choose from for Mother’s Day gifts and this handy flowchart for sure helps narrow them down, but in the end no Mother’s day gift beats a sweet home video that contains memory of the dearing MOMments with music, photos and videos!

Pavtube HD Video Converter, which has a reputation of fantastic home video making and easily sharing on TV, YouTube, Vimeo, mobile devices and more, can help you make a lovely home video dedicated to mom so easy but with so much thoughts.

Can’t wait to get started? Get Pavtube HD Video Converter and begin editing now, your mom will be surprised by the best Mother’s gift ever!


Need a Mac version? Pavtube HD Video Converter for Mac available here.


Note:expire on May 15th, more information please turn to Pavtube Facebook.

Traditions of Mother’s Day 2016 

As a part of Mother’s Day 2016 traditions, children send cards or gifts to their mother or mother figure or make a special effort to visit her. They take their mothers out for a festive lunch or dinner to show their gratitude. Some children even go all the way to cook their mothers large and elaborate dinners, thus giving their mothers a break from preparing food for the family.

The official flower presented to mothers on mother’s day is the red carnation but it is also acceptable for a person to give just about any kind of flower. Another tradition involves displaying white carnation flowers on the grave of dead mothers. Other Common Mother’s Day gifts are flowers, chocolate, clothing, jewellery and treats, such as a beauty treatment or trip to a spa. In the days and weeks leading to Mother’s Day, many schools help their pupils to prepare a handmade card or small gift for their mothers.

Share

Apr 27

Top Free (4K) M2TS to VLC Converters for Windows and Mac

Perhaps you spend an noon to build up your blue ray collection in the form of m2ts files, or copy the Panasonic HD camcorder recorded the m2ts format videos with instruction into your hard drive, because of you were advised to download and run VLC media player as this will work.

well… it kinda works, but you found that the films are not watchable, they are slow, multicoloured and jerky.

Why VLC cannot play some M2TS files?

M2TS Files are high definition files, which needs good graphics and better RAM for the files to be played. Thus, in case, you are feeling difficulty while running M2TS Files on your old computer, thus the VLC Player not running some M2TC Files well.

Even you running on a powerful computer like iMac, most of the M2TS Files can easily be played on VLC Player, but still some of the M2TS Files are there, which VLC can’t play. Some of the reasons for such errors can be in the form of the “Blu-Ray error: This Blu-Ray disc needs a library for AACS decoding, and your system does not have it”, which proves that the lack of the Library for AACS Decoding is essential for the system to play M2TS Files.

Therefore, VLC Player cannot play some M2TS Files, a professional M2TS Converter you need. Here we list the Top 4 Free (4K) M2TS to VLC Converter for VLC on Windows/Mac can be easily convert M2TS Files to VLC Player supported MP4, MKV, AVI, etc without any quality loss.

Top 4 Free (4K) M2TS to VLC Converter for VLC on Windows
(4K) M2TS to VLC Converters Pavtube MTS/M2TS Converter Pavtube Free Video DVD Converter Ultimate Pavtube HD Video Converter for Mac Pavtube iMedia Converter for Mac
Pavtube MTS/M2TS Converter Pavtube Free Video DVD Converter Ultimate Pavtube HD Video Converter Pavtube iMedia Converter
(4K) M2TS format to/from other formats
Sony M2TS Y Y Y Y
Canon M2TS Y Y Y Y
Panasonic M2TS Y Y Y Y
4K M2TS Y Y Y Y
3D M2TS Y Y Y Y
H.265/HEVC Y Y Y
XAVC Y Y Y
XAVC S Y Y Y
M4V Y Y Y
M3U8 Y Y Y
3D MP4/MKV/AVI/WMV Y Y Y
MP4, AVI, MOV, WMV, WebM, DivX, FLV Y Y Y Y
MXF/MTS/M2TS Y Y Y Y
DVD Y Y
Bluray Y Y
MP3, AAC, FLAC,OGG Y Y Y Y
WAV, M4A, DTS Y Y Y Y
Devices Preset format supported
iPhone preset( iPhone SE, iPhone 6S,etc.) Y PART Y Y
Android preset(Galaxy S7, Xperia XA, Nexus 6p,etc) Y PART Y Y
Windows preset(Windows Phone 8/10) Y PART Y Y
Gaming systems, Projectors, 3D, HDTV, etc. Y PART Y Y
HD Media Players Y Y Y Y
NLEs Preset Format Supported
Adobe Premiere Y Y Y
Sony Vegas Y Y Y
Avid MC Y Y Y
Final Cut Pro X/7/6 Y Y Y
iMovie 11/10/9.. Y Y Y
Avid MC Y Y Y
Built-in Editor Functions
Trim & Crop Video Y Y Y Y
Merge & Split Video Y Y Y Y
Reset Audio Channel/codec Y Y Y Y
Adjust Video bitrate/size Y Y Y Y
Add Subtitles Y Y Y Y
Image/Text Watermarking Y Y Y Y
Conversion
2D to/from 3D Conversion Y Y Y
Batch Conversion Y Y Y Y
GPU or Multicore Acceleration(Windows only) Y Y Y Y
Supported OS
Windows 10 Y Y Y Y
Windows2003 or higher Y Y Y Y
Mac OS X El Captian Y Y Y
Mac OS X 10.5 or higher Y Y Y
Overall Rating 8.5 8 8.5 9
Trail/Purchase
Windows Trail download download download download
Windows Purchase buy update buy buy
Mac Trail download download download
Mac Purchase update buy buy

Just follow the STEP GUIDE to convert M2TS Files to VLC Player supported formats, MTS/M2TS Converter for Mac and output MKV as example, other converters almost have the same steps and you can also choose other format if you need. Choose one of the Top 4 Free (4K) M2TS to VLC Converter for VLC and follow the steps.

Step 1. To import videos, you may click on “Add Video” or simply drag the M2TS video files in.

Step 2. Click on the dropdown list of “Format” to select MKV as output format. To convert M2TS to MKV for VLC with standard quality, you can select the “MKV (Matroska) Video (*.mkv)” format under “Common Video” option. To transcode M2TS to MKV with HD quality, you can choose the MKV format under “HD Video” option. Of course other format can be chosen as long as VLC Player compatible with.

Step 3. (Optional)Select one or more files, click the pencil icon and find more editing items for M2TS videos, ‘Trim’ to when to start and when to finish, ‘Crop’ to get rid of the unwanted edges, etc. More you can get into the interface here.

Step 4. Set an output folder to store the converted files, then hit the “Convert” button to carry out the conversion for VLC.

When the conversion is over, please click on the “Open” button next to “Output” box on the main interface to view the converted files, you can play the converted M2TS files in VLC media player smoothly.

Besides convert for playing on VLC media player, you can also choose the ProRes codec for editing in Final Cut Pro, MPG for editing in Sony Vegas, ect. You can also share the converted and edited M2TS files to Youtube or Faccebook.

Read More:

Share

Apr 21

Top Free (4K) M2TS to VLC Converters for Windows and Mac

VLC Players can play most of M2TS files on both Mac and Windows while some M2TS Files cannot be played due to some particular issues, just like the situation below:

I am currently building up my blue ray collection in the form of m2ts files. I was advised to download and run VLC media player as this will work.

well… it kinda works, but the films are not watchable, they are slow, multicoloured and jerky, this is both audio and video.

Is this a powerful enough setup? If so is there any other software I could try.

Two things I thought the problem was. not enough RAM ( I have just upped it from 1gb to 2gb and no change) and I have no graphics card?

please help, I have 40+ blue ray films on my hard drive and I cannot watch them

PS all other films which are not blue ray quality play fine.

Some of the reasons for such errors can be in the form of the “Blu-Ray error: This Blu-Ray disc needs a library for AACS decoding, and your system does not have it”, which proves that the lack of the Library for AACS Decoding is essential for the system to play M2TS Files.

Even, remember that the M2TS Files are high definition files, which needs good graphics and better RAM for the files to be played. Thus, in case, you are feeling difficulty while running M2TS Files, just check on the configuration of the System too, as these may be the other reason for the VLC Player not running some M2TC Files. Lack of the proper codec needed to play the same files, may be just the other reasons for the VLC Player not running some M2TS Files.

In case, VLC Player cannot play some M2TS Files, you need a VLC Assistant for fix the issues. Here we list Top Free (4K) M2TS to VLC Converters for Windows and Mac, which serve as the best conversion platform for all sorts of video extensions. The files having extension M2TS can be easily converted using this software and then can be easily used for the purpose of playing on any player like VLC Player.


Top Free (4K) M2TS to VLC Converters

Pavtube MTS/M2TS Converter for Mac pavtube Video Converter for Mac Pavtube HD Video Converter for Mac Pavtube iMedia Converter for Mac

Pavtube MTS/M2TS Converter

Pavtube Video Converter

Pavtube HD Video Converter

Pavtube iMedia Converter

Mac Download
Mac Buy
Windows Download
Windows Buy
Price
$29 $29 $35 $65
Key Features
-Supports convert HD/4K M2TS videos to 170+ formats-Supports convert HD/4K M2TS to preset editor profiles-Supports convert HD/4K M2TS to devices preset profiles

-Only three steps to complete the conversion process.

-Before converting HD/4K M2TS files, you can edit them with built-in editing tools.

-It supports convert M2TS videos up to 170+ formats-Supports convert M2TS to preset editor profiles-Supports convert M2TS to devices preset profiles

-Only three steps to complete the conversion process.

-Before converting M2TS files, you can cut, crop, trim, rotate, merge, add subtitles with built-in editing tools.

-Convert HD/4K M2TS videos videos between different formats;-Edit video with cut, crop, trim, rotate, merge, add subtitles;-Supports convert HD/4K M2TS to devices preset profiles

-Before converting HD/4K M2TS files, you can cut, crop, trim, rotate, merge, add subtitles with built-in editing tools.

-It supports convert 4K M2TS videos up to 170+ formats-Supports convert HD/4K M2TS to preset editor profiles-Supports convert HD/4K M2TS to devices preset profiles-Only three steps to complete the conversion process.

-Before converting HD/4K M2TS files, you can cut, crop, trim, rotate, merge, add subtitles with built-in editing tools.

-Supports Convert, Copy DVD,Blu-ray to H.265 format for personal use

Support OS
Windows XP, Vista, 7, 8, 8.1, 10,Mac OS 10.5, 10.6,10.7, 10.8, 10.9, 10.10, 10.11 Windows XP, Vista, 7, 8, 8.1, 10,Mac OS 10.5, 10.6,10.7, 10.8, 10.9, 10.10, 10.11 Windows XP, Vista, 7, 8, 8.1, 10,Mac OS 10.5, 10.6,10.7, 10.8, 10.9, 10.10, 10.11 Windows XP, Vista, 7, 8, 8.1, 10,Mac OS 10.5, 10.6,10.7, 10.8, 10.9, 10.10, 10.11
Customization
Adjust Output Settings
Trim Clips
Merge/Join Clips
Crop Frame
Add Effects
Adjust Conversion Quality
Add Subtitles
Output
Video Quality
A- B+ B+ B+
Audio Quality
A- B+ B+ B+
4K UHD Support
GPU or Multicore Acceleration
Conversion
Ease of Use
A- A- A- A-
Conversion Time (minutes)
9 9 9 9
Additional Video Formats
170+ 170+ 170+ 170+
Batch Conversion

In order to play M2TS files on Mac and Windows, which are not running on VLC Player, choose one of the top VLC Converter converts the M2TS files to other format that can be used for all sorts of needs. In here, we would like give the simple step guide with one of top VLC Converter – Pavtube Video Converter. Get it and follow our steps.

Step 1. Once run the program, click “Add video” button to load the TS files

Step 2. Choose standard H.264 *.mp4 or *.mkv format for playing M2TS files on VLC

Tip: You can adjust Bit rate, Frame rate, etc to playback TS files on VLC more smoothly.

Step 3. Start to convert M2TS files to *.mp4 for playback on VLC.

The detail step guide please refer to TS to MKV for playback with VLC Media Player, since convert TS and M2TS files to VLC compatible format have the same steps.

If you have films on your DVD, you can just download the free DVD Video Converter Ultimate to converter all the films to your hard drive with playing on VLC. With adopts unique built-in codec, Pavtube converter can absolutely ensure not to install any codec on your computers to disturb the original systems, and finish conversion at speed without any issue when play M2TS files with VLC.

Share

Apr 13

How to Edit Panasonic Lumix DMC-ZS60 4K MP4 in FCP 7/X

Panasonic has updated its compact travel zoom lineup with the Lumix DMC-ZS60, it’s small and sturdy build means it fits easily into a pocket, 4K capability means that your favorite travel memories can be recorded in stunning detail.

With four times the resolution of Full HD, videos reproduce the breathtaking color and detail of every scene, an experience second only to being there in person. The camera offers smooth, high quality video recording in 4K 3840×2160 at 30 fps in MP4, as well as high-resolution Full HD 1920×1080 60p videos in MP4.

Apple claims their editing software (Final Cut Pro) supports 4K footage importing. However, owing to the computer configuration, operating environment and software version, a lot of users still can not import the Lumix DMC-ZS60 4K MP4 footage into FCP 7/X for further editing. They met the importing or the crash problem while loading 4K recordings to the program. Like below:

“Hi, I am working with Lumix DMC-ZS60 4K MP4 files on my FCP X, but it is quitting unexpectedly very frequently, it’s entirely impossible to work on it. Is the 4K fully supported by the FCP X, or do I need to change it to some other format? Or any other solutions to it?”

As known to all, Final Cut Pro works best with video clips in ProRes MOV format. Therefore, the easy workaround is, get Pavtube Video Converter for Mac (Best 5 Video Converter for Mac Review) to convert Lumix DMC-ZS60 4K MP4 files to ProRes with the best original video quality, which will save you both time and trouble, and all you need is to drag the result videos for prompt editing.

It is not only professional on dealting with Lumix camera 4K MP4 footage, but also can handle with other video formats, such as MXFMTSTivo, MKV and so on. Plus, you may also encode Lumix DMC-ZS60 4K MP4 to Avid Media Composer, Adobe Premiere Pro, iMovie and more NLE programs highly compatible formats for smooth editing. Besides, it might help you change Lumix DMC-ZS60 4K MP4 to other frequent formats like MOV, MKV, MP4, AVI, etc for playback on media devices.

The trail-before-purchase is supported, just feel free to try it:


Install and run it, you will see the interface. The following is a simple instruction of how to use this Pavtube Video Converter for Mac:

How to Get Lumix DMC-ZS60 4K MP4 Files Support in Final Cut Pro 7/X

Step 1: Add Lumix DMC-ZS60 4K MP4 footage to the program.

Launch the software on your Mac computer, click “File” menu, select “Add Video/Audio” or “Add from folder” to import Lumix DMC-ZS60 4K MP4 footage to the program.

Step 2: Choose output format.

Click “Format” bar, from its drop-down options, move your mouse to “Final Cut Pro > Apple ProRes 422 (*.mov)” to select it as the output file format.

Tips: Read the difference of ProRes.

• Apple ProRes 422 – Higher quality than Apple ProRes 422 (LT);
• Apple ProRes 422 (HQ) – Keep original video quality for editing in FCP;
• Apple ProRes 422 (LT) – Get a smaller file sizes than Apple ProRes 422;
• Apple ProRes 422 (Proxy) – SD levels – 480i/p and 576i/p. Used in offline workflows.
• Apple ProRes 4444 – Edit and finish 4:4:4 material.

Actually, different Apple ProRes codec corresponds to different needs. Here you can refer to this article “Differences among Apple ProRes codec“.

Step 3: Customize output ProRes parameters.

Open “Profile Settings” window to adjust the output video codec, size, bit rate, frame rate, audio codec, sample rate, bit rate and channels.

Step 4: Convert Lumix DMC-ZS60 4K MP4 Video to FCP 7/X.

Hit the convert button under the preview windows, the program will start Lumix DMC-ZS60 4K MP4 footage to Apple ProRes MOV conversion for Final Cut Pro 7/X.

When the conversion is completed, run FCP 7/X and import the ProRes codec footage for post production workflow.

If you are running on Windows,for other windows NLEs please get Pavtube Video Converter.

Related program:

Pavtube Media Magician / Mac Version: A nice camcorder assistant manager, lossless camcorder video joiner, MTS/ M2TS/ MXF/ MOV/ MKV/ TiVo/ WMV/ AVI/ MPG converter and editor. Meamwhile it supported upload edited video to YouTube directly.

Read More:

Share
Page 4 of 37« First...23456...102030...Last »